How to Beat Skritch in Grounded 2: Summon, Weak Point & Strategy
Find and summon Skritch, counter its resistances, stop Termite Larvae from healing it, and exploit its exposed Gut during the fight.
Updated:
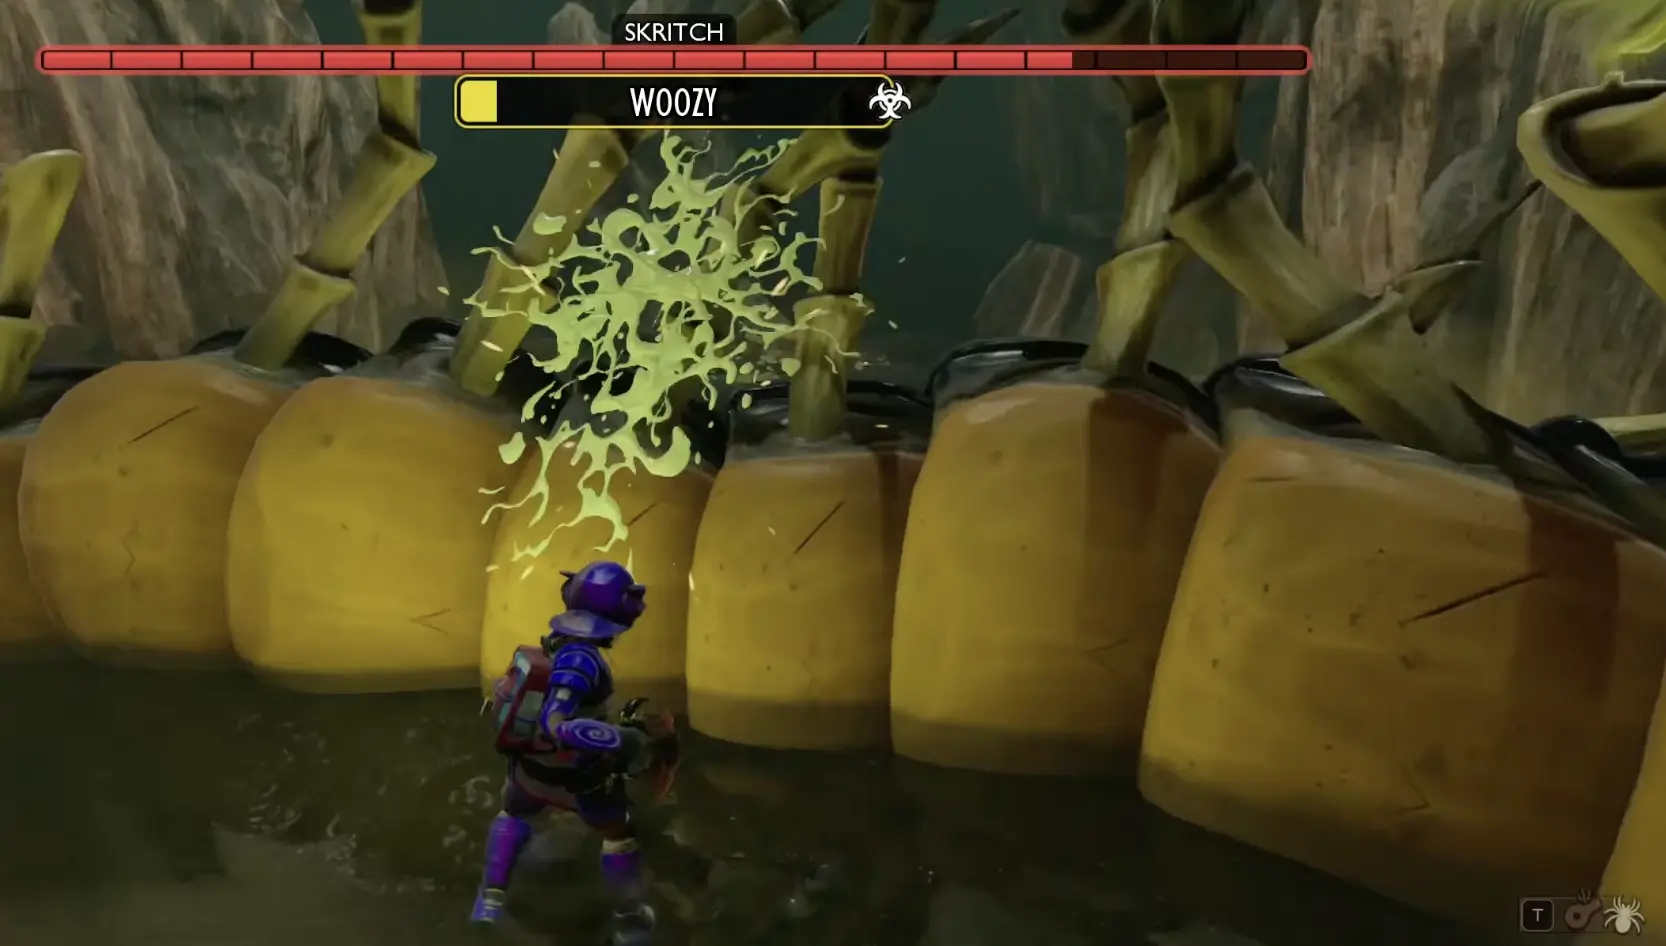
Quick Answer
Find Skritch in the Sacrificial Pit beneath the Woodpile Termite Nest. Summon it with 3 Termite Parts, 2 Termite Larva Hides, and 2 Spew Spore Chunks.
Skritch has no standard elemental or physical weaknesses. Its vulnerable spot is the Gut: Pierce weak point, which becomes accessible when the boss is stunned.
Clear the Spew Spores before starting, kill the Termite Larvae before Skritch eats them to recover health, and save your strongest attacks for the exposed Gut.
Rot and Ruin Public Test Build 0.6.0
Skritch is a Tier IV Centipede boss that turns an ordinary damage race into a fight about positioning, stun buildup, and controlling smaller enemies. Its armored body resists several common damage types, while the opening that deals the most meaningful damage is brief.
A successful attempt depends on three things: keeping the arena clear enough to move, preventing Skritch from recovering health, and being ready to attack its Gut when it becomes vulnerable.
The fight gets considerably more dangerous after the first phase. Skritch begins using longer combinations, calls in Termites, and eventually adds fast burrowing attacks. Trying to chase it through every movement usually wastes healing and leaves little stamina for the next opening.
Where to Find Skritch in Grounded 2
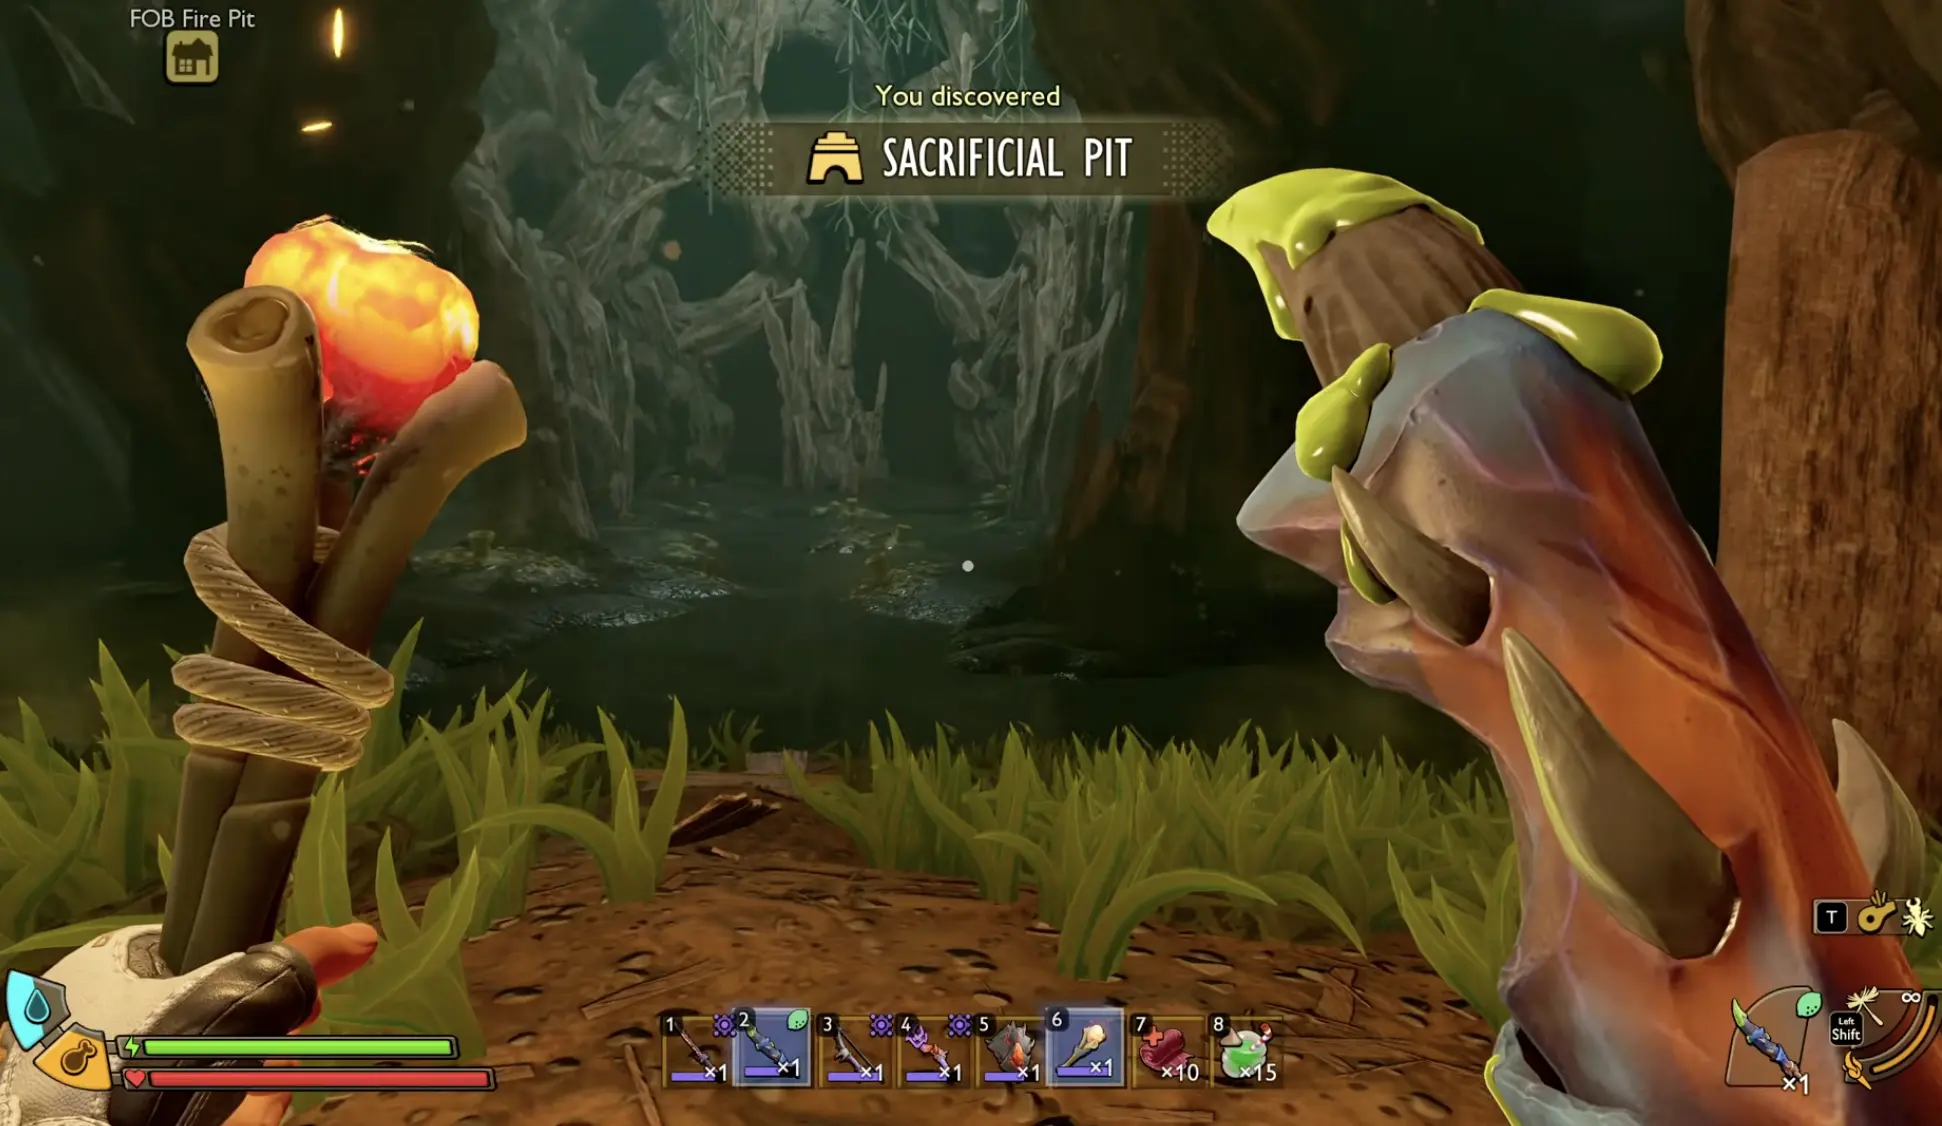
Skritch lives in the Sacrificial Pit, deep inside the Woodpile Termite Nest in northern Brookhollow Park.
Start from the Woodpile near the Fire Pit. The nest entrance and its branching passages can be confusing, particularly because the upper route leads through several chambers before reaching the central opening.
The Woodpile and Termite Nest route covers how to enter the nest, reach its main chambers, and find the paths leading toward the Sacrificial Pit.
Once you reach the large chamber with the glove and the opening descending into the nest, look for the lower passage leading into the Sacrificial Pit.
The altar is inside the boss arena. Skritch does not immediately attack simply because you enter the chamber; you must activate the summoning interaction.
Avoid starting the encounter immediately after a long resource-gathering trip if your armor is damaged or your healing supplies are low. The arena is dangerous enough without beginning at a disadvantage.
How to Summon Skritch
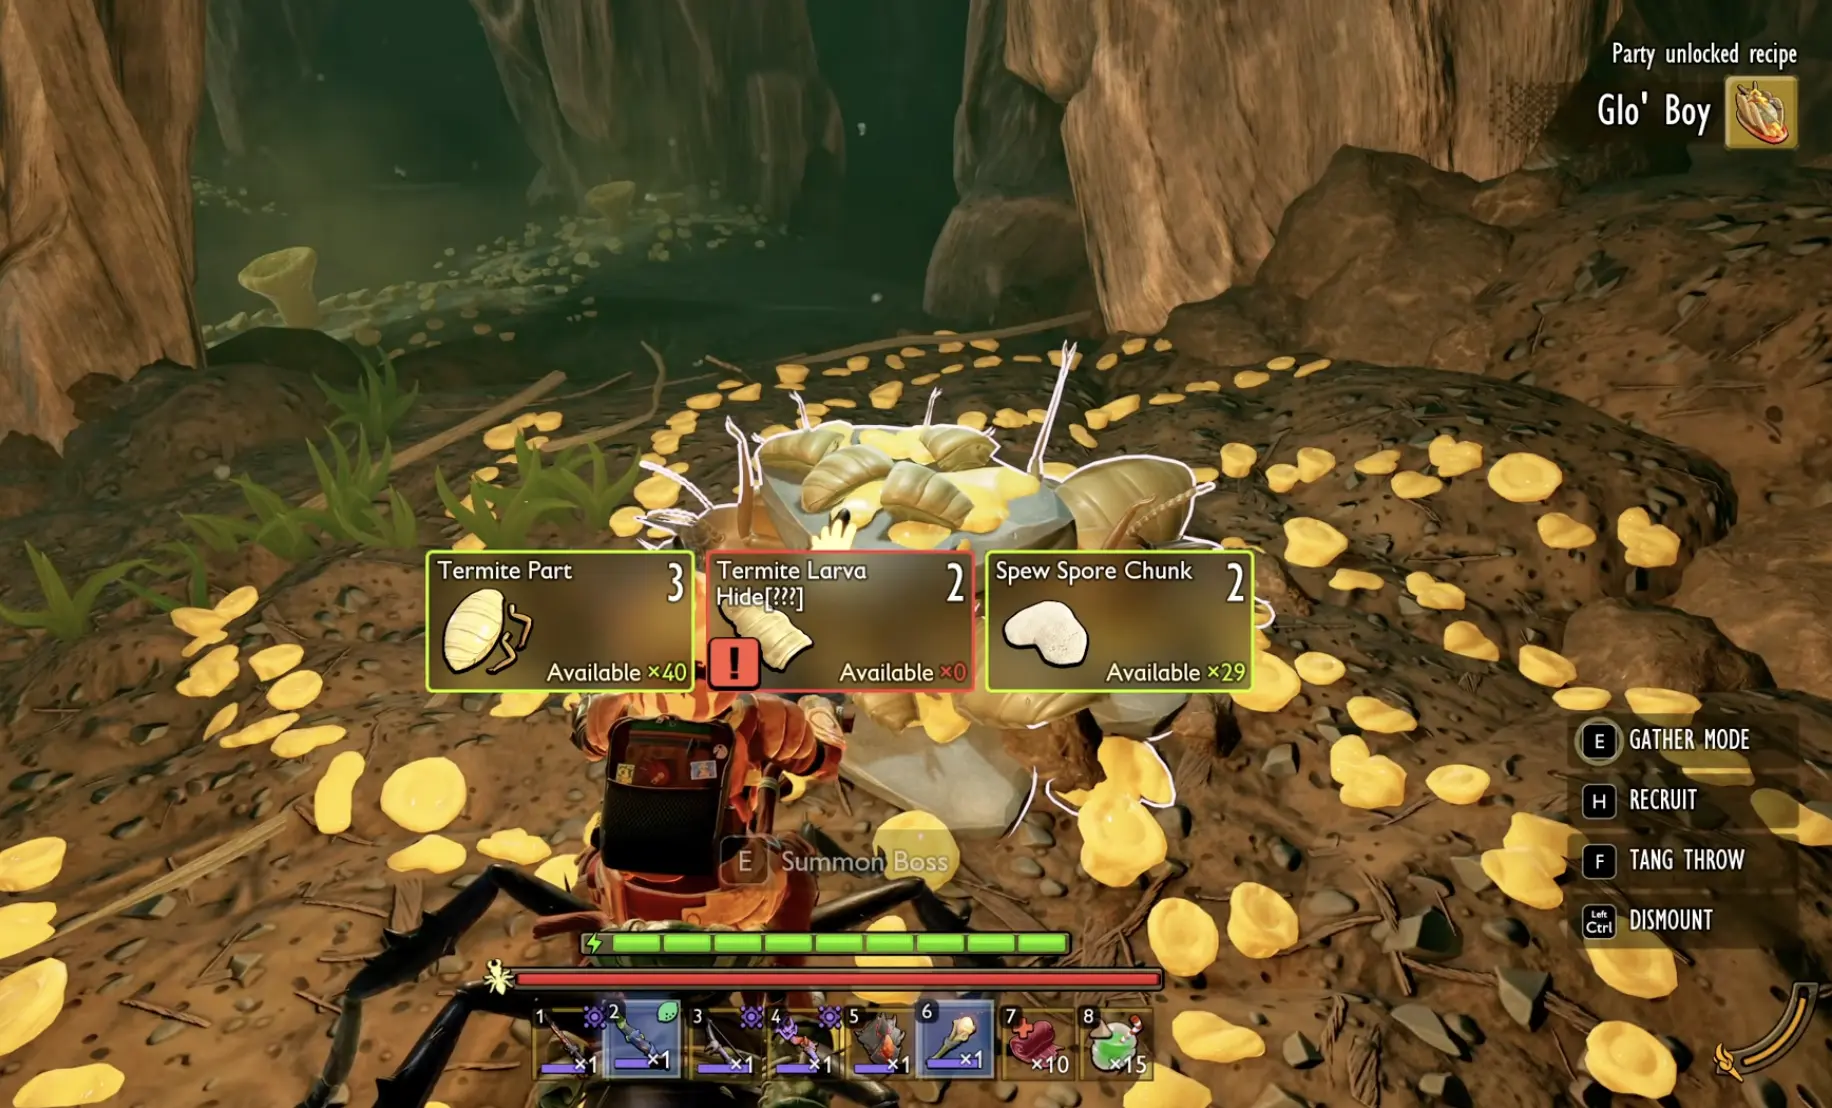
The Sacrificial Pit altar requires three materials:
- 3 Termite Parts
- 2 Termite Larva Hides
- 2 Spew Spore Chunks
Termite Parts come from the Termites found throughout the Woodpile. Termite Larva Hides require fighting the smaller larvae, while Spew Spore Chunks come from the hazardous spore growths in the nest.
Collect the materials before committing to the boss encounter. The altar accepts the offering and begins the fight.
You can gather these resources during your first exploration of the nest, but do not ignore the state of your equipment. The enemies guarding the route can consume a surprising amount of durability before you even reach Skritch.
If you intend to fight the boss again, bring another offering rather than assuming one activation will cover every subsequent attempt.
Skritch Weaknesses and Resistances
Skritch is unusual because its Peep information shows no ordinary weaknesses.
Instead, the boss resists most of the damage types players commonly use to exploit enemy weaknesses.
Its listed resistances are:
- Smashing
- Stabbing
- Fresh
- Explosive
- Spicy
- Sour
- Venom
The Peep data identifies one specific vulnerable target: Gut: Pierce.
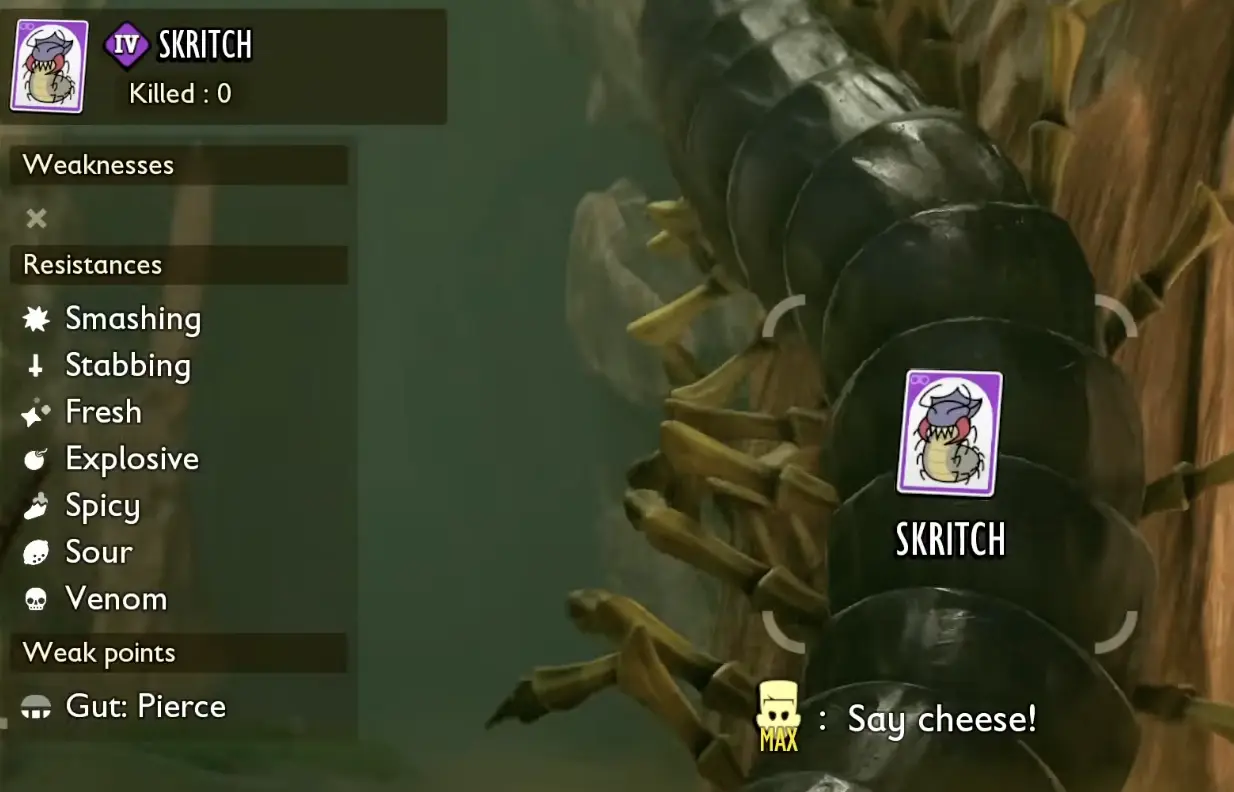
This changes how you should approach your weapon choices.
A weapon that performs extremely well against ordinary Termites may lose much of its advantage against Skritch. Adding Fresh, Sour, or Spicy damage to a weapon does not automatically improve this encounter because the boss resists those elements.
A Mighty-path weapon with reliable stun or sustained neutral damage is a sensible choice for the armored portions of the fight. If you already have a strong weapon, you do not necessarily need to craft an entirely different one just because it uses an elemental upgrade, but you should expect reduced effectiveness from resisted damage types.
The Gut is different.
How to Hit Skritch’s Gut Weak Point
Skritch’s vulnerable underside becomes accessible when it is stunned and rolls or exposes its body.
Your goal is to build enough stun to create that opening, then switch from defensive movement to concentrated damage.
When Skritch is stunned:
- Move toward its exposed underside rather than continuing to strike the outer armor.
- Aim for the Gut weak point.
- Use a weapon or attack capable of delivering Pierce damage to that exposed target.
- Take the available attacks, then disengage before Skritch resumes moving.
Do not confuse the body’s Stabbing resistance with the Gut’s Pierce weak-point requirement. Attacking the armored exterior with repeated stabbing hits is not the same as landing an appropriately aimed weak-point attack.
That short opening is where your attack positioning matters most.
Best Weapons and Armor for Skritch
There are two practical approaches to this fight: a more aggressive stun-focused setup or a safer defensive setup that relies on controlled openings.
Both need a reliable way to handle the smaller Termites.
Aggressive Melee: Striped Slashers and Shell Shocker
The Striped Slashers are a strong candidate for sustained melee pressure. Their rapid attacks work well with a fist-focused setup, and a Mighty upgrade avoids adding another elemental damage type that Skritch resists.
The Lil Fist mutation improves fist-based attack pressure and charged damage. At higher levels, its additional hits and stun contribution help you work toward the boss’s vulnerable window.
For armor, the Shell Shocker set is useful when you can land perfect blocks consistently.
Its Power Surge effect provides additional shock and stun pressure, helping to create opportunities to attack Skritch’s Gut.
This combination rewards controlled aggression:
- Build pressure with fast attacks during safe openings.
- Perfect block when you recognize a combo.
- Use the stun opportunity to move beneath Skritch.
- Deliver your strongest available attacks to the exposed Gut.
The main weakness of this setup is commitment. If you continue attacking through a long combo or fail to recognize the next movement, the boss can punish you before the stun window arrives.
Shell Shocker is most valuable when perfect blocking is already a reliable part of your combat style. Equipping it alone will not protect you from repeated missed parries.
Safer Approach: Blocking, Movement, and a Secondary Weapon
A defensive setup can work without relying on perfect blocks for every attack.
Use repaired high-tier armor, sufficient healing, and a weapon that allows you to recover quickly after attacking. A shield can help control the early melee combinations, while precise dodges provide another option when you need to escape the boss’s position.
The Rot and Ruin update also introduces Perfect Dodge. A correctly timed dodge avoids damage without consuming stamina, allowing you to counterattack immediately.
This is particularly useful against Skritch because conserving stamina gives you more freedom to reposition after a long attack sequence.
Bring a separate weapon for Termite Larvae and Soldiers. You do not want to spend the attack window or accumulated stun pressure intended for Skritch on an ordinary Termite.
The Splinter Cannon is useful for clearing smaller enemies at close range if you already own one. You can find its unlocks and ammunition requirements in the Termite armor and Splinter Cannon guide.
It is a helpful secondary weapon, not a requirement for defeating Skritch.
Clear the Arena Before Starting the Fight
One of the easiest ways to make the fight harder is leaving Spew Spore growths untouched.
These hazards interfere with movement and can expose you to unwanted status effects while you are trying to block, dodge, or follow Skritch around the arena.
Before using the altar, spend a short period clearing three important spaces:
- The central fighting area, so you can move without being pushed into nearby spores.
- The area where Termite Larvae appear, because you may need to reach them quickly.
- The space around the large column, which provides a useful landmark for repositioning during dangerous attacks.
You do not have to remove every growth from the entire chamber. Focus on clearing enough space to move between the places you are actually going to use.
The column is especially useful when the boss begins rushing around the arena. It provides a recognizable point to move around instead of retreating blindly into another hazard.
Do this preparation before summoning Skritch, when you still have time to organize your inventory and decide where you intend to fight.
Phase 1: Learn the Combo and Build Stun
The opening phase is the best time to establish your attack rhythm.
Skritch uses close-range attacks, including a shorter bite combination and a body attack that can punish you for standing directly in front of it.
Avoid committing to a long series of hits as soon as the boss reaches you. Watch for its first attack animation, block or dodge the combination, and counter during the recovery.
You should aim to build stun without spending your entire stamina bar.
If you are using Shell Shocker, perfect blocks contribute to the pressure needed for a stun. With a fist-focused setup, regular attacks help prepare a stronger charged attack when the mutation is active.
Once Skritch is stunned, move to its Gut immediately.
This is not the time to stay at the edge of the arena using low-damage attacks against its shell. Close the distance, strike the exposed weak point, and get out before it recovers.
A clean first phase should leave you with most of your healing supplies for the later attacks, which become faster and less predictable.
Phase 2: Stop Skritch From Eating Termite Larvae
The second phase introduces the mechanic that can undo a large amount of your damage.
Skritch can eat Termite Larvae to restore its health.
The larvae appear in the arena during the fight. If you continue attacking Skritch while ignoring them, the boss may reach them and recover enough health to extend the encounter.
Change priorities as soon as the larvae arrive.
Move toward the spawn area and kill them before Skritch can feed. A fast secondary weapon or the Splinter Cannon can help you deal with several small enemies without spending the stronger attack you were saving for the boss.
Try to position yourself between Skritch and the larvae when it is safe to do so. If the Centipede retreats toward them, do not follow it blindly through its movement path. You want to eliminate the healing opportunity, not take a dangerous hit while chasing.
This phase also brings longer melee combinations, including a five-hit sequence.
Wait until the combination has finished before committing to a charged attack. Starting the attack too early may leave you exposed to the final hit.
Once the larvae are gone, return to building stun and attacking the Gut.
Why Does Skritch’s Health Keep Going Back Up?
If the health bar repeatedly increases after you have dealt substantial damage, watch what happens during the add phase.
Skritch is likely reaching the larvae and consuming them.
Changing weapons may improve your damage, but it will not fix the problem if you continue leaving the larvae alive.
Clear them first, then resume attacking the boss.
Phase 3: Survive the Burrow and Clear Termite Soldiers
Skritch’s final phase adds much greater movement pressure.
It becomes faster, travels around the arena more aggressively, and uses burrowing attacks that can catch you while you are trying to chase it.
Termite Soldiers also enter the encounter, adding another source of damage and interference.
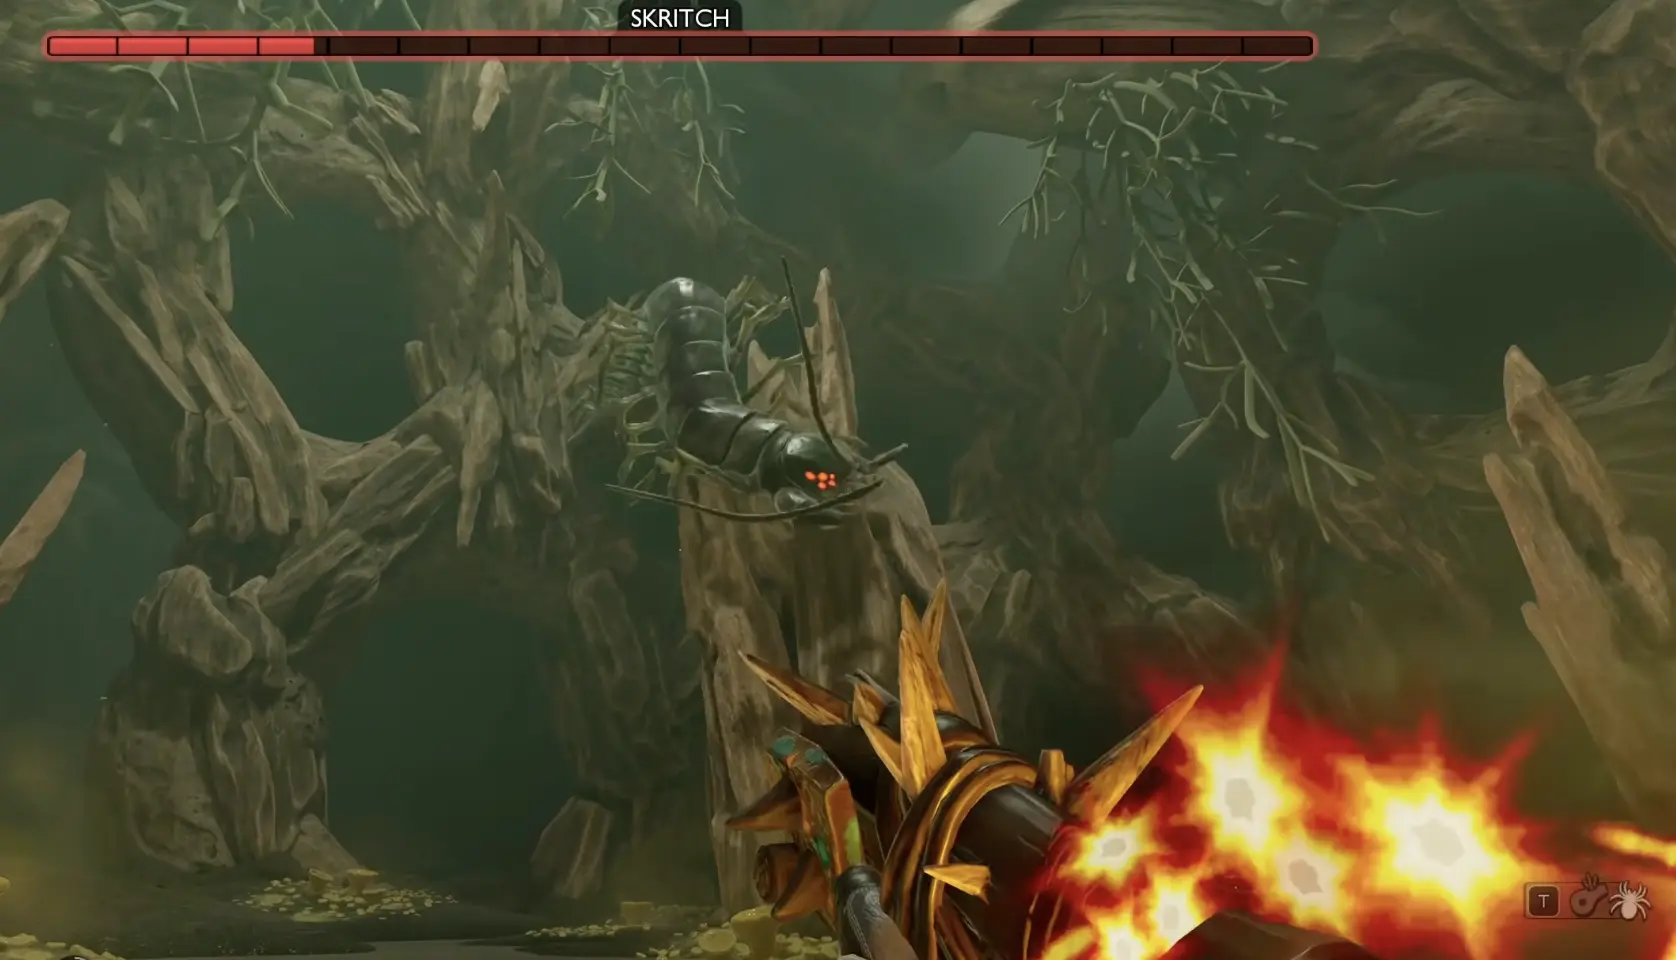
The safest change is to stop treating constant contact as your goal.
When Skritch disappears underground, focus on where it may emerge. Keep enough stamina available to dodge or block its return rather than chasing the point where it vanished.
Its final-phase attacks include rapid movement, a lunging bite, and a scream that can interfere with your movement if it connects.
A Perfect Dodge can preserve your stamina during these attacks, but you do not need to force one when the timing is uncertain. A safe block or moving out of the attack path is preferable to taking damage while attempting a perfect counter.
Termite Soldiers should be handled when they begin overwhelming your position. Leaving several alive can make it difficult to recognize Skritch’s next attack, but chasing one Soldier across the arena while Skritch prepares to emerge is equally dangerous.
Use the windows when the boss is farther away to reduce the number of smaller enemies. Once the space is manageable, wait for an attack recovery or another stun.
The final phase is easiest to finish when you still have enough healing and stamina to exploit one clean weak-point opening.
How to Finish Skritch Without Losing the Last Part of the Fight
Players often reach the final phase successfully, then begin taking unnecessary risks because Skritch has only a small amount of health remaining.
That is exactly when its movement is most punishing.
If the boss is nearly defeated, resist the urge to chase every movement across the arena. Keep the central space clear, watch its emergence attacks, and take smaller safe opportunities until another stun becomes available.
Several mistakes can turn a nearly finished attempt into another long fight:
Skritch keeps healing. You are allowing Termite Larvae to survive long enough to be eaten. Clear them as soon as they arrive.
The fight feels much longer than expected. You may be spending most of your attacks against the resistant exterior instead of the exposed Gut.
You cannot land a charged attack. Begin charging after a recognizable recovery or stun, not during Skritch’s active combination.
You are being overwhelmed in the final phase. Clear nearby Soldiers when there is space to do so, and avoid standing still while Skritch is burrowing.
Woozy or environmental hazards keep interrupting you. Clear the Spew Spores in the main fighting area before the next attempt.
Your shield or armor breaks mid-fight. Repair everything before summoning again. A long encounter can exhaust equipment that survived several ordinary Termite fights.
If you can consistently reach the final phase, another weapon upgrade may be less important than improving how you manage the smaller enemies and use stun windows.
Skritch Rewards: Centi-Cultist Armor and Cane-tipede
Defeating Skritch gives you Centipede materials that unlock several pieces of equipment and furniture when analyzed.
The major combat rewards are the Centi-Cultist armor set and Cane-tipede weapon.
These items focus on summoned creatures and Venom rather than the stun-focused approach commonly used to defeat Skritch.
Centi-Cultist Armor Set
The Tier IV Centi-Cultist set contains:
- Centi-Cultist Mask — Major Woozy Reduction.
- Centi-Cultist Robe — Summon Critical.
- Centi-Cultist Leggings — Summon Critical.
The complete set provides Call From Beyond, which allows weapon attacks to build toward summoning a Termite Soldier to fight alongside you.
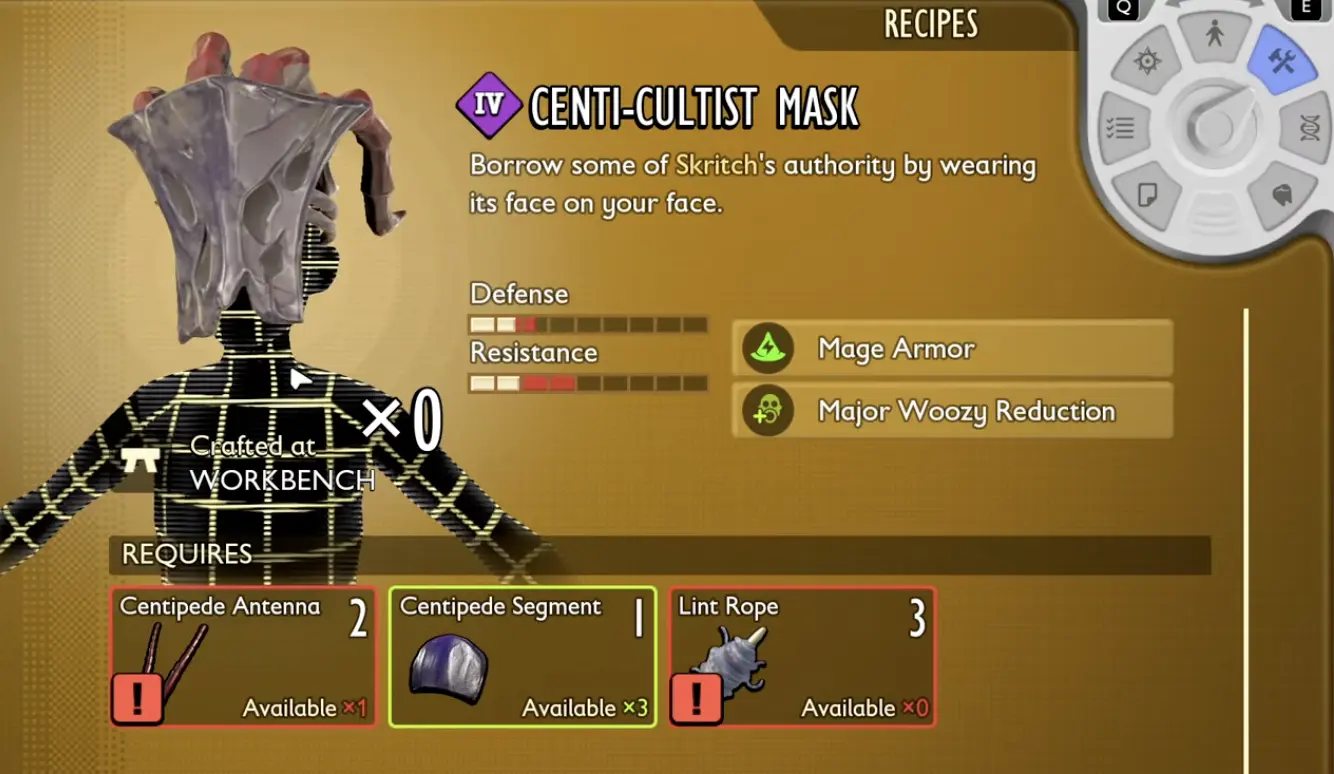
This equipment is most attractive when your character already uses summons and you intend to strengthen their effectiveness.
The mask’s Woozy protection provides a defensive benefit, while the remaining pieces improve the damage potential of your summoned creatures.
The complete set is not automatically a better replacement for a well-upgraded melee or Ranger build. Its greatest value comes from committing to summon-oriented combat.
Cane-tipede Staff
The Cane-tipede is a Centipede-themed staff obtained through the new material unlocks.
It attacks using Venom and provides Summon Venom, allowing summoned creatures to apply Venom through their attacks.
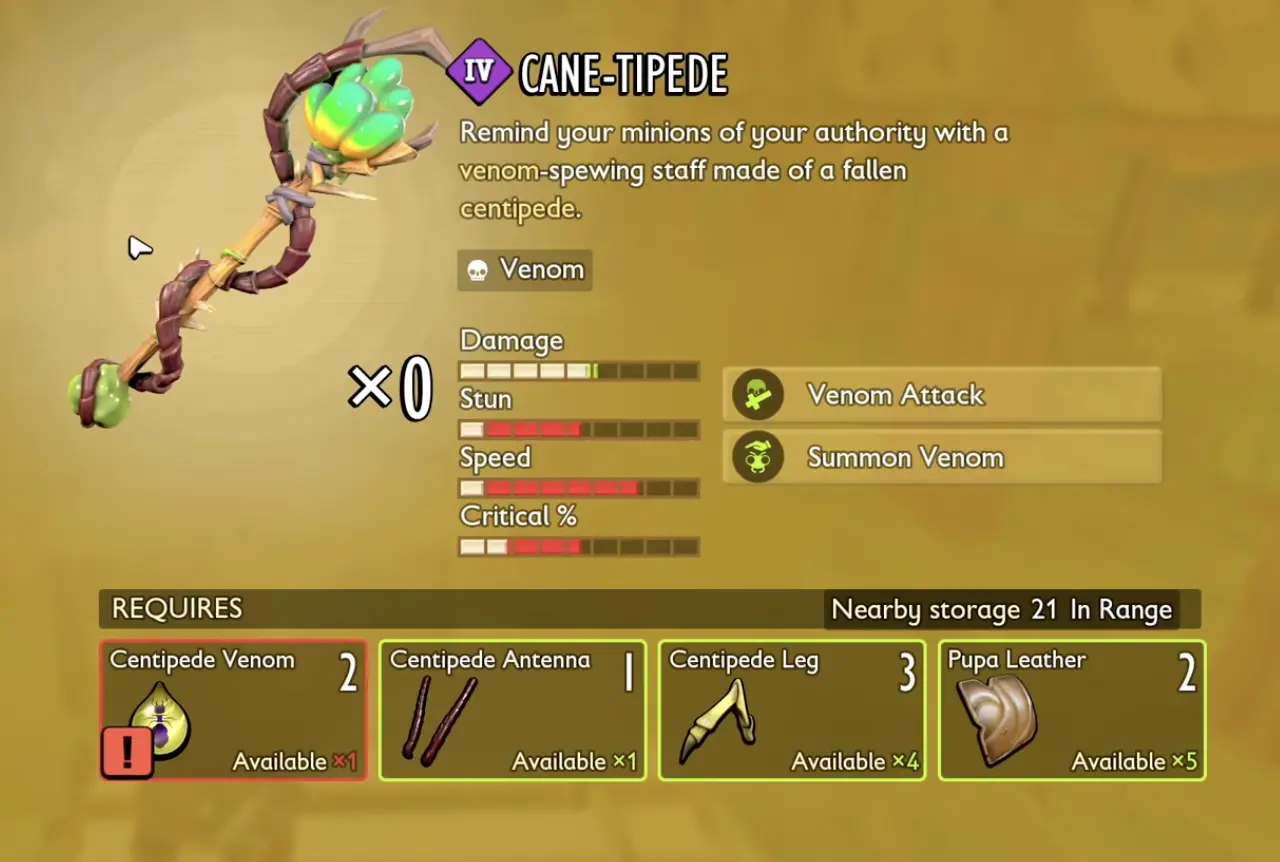
The Cane-tipede and Centi-Cultist set work toward the same kind of combat setup. The armor improves your summoned creatures, while the staff adds another form of pressure through Venom.
You do not need to craft this equipment to defeat Skritch for the first time. It is a reward for the encounter rather than a prerequisite for it.
Other Rewards and Repeat Kills
Skritch also unlocks additional Centipede-themed rewards, including:
- Centipede Cauldron
- Centipede Candle
- Centipede Apothecary
- Stuffed Centipede
- Skritch Wall Mount
- New mutation and trinket rewards
The Centipede Apothecary is particularly useful if you want themed base storage rather than only decorative items.
Repeated kills can provide more crafting materials and contribute toward additional combat unlocks. If you are farming Skritch, prepare fresh summoning materials and carry enough supplies for the entire return trip.
There is little reason to repeat the fight immediately unless you need more Centipede materials, a particular reward, or the additional completion progress.
Once you know how to prevent the larvae from healing Skritch and can consistently expose its Gut, subsequent attempts become much more manageable.