What I Upgrade First—and What I Leave Alone
I buy upgrades that remove the next real bottleneck, not every glowing button. This is how I choose between unlocks, production, workers, and storage.
Updated:
Quick Answer
I do not try to buy every available Research or building upgrade.
My priority is:
unlock the next required system
→ fix the resource blocking the current objective
→ buy broad production bonuses when several resources are behind
→ improve base production or worker capacity on the active bottleneck
→ raise storage only when I am capping or the next requirement will not fit
→ leave convenience and completion upgrades until the important gate is safe
The question I ask before every expensive purchase is:
What does this let me do next?
If the answer is only “make a resource I already have enough of slightly better,” I usually wait.
Hearth and Hamlet gives me useful upgrades faster than I can afford to buy them.
That makes buy whatever is glowing one of the easiest ways to slow the town down.
A Research card can be good and still be the wrong purchase right now.
If buying it delays the building that unlocks Iron, the Library level that opens new Research, or the resource payment sitting in my current objective, I leave it alone.
So before I spend anything substantial, I ask:
What is stopping my next useful action?
If the answer is Stone, I improve Stone.
If the answer is a building requirement, I upgrade that building.
If the answer is storage, I increase capacity.
If the next major objective already needs the resources in my inventory, I stop shopping.
For the exact story order, I use the complete progression route. Here I only care about choosing upgrades along that route.
Early Flat Production Is Better Than It Looks
I value flat production upgrades much more in the opening than I do later.
When a worker only produces a small amount per cycle, adding another point of base production can be a large proportional improvement.
The production formula makes the reason clear:
Gather Amount = (Base × Multipliers) + Extras
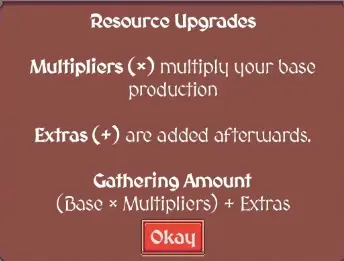
If my base output is tiny, a cheap flat increase can materially change the line.
Later, once buildings, workers, and other bonuses have made that base much larger, percentage multipliers become increasingly attractive.
That is why I do not use a permanent rule such as:
flat production is always better
or
percentage production is always better.
The value changes with the town.
Early:
small base → flat gains matter more.
Later:
larger base + more workers → multipliers have more to multiply.
Broad Multipliers Become Stronger as the Town Expands
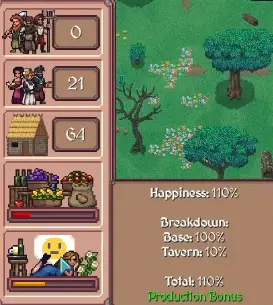
One of the clearest early examples for me was Happiness.
After gaining +10% Happiness, the town reached a 110% Production Bonus.
One production value I checked moved from roughly 9 to 9.9.
That changed how I compare upgrades.
If two upgrades cost roughly the same amount and one improves a single resource while the other improves several active production lines, the broader effect usually wins.
But there is an important exception:
a progression unlock beats a nice multiplier when the unlock is what lets the town continue.
I Buy System Unlocks Before Efficiency
This is the highest-priority upgrade rule I use.
A percentage bonus makes an existing system better.
A progression upgrade can give me an entirely new system.
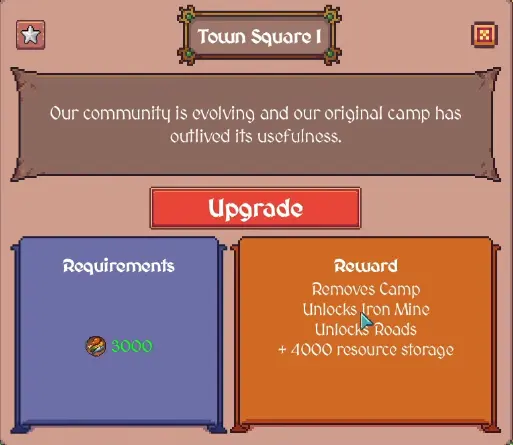
When I reached the Town Square stage, another multiplier was tempting, but the Town Square itself opened much more important things.
Its rewards included:
Iron Mine
Roads
+4,000 resource storage
The multiplier was still useful.
I simply bought it later.
That gives me a rule I keep using through the entire run:
unlock first, efficiency second.
A system that opens Iron, Education, Trade, Blueprints, Ships, or another progression branch changes my available decisions.
A small percentage only improves the decisions I already have.
If Research Is Locked, I Check the Named Building
A Research page full of locked cards does not automatically mean I need more resources.
Sometimes I need a higher building level.
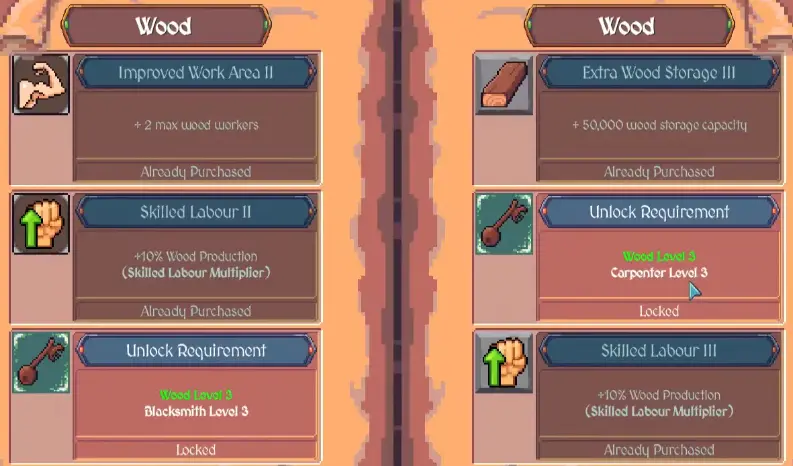
In one later Research screen, different cards were blocked by requirements such as:
Blacksmith Level 2
Carpenter Level 2
Market Level 2
This saves me a lot of useless gathering.
If I already have the resources a Research card appears to need but it is still unavailable, I read the requirement before doing anything else.
If it says Blacksmith Level 2, I work on the Blacksmith.
If it says Market Level 2, I work on the Market.
If the blocker is instead a Blueprint requirement, I stop treating it as a Research-level problem and use the Blueprints route.
The important habit is:
read the lock before farming the cost.
I Like Flexible Multipliers When the Bottleneck Keeps Moving
Once Food, Wood, Stone, Iron, and Gold are all competing for attention, the resource I need most can change very quickly.
That makes flexible production bonuses valuable.
One Mayor’s House upgrade gave workers at the active location an Inspiration buff worth +20% Production.

That is the kind of upgrade I like once the town is large enough that different objectives keep changing my worker priorities.
If I need Stone now and Iron immediately afterward, a flexible multiplier keeps helping.
A narrow Stone upgrade may become much less valuable as soon as Stone starts capping.
I still do not buy broad bonuses automatically.
If the upgrade consumes the exact resources needed for the current quest, I finish the quest first.
The bonus is still there afterward.
Storage Is Worth Buying Only When Capacity Is the Bottleneck
Storage is one of the easiest upgrades to justify emotionally.
More capacity never sounds bad.
But empty capacity is not progression.
If I can hold 60,000 of a resource and I am currently sitting at 25,000, another storage upgrade has done nothing to solve the problem.
The decision changes when the cap itself blocks me.
I reached a wall stage where the requirement was roughly 70,000 of a resource while my current capacity was only around 69,000.
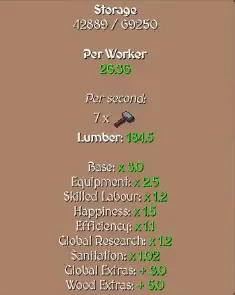
At that moment, production was not the real issue.
I could wait forever and never satisfy the requirement because the resource could not fit in storage.
So my storage rule is:
next requirement fits + I am not repeatedly capping
→ leave storage alone.
production repeatedly hits the cap
→ storage becomes more attractive.
next mandatory requirement exceeds the cap
→ storage becomes a progression upgrade.
This keeps me from spending resources on warehouse space while the actual problem is slow production.
Worker Capacity Is Not Production Until I Can Fill It
Max-worker upgrades can be very strong.
They can also do absolutely nothing immediately.
If a building already has empty worker slots and I have no spare workers, adding two more slots does not increase output.
It only gives me permission to add more workers later.
So I buy worker-capacity upgrades when:
- the building is already full;
- that resource is still the active bottleneck;
- I have workers available or expect them soon;
- I am preparing to move several workers there for a known objective.
If those conditions are not true, I prefer an upgrade that improves the workers already working.
That distinction matters a lot:
+2 worker capacity
is not the same thing as
+2 workers producing right now.
The first only creates potential.
I pay for that potential when I know I can use it.
I Do Not Improve a Resource That Is Already Solved
A resource constantly hitting its cap is giving me information.
Usually it is not asking for another production upgrade.
It is telling me one of four things:
spend it
trade it
move workers away
save it for a known future requirement
I had stages where Food or Stone stayed comfortably full while Iron or Gold controlled nearly every useful next purchase.
Buying another Food or Stone production bonus at that moment would have increased a number I was already unable to spend fast enough.
So before I upgrade a capped resource, I redirect the economy first.
My check is:
resource keeps capping
→ move workers away or leave its next production upgrade.
resource stays near empty
→ improve production or worker allocation.
several resources are all slow
→ broad multiplier becomes more attractive.
Research is locked
→ check the named building or progression requirement.
This is more useful to me than a fixed list of “best upgrades,” because the bottleneck changes constantly.
I Stop Side Upgrades Before a Major Progression Gate
This is probably the upgrade habit that saves me the most time.
The game constantly gives me affordable side upgrades while I am saving for a much larger objective.
Each individual purchase feels harmless.
Several of them together can keep resetting the same resource total I am trying to build.
Before buying anything, I ask:
Will this purchase make me refill the exact resource my current objective is waiting for?
If yes, I usually stop.
This matters around large Gold requirements, the first Caravan progression, Blueprint stages, and later Magic progression.
I do not repeat their costs here.
The Research-side decision is simply:
once I can see the mandatory gate, optional efficiency has to justify delaying it.
If it cannot, I come back after the objective is complete.
I Judge an Upgrade by Payback Time
A good upgrade can still arrive too late to be worth buying immediately.
This becomes especially obvious when I am already close to a major payment.
Suppose a permanent production bonus will eventually improve the town.
That sounds good.
But if buying it consumes most of the resource I need for a quest I could otherwise finish soon, I ask:
Will this upgrade repay its cost before I need that resource back?
Early in a long progression stage, the answer may be yes.
Right before the gate, the answer is often no.
That is why I become more selective as I approach a known requirement.
The closer I am to clearing the gate, the higher the standard an optional upgrade has to meet.
Late Game Is About Bottlenecks, Not Completing Every Menu
Once advanced buildings, Blueprints, stronger Walls, trade systems, Magic, military Research, and high building levels are all active, there are too many upgrades to keep everything equally developed.
I stop trying.
If the next objective is waiting on Gold, I do not spend a huge amount finishing an old Wood branch simply because one final Research card is available.
If a building level is blocking the next useful Research tier, that building moves to the front.
If storage is already sufficient, I leave it.
If one resource is solved, I stop polishing it.
The goal is not:
complete every upgrade branch as soon as possible.
The goal is:
remove the next bottleneck with the least wasted spending.
I become much more willing to leave upgrades untouched for an hour if they do not affect the current route.
“Eventually useful” is not the same thing as “useful now.”
The Five Checks I Use Before I Buy an Upgrade
When several Research markers are glowing and I cannot decide, I run through five questions.
Does this unlock something I need to continue?
If yes, it usually comes first.
Is this improving the resource actually blocking me?
If yes, it is a strong purchase.
If that resource is already capping, it probably is not.
Does this improve several active production lines?
Broad multipliers become increasingly valuable as the settlement grows.
Can I actually use the capacity I am buying?
Worker slots and storage are only useful when workers or resources can fill them.
Will buying this delay the next mandatory objective?
If yes, the upgrade needs to be unusually valuable before I buy it.
That is the Research strategy I keep coming back to.
There is no single upgrade tree I follow from beginning to end.
The bottleneck moves.
My spending moves with it.