How I Plan All 24 Achievements Without Wasting Runs
Most achievements follow normal progression. I plan around the few that need 20 trades, 200% Happiness, full upgrades, no defeats, or a restricted run.
Updated:
Quick Answer
Hearth and Hamlet has 24 achievements, but I do not treat them as 24 separate grinds.
Most arrive through normal progression.
The ones I actively plan around are:
Merchant Kingdom — keep trade moving until I reach 20 distant trades.
We love it here! — create a clean late-game window for 200% Happiness.
Master Builder — finish every city upgrade before ending the run.
Flawless Victory — protect the save from the first serious raid because one defeat ends the attempt.
Steadfast Resolve — never trade with Ashenholt on that save.
Gentle / Steady / Challenging / Intense — I treat the four difficulty completions as separate goals unless my own unlocks prove they stack.
My first serious run is for story progression and cleanup. I save restrictive achievements for later runs instead of trying to protect every condition at once.
The achievement list looks more intimidating than it plays.
A large part of it follows the same progression I am already doing: build the settlement, unlock Gold, start trading, research Blueprints, reach Magic, survive the late-game threats, and become a kingdom.
The dangerous achievements are different.
They can be ruined by a decision I made hours earlier.
A defeat can end Flawless Victory.
One normal trade expedition to Ashenholt can end Steadfast Resolve.
Finishing the story before checking every building can leave Master Builder unfinished.
That is why I look at the achievement list before I decide what kind of run I am playing.
The completion percentages below are a snapshot from the first days after release. I use them as a rough sign of where players are dropping out of progression, not as proof that one achievement is mechanically harder than another.
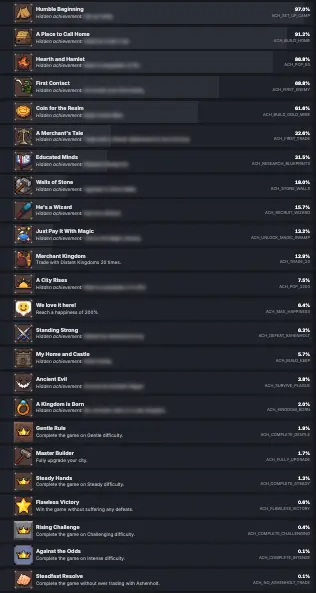
All 24 Hearth and Hamlet Achievements
Story and progression
- Humble Beginning — Set up Camp. 97.0%
- A Place to Call Home — Build the Chief’s Hut. 91.2%
- Hearth and Hamlet — Reach 50 population. 86.8%
- First Contact — Encounter your first enemy. 68.8%
- Coin for the Realm — Build a Gold Mine. 61.6%
- A Merchant’s Tale — Trade with a Distant Settlement for the first time. 32.6%
- Educated Minds — Research Blueprints. 31.5%
- Walls of Stone — Upgrade to Stone Walls. 18.0%
- He’s a Wizard — Recruit a Wizard. 15.7%
- Just Pay It With Magic — Unlock the Magic Swamp. 13.2%
- A City Rises — Reach 1,200 population. 7.5%
- Standing Strong — Defeat the Ashenholt Army. 6.3%
- My Home and Castle — Build a Keep. 5.7%
- Ancient Evil — Survive the Zombie Plague. 3.8%
- A Kingdom is Born — Be crowned rulers of a new kingdom. 2.0%
Goals I plan during a normal run
- Merchant Kingdom — Trade with Distant Kingdoms 20 times. 12.9%
- We love it here! — Reach 200% Happiness. 6.4%
- Master Builder — Fully upgrade your city. 1.7%
Difficulty and restriction achievements
- Gentle Rule — Complete the game on Gentle difficulty. 1.9%
- Steady Hands — Complete the game on Steady difficulty. 1.3%
- Flawless Victory — Win without suffering any defeats. 0.6%
- Rising Challenge — Complete Challenging difficulty. 0.4%
- Against the Odds — Complete Intense difficulty. 0.1%
- Steadfast Resolve — Complete the game without ever trading with Ashenholt. 0.1%
I let the first group unlock naturally while following the complete progression route.
I only start changing my normal play for the achievements in the second and third groups.
I Do Not Force 1,200 Population Early
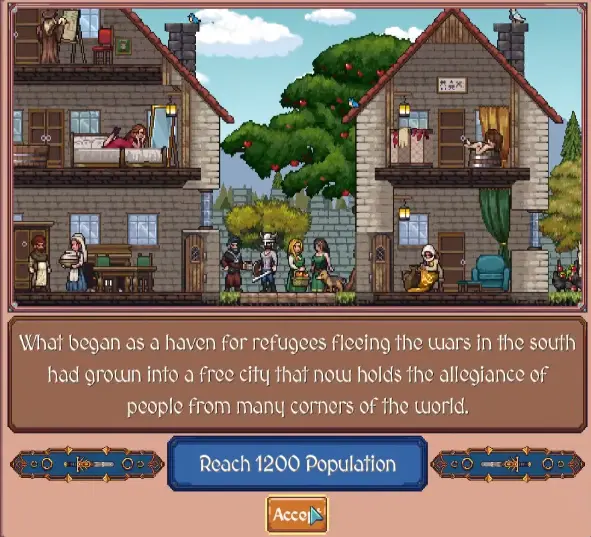
A City Rises looks like a major grind when I first see the requirement, but I do not chase it early.
The story itself eventually asks me to reach 1,200 population.
By that point I have much better housing, stronger production, Magic, more workers, and more ways to improve Happiness and population growth.
The only reason I delay that growth is Food.
If population is climbing while Food Security is collapsing, I stop pushing growth and stabilize the settlement first.
I would rather reach 1,200 slightly later than trigger a starvation cycle just to make the population number move faster.
If Food is already becoming the real blocker, I switch to my Food shortage recovery route instead of treating the achievement as the priority.
I Keep Trade Moving for Merchant Kingdom
I do not wait until the end of the game to start counting 20 trades.
Once my Caravan network is stable, I let the achievement build in the background.
I still make useful trades.
If one resource is repeatedly hitting its storage cap, I would rather export that than sacrifice something the next quest needs just to increase the counter.
That means Merchant Kingdom usually becomes a passive target:
send useful expedition
→ continue building
→ send another when the Caravan returns
→ let the count accumulate through normal progression
The Caravan and trade guide owns the actual route, Demand, export, and Caravan decisions.
For achievements, my only extra rule is not to abandon the trade system after I stop needing emergency Gold.
I Reach 200% Happiness During a Clean Window
I do not try to maintain 200% Happiness for the entire game.
I wait for a developed town where most permanent Happiness sources are already online, then temporarily remove the penalties holding the number down.
My best window is when:
- I am not carrying a defeat penalty;
- the economy is stable;
- I can disable a negative policy without creating another problem;
- Food is strong enough that Happiness-related consumption is not pushing it negative.
I avoid trying to force 200% during starvation or immediately after losing a raid.
Those are exactly the moments when I am already fighting negative modifiers.
If I am close but cannot reach 200%, I open the Happiness breakdown first.
I remove the visible penalty before I buy another random building.
That is much more reliable than assuming one more upgrade will somehow close the gap.
Master Builder Is My Final City Sweep
Master Builder is the achievement I deliberately check before ending the run.
Late-game progression can make the city feel complete while one or two buildings still have another upgrade available.
When the final sequence is close, I stop buying upgrades casually and make a proper sweep through the settlement.
I check:
- Town Square;
- Food and resource buildings;
- Market;
- Warehouse;
- Walls;
- military buildings;
- Church;
- Alchemist and Magic buildings;
- late civic buildings;
- late defensive buildings.
At this stage I am no longer asking whether every upgrade is economically efficient.
I am trying to finish the city.
The Research and upgrades guide is what I use earlier when I still care about buying upgrades in the right order.
For Master Builder, once only a few upgrades remain, completion takes priority.
The Crown Objective Is My Cleanup Warning
When the late-game objective shifts toward crowning a new king and queen, I stop playing on autopilot.
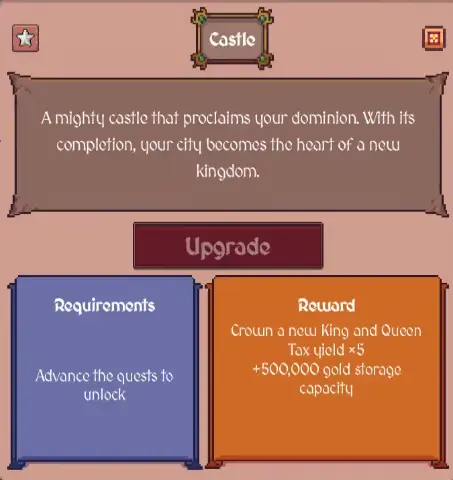
This is where I check three normal-run goals:
Master Builder
Merchant Kingdom
We love it here!
They are all easier to clean up with a fully developed town than in another fresh save.
I also check the restrictive achievements, but only to see whether the save is still eligible.
If I already lost a battle, I do not pretend Flawless is recoverable.
If I already traded with Ashenholt, I move Steadfast Resolve to another run.
Flawless Victory Starts at the First Dangerous Raid
Flawless is not something I decide to chase near the ending.
By then it is far too late.
A single defeat anywhere in the run breaks the condition, so once I choose a Flawless attempt I stop taking speculative fights.
I would rather overprepare for one wave than discover several hours later that an earlier loss invalidated the save.
My priorities become:
keep enough Food and Iron for emergency recruitment
→ do not let military upkeep destroy the economy
→ buy efficient combat upgrades
→ finish important Walls before the dangerous raid reaches town
→ treat Extreme threats conservatively
The detailed combat decisions stay in the Raids and Guards guide.
For the achievement itself, the rule is much simpler:
I never accept a defeat just because recovery would normally be possible.
Steadfast Resolve Starts With the First Trade
Steadfast Resolve has the same kind of permanent restriction.
The moment I decide this is the no-Ashenholt run, I stop selecting Ashenholt as a trade destination.
I do not make an exception because demand is excellent.
I do not send one early expedition and plan to become strict later.
I route trade through the other available settlements for the entire save.
That makes the economy less flexible than a normal run, which is why I do not pair my first Steadfast attempt with my first Intense attempt.
I would rather learn the restricted trade route under a difficulty I already understand.
I Plan Difficulty Achievements Conservatively
Hearth and Hamlet has separate completion achievements for:
Gentle
Steady
Challenging
Intense
I do not assume that finishing a higher difficulty automatically grants every lower-difficulty achievement.
The achievement list presents them as separate conditions, and I do not have enough evidence to build a 100% route around automatic stacking.
So my planning rule is conservative:
I expect each named difficulty to need its own completion until the game proves otherwise through actual unlocks.
That may mean an extra run, but it is safer than reaching the end of Intense and discovering I still need a lower difficulty I thought would pop automatically.
The 100% Run Order I Would Use
I do not try to protect every challenge condition on my first complete save.
That turns normal progression into unnecessary stress and makes a restart more expensive if something goes wrong.
Run 1 — Story, cleanup, and one difficulty
My first serious completion teaches me the full progression chain.
I target:
all natural story achievements
Merchant Kingdom
200% Happiness
Master Builder
one difficulty completion
If I am already comfortable on Challenging, this is a good place to earn Rising Challenge while learning the late game.
I do not restart this save if I lose a battle or trade with Ashenholt.
Those restrictions belong to later runs.
Run 2 — Flawless on an easier difficulty
My second run is where I protect the no-defeat condition from the beginning.
I pair it with a lower difficulty achievement I still need rather than trying to learn Flawless and Intense at the same time.
I play raids conservatively and keep enough economic reserve to react when Threat rises.
Run 3 — No Ashenholt Trade
This save has one permanent identity:
Ashenholt is never a trade destination.
I use every other trade route normally and pair Steadfast Resolve with another difficulty completion I still need.
If the previous Flawless run was extremely comfortable, I could combine restrictions more aggressively, but I do not make that the default plan.
Final Run — Intense
I save Intense until I already know:
- the main quest sequence;
- where Gold becomes a gate;
- when Blueprints arrive;
- where trade becomes important;
- when Magic unlocks;
- which raid stages need preparation;
- what the late-game economy demands.
That way Intense is testing how well I execute the game, not whether I remember where the next progression system comes from.
I Separate Achievements by What Can Actually Waste a Run
The 24 achievements become much easier to plan once I stop treating them equally.
Story achievements
I let normal progression unlock them.
Count achievements
I keep them moving in the background.
Cleanup achievements
I finish them before the final sequence.
Restriction achievements
I decide whether I am attempting them before the save begins.
That is the structure I use for 100%.
I do not need to turn every achievement into its own grind.
I only need to recognize which ones can still be completed later and which ones can be ruined by a single decision now.