How I Unlock and Use Every Movement Toy in Twisted Tower
Where I get the Harpoon, Fairy Wings, Bouncy Boots, and Twisted Jet Pack, what each one actually does, and when I stop trying a route without it.
Updated:
Quick Answer
The four movement toys I use during the main progression are:
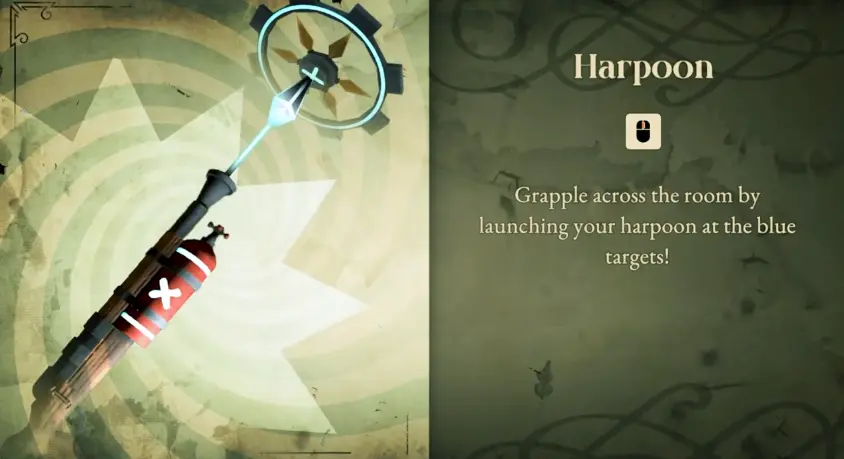
Harpoon — grapple to blue targets.
Fairy Wings — jump, then press Shift to dash across gaps.
Bouncy Boots — make the previously unusable trampoline routes available.
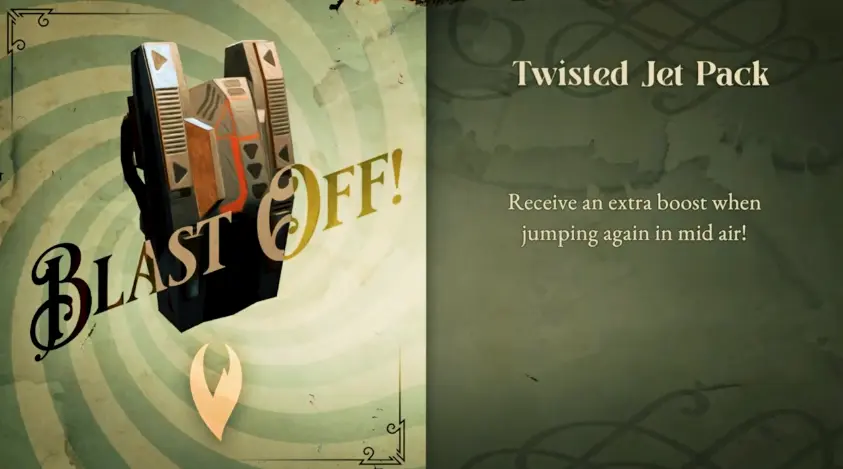
Twisted Jet Pack — jump again in mid-air for an extra boost.
I get them in that order.
If I can clearly see a traversal route but cannot physically make the jump, grapple, or bounce, I usually stop trying and check whether the next movement toy is still missing.
Twisted Tower shows me traversal routes before it gives me the tool needed to use them.
The Lobby trampoline is the clearest example.
I can find it near the beginning of the game, but it simply is not usable yet.
That taught me a rule that saved me a lot of wasted attempts later:
if a route looks deliberately designed around a movement mechanic I do not have, I remember it and keep progressing.
I do not assume every visible platform is reachable the first time I see it.
There are four movement achievements tied to these toys, and their launch completion rates fall sharply as the game progresses:
Harpoon Hero — 44.3%
Dashingly Handsome — 23.9%
Bouncy Boot Bonanza — 14.3%
Jet Pack Joe — 9.4%
So if I am missing one of the later toys, there is a good chance I am simply not far enough through the Tower yet.
Harpoon — My First Major Traversal Toy
I get the Harpoon after completing the Hotel.
The important progression sequence is:
finish Hotel
→ take the green Twisted Token
→ return to the Lobby
→ move through the new Lobby route
→ get the Harpoon.
The first Twisted Token explicitly teaches me that tokens are brought back to the Lobby to receive a new Twisted Toy.
I do not keep searching the Hotel for the Harpoon itself.
The full token order stays in my Twisted Token guide.
How the Harpoon Actually Works
The Harpoon’s instruction card is very specific.
I use it by firing the Harpoon at the blue targets placed around traversal rooms.
The Harpoon then pulls me across the gap.
That changes how I read rooms.
Before I have it, a blue target on the far side of an open space is effectively a sign that says:
come back when you have the Harpoon.
After I have it, that same target becomes the route.
When I Do Not Keep Trying
If I am early in the Hotel and see a suspicious gap with a blue grapple point, I do not spend five minutes testing sprint-jumps.
I cannot solve a Harpoon route without the Harpoon.
I finish the Hotel first.
This sounds obvious once I have the toy, but Twisted Tower regularly shows these mechanics early enough that it is easy to assume I missed a nearby switch.
Where the Harpoon Sends Me Next
The Harpoon arrives immediately before the next major progression phase.
Soon afterward I obtain the Mermaid Palace Ticket.
That makes the intended sequence clear to me:
Harpoon
→ Mermaid Palace
rather than:
Harpoon
→ revisit every room in the Hotel.
I may eventually return to earlier routes for optional exploration, but during the main story I follow the newly opened destination.
Fairy Wings — Get Them After the Sewer
The second movement toy is the Fairy Wings.
I reach them after completing Mermaid Palace and continuing all the way through the Sewer.
Opening the Crimson Pearl is not enough.
I still need to finish the lower Sewer route and collect its Twisted Token.
Once that happens, I return to the Lobby.
The Fairy Wings are part of the new progression there.
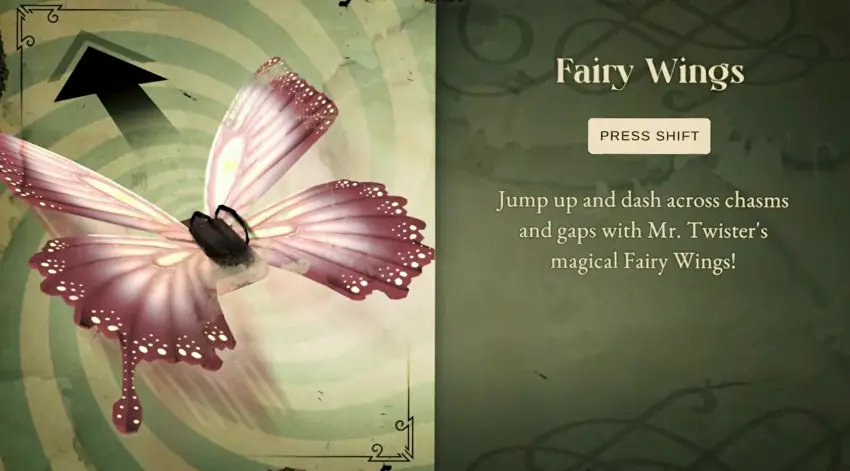
The instruction card gives the actual control:
jump → press Shift → dash
This is much more useful than thinking of the Wings as a generic movement-speed upgrade.
What Fairy Wings Change
The Wings let me cross horizontal gaps that a normal jump cannot comfortably cover.
When I see a route with a large chasm but no Harpoon target, this becomes one of the first movement options I test.
I jump normally and then use the Shift dash while airborne.
The timing matters more than rushing.
If I dash immediately without giving myself enough height, I can waste part of the horizontal movement.
For wider gaps, I prefer:
jump cleanly
→ get airborne
→ dash toward the landing point.
I also stop treating every new gap as a Harpoon problem.
The visual clue helps:
blue grapple target → Harpoon
open horizontal gap → Fairy Wings may be the answer.
I Do Not Immediately Backtrack Everywhere With the Wings
The Fairy Wings make movement around the Tower noticeably easier, but I still do not turn the unlock into a full cleanup session.
The story is already moving toward Clown Casino.
That is where I go next.
If I am working on secrets or achievements later, the extra movement is useful for cleanup.
During normal progression, I would rather keep the main route moving.
Bouncy Boots — The Trampoline Finally Makes Sense
The Bouncy Boots are the movement toy that solved something I had been staring at since near the beginning of the game.
The Lobby has a trampoline very early.
When I first find it, I cannot use it properly.
So I leave it.
After finishing Clown Casino, taking its Twisted Token, and returning to the Lobby, the situation changes.
I follow the new route through the East Lounge.
This is where the Bouncy Boots progression happens.
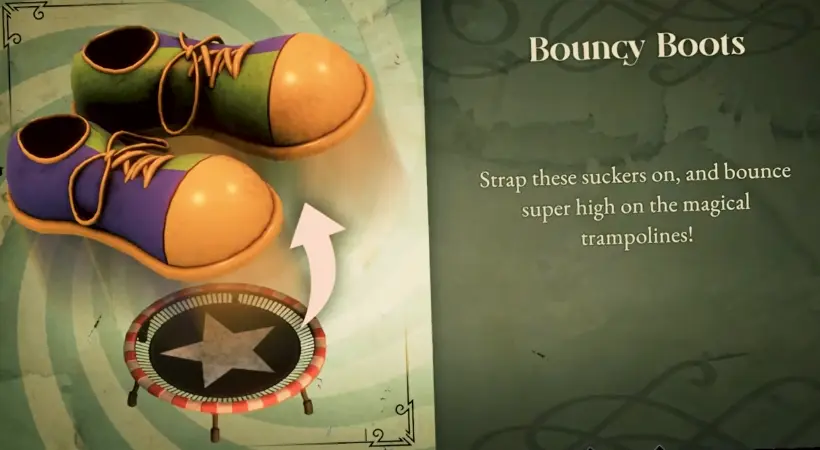
The achievement attached to this unlock is Bouncy Boot Bonanza, which specifically describes using the Bouncy Boots to bounce to higher routes.
I do not need a separate button combination like the Fairy Wings.
The practical change is the environment itself:
trampolines that were useless before are now progression tools.
The Best Progress Check for Bouncy Boots Is the Lobby Trampoline
If I am not sure whether I have reached the correct stage, I go back to the trampoline.
Before this progression, it does not help me.
Afterward, I can finally use it to reach the upper route.
That is a much better confirmation than repeatedly checking every high ledge around the Tower.
The sequence around the unlock also makes it clear that I am in the right place:
Clown Casino token
→ return to Lobby
→ East Lounge
→ trampoline becomes usable
→ Mr. Twister comments on my new shoes
→ leave through the Tower entrance
→ Fairground Forest.
So when I get the Boots, I do not immediately climb toward the top of the Tower.
The story sends me back outside.
Bouncy Boots Matter Again After Fairground Forest
The Boots are not just a one-room gimmick.
After I finish Fairground Forest and return to the Lobby, I need that trampoline ability again.
This time there is a red token above me.
I use the trampoline to reach it.
That opens the next Lobby route toward Bell Tower.
This is why I do not forget about movement toys after their introduction.
Twisted Tower reuses them later as part of the progression language.
Twisted Jet Pack — My Final Major Movement Upgrade
The Twisted Jet Pack is the fourth movement toy in this chain.
Piper actually tells me about it before I obtain it.
Around the later Fairground Forest progression, he explains that Charlotte has been taken high up toward Lightspeed Land and that I am going to need a Jet Pack to get there.
I do not start hunting randomly around Fairground Forest when he says that.
I finish the Forest first.
That gives me its Twisted Token.
Then I return to the Lobby, use the Bouncy Boots route to reach the red token, and move into Bell Tower.
That is where the Jet Pack progression actually happens.
How the Jet Pack Works
The instruction is simple:
jump once
→ while already airborne, jump again
→ receive an extra upward boost.
I think of it as a second-stage jump rather than free flight.
That distinction matters.
I am not holding a button and flying wherever I want.
I use the extra boost to extend vertical movement and reach routes that were too high with my previous tools.
When I Know I Am Too Early for Lightspeed Land
Piper gives me one of the clearest progression warnings in the game:
I need the Jet Pack to get to Lightspeed Land.
So if I am staring at that route and cannot make the height, I do not keep trying to combine Wings, normal jumps and random geometry.
I check whether I have finished:
Fairground Forest
→ return to Lobby
→ red token
→ Bell Tower
→ Jet Pack.
If the Jet Pack is still missing, that is my problem.
After I get it, I continue until I obtain the Lightspeedland Ticket.
Then I return to the elevator and finally move into Lightspeed Pass.
Which Toy I Use When a Route Looks Impossible
The fastest way I learned to troubleshoot traversal was to read the obstacle before trying random movement.
When I see a blue target, I think Harpoon.
When I need to cross an open horizontal gap, I think Fairy Wings and the airborne Shift dash.
When the route is built around a trampoline, I check whether I have the Bouncy Boots.
When the problem is gaining extra height in mid-air, especially on the way toward Lightspeed Land, I use the Jet Pack.
If none of those fits, I stop assuming the answer is another movement trick.
The route may instead require a key, puzzle step, or later progression.
That distinction is what keeps me from repeatedly forcing jumps that the game never intended me to make.