Silent Hill: Townfall Walkthrough
Silent Hill Townfall Part 1 Arrival Walkthrough
Follow Part 1 Arrival through St. Amelia, Haldane Hotel, Zoe's house, the Clinic, Pharmacy, Jess's house, and the final scales sequence.
Read Guide →Game Guide Hub
Follow Silent Hill Townfall through Parts 1–6, major puzzles, St. Amelia, Clara Woods, CEG HQ, the Medical Center, and all five endings.
Recommended Order
Use these guides to find the right Silent Hill: Townfall walkthrough, solution or next step.
Walkthrough
Follow Part 1 Arrival through St. Amelia, Haldane Hotel, Zoe's house, the Clinic, Pharmacy, Jess's house, and the final scales sequence.
Puzzle
Open the Pharmacy locker with 6539, restore the CRTV clue, match all four images, and collect the Prescription Dosage Error Note.
Puzzle
Find the three Clinic Scales items, place the Broken Stethoscope, Prescription Dosage Error Note, and Zoe's Keycard correctly, and finish Part 1.
Walkthrough
Follow Part 2 Zoe from the Community Gardens and Mr. Stewart's house to the Medical Center, then return as Simon and follow Zoe.
Guide Cluster
Follow Part 1 Arrival through St. Amelia, Haldane Hotel, Zoe's house, the Clinic, Pharmacy, Jess's house, and the final scales sequence.
Read Guide →Open the Pharmacy locker with 6539, restore the CRTV clue, match all four images, and collect the Prescription Dosage Error Note.
Read Guide →Find the three Clinic Scales items, place the Broken Stethoscope, Prescription Dosage Error Note, and Zoe's Keycard correctly, and finish Part 1.
Read Guide →Follow Part 2 Zoe from the Community Gardens and Mr. Stewart's house to the Medical Center, then return as Simon and follow Zoe.
Read Guide →Complete Part 3 The Patient with the correct vital signs, X-ray settings, medications, infusion rates, intubation, and surgery sequence.
Read Guide →Find the required Blood Bags, open S.W. and D.P., get through Ward W and Ward P, place the final three bags, and solve the ORDELL transfusion.
Read Guide →Get through Clara Woods, solve the CEG locker and house puzzles, collect all three Mechanical Parts, open the Strange Gate, and finish the Tower route.
Read Guide →Get through Part 5 as Richard, restore power in CEG HQ, collect the shotgun, recover the missing slides, finish the Boardroom sequence, and reach Part 6.
Read Guide →Finish Part 6 as Simon through the Access Card route, Remote Systems Control, Auxiliary Lines, Valve F, final controls, and the last boss.
Read Guide →Get Justice, Forever, Abandoned, Dog and Sci-Fi/UFO endings, understand kills vs discoveries, and use NG+ saves to unlock all five.
Read Guide →Match your current save to the Part title: Arrival → Zoe → The Patient → Clara Woods → Richard → Part 6. Open that walkthrough and continue from the location or objective currently shown in your game.
Silent Hill: Townfall keeps returning to places that looked finished the first time you visited them. A locked door may need an item from another street, a locker may not respond until its barcode has been scanned, and an office on another floor may contain the object needed beside the room you are already standing in.
The Part title is the most reliable way to recover your route after a break. Once you know which Part you are in, follow the current chain rather than trying to clear every marked room before moving on.
Arrival opens St. Amelia and gives Simon enough freedom to make the first few hours feel less linear than they really are.
The main route runs through:
Town Square → Haldane Hotel → Zoe’s house → Shorefront Family Clinic → Pharmacy → St. Amelia Park → 21 Pharaoh Street → Clinic
Take the St. Amelia map in Town Square early. Later clues repeatedly send Simon between the Clinic, park, Main Street and nearby houses, so knowing where those areas sit relative to each other saves a lot of unnecessary street searching.
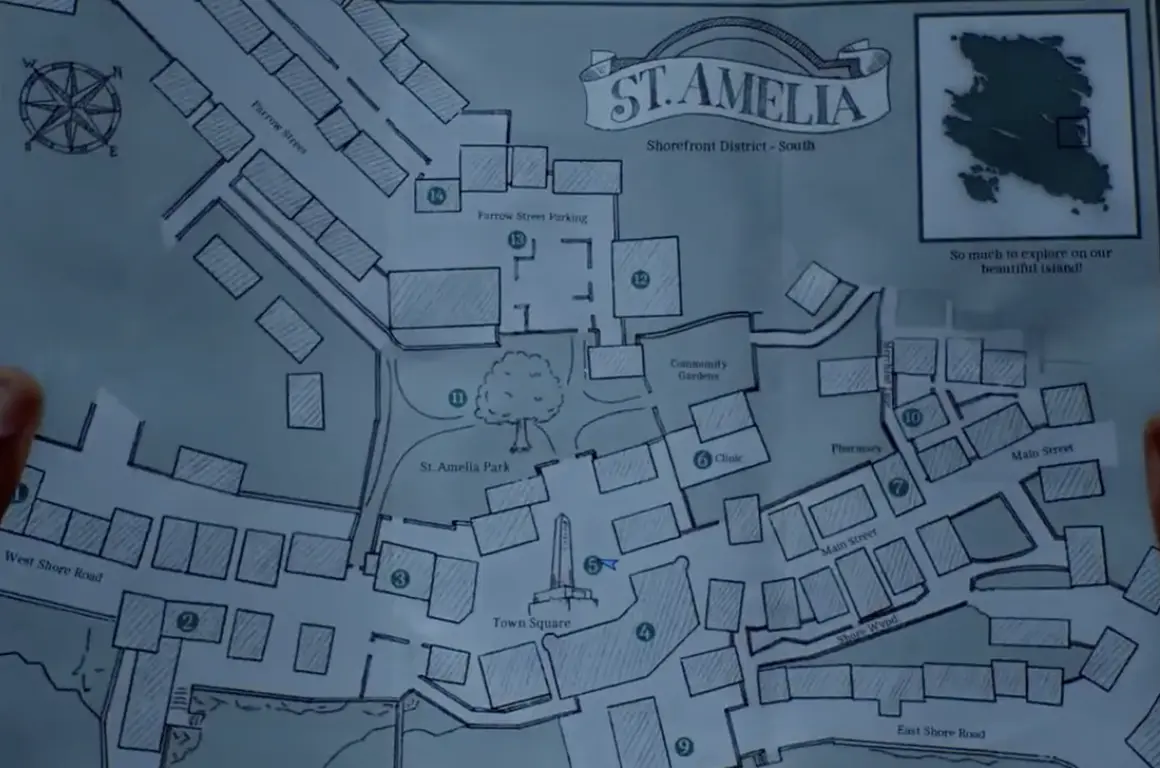
The Part 1 Arrival walkthrough follows that entire chain from Simon’s arrival through the transition into Zoe.
Two puzzles account for most of the backtracking in this Part.
The Pharmacy locker code is 6539. If you need the CRTV clue sequence or are unsure why one of the four digits is correct, use the Pharmacy Locker Code solution.
The final Clinic arrangement is Broken Stethoscope → Prescription Dosage Error Note → Zoe’s Keycard from left to right. The Clinic Scales puzzle solution covers where all three objects come from and how Zoe’s Resignation Letter determines their positions.
Completing the scales ends Arrival.
Part 2 rewinds events and puts you in control of Zoe Ellis.
Her pager identifies the first destination:
Mr. Stewart — 10 Church Avenue
The route through the Community Gardens requires code 1993, which opens the shed containing the key needed to leave through the locked garden gate.
After reaching Mr. Stewart, the objective shifts to the Medical Center. The staff phone number is 496 0556, followed by the response sequence:
3 → 2 → 2 → 1
Those answers complete the access call and let Zoe continue toward surgery.
The Part 2 Zoe walkthrough covers the Community Gardens, 10 Church Avenue, Medical Center access and the later switch back to Simon.
When Simon returns, Richard directs him to Town Square first. Take the handgun from the box before following Zoe. Gunfire attracts attention, so bottles, bricks and quiet movement remain useful even after ranged combat becomes available.
The Patient replaces town exploration with a chain of medical tasks.
The order matters:
vital signs → X-rays → medication → infusion pumps → intubation → surgery
For the first assessment, report:
Blood pressure — 70/40
Pulse — 162 BPM
Oxygen — 80%
The X-Ray Room opens with 7103. Once inside, the skull uses 3 / 7 / 1, while the chest uses 7 / 3 / 1.2.
Later, the three infusion rates are:
15 / 7 / 8
The Part 3 The Patient walkthrough keeps the procedures in the order they occur, including the Record Room, medication search, extension 5353 and intubation sequence.
The hospital changes completely after surgery. From that point onward, stop looking for another treatment machine and start reading the building as a multi-floor navigation problem.
The post-surgery Medical Center uses vents, stairs, ladders and locked wards to move Simon around the building.
Blood Bags also serve different purposes. Some open routes, while others must be carried much farther into the sequence. Treating every bag as something for the same machine is one of the fastest ways to lose track of where you are supposed to go.
The route eventually passes through:
S.W. → Ward W → ladder route → D.P. → Ward P → manual releases → central transfusion room → ORDELL
Use the Blood Transfusion puzzle walkthrough once Simon reaches the altered hospital and begins collecting named Blood Bags.
That walkthrough covers the patient list, both Master Keys, the Ward W ladder, Matthew and George’s routes, the valves and the final ORDELL mechanism without making you retrace the earlier surgery procedures.
Finishing the hospital sequence moves the story into Clara Woods.
Clara Woods is built around repeated trips between employee housing and the CEG locker building.
The central objective is collecting three Mechanical Parts. Each branch begins with a clue, barcode or house puzzle and eventually sends Simon back to a numbered employee locker.
Knowing a PIN does not always let you skip that branch. Several lockers only become usable after the matching barcode has been found and scanned.
The Part 4 Clara Woods walkthrough covers the full route through Lost and Found, South Brae, North Brae, Upper Brae, the employee lockers, all three Mechanical Parts and the final gate.
You do not need to memorize every locker PIN before entering the area. What matters is keeping each barcode tied to the branch that produced it and returning to the locker building when the game gives you a new one.
Part 5 switches to Richard Shaw and moves almost entirely into CEG HQ.
This section has a different kind of navigation problem from Clara Woods: several floors look similar, objectives regularly send Richard from one end of the building to another, and the item required in the Boardroom may be several levels away from the projector itself.
The broad route is:
generator → rear levers → shotgun → CEG offices → Boardroom → missing slides → Boardroom return → late CEG controls
Once the generator reports trouble, check the rear of the machinery rather than abandoning it; three separate levers are part of that sequence.
Later, when the objective says Project the Slides, reaching the Boardroom is not enough. The missing material must be recovered elsewhere in CEG HQ and carried back.
Use the Part 5 Richard walkthrough for the floor-by-floor route, Boardroom sequence and late alarm/clamp controls.
A manual save before long cross-floor runs is especially valuable here. CEG HQ can make you carry a newly found item through several dangerous rooms before reaching the place where it is used.
Part 6 puts Simon back in control for the final stretch.
The opening area is another multi-level facility, but this time the route revolves around industrial controls rather than office access. The main progression chain is:
Access Card → shutter near the clamps → Remote Systems Control → Auxiliary Lines → Remote Systems Control → Valve F → final control board → last confrontation
The Access Card is used back near the clamp area rather than in the room where you find it, which makes the first half easy to misread.
Remote Systems Control then uses CCTV feeds and equipment identifiers. After that, the Auxiliary Lines room requires the switch network to be completed until all three indicators are green.
The Part 6 Simon walkthrough follows the Access Card route, CCTV controls, Auxiliary Lines, Valve F, final panel and the last combat sequence.
Keep ammunition and healing for the end. The final encounter is substantially more combat-heavy than most of the game, adds extra enemies during the fight and punishes slow reloads.
Townfall has five endings: Justice, Forever, Abandoned, Dog, and Sci-Fi/UFO. The first three are available on a normal playthrough, while Dog and Sci-Fi/UFO require New Game Plus and additional steps across several Parts.
Use the Silent Hill Townfall endings guide for the exact requirements, useful backup-save points, the three Dog coins, and the Sci-Fi/UFO route.
Townfall does use autosaves, but long backtracking sections make them unreliable as your only safety net.
Whenever the route gives you access to a usable phone, dial 100 to save.
The most valuable manual saves are before:
Saving before those transitions costs very little and can prevent repeating twenty minutes of navigation after one bad encounter.
Most progression stops in Townfall fall into one of four categories.
A number lock usually means the clue is already somewhere nearby or in a document you recently collected. A door with no usable interaction often means you reached it before the required key, barcode or story state. A room visible on the map but unreachable from your floor usually needs a staircase, vent, elevator or ladder from another section. A machine that accepts input but does not advance usually still has another control, switch or linked system left unfinished.
That distinction is more useful than testing every item in your inventory against every locked door.
Follow the Part you are currently playing, finish the active chain, and only backtrack when the game gives you a concrete reason to return.