Orc Incremental Best Totems: What Should You Pick?
Pick the best Orc Incremental Totems for your current army, with Iron Snake, Silver Idol, Rage synergies, Power costs, stacking and dead-draw traps.
Updated:
Quick Answer
At the Portal, take a Totem when its trigger already matches Units in your Warband. Iron Snake is my easiest early pick when Fighters are actually taking hits, while a cheap Rage Totem can be worth the Power when Spellcasters already matter to the formation.
Skip Totems tied to a Unit family you are not fielding. After adding one, run a fight and watch whether it actually triggers before spending more Gold rerolling around it.
A Totem can be the strongest card in a run or occupy Power while doing absolutely nothing.
I hit both extremes within the same progression stretch.
One Totem began deleting ranged enemies so efficiently that I kept choosing it over new Units. A little later, I had two Machine of War Totems active with no Catapults in the army. Both effects were waiting for a Unit tag that did not exist.
That difference changed how I read every Totem card afterward.
The first question is no longer “is this effect strong?”
It is “what in my current Warband will trigger it?”
Totems Compete With Units for Power
Portal draws can give me either Units or Totems, and both can consume the Warband’s available Power.
That means a passive effect is not free just because it does not look like another soldier.
Early on, Power is often the real restriction. Adding another Witch Doctor, Fighter or Totem can require the same scarce capacity, so I compare the Totem against the Unit I would have fielded instead.
One Rage Totem I used only needed 1 Power. Its effect triggered when an allied Fighter dropped below 30 HP, granting Rage to the nearest allied Spellcaster within 100 units.
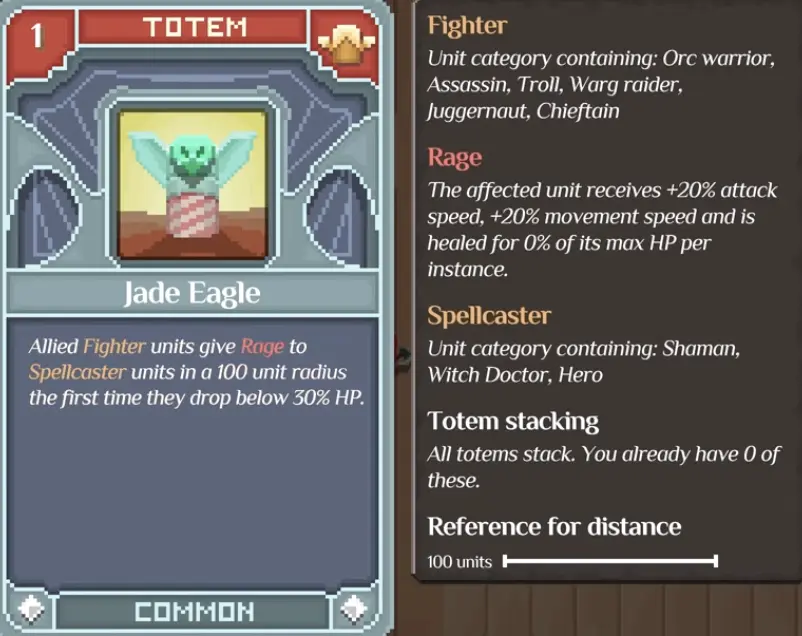
One Power was inexpensive enough that I could test it without dismantling the entire formation. Once Witch Doctors or other Spellcasters were already contributing, converting a frontline damage event into Rage created value from something that was happening naturally anyway.
The same card is much worse when the army barely contains Spellcasters.
Nothing about the tooltip changed. The Warband did.
Iron Snake Can Be Better Than Another Unit
Iron Snake was the first Totem that made me stop treating Totems as secondary cards.
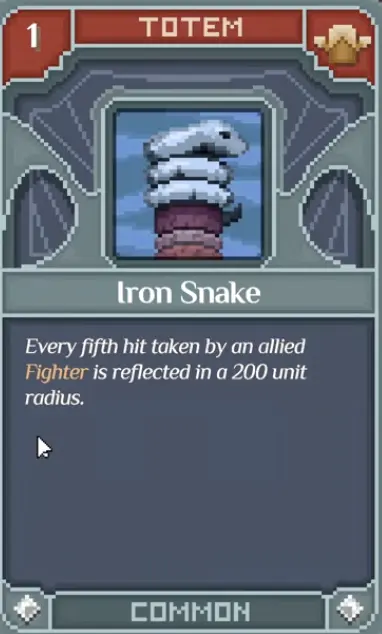
Its trigger is simple:
every fifth hit taken by an allied Fighter is reflected in a 200-unit radius.
The effect looked odd before I tried it. Once the Fighters began absorbing repeated attacks, the reflected damage started clearing enemies that the frontline was not directly reaching.
Archers were where I noticed the change immediately.
They could sit away from the melee pile and continue firing into my Fighters, but every fifth hit helped trigger damage back across the battlefield. A card that initially looked defensive was effectively converting my tanks into an area-damage engine.
The result was large enough that I went back to the Portal specifically hoping to find another Iron Snake.
Later runs reinforced the same impression. When I checked the damage contribution during a stronger Warpath setup, Iron Snake was still producing a conspicuous amount of DPS rather than fading into the background as Unit stats scaled upward.
That makes it one of my easiest Totem picks when three conditions line up:
my frontline contains Fighters, those Fighters are surviving long enough to take repeated hits, and the current wall contains enough incoming attacks for the fifth-hit trigger to keep firing.
Remove any of those conditions and the value drops.
I Still Remove Iron Snake When the Boss Needs Something Else
A strong Totem does not automatically deserve permanent Power in every fight.
Much later, I reached a boss where raw reflected damage was not solving the part of the encounter that mattered. I needed control badly enough that I removed Iron Snake and brought the stunning option back into the formation.
Once that boss was finished, Iron Snake returned for the following Warpath.
That is a useful way to handle Totems in general.
I treat the Warband as a working lineup, not a collection of favorite cards. A Totem can carry several levels and still be the correct card to remove for one boss.
The build and formation guide covers the wider Unit lineup. From the Totem side, I care about whether the passive is helping with this specific failure state.
Silver Idol Needs Spellcaster Kills and Fighter Corpses
Silver Idol is much more conditional than Iron Snake, but the ceiling can be enormous.
Its effect triggers when an allied Spellcaster defeats an enemy. A random dead allied Fighter corpse then explodes, dealing damage equal to that Fighter’s max HP within a 100-unit radius.
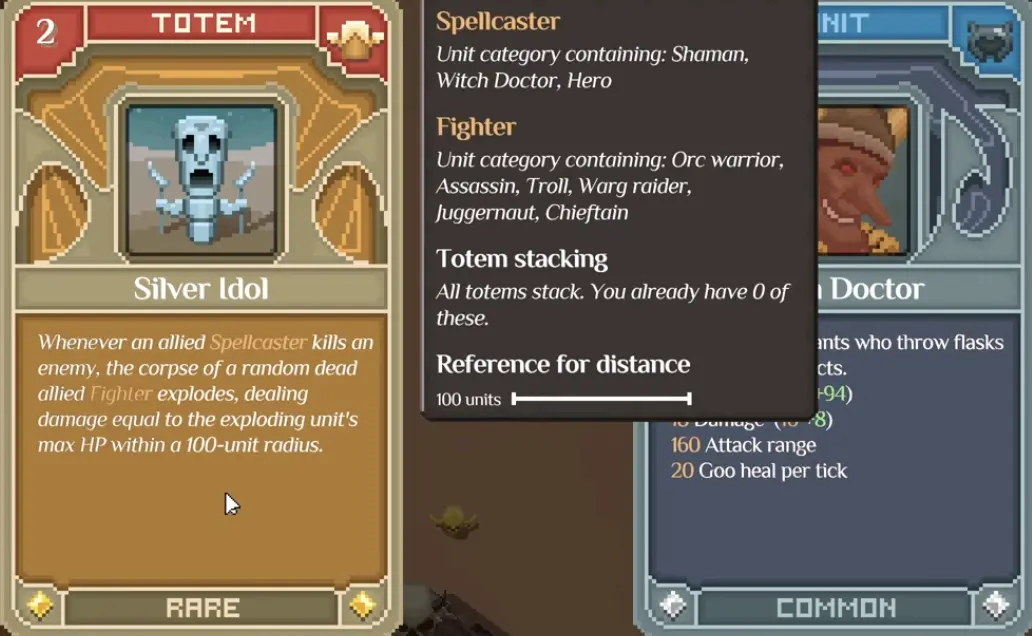
In the run where I picked it, one available corpse was worth roughly 1,000 explosion damage.
That immediately changed how I looked at the Fighter deaths that were already happening near the middle of the formation. Losing a frontline Unit was still bad, but Silver Idol could turn the corpse into one final burst when a Spellcaster secured the next kill.
The effect also explains exactly when I leave Silver Idol behind.
An army with no meaningful Spellcaster damage cannot trigger it reliably.
An army whose Fighters almost never die may have very few corpses available.
A formation that spreads enemies far beyond the explosion area also gets less from the payoff.
Silver Idol becomes interesting when the build already contains both sides of its chain. I do not add weak Spellcasters or sacrifice good Fighters just to manufacture that chain from scratch.
Some Totems Are Dead Cards Until the Matching Unit Exists
The cleanest bad example came from Machine of War effects.
I picked Totems that interacted with Machine of War Units, including an effect that could make them fire a five-shot salvo when they dropped below a health threshold.
Then I reached a stretch with no Catapults in the Warband.
I still had two Totems.
Neither was helping.
This is the mistake I make most easily when the Portal shows a strong-looking effect for a Unit I expect to draw later.
“Later” can take a long time.
The next Catapult may require several expensive draws. The run may hit a boss before it appears. I may find a different carry first and stop wanting the Catapult at all.
A Totem that works immediately has an enormous advantage over a theoretically stronger card waiting for another lucky draw.
Position Matters When the Effect Has a Radius
Several Totem effects care about distance.
The Rage example works within 100 units. Iron Snake reaches 200 units. Silver Idol’s corpse explosion is also confined to an area around the corpse.
That makes formation placement part of the Totem decision.
When an effect seemed to stop reaching the Units I expected, I moved the Totem and the relevant Unit group before spending Gold on another reroll. Ranged Spellcasters sitting too far behind the frontline can miss a short Rage handoff; shifting them closer can fix the interaction without changing a single card.
The reverse matters too.
I do not drag vulnerable ranged Units into melee simply to satisfy one Totem radius. When an effect demands a formation that makes the core Units worse, the Totem is the piece I replace.
Totem Stacking Makes Duplicates Worth Checking
Duplicate Totems are not automatically wasted draws.
The game allows Totem effects to operate together, and I have run duplicate effects at the same time for a stronger combined setup.
That made repeated Iron Snake draws especially tempting because the underlying Fighter trigger was already central to the formation.
There is still an important difference between “both Totems are active” and assuming every number on the card doubles exactly the way I expect. When I pick a duplicate, I run another battle and watch the result rather than planning the entire build around arithmetic I have not seen on the battlefield.
The practical test is quick:
add the second Totem → run the same level → watch the trigger and damage contribution → keep it only if the extra Power is buying a meaningful change
That prevents a duplicate passive from pushing out a Unit that was contributing more.
Rage Totems Need the Right Direction of the Synergy
Rage interactions are easy to misread because the game can move Rage between several Unit types.
One Totem I used waited for an allied Fighter to fall below 30 HP, then granted Rage to the nearest allied Spellcaster within 100 units.
Elsewhere I found effects that move Rage in the opposite direction or trigger from completely different events.
So “this is a Rage build” is not enough information.
I check:
who creates the trigger, who receives the Rage, and whether those Units are close enough when the trigger happens.
A frontline packed with Fighters does not help a Spellcaster-focused Rage Totem if the Spellcasters are too far away. A Totem feeding Fighters is similarly weak when the build’s actual damage engine sits in the back as Spellcasters or Machines of War.
This is one place where rearranging the formation before rerolling saves a surprising amount of Gold.
A Strong Totem Can Change What I Draw Next
Once a Totem proves that it is carrying, the next Portal choice changes.
With Iron Snake working, another durable Fighter becomes more attractive because it supplies more reliable triggers.
Silver Idol makes high-HP Fighters and Spellcasters that can secure kills fit together better than they would independently.
A Machine of War Totem pushes Catapults upward only after I already have a realistic path to fielding them.
This is different from forcing the whole army around the first passive I see.
I let the Totem earn that influence in combat first.
After one or two fights, the result is usually obvious. Either the trigger keeps appearing and the passive begins shaping the build, or the card sits there waiting for a situation that almost never occurs.
Rarity Does Not Rescue the Wrong Trigger
Rare and Epic Totems can offer much more exciting effects, but I still apply the same test.
An Epic passive tied to a Unit family I do not use can be worse for the current run than a Common Totem that triggers every few seconds.
Permanent card-rarity access comes through the Blight Tree, so I treat better Totem rarity as part of long-term card progression rather than a reason to reroll the current run endlessly. The Blight Tree guide covers when I save for those card-access breakpoints.
Once those rarities are available, the Portal gives me more possibilities.
It does not remove the need for synergy.
Dark Rebirth Removes the Current Totems
Totems belong to the current run.
A Dark Rebirth clears the Units and Totems I assembled, so I do not delay a good reset simply because the Portal gave me an unusually strong Iron Snake or Silver Idol setup.
The permanent question—how much Blight I gain and when the reset is worth taking—is covered in the Dark Rebirth guide.
For the Totems themselves, I expect to rebuild the synergy afterward.
That makes cards with simple, common triggers particularly valuable early in a new cycle. A Totem that works with the basic Fighter frontline can start contributing before a specialized late-run army has been assembled again.
What I Do After Drawing a Totem
I put the card into the formation before buying several more draws around it.
The next battle tells me more than the Portal screen does.
With Iron Snake, I can see whether the Fighters are taking enough hits to produce reflected damage. With Silver Idol, I watch whether Spellcasters are actually securing kills while Fighter corpses exist. With a Rage Totem, I check the distance between the trigger Unit and the intended recipient. A Machine of War passive gets no extra investment until the Machine of War is physically in the lineup.
When the interaction works, I start choosing Units that make the trigger more reliable.
When nothing happens, I free the Power and keep rolling.
That one-battle check has saved me far more Gold than trying to predict an entire run from a strong-looking Totem tooltip.