Orc Incremental Best Builds: Units, Totems and Formation Choices
My strongest runs come from matching Unit roles, Power cost and Totem triggers rather than chasing rarity. I build enough frontline to buy time, protect the damage that is actually carrying the run, and reroll cards that cannot contribute to the current plan.
Updated:
Quick Answer
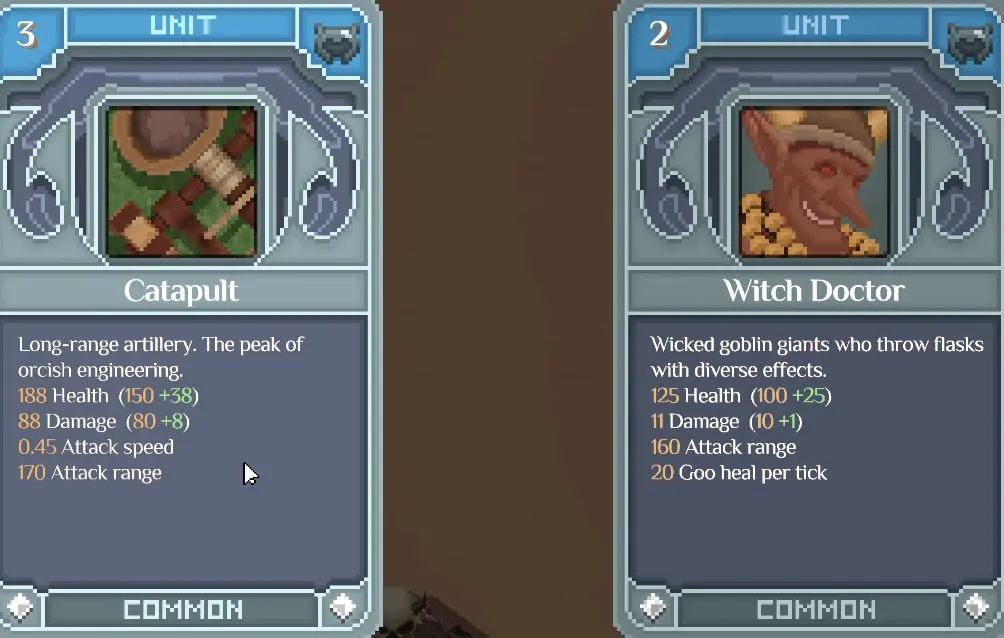
My most reliable builds start with enough frontline to keep the backline working, then add one clear damage package and Totems that reinforce it. Catapult is one of the strongest early wave-clear options but costs 3 Power, while Shamans scale well when chain effects and Spellcaster support line up. Witch Doctor earns a slot when survival is the real problem. I keep Rare or Epic cards only when their role, enchantment or synergy improves the formation I already have.
I Build Around Roles Before I Build Around Names
The strongest-looking card in the Portal is not always the card that moves a run forward.
That became obvious once my Warband had enough capacity for several different Unit types. One formation could have excellent damage on paper and still collapse because nothing held the enemy long enough for that damage to happen. Another could survive forever while lacking any reliable way to reach Archers or clear a clustered wave. Rarity did not fix either problem by itself.
I now look for four jobs before I worry about an ideal roster:
- frontline that survives first contact;
- damage that can actually reach the dangerous enemies;
- sustain or control that gives the damage enough time;
- Totem effects whose trigger matches what those Units are already doing.
A card becomes interesting when it fills one of those missing jobs. If the formation already has that job covered, another card doing the same thing has to be substantially better before I spend Power or Gold on it.
Before committing Power to a Totem, I check whether its required Unit category is already present and whether the trigger will actually happen in this formation. The Totems guide covers the trigger ranges, Power tradeoffs, stacking and specific picks such as Iron Snake and Silver Idol.
This is why my “best Units” change between runs without becoming completely random. The names move around, but the jobs stay recognizable.
The Units I Value Most Depend on What the Current Army Is Missing
I would not turn the roster into a rigid S-to-D tier list yet. Several Units that looked weak in one setup became excellent once the right enchantment or Totem appeared, while later unlocks sometimes underperformed basic cards that already fit the formation.
There are still clear patterns in what I keep.
Catapult is one of my favorite early and mid-game wave-clear pieces when the frontline can protect it. Its long-range AoE gives the formation something basic melee Units cannot easily provide.
Shaman becomes a serious carry when chain attacks, attack speed and Spellcaster effects start stacking. Several Shamans can cover targets that the frontline has not physically reached yet.
Witch Doctor earns its Power when the problem is survival rather than damage. Its value rises sharply in a formation that stays inside the useful healing area.
Troll is much easier to understand: it brings a large health pool and belongs where the army needs a body capable of absorbing pressure.
Dragon has higher upside than its first appearance suggests, but I only like it when the build gives it enough support or a useful enchantment such as Life Steal.
War Raider offers area pressure and a hook that can pull enemies into close combat. That is useful against certain formations, though I do not automatically replace an established carry just because War Raider unlocked later.
Juggernaut is an explosive specialist rather than a conventional frontline Unit. Its self-sacrifice can break enemy formations, which means I evaluate it around the effects that interact with its explosion rather than expecting it to survive like a Troll.
Those are roles, not permanent rankings. The Portal can change the answer every cycle.
Catapult Is Strong Because It Solves a Problem Melee Units Cannot
Catapult was one of the earliest Units that made the whole battlefield feel different.
It attacks from long range, deals area damage and can remove clustered enemies before my Fighters ever reach them. In the state I captured, the card showed 3 Power, 188 Health, 88 Damage and 170 Attack Range.
The 3 Power is the number I pay attention to most.
One Catapult takes the space that could otherwise hold several cheaper Units. Against a crowded wave, that trade is often excellent because its AoE can remove multiple targets while staying behind the frontline. Against a boss that reaches and kills the artillery quickly, the same three Power may buy too little effective health.
I therefore keep Catapult when it is getting repeated shots into meaningful targets. If the fight ends before the artillery has time to work, I start comparing that slot with more frontline bodies or another form of sustain.
The formation that works best for me is simple in principle: Fighters meet the enemy first, Catapult sits comfortably behind them, and support avoids standing where the first enemy charge or AoE will land.
Obsidian Beacon Can Turn Catapult From Good Into a Build
A powerful Unit becomes much easier to invest in when the Totem reinforces the exact action it already performs.
Obsidian Beacon is the clearest Catapult example I found. Its effect makes every fifth attack from an allied War Machine a heavy shot with 2× damage and double AoE radius.
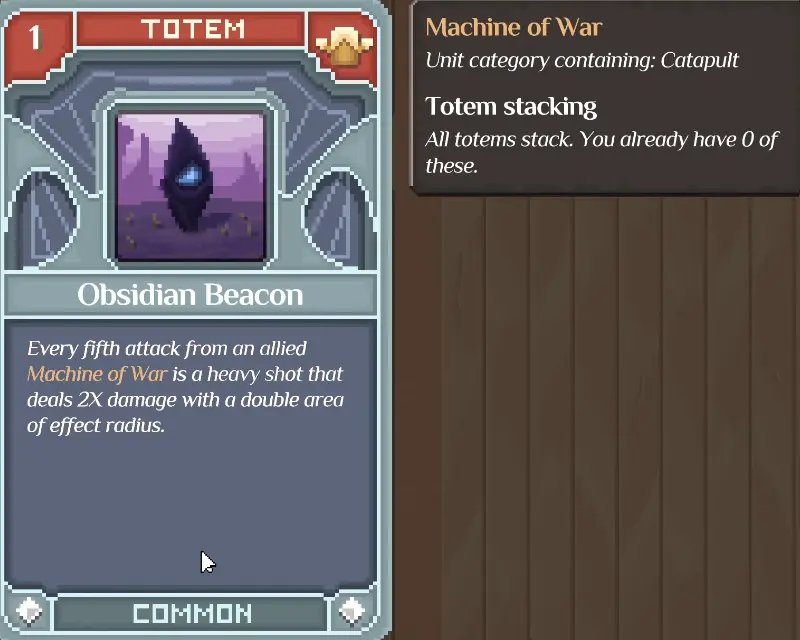
Now the Catapult is no longer competing with three Fighters only on its base card.
Attack speed helps it reach every fifth shot sooner. War Machine upgrades strengthen the same damage package. Catapult-specific bonuses improve an already amplified piece rather than spreading Gold across unrelated Unit families.
That concentration is what I look for in a real build.
Once one interaction is clearing most waves, I would rather reinforce it than buy five mediocre upgrades because all five buttons happen to be affordable.
Reflection Can Kill the Enemy Backline Without Reaching It
Not every useful Totem is attached to my highest-damage Unit.
One reflection effect triggers on every fifth hit taken by an allied Fighter and reflects damage within a 200-unit radius.
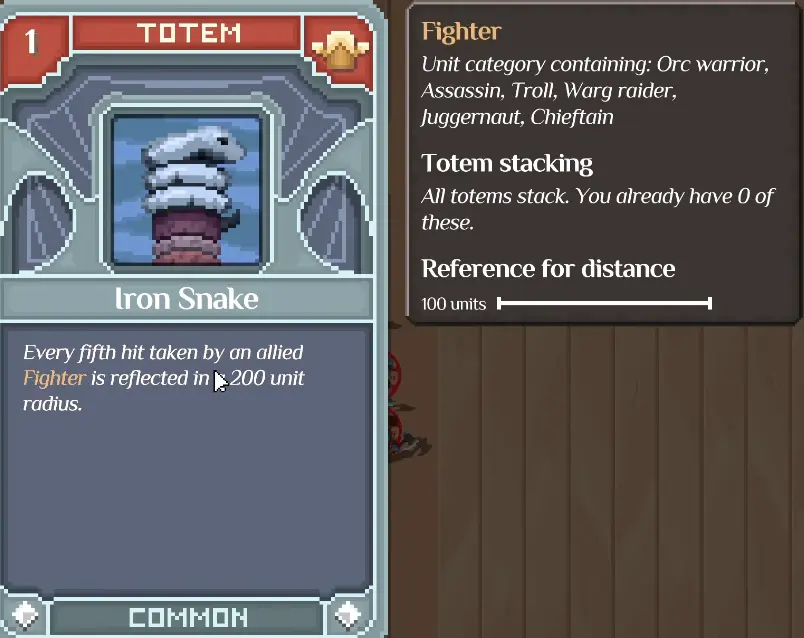
The interaction became noticeable against Archers.
My Fighters could be tied up in front while the dangerous ranged enemies remained farther away. Reflection allowed attacks aimed at my frontline to punish those fragile targets without waiting for melee Units to reach them.
That changes the value of health.
A tougher Fighter is not simply surviving longer; it is feeding more hits into the reflection trigger. In one later setup, a Rare Orc Warrior had roughly 750 HP, which gave this kind of interaction far more time to work.
I like Reflection when the enemy is supplying frequent attacks and the targets I want dead are inside the effective radius. Against a single slow boss or a fight where the incoming hits do not line up with that trigger, I stop treating the Totem as a central source of damage.
Witch Doctor Is a Formation Piece Before It Is a Stat Block
Witch Doctor caused some of my most misleading upgrade decisions.
I could add healing and still watch the frontline die because the melee Units had already run away from the area where the support mattered. The problem was not always that the Witch Doctor needed better numbers.
Sometimes the army simply needed to stop stretching itself across the battlefield.
Pulling the formation back and keeping Witch Doctor behind a stable frontline made the healing noticeably more useful. Once that structure was working, upgrades such as a 25% chance to throw two flasks became much easier to justify.
This is also where I separate support value from damage value. Witch Doctor does not need to compete with the Shaman or Catapult on damage if its healing gives those pieces several additional attack cycles.
If the backline is already safe and nobody is dying until the fight is effectively decided, another Witch Doctor may be wasted capacity. When the carry keeps dying seconds before the enemy would have fallen, healing becomes much more attractive.
Position tells me which version of that story I am actually in.
Shaman Is One of the Best Damage Packages Once Chains Start Working
Shamans became much more convincing when I stopped looking at one card’s base attack and watched how the whole group interacted with a wave.
A Rare Shaman I used could fork its lightning, which helped damage enemies away from the first point of contact. Several Shamans operating together meant the frontline did not need to physically catch every target before damage started landing.
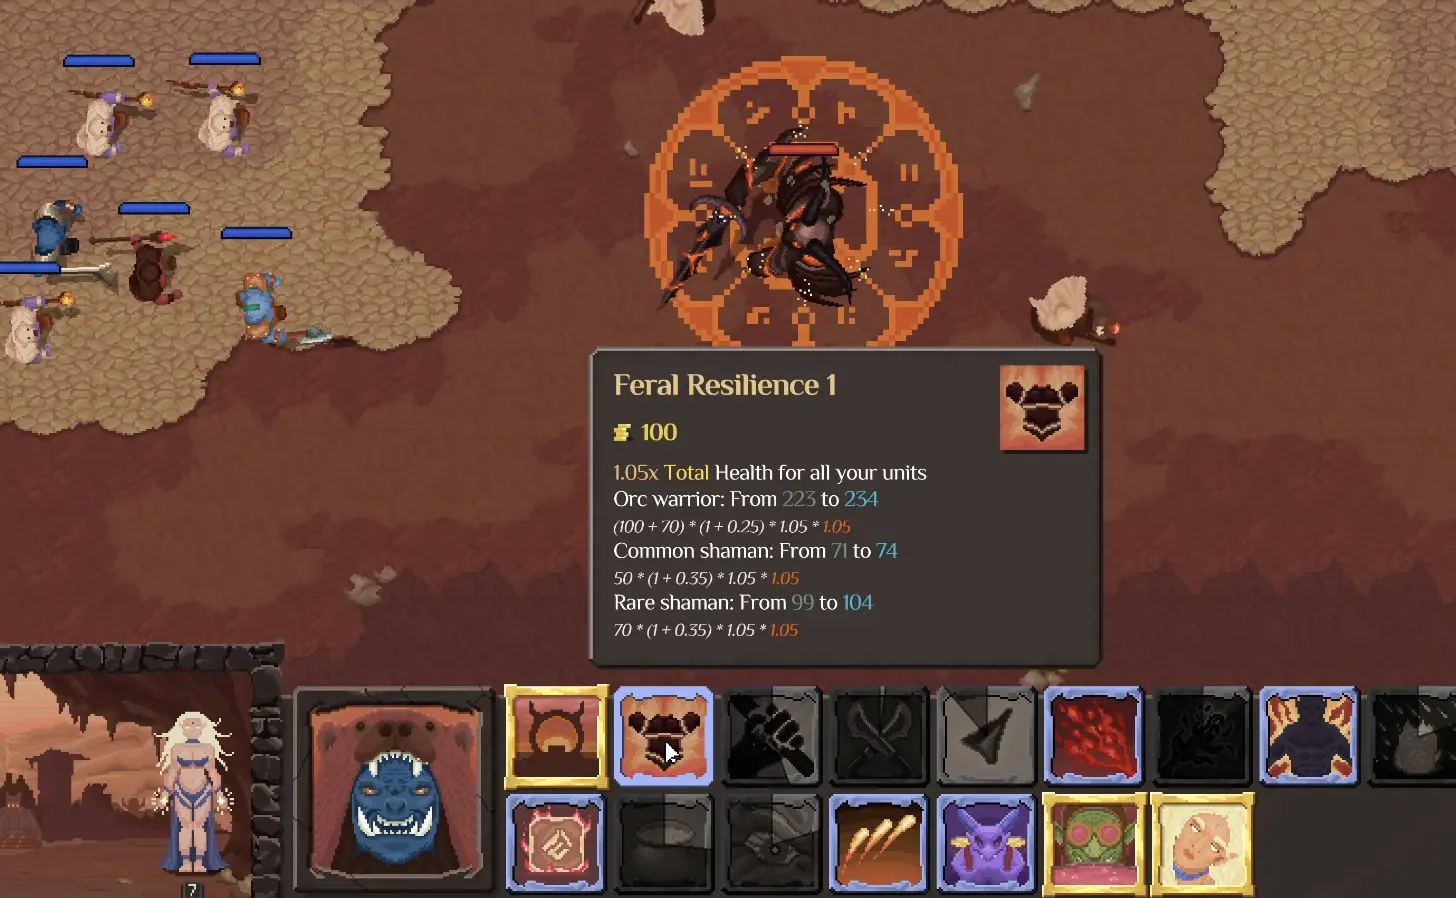
Once that setup was established, Shaman attack speed and Spellcaster upgrades had a clear destination. Generic melee bonuses looked much less urgent because melee damage was not what was finishing the waves.
The limitation is equally important: Shamans still need time.
A board full of ranged damage can look spectacular until an enemy walks through the front and reaches the casters. I still want a Fighter, Troll, healing support or enough control to prevent that from happening.
Shaman is therefore one of the better examples of why I separate a carry package from a complete formation.
The Shamans can provide the damage. Something else must make the battlefield safe enough for them to cast.
Life Steal Gets Better When a Unit Can Keep Connecting
Life Steal is one of the enchantments that can change whether I keep a card.
The Rare Dragon I captured showed 468 Health, 28 Damage, 0.85 Attack Speed, and a Life Steal effect that restored 10 Health on hit.
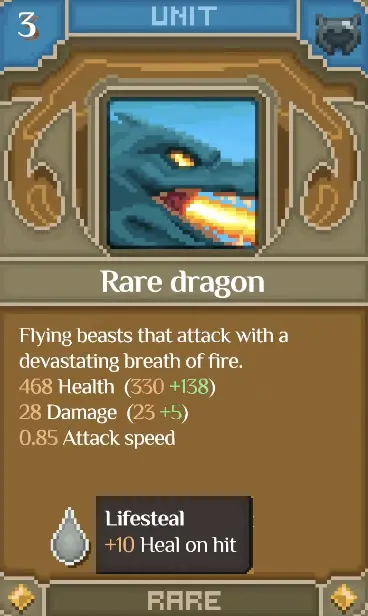
Ten health on one isolated hit does not sound enormous. Repeated attacks change the picture.
The same lesson became even clearer when Life Steal appeared on Units capable of interacting with groups. Frequent or multi-target connections give the sustain more opportunities to matter, so the enchantment can keep an important damage piece alive without relying entirely on external healing.
I still do not pick Life Steal in a vacuum.
A Unit that cannot reach the enemy, dies before attacking, or does not fit the Power budget remains a poor choice even with a strong enchantment.
Life Steal breaks ties for me when the underlying Unit already belongs in the formation.
Amethyst Idol Turns Totem Timing Into a Real Combo
Totems become much more interesting once several triggers start interacting instead of firing independently.
Amethyst Idol gives a strong example. Activating three different Totems within two seconds causes two effects:
- allied Units recover 10% of their maximum HP;
- enemies within 160 units receive Rupture.
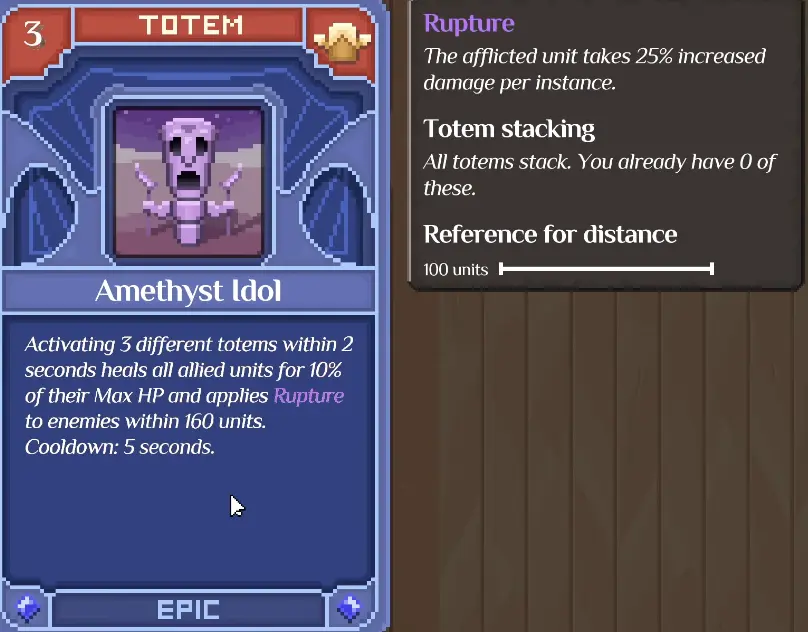
That is more than a defensive emergency button.
Rupture can become the starting condition for other cards. During later runs I found effects that reacted to Ruptured enemies, including healing and Rage interactions. Once that happened, the sequence became more valuable than the tooltip of any one Totem:
Totems activate together → Amethyst Idol applies Rupture and healing → another effect reacts to Rupture → the army survives longer or gains another offensive state.
This is why I do not judge Totems only by whether their individual number is large.
A modest effect that activates the next part of the build can matter more than a stronger standalone bonus.
Iron Snake Is the Totem I Was Willing to Search For Again
Most Portal cards are judged in the context of the current run. Iron Snake was one of the few Totems strong enough that I actively hoped to see it again after already understanding what it could do for a working formation.
That changed how I handled rerolls.
When the army already had enough frontline, healing and damage bodies, another average Unit had relatively little marginal value. A Totem capable of amplifying what was already working could move the run farther.
This does not make Iron Snake an unconditional best-in-slot choice. A strong Totem still needs a compatible formation; drawing the effect without the Units that exploit it leaves part of the build inactive.
What changed was my willingness to pass on a merely acceptable card.
Once I knew a specific Totem could transform the current setup, saving Gold or rerolling for the synergy became a rational build decision rather than rarity gambling.
Dragon Proved That a Later Unlock Is Not Automatically a Better Unit
Dragon is exactly the kind of card that tempts me into ranking Units by unlock order.
It arrives later, looks powerful and can have an enormous health pool. In one Portal sequence, even a Common Dragon showed more health than the Troll offered beside it.
That did not mean it always improved the board.
Early Dragon attempts could feel expensive because the card occupied capacity without solving the fight I was currently losing. The situation changed when I rolled better enchantments, Creature interactions and effects that rewarded what the Dragon was actually doing.
Life Steal made one Rare Dragon much more self-sufficient. Other synergies encouraged me to care about Dragon kills or Creature damage.
Those setups also exposed an important limitation: a trigger that heals when the Dragon gets a kill does almost nothing if another Unit keeps securing the final hit.
I read those conditional effects literally.
If the event is happening often, I build around it.
If the condition rarely occurs in the real battle, the card is not contributing what the tooltip seems to promise.
Troll Is Easier to Use Because Its Job Is Obvious
Troll does not need the same amount of interpretation.
It is a large enchanted frontline Fighter with a very high health pool, and it can hurt nearby enemies when taking damage.
That makes it useful when the formation needs a body capable of sitting in contact while Shamans, Catapults or other ranged Units work behind it.
I like this kind of Unit after a run exposes a straightforward survival problem.
If several damage cards are already performing but the frontline disappears too early, a durable Troll can be a cleaner answer than another offensive roll.
The tradeoff is still Power.
A large health pool is valuable only if the rest of the formation converts the extra time into damage. If my backline is weak, adding a tank can simply make a losing fight last longer.
War Raider Is More About Control Than Raw Damage
War Raider initially looked underwhelming when I focused on the damage number.
Its actual role is more specific: it is a vanguard Unit with area damage that hooks enemies into close combat.
That changes how I evaluate it.
Against an enemy backline or a dangerous artillery target, the hook can potentially solve a positioning problem the rest of the army cannot solve quickly. Against a fight where every important target is already in melee range, that utility loses value.
The low-looking damage therefore does not automatically make War Raider bad, and the later unlock does not automatically make it good.
I want the hook to matter.
When the enemy formation gives me a target worth displacing, War Raider has a reason to take Power. Otherwise, I am comfortable leaving it out while another Unit handles a more important job.
Juggernaut Wants Effects That Reward Its Explosion
Juggernaut behaves differently enough that I do not treat it as another durable Fighter.
It is an explosive Unit that sacrifices itself to break the enemy frontline. Later I also found an interaction where a Juggernaut explosion could upgrade the nearest living Juggernaut within 140 units.
That immediately suggests a different kind of build logic.
If I have only one Juggernaut and no effect that benefits from the sacrifice, I am paying for a Unit designed to disappear.
If multiple Juggernauts or explosion interactions are available, losing the first one can become part of the plan rather than a failure of the frontline.
This is why I keep the Unit outside a simple “best tank” comparison. Its value comes from whether the formation is built to profit from the death trigger.
Rarity Helps a Good Card More Than It Fixes a Bad Fit
Rare and Epic borders still matter.
Higher rarity can improve stats and bring stronger enchantments, and I have absolutely kept cards because the Rare or Epic version finally gave an already useful Unit the numbers it needed.
What rarity does not do is change the job the formation needs.
A Rare Witch Doctor with more health and attack range is excellent when support is already keeping the carry alive. It is much less impressive if the army actually needs another frontline body.
An Epic Assassin can be exciting and still be the wrong draw for the current setup.
A Rare Dragon with Life Steal can be worth reorganizing around because both the Unit and the enchantment now solve useful problems.
That leads to a practical ranking rule:
role first, synergy second, rarity third.
I break that order only when the rarity jump is large enough to transform the card’s effective role.
Rerolling Gets Expensive Enough That I Stop Chasing Names
The Portal makes it very easy to turn a good run into a Gold problem.
I see a card I do not love, reroll. Another mediocre pair appears, reroll again. After several attempts, the search for a theoretical perfect Unit can consume more Gold than upgrading the formation that was already winning.
I stop that cycle once the current board has a functioning core.
A reroll is attractive when both choices fail the formation:
- neither card fills a missing role;
- the Power cost breaks the current lineup;
- the enchantment has no useful trigger;
- or another copy of the same role adds very little.
I keep a card much more readily when it completes something already active. Another War Machine when Obsidian Beacon is carrying the run has a clear use. A Life Steal version of my current damage piece has a clear use. A support Unit when the frontline is dying seconds too soon has a clear use.
Once permanent progression makes rebuilding fast enough, a terrible Portal sequence can eventually become a Dark Rebirth decision rather than an excuse to spend every last piece of Gold rerolling.
My Formation Usually Has Three Layers
The exact Unit names change, but my board tends to settle into three spatial layers.
Front contact belongs to the Units that can survive pressure. Orc Warriors, Trolls and other durable Fighters go where the enemy is likely to meet the army first.
Protected damage sits behind that layer. Shamans, Catapults and other ranged Units need enough distance that they can attack before enemy melee or AoE reaches them.
Support and Totems are positioned around the Units their range or trigger is meant to affect. Witch Doctor needs to help Units that will actually remain inside useful healing space; radius-based Totems need their intended targets inside that radius when the trigger happens.
This sounds basic until enemy mechanics start disturbing it.
Hooks can move Units. Ranged attacks can bypass the front. Area damage punishes a backline packed too tightly together. Aggressive melee Units can run farther forward than the healing setup expects.
When the build suddenly performs worse after adding a strong card, spacing is one of the first things I check.
A better card can create a worse formation.
Bosses Expose Different Weaknesses Than Normal Waves
The build that clears normal waves fastest is not always the build I want for a boss.
AoE-heavy Catapult setups are a good example. Waves give artillery many targets, so each shot can justify the 3-Power investment. A single durable boss removes much of that advantage while still being capable of killing the Catapult.
Reflection has the same issue. Fragile ranged enemies can feed the trigger beautifully, while a lone boss may not create the same pattern of incoming hits and vulnerable secondary targets.
Kill-based effects can snowball through groups and then stop working completely when there is nothing weak enough to die and trigger the chain.
This is why a boss failure does not automatically tell me the whole build is weak.
I inspect which triggers have disappeared.
If the army relied on kills, clusters or repeated ranged hits and the boss no longer supplies those events, I change the package rather than buying another round of generic stats.
For one concentrated fight, I care more about reliable single-target damage, enough independent health pools, sustain and control.
Warpath Rewards a Formation That Can Stay Whole
Warpath asks something different again.
The progression guide covers how Warpath starts and how the continuous waves work. From a build perspective, the important part is that surviving Units remain in combat.
That makes the health of the whole formation more important than a narrow burst setup.
A boss-oriented army can spend everything to scrape through one target and finish with one survivor.
A good Warpath army needs enough healing, protection and consistent damage to arrive at the next wave in usable condition.
Catapult becomes excellent again when incoming groups continue giving its AoE useful targets. Healing becomes more valuable because the same Unit can carry recovered health into another wave. Reflection can keep feeding on repeated enemy attacks. A fragile glass-cannon setup that technically wins each isolated battle may struggle to chain them.
I therefore use Warpath as a build-quality test.
If clean wins keep chaining, I am careful about replacing working pieces just because the Portal offers something rarer.
If Warpath dies almost immediately, I look for the Unit that is draining the formation’s staying power.
Which Units Have Been Strongest in My Runs?
The answer is conditional enough that I would rather give each Unit a reason than assign a permanent tier.
Catapult has been one of my strongest general wave-clear Units when protected properly. Three Power is expensive, but long-range AoE and War Machine synergy can justify it.
Shaman has produced some of my strongest scalable damage setups once chain effects, attack speed and Spellcaster bonuses start stacking.
Witch Doctor has rescued formations that were already close to winning. I value it when another few seconds of survival will let the carry finish the fight.
Troll is one of the cleaner answers to a weak frontline because its large health pool gives the backline more time.
Dragon has high upside but has needed a convincing enchantment or Creature synergy before I felt good about the Power cost.
War Raider is more situational. The hook becomes interesting when enemy positioning is the real problem.
Juggernaut is strongest when sacrifice and explosion interactions are part of the build rather than an accidental death.
Orc Warrior remains useful much longer than the opening suggests. Good permanent investment, Rage interactions and a strong rarity can turn the basic Fighter into a piece worth keeping beside much later unlocks.
This is the closest I currently get to a tier list.
The strongest Unit is usually the one whose role, Power cost and available synergies all match the current wall.
Which Totems Do I Actually Look Forward to Seeing?
Totems follow the same rule, but several effects have stood out enough that I actively recognize them when they appear.
Obsidian Beacon is one of the clearest build-around options for Catapult or other War Machines because its fifth-attack bonus directly multiplies what those Units already do well.
Reflection effects become excellent when a durable Fighter is absorbing repeated hits from fragile enemies inside the radius.
Amethyst Idol offers both survival and status setup, with the three-Totem trigger healing the army for 10% max HP and applying Rupture within 160 units.
Iron Snake became strong enough in working formations that I was willing to prioritize seeing it again over taking another average Unit.
A Totem becomes much less interesting when its category is absent from the board or its trigger rarely fires. When I need to decide whether the Totem itself deserves the Power slot, I check the Totems guide before rerolling the rest of the Warband around it.
The Fastest Way I Diagnose a Bad Build
When a formation stalls, I do not rebuild everything immediately. I watch one full attempt and identify where the failure begins.
If the frontline dies first, I look at health, healing, capacity distribution and positioning.
If the frontline survives but enemies remain alive, the damage package needs help. I strengthen the carry or replace a Unit whose contribution is too low for its Power cost.
If Archers or other backline enemies keep deciding the fight, I want ranged damage, Catapult AoE, chain effects, Reflection or a control option that can reach them.
If a Totem rarely activates, I stop spending around it no matter how good its theoretical effect looks.
If an expensive Rare or Epic Unit dies before contributing, rarity is not enough to save its slot.
If the same coherent formation has already been improved and the run itself has stopped moving, then the problem is no longer primarily a build problem.
That is when I return to the larger progression decision rather than continuing to rearrange a Warband that has already shown me its limit.
I Keep the Build When I Can Explain Why It Wins
My best runs have one thing in common: I can point to the interaction that is doing the work.
Sometimes Fighters are feeding Reflection and punishing enemy Archers.
Sometimes Catapults are reaching an amplified fifth attack through Obsidian Beacon.
Sometimes a Shaman package is chaining damage through enemies before melee Units can reach them.
Sometimes Amethyst Idol is turning several Totems into healing and Rupture at exactly the moment the formation needs both.
Sometimes Life Steal is keeping the active carry alive without forcing another support Unit into the Power budget.
Those are formations I continue upgrading because every Gold purchase has a clear destination.
The warning sign is an army full of individually impressive cards where I cannot explain which interaction is actually moving the fight.
When that happens, I simplify.
I protect the Unit that is producing useful damage, keep enough frontline to buy it time, retain the support or Totems that reinforce that plan, and make everything else justify its Power.
That has been far more reliable than trying to force the same “best” lineup through every Orc Incremental run.