Why My Best Relics Stay in Storage at the Start of a Shop Day
My expensive relics usually wait. Cheap and Perfect sales build the Perkmeter first, then I choose a Shop Perk around the stock that can still benefit from it.
Updated:
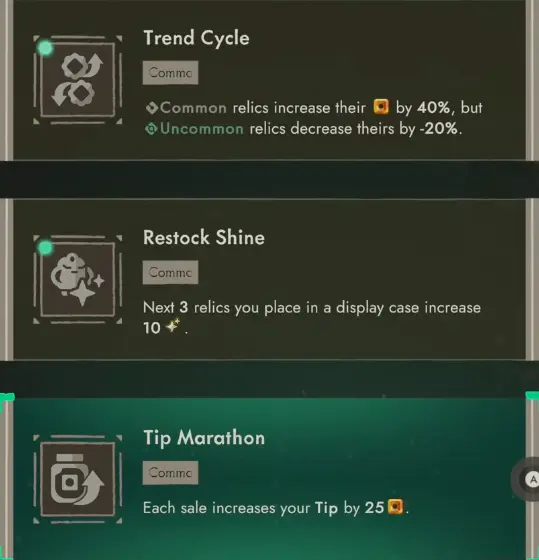
Quick Answer
For a serious shop day, I split the inventory into two groups before opening.
Cheap or already-priced relics go first because clean sales advance the Perkmeter. The expensive Rare, Epic, Legendary, or heavily improved relics wait until I know which Shop Perk is active and whether that bonus can actually improve them.
A 10,000-Gold relic sitting in storage used to bother me.
If I had it, I wanted it on a display immediately.
That stopped after one simple sequence repeated often enough: I sold the valuable stock, filled the Perkmeter afterward, and then received a perk that would have made those earlier sales better.
The relic price had been fine.
The timing was wrong.
Since then, I have treated a shop shift as three different phases rather than one long liquidation.
Before Opening, I Separate Meter Stock From Money Stock
The low-value relics are not useless just because their final sale barely moves my Gold total.
K33P3R’s shop system gives them another purpose: Cheap and Perfect sales advance the Perkmeter.
That makes a cheap Common relic a useful opening item.
If dropping its price slightly gets a qualifying customer reaction, the lost Gold can be tiny compared with the value of activating a perk before my premium inventory comes out.
The limit is important.
I will sacrifice a few Gold on an item whose sale barely matters.
I will not turn a strong relic into bargain-bin stock just to make the meter move.
The opening inventory is therefore usually made from relics where I can afford to prioritize the Perkmeter over squeezing every last coin out of the sale.
Perfect Prices Remove Guesswork From Those Opening Sales
A relic becomes much easier to use for this once I have already found its Perfect price.
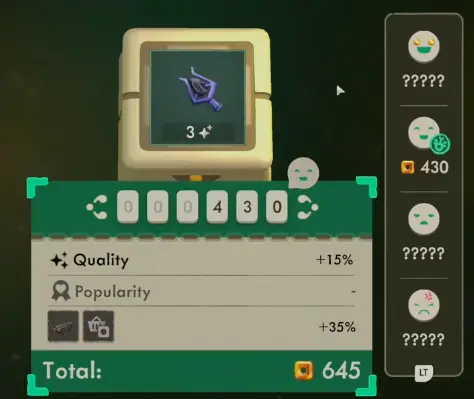
I still use customer reactions while discovering an unfamiliar relic.
A price that is obviously too generous leaves room to move upward.
An unhappy buyer tells me the current number is poor for a clean opening sale even if the customer still accepts it.
An outright refusal means I overshot.
Once the Perfect symbol appears, that uncertainty disappears.
Known prices are particularly useful early in the shift because I can move the Perkmeter without spending several customers testing one Common relic.
There is no need to perfect-price every item in the building, though. If an inexpensive relic already sells cleanly and the next perk is close, a few extra Gold are less important than keeping the shop moving.
The Perk Screen Is Where I Revalue the Entire Chest
Once the meter fills, the shop stops being about what I have already sold.
The important inventory is what remains.
I have seen selections affecting rarity groups, tips, the next few relics placed on display, and bonuses that become stronger as the shift continues.
A large percentage can still be a poor choice.
If an Epic bonus appears after all my Epics are gone, the number has almost no value to that shop day.
A smaller bonus that reaches several Rare relics still sitting in storage can make substantially more Gold.
Limited-use effects need even more attention. If a perk improves only the next few relics placed on display, I want those uses landing on the strongest eligible inventory I have.
Before picking, I scan the chest and answer three questions:
- Where is most of the remaining sale value?
- How many relics can actually receive this effect?
- Does the bonus improve a few upcoming sales or keep paying for the rest of the shift?
One Sale Made the Timing Difference Obvious
Later in a prepared shift, one premium relic sold for 13,345 Gold.

That number was not created by a Shop Perk alone.
Base price, rarity, Relic Quality, furniture and other modifiers can all be contributing to the final amount.
But it shows why sale order matters.
An effect that adds value to a Common relic worth almost nothing has little room to work.
The same effect reaching a five-figure transaction has much more leverage.
High Quality can widen the difference further. When I need to decide which relic has accumulated enough Quality to protect, I compare it using the Relic Quality guide. Back in the shop, the decision is simply whether that relic should be sold now or held until the bonus window is better.
The Best Shop Day Sometimes Starts One Dungeon Earlier
Storage eventually changed another habit.
I stopped opening the shop automatically after every expedition.
One haul might contain excellent premium relics but very little cheap stock. That is an awkward inventory for a Perkmeter-focused shift: the items I most want to sell are also the ones I least want to spend before the first useful perk appears.
When storage allows it, another run can fix the mix.
Now a prepared shop day can begin with several different kinds of stock already available:
cheap relics for the meter,
known-price relics for reliable opening sales,
and expensive pieces waiting for the perk-active half of the shift.
That difference became noticeable when one prepared day passed 100,000 Gold, compared with earlier strong shop days around the 40,000 range.
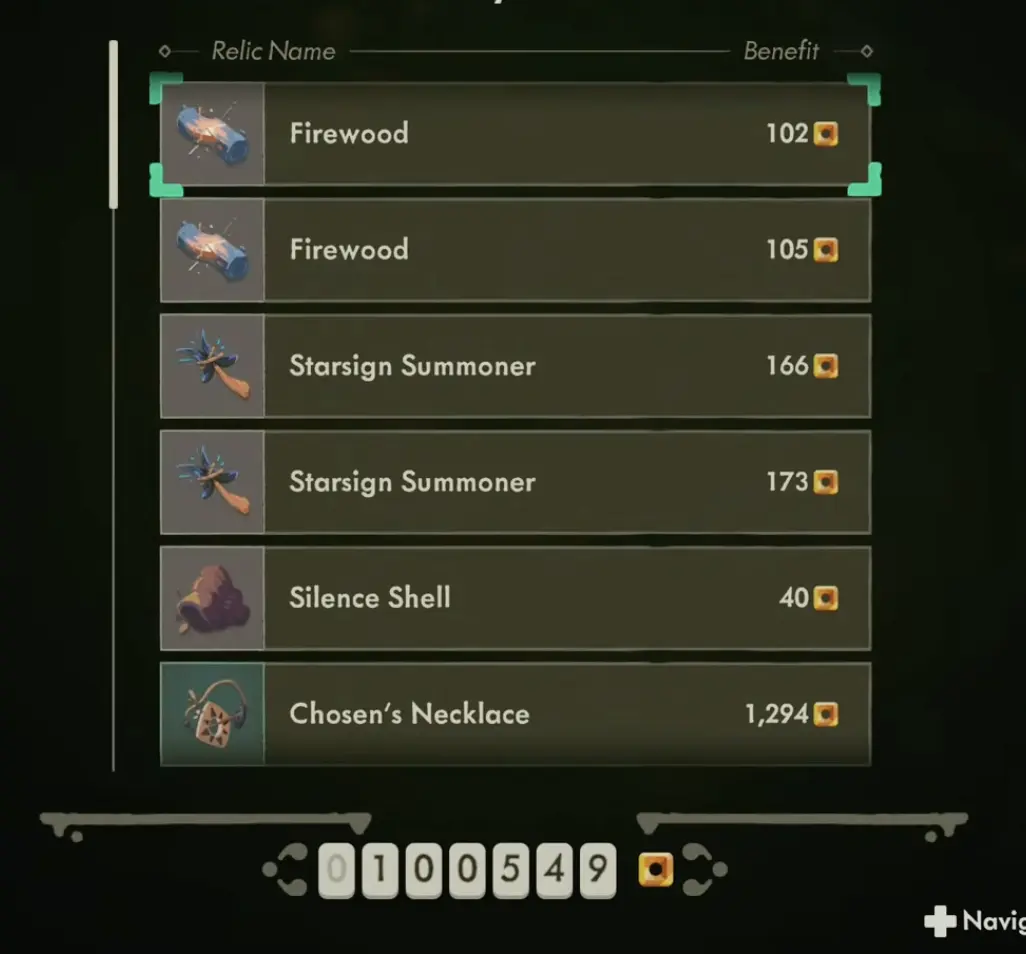
There was no single magic perk behind that result.
The inventory was simply deep enough for the Perkmeter system to matter across the whole shift rather than only the last few sales.
Batching Stops Working the Moment Storage Blocks the Next Run
Holding relics has a cost.
If the chest is packed and the backpack has nowhere comfortable to unload another expedition, waiting for an ideal shop setup starts hurting the main loop.
That is my stopping point.
A couple of premium relics with plenty of free storage can sit.
Several good relics plus enough cheap stock to build the meter are a reason to open.
A full chest that prevents the next expedition is already a reason to sell, even if the perk setup is not perfect.
This also keeps me from solving the wrong problem with Gold. When storage is full because I have delayed selling, another permanent backpack slot will not necessarily fix the bottleneck. Extra capacity makes more sense when valuable relics are being lost inside the dungeon; the difference is clearer in the Backpack Upgrade guide.
Furniture Can Split Premium Stock Into “Today” and “Later”
Perks are not the only reason an expensive relic can stay in storage.
Furniture can favor specific rarities.
I have run a shop setup that improved Uncommon, Rare, and Epic relics while leaving Legendary stock outside that benefit.
That creates an easy split.
The Epics fit today’s shop.
The Legendary can wait if storage is comfortable.
There is no penalty for owning an excellent relic that does not match the current setup. Forcing every premium item through the same shift wastes the advantage created by a rarity-specific bonus.
The same reasoning applies when a Perkmeter choice lands badly.
Sometimes all three options are mediocre for the inventory I saved.
I still sell if I need Gold or space.
What changes is whether the best relic has to be part of that sale.
If waiting creates no problem, a five-figure item can survive one bad perk roll.
A Good Shift Does Not Need Every Relic Sold
The most profitable lesson from the Perkmeter was not a particular perk.
It was separating the shop day into jobs.
The first sales create access to bonuses.
The next group supplies enough value for those bonuses to matter.
The final sales solve whatever the town needs next: Gold, storage space, or both.
That means closing the shop with something valuable still in storage can be perfectly reasonable.
The shift already succeeded if the cheap stock activated useful perks, the right expensive relics received them, and I now have enough room and Gold to continue progressing.
When that Gold starts competing with a major Vault requirement or a six-figure upgrade, I compare those costs in the endgame progression guide.
The shop decision is already finished by then.
The relics were sold in the part of the day where they were worth the most to me.