Minecraft Dungeons II Enchantments: Best Enchants & Upgrades
Learn how reusable Enchantment Books work, how ranks scale, which enchants are worth using, and when to spend Enchantment Points and Echo Shards.
Updated:
Quick Answer
If you have Enchantment Points or Books but still cannot use them, complete Training with the Enchantsmith.
Once enchanting is open, put points into gear you expect to keep and choose effects that match how you actually fight. Enchantment Books are permanent and reusable, so the book itself is not what you need to conserve.
A good Enchantment Book can stay useful for the rest of the game. The weapon carrying it often cannot.
That difference changes how I spend resources. I collect books freely because they remain available after discovery, but I am much more cautious about pushing an enchantment to Rank III while weapons and armor are still being replaced every region.
The useful decision is not simply “Which enchantment has the biggest number?” It is:
Will this effect trigger often on my current gear, does it solve a problem I actually have, and will this item survive long enough to justify the points?
Why Do You Have Enchantment Points but Still Cannot Enchant?
Enchantment Points begin accumulating before the complete enchanting system becomes usable.
The unlock comes from story progression rather than reaching a particular character level. If the points are already visible but the Enchantsmith still cannot work on your gear, finish Training with the Enchantsmith first.
That quest handles the stolen books and the final unlock. Once it is complete, return here for the actual spending decisions.
What Do Enchantment Points and Echo Shards Do?
Every character level gives 1 Enchantment Point.
Those points are what make early investment awkward. Interesting gear arrives faster than a new character can comfortably push every useful enchantment to its highest rank, so spreading points across several temporary weapons leaves less room when a clearly better drop appears.
Echo Shards also feed into the enchanting upgrade loop. Check the Enchantsmith interface before committing them rather than assuming every upgrade has the same requirement.
For the first part of the game, I treat both resources as upgrade capital rather than something that must immediately be spent. A weapon being slightly better than the previous drop is not enough reason by itself to fully enchant it.
Enchantment Books Are Permanent and Reusable
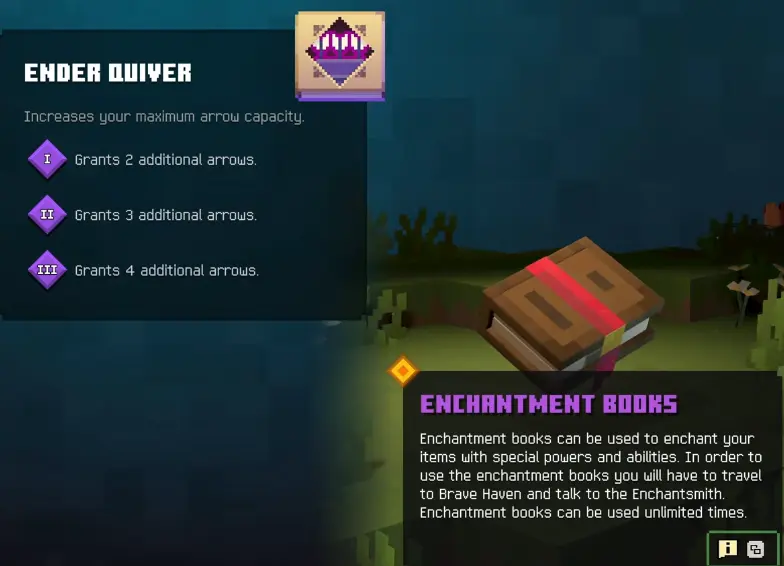
Finding an Enchantment Book permanently adds that effect to the collection.
The book is not consumed when you apply its enchantment to compatible gear, and it can be used again on later equipment.
That makes Books fundamentally different from the resources spent upgrading an item. I do not hold back a strong Book because I am afraid of losing it. I hold back points when the weapon or armor receiving the enchantment is likely to be replaced soon.
Compatibility still matters. Armor, melee weapons, and ranged weapons have different available effects, so a strong Book does not automatically belong on every equipment slot.
Books can appear in Dungeons, while Rifts can also reward Books alongside Echo Shards and other useful loot.
Rank I, II, and III Can Change More Than One Number
Enchantments have three ranks, but they do not all scale in the same way.
Some add more charges. Some increase damage. Others improve both proc chance and damage at the same time.
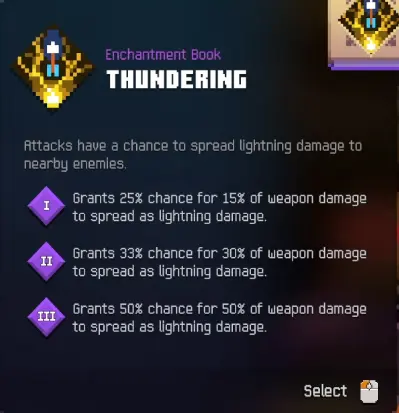
| Enchantment | Rank I | Rank II | Rank III |
|---|---|---|---|
| Bottomless Brew | +1 potion use | +2 potion uses | +3 potion uses |
| Lightning Surge | 60% weapon-damage wave | 75% weapon-damage wave | 90% weapon-damage wave |
| Frost Crescent | 10% weapon-damage wave | 15% weapon-damage wave | 20% weapon-damage wave |
| Thundering | 25% chance / 15% damage | 33% chance / 30% damage | 50% chance / 50% damage |
The table also shows why Rank III cannot be judged from the rank label alone.
Bottomless Brew gains another potion charge each time. Thundering improves two variables at once, while Lightning Surge mainly raises the damage of a trigger that still needs to occur often enough to matter.
A Rank III enchantment can be a major improvement on the right item. It can also be three ranks of resources attached to a weapon that disappears from the loadout twenty minutes later.
Which Armor Enchantments Are Worth Using?
Armor enchantments become much easier to choose when you start with the problem the build has.
Running out of potion charges is different from running out of Souls. Both are different again from surviving the few seconds after a heal or keeping recovery flowing while Artifacts are already part of the rotation.
Bottomless Brew: More Potions for Long Fights
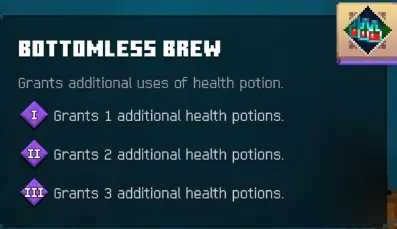
Bottomless Brew increases available health-potion charges.
At Rank III it adds three extra uses, giving you up to four potion charges when the normal potion is included.
That is powerful in long encounters where healing availability is already the failure point. It is much less urgent when normal fights are ending with unused potion charges.
Bottomless Brew also has equipment compatibility restrictions, so it cannot simply be placed on every armor piece.
Ancient Alchemy: Convert Potion Uses Into Souls
Ancient Alchemy adds Soul recovery to potion activation.
At its strong value, one copy can provide 60 Souls per potion use. Compatible copies can stack across separate armor pieces, so two 60-Soul effects can return 120 Souls from one potion.
That amount is larger than the default 100-Soul capacity, which makes the trade-off easy to see: stacking Ancient Alchemy only pays off when the build can actually spend that Soul income or has increased capacity.
I would not stack it simply because 120 looks impressive. If Artifacts are rarely draining the bar, the second copy is solving a resource shortage that does not exist.
Artifact costs, Soul generation, and Talisman choices belong with Artifacts and Talismans once the question becomes how to run the complete resource loop.
Health Synergy: Healing From Buttons You Already Press
Health Synergy can restore 35% of maximum health when an Artifact is activated.
Its value depends on Artifact frequency. A cheap Artifact used throughout normal combat can repeatedly trigger the heal; an Artifact saved for one burst window cannot provide the same recovery rhythm.
This is the sort of enchantment I choose when health is dropping between potion uses and Artifact activation is already part of the build. If I have to change the entire playstyle just to trigger the healing, the slot is doing less work.
Barrier Brew: Defense After the Potion
Barrier Brew creates a well after potion use and grants Fortifying.
The useful part is that the well remains relevant after the initial drink. You can leave its area during the fight and return before it disappears to regain the defensive effect.
That makes it especially useful when the dangerous moment is not the damage that forced the potion, but the attacks arriving immediately afterward.
Bottomless Brew increases how many healing opportunities you have. Barrier Brew makes each potion window safer. They solve related problems, but not the same one.
Spring Lord: Movement Rather Than Raw Survival
Spring Lord grants a speed boost for 6 seconds after Artifact use.
Movement can be valuable when avoiding pressure or repositioning is what keeps ending the fight, but this is a lower priority when the real problem is missing damage, healing, or Soul generation.
I would add movement utility after the core loop is functioning, not before it.
For Melee Enchantments, Trigger Frequency Matters More Than the Biggest Percentage
Several melee enchantments create waves from specific attack events such as jump attacks or the end of a combo. Others use different triggers.
That means a large Rank III number does not guarantee high real damage.
If the weapon naturally triggers a wave again and again, a wave enchantment gets many chances to matter. If the weapon’s strongest attack rhythm rarely reaches the trigger, the same Book contributes far less.
If a weapon’s strongest attack rhythm is unclear, compare its tested attack patterns before spending more points on a wave effect. In normal fights, watch how often the enchantment actually triggers.
Lightning Surge: High Wave Damage When You Can Trigger It Often
Lightning Surge creates a lightning wave on jump attacks and final combo hits.
Its damage rises from 60% → 75% → 90% of weapon damage across the three ranks.
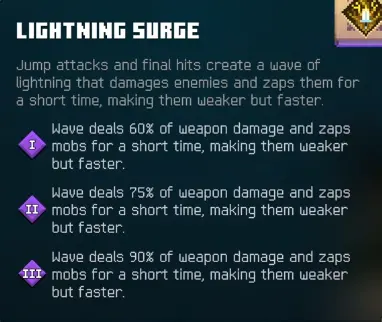
The wave also weakens enemies it hits, while those enemies become faster for a short period.
For a weapon that produces the trigger constantly, Lightning Surge can be one of the strongest offensive choices. On a weapon where the wave only appears occasionally, the 90% number overstates what you will actually get during a fight.
Frost Crescent: Less Damage, More Control
Frost Crescent uses the same broad wave idea but trades damage for control.
Its Rank III wave is 20% weapon damage, far below Lightning Surge, while enemies caught by it are frozen briefly and have their movement and attacks slowed.
That makes the comparison situational rather than numerical.
If enemies already die before they can surround you, extra control adds little. If close-range packs are forcing potion use or interrupting attacks, slowing them may be more useful than another damage-focused effect.
Swirling, Soul Blast, and Shockwave Solve Different Problems
At stronger values:
- Swirling can reach 100% weapon damage as direct wave damage.
- Soul Blast can reach 75% weapon damage and continue with damage over time.
- Shockwave can reach 50% weapon damage while adding knockback.
Those numbers are not a ranking by themselves.
Swirling is the cleanest option when immediate damage is the goal. Soul Blast continues applying pressure after the hit. Shockwave gives up some damage to create space.
If enemies are already kept away, additional knockback may be unnecessary. If being surrounded is what repeatedly breaks the fight, Shockwave’s lower percentage can still be the better answer.
Thundering Is Useful When Wave Triggers Are Awkward
Thundering does not need the same jump or combo-ending wave trigger.
Instead, it uses a chance-based lightning proc. Its three ranks move from 25% chance / 15% weapon damage to 33% / 30%, then 50% / 50%.
That gives it a different niche from Lightning Surge.
A weapon that naturally produces constant waves has a strong reason to use a wave effect. A weapon whose preferred rhythm rarely reaches those triggers can get more reliable value from Thundering.
This is why I would test the weapon before spending the last points rather than deciding entirely from the Book description.
Healing Smite and Shielding Smite Trade Damage for a Safer Run
Not every melee slot needs to increase damage.
Healing Smite can create a regeneration well after an enemy is defeated, while Shielding Smite can create a Fortifying well.
They become much more attractive when normal packs are consuming health before the actual difficult encounter begins.
Arriving at a boss with a full potion and stable health can be worth more than adding another offensive effect to a setup that is already killing regular enemies quickly.
If the build survives comfortably, use the slot for damage instead. If the route to the boss is the reason the boss attempt starts badly, support enchants deserve more attention.
Piercing or Ricochet for a Bow?
Ranged enchantments have the same underlying rule: match the effect to what the bow is actually doing.
Piercing helps when enemies are lining up so one shot can continue through multiple targets.
Ricochet is more useful when enemies are spread across a pack and a projectile can bounce to another target.
Neither is automatically worth heavy investment on a bow that only comes out for occasional backup shots. Arrow supply and how often the weapon is actually fired matter as much as the enchantment itself.
For a ranged-focused setup, upgrade the enchant that keeps contributing through full encounters rather than the one that looks strongest in a single ideal shot.
When Should You Spend the Points for Rank III?
I use three checks before committing the last upgrade:
- The equipment has stopped being replaced every region.
- The enchantment triggers often enough to affect normal fights.
- The upgrade solves a real problem or noticeably improves the build’s main damage loop.
If one of those is missing, I usually wait.
This matters most during the campaign, where a strong new weapon can replace an enchanted item surprisingly quickly. Rank III becomes easier to justify later, once gear churn slows down and the build has a clearer identity.
There is also a completion reason to invest eventually: Maxed Out and Geared Up requires level-3 enchantments across the equipped weapons and armor. Do not exhaust resources on temporary campaign gear; if that achievement is your target, check its exact requirement before committing the final upgrades.
Where Do You Find More Enchantment Books?
After the initial unlock, Dungeons and Rifts are the important repeatable places to keep expanding the Book collection.
Rifts are particularly useful because the same activity can also return Echo Shards and other loot, so the run can improve both the available enchantments and the resources surrounding them.
During the story, I only detour when the current gear actually needs help. Clearing every available Rift the moment it appears can slow progression without solving anything if the existing loadout is already handling the region comfortably.
After the ending, Book hunting, Echo Shards, Rifts, Dungeons, Soul Storms, and gear improvement begin feeding the same progression loop. Prioritize the activity that matches the upgrade you still need in post-story progression.
Collecting every Book eventually completes Mystic Librarian, but there is no need to change normal upgrade decisions for it. If the achievement is still locked later, track the missing Books through the achievement checklist.