Minecraft Dungeons II Best Artifacts & Talismans
Choose the best Artifacts and Talismans for damage, defense, healing, Soul recovery, potion cooldown, fast weapons, and co-op.
Updated:
Quick Answer
For burst damage, pair Fighter’s Flute with Warrior Drums only when your Soul income can support the 90-Soul combined cost. For defense, use Warding Chimes when you have enough cooldown support, or Turtle Master’s Mandolin when you want steadier protection.
For Talismans, Twisted Tooth fits Soul-heavy setups, Fist of Iron strengthens melee, Sigil of Beeswax adds health, and Glowstone Flask helps when potion cooldown is limiting your survival.
Artifacts and Talismans solve different parts of a Minecraft Dungeons II setup. Artifacts are active abilities with a Soul cost and cooldown, while Talismans provide passive bonuses and grow stronger as they level.
That difference becomes important once all three Artifact slots are available. Filling every slot with the highest-damage option can leave a character with no healing, no defense, and an empty Soul bar after the first burst. A stronger setup usually has a job for each slot: damage, defense, healing, control, or resource recovery.
Base Soul capacity is 100, so Artifact costs should be treated as a budget rather than isolated numbers.
Best Artifacts at a Glance
| Artifact | Best use | Important condition |
|---|---|---|
| Fighter’s Flute | Burst damage | Strongest when paired with reliable critical-damage support |
| Warrior Drums | Critical burst | Costs 45 Souls; poor value if crits are infrequent |
| Warding Chimes | Short windows of very strong defense | Needs enough cooldown coverage for the downtime |
| Turtle Master’s Mandolin | Consistent defense and co-op | Lower-risk defensive choice for longer fights |
| Picnic Basket | Early healing | Costs only 15 Souls but loses value later |
| Deathcap Mushroom | Attack and movement speed | Better for weapons that benefit directly from attack speed |
| Power Shaker | Fast, low-base-damage weapons | Explosive hit effect rewards frequent attacks |
Fighter’s Flute and Warrior Drums Are a Burst Pair, Not Two Free Buffs
Fighter’s Flute makes your attacks critical while active. Warrior Drums increases the damage of those critical hits.
Together, they create one of the clearest burst combinations in the game, but the Soul cost is the part that decides whether the setup actually works.
Each costs 45 Souls.
Activating both uses:
45 + 45 = 90 Souls
from a base capacity of 100.
That leaves almost nothing for another Soul-powered Artifact.

For ordinary mobs, spending almost the full bar is usually unnecessary. Save the pair for a boss, elite pack, or another target that will live long enough for the burst window to matter.
If the bar stays empty afterward, the solution is not adding another expensive Artifact. Increase Soul recovery or stop activating both on every encounter.
If Fighter’s Flute + Warrior Drums fits your Soul budget, pair it with a weapon that can exploit the burst window; compare the weapon setups before committing the rest of the loadout.
Warrior Drums Has a 45-Soul Cost and a Short Cooldown
The core effect of Warrior Drums is straightforward: critical hits deal more damage.
A Special Warrior Drums example shows:
- Soul cost: 45
- Cooldown: 5 seconds
That same roll also carries +30% Soul capacity and 15% Artifact cooldown reduction. Those extra modifiers belong to that particular Special item, so they should not be treated as guaranteed stats on every Warrior Drums drop.
This distinction matters when comparing two copies. The Artifact name can be the same while the supporting modifiers change how easily the build can keep using it.
Warrior Drums is much less compelling by itself when the current setup has no reliable way to create critical hits. Pairing it with Fighter’s Flute removes that inconsistency.
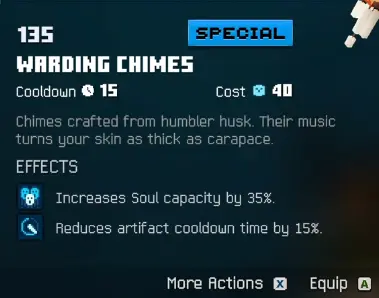
Warding Chimes Is the Strong Defensive Button, but Downtime Matters
Warding Chimes can completely protect you from incoming damage while the defensive effect is active.
That makes it extremely useful for short dangerous windows, but the protection does not solve the moments when the Artifact is unavailable.
A Special Warding Chimes example shows:
- Soul cost: 40
- Cooldown: 15 seconds
Its roll also includes +35% Soul capacity and 15% Artifact cooldown reduction.
A build that survives only while Chimes is active needs a plan for the gap afterward. Artifact cooldown reduction helps, but Soul income also matters because a ready button is useless if the bar cannot pay the activation cost.
Use Chimes when the fight contains a short damage window that must be survived. If pressure is constant for an entire region, steadier defense can be easier to maintain.
Turtle Master’s Mandolin Is the Safer Long-Fight Defense
Turtle Master’s Mandolin grants resistance to you and nearby allies.
Its protection is less absolute than Warding Chimes, but the important advantage is consistency. It fits longer encounters where taking reduced damage repeatedly is more useful than being fully protected for one shorter window.
The co-op value is also higher because nearby allies benefit from the resistance.
Mandolin becomes especially useful when defensive support needs to stay available while another Artifact slot handles damage or control.
If the current setup keeps dying specifically during Warding Chimes downtime, switching to Mandolin is a direct way to trade peak protection for steadier survival.
Picnic Basket Is Excellent Early Healing for 15 Souls
Picnic Basket costs only 15 Souls and drops food for healing.
That low cost is the main reason it works so well during the first part of the game. It can restore a large amount of health without consuming most of the Soul bar, and it does not require a finished enchantment setup to be useful.
Its value drops later.
Once armor, potion effects, Talismans, and other healing tools become stronger, an Artifact slot becomes more valuable than the food itself. A late-game character that already has reliable healing can usually replace Picnic Basket with damage, control, or stronger defense.
So the decision is tied to the failure state:
- potion unavailable and health keeps collapsing → Picnic Basket still solves a real problem;
- healing is already comfortable → free the slot.
Deathcap Mushroom Depends on How the Weapon Attacks
Deathcap Mushroom increases movement speed and attack speed.
That sounds universally useful, but attack speed does not benefit every weapon in the same way.
A weapon whose best output comes from repeated normal attacks gains directly from attacking faster. A weapon built around jump attacks or another timing-specific sequence can get less value because the limiting factor is not simply basic attack speed.
Before committing an Artifact slot, watch what is actually slowing the damage loop.
If the weapon spends most of the fight holding normal attack, Deathcap Mushroom makes sense. If damage comes from jumps, waves, or another fixed cadence, a direct damage or defensive Artifact may produce more value.
Power Shaker Rewards Fast Weapons
Power Shaker gives a temporary effect that makes attacks create explosions with consistent added damage.
Because the added explosion is not simply a percentage of the weapon’s base hit, the Artifact becomes more attractive on weapons that attack frequently but have lower individual hit damage.
That gives it a different role from Fighter’s Flute.
Fighter’s Flute improves a burst window around critical hits. Power Shaker rewards a weapon that can produce many hits while the effect remains active.
If the weapon is slow and each hit is already large, fewer explosions occur during the same time window.
Best Talismans at a Glance
| Talisman | Best use | Useful observed value |
|---|---|---|
| Twisted Tooth | Soul-heavy Artifact setups | +40% Souls gained at Level 1; higher levels increase further |
| Fist of Iron | Melee damage | Seen at +10% early and +35% at a higher tier |
| Sigil of Beeswax | Maximum health | +35% max health at Tier III |
| Glowstone Flask | Potion-driven survival | Up to 25% potion cooldown reduction in the high-tier example |
| Skulk Badge | Longer positive-status uptime | +50% positive-status duration at Tier II |
| Soul Chip | Larger Soul reserve | Useful when capacity, not refill speed, is the real limitation |
Talisman percentages should always be read together with their level. The same Talisman can show a very different value later in progression because its passive effect improves as the item levels.
Twisted Tooth Is for Builds That Spend Souls Repeatedly
Twisted Tooth increases Souls gained.
Its progression demonstrates why Talismans should not be described with one permanent percentage. A Level 1 copy shows +40% Souls gained. A later copy shows +80%, while a higher-tier example reaches +140%.

This is the better Soul Talisman when the build repeatedly spends and refills the resource.
For example, Fighter’s Flute plus Warrior Drums consumes 90 Souls in one activation cycle. A larger maximum bar helps the first burst, but stronger Soul gain helps rebuild the resource for the next one.
That is the distinction between Soul capacity and Soul income.
If the build only needs one large opening burst and rarely spends Souls afterward, capacity can still be useful. For repeated Artifact use, refill rate becomes much more important.
Fist of Iron Scales With Talisman Level
Fist of Iron increases melee damage.
An earlier version can show +10% melee damage, while a higher-tier example reaches +35%.
That makes it a simple choice when melee damage is the main output and the build does not need the Talisman slot to repair a bigger problem.
It becomes less valuable when:
- Souls are constantly empty;
- survivability is failing;
- potion cooldown is causing deaths;
- most damage comes from Artifacts or another non-melee source.
Do not replace a necessary resource Talisman just to add melee damage to a setup that cannot stay functional.
Sigil of Beeswax Is the Straight Health Choice
At Tier III, Sigil of Beeswax provides 35% more maximum health.

The extra health is most useful when damage is arriving too quickly for healing to react.
If an attack kills the character before a potion can be used, reducing potion cooldown does not solve that specific failure. A larger health pool can.
Once those dangerous attacks are being avoided consistently, the slot can be moved back toward damage or resource generation.
Glowstone Flask Helps When the Potion Button Is Doing Too Much Work
Glowstone Flask reduces potion cooldown, reaching 25% in the stronger example.
That becomes valuable when survival depends on getting the potion back faster.
Potion-centered setups can eventually connect healing, Soul recovery, and defensive effects to the same action. When several parts of combat are waiting on that cooldown, shortening it has more value than when the potion is only used occasionally.
If potion use is also driving Ancient Alchemy, Barrier Brew, or another effect, compare the relevant enchantment triggers before building around the potion loop.
If the potion is regularly ready before it is needed, Glowstone Flask is solving a problem that does not exist.
Skulk Badge Extends Strong Temporary Effects
At Tier II, Skulk Badge increases positive-status duration by 50%.
This is useful when the character already relies on temporary buffs and the main limitation is how quickly those effects expire.
It can support Artifact-driven damage or defensive windows without increasing their activation cost.
Before equipping it, check the rest of the gear. Armor can also provide positive-status duration, so another Talisman may add more value if that stat is already heavily covered.
Skulk Badge is strongest when extending an important status changes how long the build remains effective, not simply because a longer buff sounds useful.
Soul Chip Is About Capacity, Not Recovery
Soul Chip increases maximum Soul capacity.
That serves a different purpose from Twisted Tooth.
Choose capacity when a larger stored reserve is the requirement—for example, entering a major fight with enough Souls to pay for several expensive activations.
Choose Soul gain when the problem appears after that first burst and the bar cannot refill quickly enough.
A character that begins every boss with a full bar but runs dry halfway through is usually dealing with income, not capacity.
Which Artifact Should You Replace First?
Three Artifact slots do not mean three damage buttons.
Replace the slot that contributes least to the current fight.
You die during one short boss attack:
Use Warding Chimes.
Damage arrives steadily throughout a long encounter:
Use Turtle Master’s Mandolin.
Healing is weak in the early game:
Use Picnic Basket.
A fast weapon needs more hit-based damage:
Try Power Shaker.
A normal-attack weapon feels too slow:
Try Deathcap Mushroom.
A boss needs to die during a short burst window:
Use Fighter’s Flute with Warrior Drums if the Soul economy can support the pair.
Once the Artifact and Talisman choices are settled, combine them with the weapon and enchantment setup that supports the same damage or survival goal.
Which Talisman Should You Equip?
Choose the Talisman from the resource or stat that is actually failing.
Souls run out after every Artifact cycle:
Twisted Tooth.
Melee is already safe but damage is too low:
Fist of Iron.
Large hits kill you before healing can react:
Sigil of Beeswax.
Potion is always on cooldown when needed:
Glowstone Flask.
Strong temporary buffs expire too quickly:
Skulk Badge.
The opening Soul reserve is too small for the planned activations:
Soul Chip.
Because Talismans improve as they level, compare their current values before replacing one purely from a percentage seen on another character. A Level 1 Twisted Tooth and a high-level Twisted Tooth are not equivalent pieces.