Grounded 2 Bubble Diffuser & Underwater Base Guide
Unlock the Bubble Diffuser, bring the exact recipe, solve underwater placement problems, and turn one reliable air point into a useful Pond outpost.
Updated:
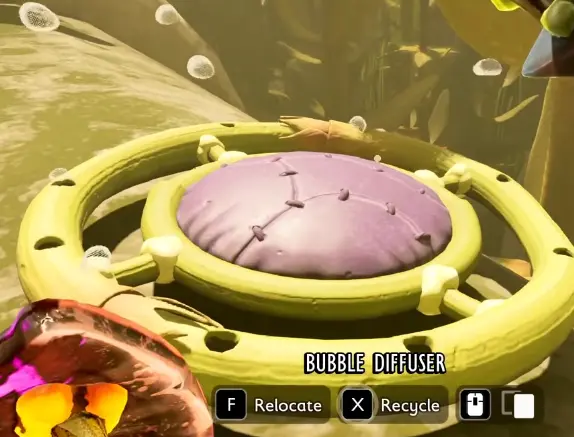
Quick Answer
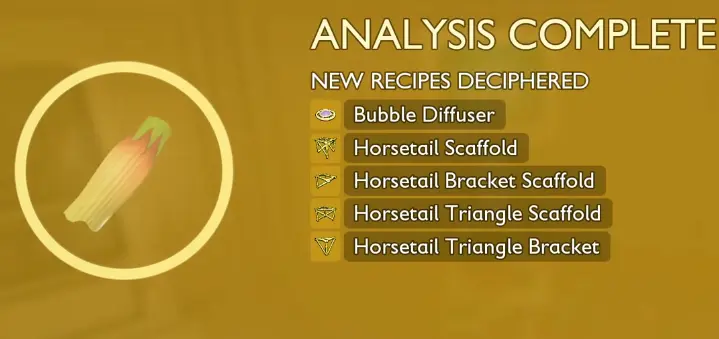
The Bubble Diffuser unlocks after I analyze Horsetail Stem.
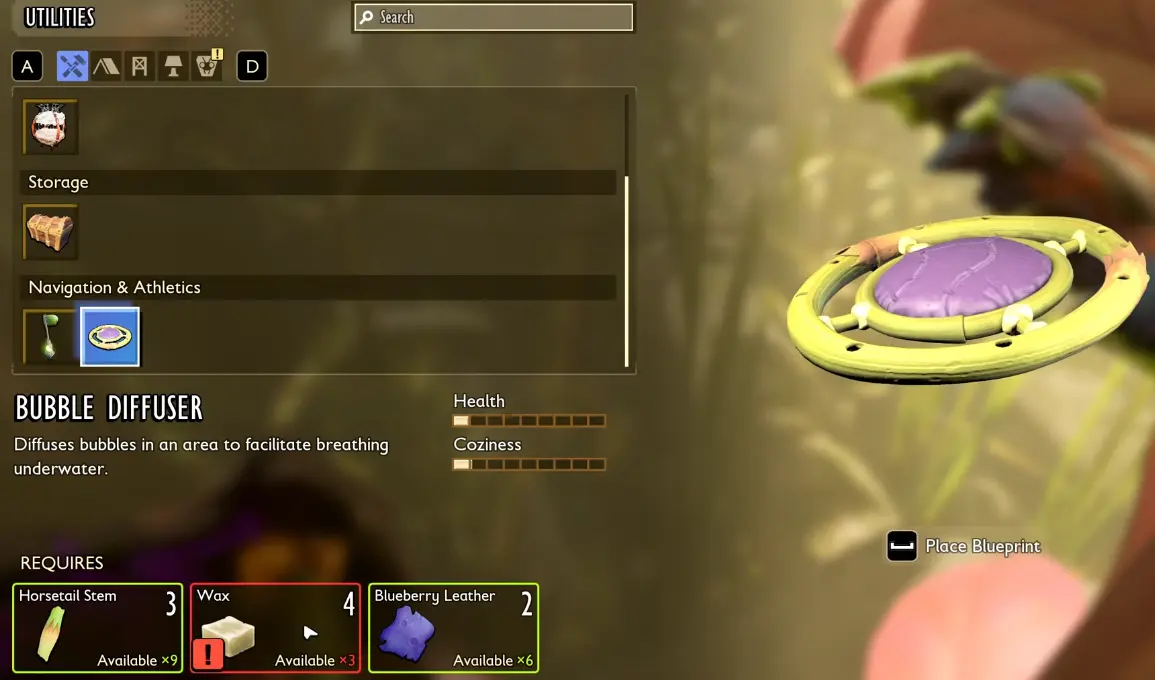
Its recipe is:
- 3 Horsetail Stem
- 4 Wax
- 2 Blueberry Leather
I build it from the underwater construction menu. If I have already analyzed Horsetail but cannot find the Bubble Diffuser while standing on land, I get fully submerged and check Construction again.
Once it is placed, the Diffuser creates a local breathable area. I use that oxygen zone as the center of my first underwater outpost, preferably near a deep route I expect to swim more than once rather than beside the surface where air is already easy to reach.
The Bubble Diffuser changed the way I approached underwater building more than any wall or decorative piece did.
Before I had one working in the Pond, every attempt to build at depth was competing with the oxygen bar. I could have all the right materials, find a good patch of terrain, and still lose the attempt because I spent too long rotating a blueprint or dealing with an enemy.
Once I established a dependable air point, the job became much simpler. I could stop treating the first underwater structure as a full base and instead build around the one utility that solved the immediate problem: a safe place to breathe while I worked.
Bubble Diffuser Recipe and Unlock
The progression requirement is Horsetail Stem.
I analyze one at a Resource Analyzer, which unlocks the Bubble Diffuser along with other Horsetail-based building pieces. Simply harvesting Horsetail is not enough; the analysis step is what moves the Diffuser into my building progression.
The Bubble Diffuser recipe requires:
- 3 Horsetail Stem
- 4 Wax
- 2 Blueberry Leather
It is a utility structure placed through the building system underwater rather than something I craft at a normal workbench.
If Horsetail itself is still the problem, I use the Horsetail Stem route for where I gather it and which cutting tool I need. I keep the full farming route there; once I already have a stem, the only important step here is getting one analyzed.
Why the Bubble Diffuser Can Look Missing
The confusing part comes after the unlock.
Underwater construction does not behave exactly like building at my surface base. I can analyze Horsetail correctly, return home, open Construction on dry land, and still think the new structure is missing.
That does not necessarily mean the unlock failed.
When that happens, I enter the water and open the build menu while submerged. The underwater options become relevant there, including the Bubble Diffuser.
So I separate two different problems:
I have never analyzed Horsetail means I still have an unlock problem.
I analyzed Horsetail but cannot see the underwater structure while standing on land means I check the construction menu again after getting into the water.
That distinction saves a surprising amount of wasted travel.
I Bring the Full Recipe Before Swimming to the Build Site
The underwater menu creates another inconvenience: it is easy to reach the place where I want to build, open the blueprint, and only then discover that I left one ingredient at my main base.
I did exactly that on one of my early attempts. I had six Blueberry Leather with me, reached the Pond, and still had to abandon the build because I was short on Wax.
Since then I prepare from the actual recipe:
3 Horsetail Stem + 4 Wax + 2 Blueberry Leather
and I usually carry a little extra Wax if I am planning more than one underwater construction.
That is especially useful when the Diffuser is only the first object I intend to place. A technically complete recipe does not help much if I immediately have to swim home for the materials needed around it.
Where I Put My First Bubble Diffuser
A valid placement is not automatically a useful placement.
If I build a Bubble Diffuser just beneath the surface, it works, but I have solved a problem that swimming upward could already solve in a few seconds. The air point becomes much more valuable when it sits closer to the part of the Pond where my oxygen usually starts changing my decisions.
I look for a site near something I expect to revisit:
- a deeper resource route;
- a group of underwater structures;
- a fixed landmark I can find again;
- a construction area where I will spend time stationary;
- or the beginning of a deeper route where turning back to the surface becomes expensive.
On my first serious setup, I worked around the pipes and pushed the Diffuser toward the deeper route rather than leaving it near shore. That gave me a recognizable retreat point and reduced the amount of each dive spent simply travelling between the surface and the place where the useful work began.
The best first position is not necessarily the deepest position, either. I still have to reach the site, place the blueprint, correct a bad angle, and finish construction before the air station exists.
I want enough oxygen margin for something to go wrong.
Bubble Diffuser Placement Errors
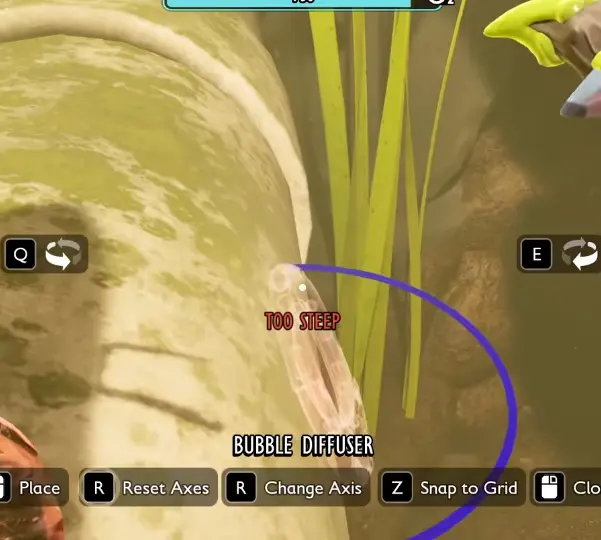
The blueprint can be unlocked, visible, and fully funded while the game still refuses the location.
The rejection messages I encountered were:
Unsupported
Too Steep
Location Obstructed
Once I can see the blueprint, I stop treating those messages as progression problems. They are telling me to solve the terrain.
I normally try a small correction first.
A slight sideways movement can clear an obstruction. Rotating the blueprint can change which part of the structure collides with the terrain. If the bottom is too steep or lacks support, I move to a flatter patch nearby instead of swimming halfway across the Pond immediately.
This is also one of the situations where nearby enemies become disproportionately annoying. Placement already requires me to watch oxygen, terrain, blueprint orientation, and the construction interface. If a Toe Biter or another Pond creature keeps interrupting that process, I clear the immediate area before trying to fine-tune the structure.
I am not trying to make the entire Pond safe. I only need enough quiet to finish the build.
How I Know the Bubble Diffuser Is Working
I do not judge the finished build by whether the model looks active.
I step into its effective area and watch what happens to my oxygen.
When I am properly inside the Bubble Diffuser’s breathable zone, the oxygen countdown stops controlling the dive. I can remain around the site and work without immediately planning another trip to the surface.
That is the moment I consider the location established.
Before then, building a wall or arranging storage means spending oxygen on a task that does not help me breathe.
Afterward, I can take my time.
I Build the Underwater Base Around the Air Point
My first underwater base is deliberately small.
I already have a surface base with production and storage. Recreating the whole thing underwater before I know whether I will revisit the location would turn one useful utility into a large material commitment.
So the order I use is straightforward:
establish breathable air first, then add only the structures that reduce friction on future dives.
Mushroom Walls can work underwater, which means I do not need to wait until I have every specialized Marine piece before creating a practical enclosure.
A minimal outpost can be enough:
- Bubble Diffuser;
- stable building space;
- a simple enclosure where useful;
- storage once I am repeatedly carrying materials through the area;
- additional utilities only when the location proves that I need them.
That approach also makes failed base locations cheap. If I stop returning after one objective, I have not spent a large stockpile turning an unnecessary stop into a second headquarters.
Bubble Diffuser vs Diving Gear
The Bubble Diffuser gives me stationary safety.
Diving equipment gives me mobility.
That distinction matters as soon as I start leaving the base.
The Diffuser can make one work area comfortable, but its breathable zone does not follow me across the Pond. If I swim far enough away, oxygen management immediately becomes part of the run again.
That is why I do not treat an underwater base as a replacement for the Diving Suit.
For a build site, resource loop, or repeated landmark, the Diffuser is excellent. For reaching the deeper equipment-gated parts of the Pond, I still want the gear that lets me travel there safely.
The two solve different halves of the same problem.
A Deeper Air Point Usually Saves Me More Time
I learned this after having a working Diffuser and still drowning on a later resource run.
The structure itself was fine. The problem was that I had left my dependable air source too far behind.
By the time I noticed how low my oxygen had become, surfacing was no longer a realistic recovery plan. I already owned a safe oxygen point; I simply had not placed that point close enough to the route that was actually causing trouble.
Since then, I bias the Diffuser toward the deepest repeat work I can support safely.
There is a balance.
Too shallow, and the station saves very little time.
Too deep, and constructing the first one becomes a dangerous oxygen race before I have the benefit I am trying to create.
I want enough room to reach the spot, deal with a creature if necessary, test a few placements, finish construction, and still recover from a failed attempt.
Once that first station is established, it can support another stage of exploration farther down.
I Use Fixed Landmarks to Find the Diffuser Again
A Bubble Diffuser is only useful as a retreat point if I can actually return to it.
Underwater navigation becomes unreliable quickly when I depend on vague directions such as “behind me” or “toward the shore.” Darkness, vertical movement, combat, and detours can all ruin that mental map.
I prefer to associate the Diffuser with something fixed.
The pipes work well for this because they remain easy to recognize from different angles. When I leave the breathable zone for a deeper run, I remember where the air point sits relative to those structures.
The same logic carries into my Into the Abyss route: recognizable structures are more dependable than trying to preserve a direction in open water.
A well-placed Diffuser therefore does two jobs for me. It provides oxygen, and it becomes part of the return route.
When an Underwater Base Is Actually Worth Building
I do not automatically build a permanent underwater base just because the game allows it.
For one short objective, the material cost and setup time may save nothing. I can complete the dive, return to the surface, and move on.
The calculation changes when the same section of the Pond keeps pulling me back.
I am much more willing to establish an outpost when I expect repeated trips for things such as:
- Sunken Bone;
- Pond Moss;
- Koi materials;
- underwater construction;
- repeated exploration;
- or deeper Into the Abyss runs.
At that point the value compounds. Every later visit starts from a known air station instead of from the surface, and I can add storage or more building space only when those additions remove another repeated inconvenience.
I let the route prove that it deserves expansion before I spend heavily on it.
If the Bubble Diffuser Still Is Not Working
When the setup fails, the symptom usually tells me where to look.
I cannot unlock the Bubble Diffuser
I make sure I have analyzed Horsetail Stem at a Resource Analyzer.
Collecting additional stems will not replace that step.
I unlocked it but cannot find it in Construction
I enter the water and check the construction options while submerged.
I do not assume that a structure missing from my normal land-building view means the recipe is still locked.
I can see the blueprint but cannot place it
I read the placement message.
Unsupported, Too Steep, and Location Obstructed point me toward the surface, angle, or nearby collision rather than toward the unlock requirement.
I reached the site without enough materials
I return with the complete recipe:
3 Horsetail Stem
4 Wax
2 Blueberry Leather
For a remote build, I would rather carry a little extra Wax than repeat the entire swim because of one missing piece.
The Diffuser is built but I keep drowning
I check the route rather than the structure.
If the breathable zone works while I stand beside it, the Bubble Diffuser is doing its job. The problem is usually that I am travelling too far from it, staying away too long, or using an air station that was placed for a different part of the Pond.
The underwater base is becoming too expensive
I stop expanding it.
A Bubble Diffuser with a small functional outpost can already solve the main problem. Storage, sleeping space, additional walls, and more specialized pieces only earn their cost when I keep returning to the location.
For me, that is what makes the Bubble Diffuser useful in the first place. It is not the final piece of an elaborate underwater base. It is the structure that lets me establish one safe working point, then decide from actual play whether anything larger deserves to grow around it.