The Point Where I Finally Feel Safe Going Down to Floor 2
I go down once Floor 1 feels controlled, the active party is ready, and I have a real exit plan for the first bad room I cannot predict.
Updated:
Quick Answer
On Hard, I make my first serious Floor 2 push after the active four are around Level 2, ordinary Floor 1 fights feel controlled, and a Return Scroll is ready.
Before leaving, I fix obviously weak armor, rest the party, clear food and ammo problems, and move the better ammunition onto the characters who will actually use it.
If Floor 1 still needs to go perfectly for the party to survive, I spend another run preparing instead of descending.
The first time Floor 2 appeared, I could click it.
That was about the only reason I had for going there.
My frontline was still taking ugly hits on Floor 1, the party had unfinished upgrades, and one bad encounter could turn into a near-death rescue.
So I left.
That decision became my basic rule for deeper progression in Dungeon Settlers:
access is not readiness.
I want enough margin that Floor 2 is allowed to surprise me once without ending the expedition.
The Game Gives a Real Warning About Floor 2
Dungeon Settlers does not hide the danger.
The expedition instructions explicitly warn that the second floor is extremely difficult and strongly recommend following the main objectives first.
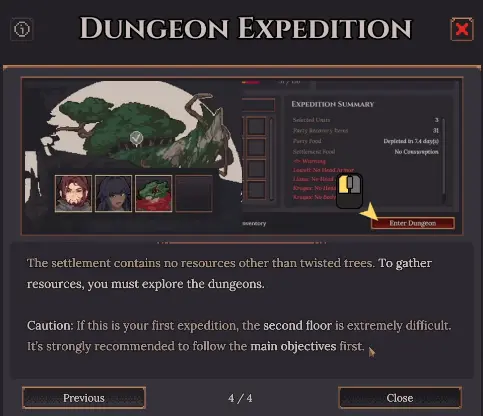
That warning matches what I see in practice.
When ordinary Floor 1 enemies can still push a core member into near-death, going downstairs adds uncertainty without fixing the weakness that already exists.
Floor 1 still gives me useful ways to improve:
Mana Stones for character progression,
Research Books,
equipment and chest loot,
construction resources,
and enough combat to finish the next round of levels.
I stay there until those runs feel repeatable rather than fragile.
My Hard-Difficulty Benchmark Is a Full Level 2 Party
For my first deliberate Floor 2 attempt on Hard, I want the four active expedition members around Level 2.
That is a practical threshold, not a hidden game requirement.
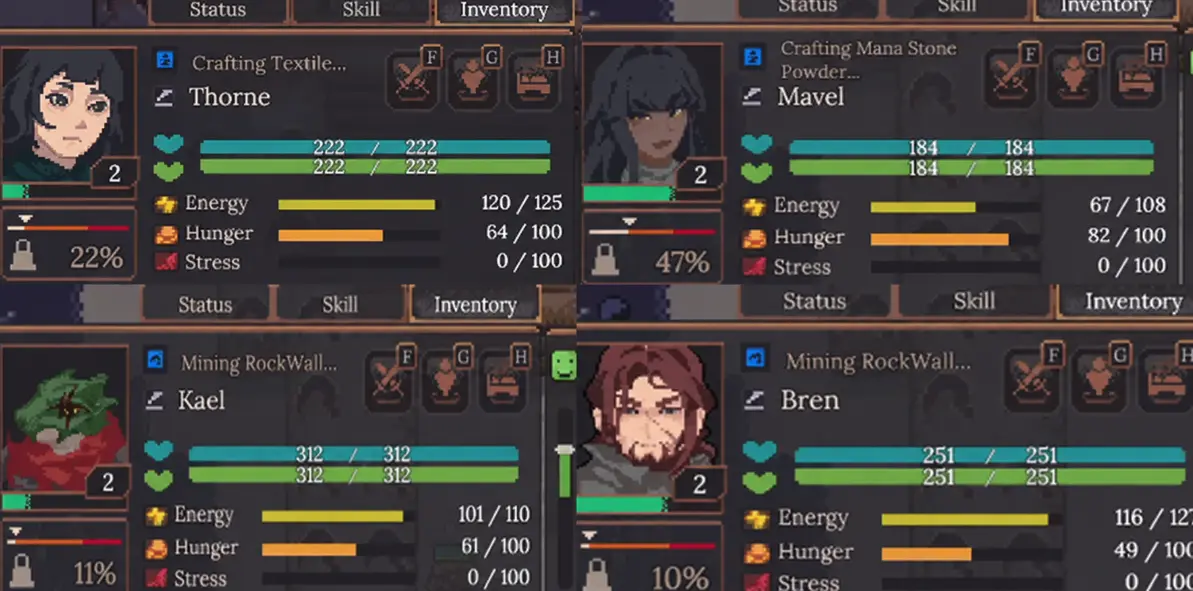
I have reached the end of Floor 1 with the option to descend and still gone home because the party was not there yet.
A useful rule of thumb from my Hard runs is roughly:
Level 2 for Floor 2.
Later floors may continue pushing that relationship upward, but I treat it as a starting point rather than a formula. Party quality, equipment, difficulty and the actual builds can move the line.
What matters is what the level does for the current four.
More stats help.
New skills help.
A tank becomes harder to break.
Damage dealers shorten dangerous fights.
If one of my main characters is still Level 1 with a full EXP bar, that is an obvious surface problem to solve before I descend. I handle the Goddess Statue and prayer process through the level-up route.
The Return Scroll Is My Exit Plan
Levels make Floor 2 fights less dangerous.
The Return Scroll makes being lost on Floor 2 less dangerous.
That distinction is why I value it so highly.
A new procedural floor gives me two unknowns at once:
how hard the next room will be,
and where the safe route out is.
On Floor 1, finding the portal early gives me a known retreat point. On a fresh Floor 2 run, I may hit trouble before I have mapped anything useful.
The scroll gives me another way home.
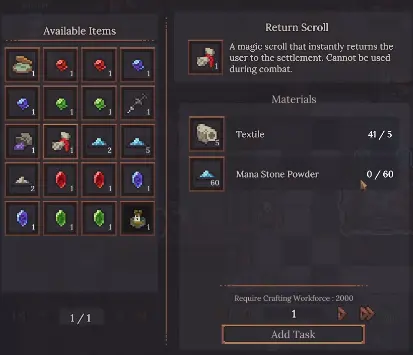
The exact recipe shown in my current build is:
- 5 Textile
- 60 Mana Stone Powder
- 2,000 Crafting Workforce
There is one limitation that matters more than the material cost:
the Return Scroll cannot be used during combat.
That changes how I use it.
I do not keep pushing until three people are down and expect the scroll to erase the mistake.
Its value is being able to say:
that fight cost too much; we are done here
and leave before opening the next door.
Mana Stones in Storage Are Not the Same as a Finished Scroll
The first time I seriously prepared this recipe, textiles were not the problem.
Mana Stone Powder was.
I had 21 Mana Stones available in the broader resource chain, while the Return Scroll recipe itself was still asking for 60 Mana Stone Powder.
The scroll was not ready, so neither was my Floor 2 plan.
That distinction helped me stop looking at raw stock counts as though they were finished components.
The actual path is closer to:
Mana Stones → Mana Stone Powder → Return Scroll
and each production step needs to exist before the item in my inventory becomes an exit plan.
The same Alchemist Workstation is useful for more than the scroll.
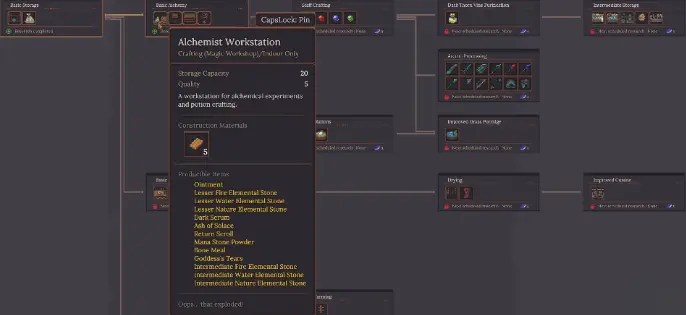
I can use the workstation for things such as:
- Ointment
- Mana Stone Powder
- Elemental Stones
- Ash of Solace
- Return Scrolls
That makes the setup worthwhile even when another resource shortage delays the actual descent.
I Have Dismantled a Building to Finish the Safer Setup
One preparation cycle left me short on useful construction material while the alchemy setup mattered more than one existing structure.
The Repair Stand was the thing I could afford to lose temporarily.
Dismantling it returned:
8 Logs
and
6 Stone.
Those materials matched what had gone into the building, so moving the investment into a more urgent system did not feel like throwing resources away.
I use demolition this way only when there is a clear exchange.
The old building is not solving the current bottleneck.
The recovered material immediately unlocks something important.
The new system changes the next expedition more than the old structure does.
For that run, a safer Floor 2 exit was worth more than keeping the Repair Stand exactly where it was.
Once the settlement has more material, I can rebuild convenience.
A dead expedition is harder to rebuild around.
Gear Preparation Starts With the Weakest Character
I do not wait until all four characters are wearing identical high-end armor.
That standard would keep me on Floor 1 much longer than necessary.
Instead, I inspect the weak links.
In one preparation cycle, Scorp and JD already had wooden protection while the other two active members were still relying on weaker original textile equipment.
The next upgrade was:
two new pieces of head protection and two sets of Thick Textile Armor for the characters who were behind.
That was enough to make the party more even without consuming the wood required to put wooden armor on everybody.
The material tradeoff matters.
Grass is already one of the resources I gather aggressively, so textile gear is easier for me to support.
Wood has too many other jobs:
rooms,
beds,
weapons,
workstations,
housing upgrades,
and settlement expansion.
A backline character does not automatically deserve the same wood budget as the unit standing in front of three slimes.
I spend protection where taking another hit is most likely to decide the expedition.
Premium Arrows Start Making Sense Downstairs
The same logic applies to ammunition.
I have kept Bloodwood arrows out of routine Floor 1 combat because the extra damage was unnecessary there.
Ordinary ammunition was already doing the job.
Floor 2 gives the expensive arrows a reason to leave storage.
The enemies are less familiar.
Fights can last longer.
Taking one dangerous target off the board quickly is worth more than shaving a little time from an easy Floor 1 room.
There is also a practical equipment detail: I do not assume I can freely sort out the preferred ammunition once combat is already underway.
I set the ranged character up before the descent.
Premium ammunition is a limited resource.
The first unknown floor is exactly the kind of place I saved it for.
Supplies Need to Survive Floor 1, Not Just Reach It
The Return Scroll does not replace the normal expedition checklist.
It raises the standard.
I still want:
- everyone rested;
- no unresolved near-death problem on a core member;
- enough food for the planned trip;
- enough normal ammunition;
- recovery items distributed across the party.
The important difference is where I measure the reserve.
For a Floor 1 resource run, the supplies only need to support that floor and the return.
For a Floor 2 expedition, Floor 1 is the approach route.
If I reach the stairs with half my arrows gone, food already running thin and two characters exhausted, the preparation failed before the real objective even started.
The first-floor portion should feel cheap.
If it does not, I go home.
Floor 1 Becomes Transit Once the Goal Is Below It
This is one of the biggest changes in how I play after deciding to descend.
When Floor 1 is the objective, I explore.
When Floor 2 is the objective, I move through Floor 1 efficiently.
I still take something valuable if it is directly on the route.
I still deal with enemies that block progress.
What disappears is the urge to sweep every side room simply because something might be inside.
Long dungeon stays have their own cost, so burning time and Energy above the floor I actually want to explore makes the lower-floor attempt weaker before it starts.
The full Dungeon Stay and depletion decisions fit better into my early progression route. For a Floor 2 attempt, the practical conclusion is enough:
I want as much of the party’s Energy, Mood and supplies intact as possible when the descent begins.
Finding the Exit Early Changes the Whole Run
A portal is more than the end of an expedition.
It is information.
Once I know where the safe return point is on the current floor, I can judge risk much more accurately.
That becomes even more important on a new lower floor.
My first priorities are not “clear every room” or “find the biggest chest.”
I want to know:
where I can retreat,
what an ordinary enemy group costs,
how quickly Energy is disappearing,
whether the frontline is actually holding,
and whether the party can absorb one bad pull.
If the first few rooms already consume most of the healing I brought, I have learned what I needed to learn.
The correct response can be leaving.
A wipe is not required to confirm that the floor is ahead of the current build.
Better Resources Are the Reason I Eventually Stop Farming Floor 1
There is a point where staying upstairs becomes its own form of wasted time.
Floor 1 supports the opening extremely well, but it does not solve every later material requirement.
Deeper progression starts mattering when the settlement wants resources that the upper floor is not providing reliably enough.
That gives Floor 2 a purpose.
I am not descending because the button has been available for a while.
I am descending because the party can now afford the risk and the settlement has something to gain from taking it.
That is the readiness combination I want:
need + capability + exit plan.
Remove one of those and another preparation run usually has better expected value.
My First Floor 2 Trip Is Reconnaissance
The procedural layout changes what I consider a successful first attempt.
I am not trying to memorize a perfect route.
I cannot depend on one fixed room sequence anyway.
The first trip is about measuring the floor.
How much Energy does a normal fight cost?
Which enemies force active skills?
Can the tank keep the group stable?
How much healing disappears in a bad room?
Can I explore without using the Return Scroll immediately?
What new resources are actually appearing?
A modest haul plus a safe return is a successful first descent.
It gives me information that improves the second one.
Trying to force a full clear before I understand the floor is exactly the kind of ambition that turns a useful scouting run into a recovery disaster.
What Makes Me Postpone the Descent
I run one more Floor 1 cycle when the problem is obvious before departure.
A core party member is still Level 1 and ready to level.
Several characters have not recovered from the previous expedition.
Ordinary Floor 1 combat is still producing repeated near-death states.
The Return Scroll production chain is unfinished on Hard.
A ranged character is already short on ammunition.
One member’s equipment is clearly lagging behind the rest of the party.
Food or another supply warning is already active at the expedition screen.
Any one of those can be more productive to fix than testing the next floor.
The key is that I already know what the next preparation run is supposed to achieve.
I am not farming Floor 1 because I am afraid to leave it.
I am going back because the next run can solve a specific weakness.
“Probably Survivable” Is My Signal to Check Once More
There is a stage where the party looks good enough.
Everyone is stronger.
The weak armor has been replaced.
Research is producing useful gear.
The settlement can feed another expedition.
Floor 1 is no longer frightening.
At that point I usually think:
we could probably survive Floor 2 now.
That is when I check the exit plan, supplies and active four one last time.
Perfect gear is unnecessary.
Perfect information is impossible on a procedural floor.
What I want is a margin for one unknown room to go badly.
Once Floor 1 has become predictable, the core four are ready, and I can leave Floor 2 without depending on immediately discovering its portal, the descent finally feels like progression instead of gambling.