Broken Arrow Specialization Guide
Featured
Russian Guard Guide: How I Play the Specialization
Russian Guard works best for me as a flexible support layer around a stable frontline, not as a roster I try to use all at once.
Read Guide →Game Guide Hub
A practical Broken Arrow starting point for reading terrain, spending points, building battlegroups and finding the right Russian Guard, map or scenario guide.
Recommended Order
Use these guides to find the right Broken Arrow walkthrough, solution or next step.
Specialization Guide
Russian Guard works best for me as a flexible support layer around a stable frontline, not as a roster I try to use all at once.
Units
A practical Russian Guard unit guide built around roles, loadouts, purchase windows and exit signals rather than card stats alone.
Counter
Russian Guard gets much easier to fight when I deny the clean engagements its specialist units need and force each threat into a worse matchup.
Walkthrough
A practical Assault on Daugavpils route covering sabotage, battlegroup choice, the outskirts, counterattack, observers, reinforcements and the final push.
Guide Cluster
Russian Guard works best for me as a flexible support layer around a stable frontline, not as a roster I try to use all at once.
Read Guide →A practical Russian Guard unit guide built around roles, loadouts, purchase windows and exit signals rather than card stats alone.
Read Guide →Russian Guard gets much easier to fight when I deny the clean engagements its specialist units need and force each threat into a worse matchup.
Read Guide →A practical Assault on Daugavpils route covering sabotage, battlegroup choice, the outskirts, counterattack, observers, reinforcements and the final push.
Read Guide →Coal Mountain rewards early tree-line control, linked center lanes and disciplined stops before exposed crossings. This is how I read the map.
Read Guide →Daugavpils is easier to control once I treat Alpha as an isolated pocket, the center as a shared vision fight and the high-rises as strategic terrain.
Read Guide →Russian Guard pairs with almost anything, but the best partner is the one that fixes the frontline job my deck still cannot do cheaply.
Read Guide →Broken Arrow gets much easier once I stop treating every contact as a question of firepower.
Most failed pushes are missing permission to happen.
I may lack vision beyond the next tree line. The objective may be reachable but surrounded by better enemy positions. My tanks may be ready while the AA and supply network is still one sector behind. Or the attack may simply cost more than holding the ground I already own and helping another lane.
Before I commit a large part of the battlegroup, I check five things:
Can I see the threat?
Does the terrain let me approach it?
Do I have something that can survive the first direct exchange?
Can AA, smoke and supply support the new position?
Is this still the best place to spend the next points?
Those five questions are the framework I use across decks, maps and specializations.
The first expensive purchase should solve something I already know about.
If the next building might contain infantry, the next ridge might hide ATGMs and the next road might be watched by armor, I am still collecting information. Throwing a premium unit into that uncertainty does not make the reconnaissance problem disappear.
Recon tells me what kind of fight I am actually buying.
It also tells me when not to buy.
A tank can wait if the road is covered by ATGM teams. An aircraft can wait if the important AA positions are still unknown. Another infantry squad can wait if artillery is deciding the engagement.
The unit changes from deck to deck.
The principle does not: information should reduce the number of jobs I am asking one purchase to perform.
Capture zones show where points are scored.
They do not always show where the fight is won.
A tree line overlooking the objective, a high-rise covering several approaches, a bridge crossfire or a crest hiding the defender can matter more than entering the marker ten seconds earlier.
I therefore look one piece of terrain beyond the objective.
If I capture the zone, where does the defender shoot from?
If I push another hundred meters, what cover disappears?
If I have to retreat, can damaged units reach supply without crossing the same exposed ground again?
This is why I am comfortable leaving an objective neutral for a short time when the surrounding position is more important.
Once the firing angles are favorable, the marker usually becomes much cheaper to take.
Broken Arrow has plenty of units that can produce spectacular damage.
Someone still has to make contact.
A workable force needs enough infantry, armor or other direct-fire presence that recon, artillery, aircraft and specialist units are not forced to perform the frontline job themselves.
I become suspicious of a battlegroup when every difficult contact requires another premium answer.
If ordinary ground units cannot hold a captured sector long enough for support to arrive, the deck may have too much capability behind the fight and not enough force inside it.
This matters especially with specializations that offer many attractive support options.
Russian Guard is the clearest current example.
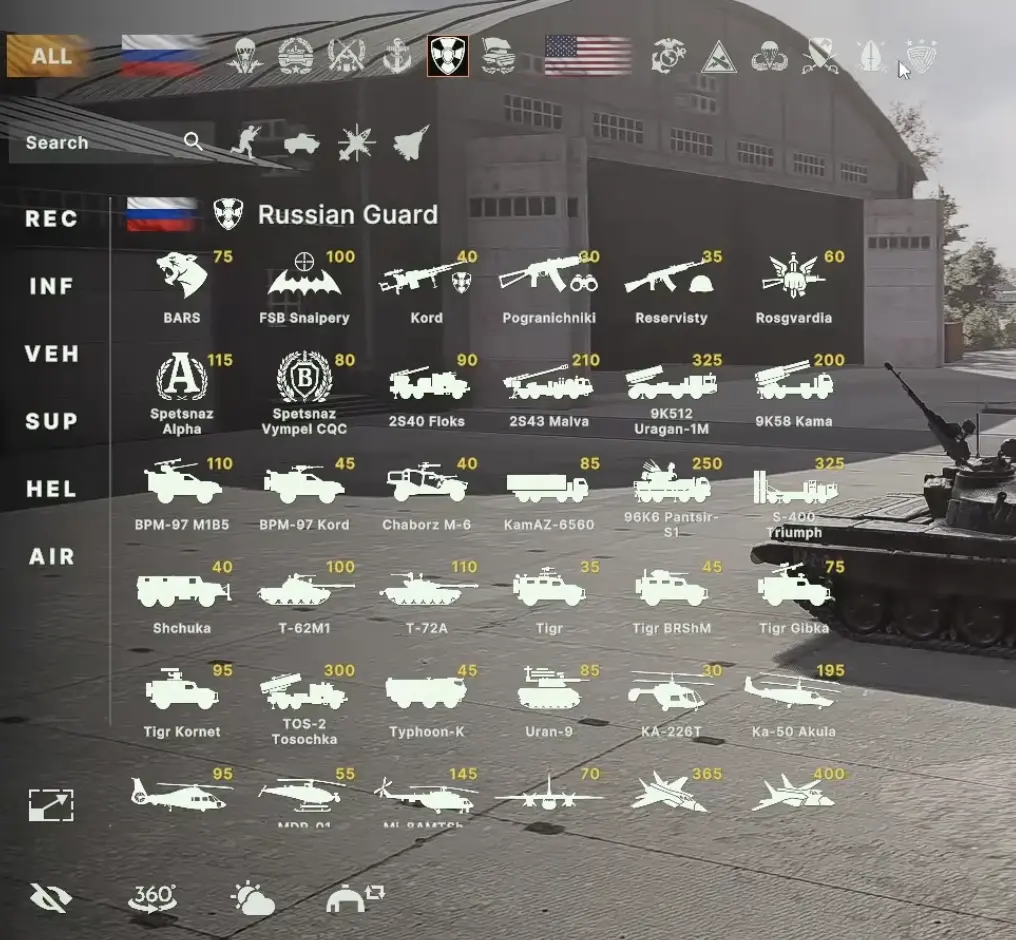
Russian Guard adds a broad Russian roster built from elite security formations, reserve troops, older armor, unmanned systems, artillery, air defense, helicopters and aircraft.
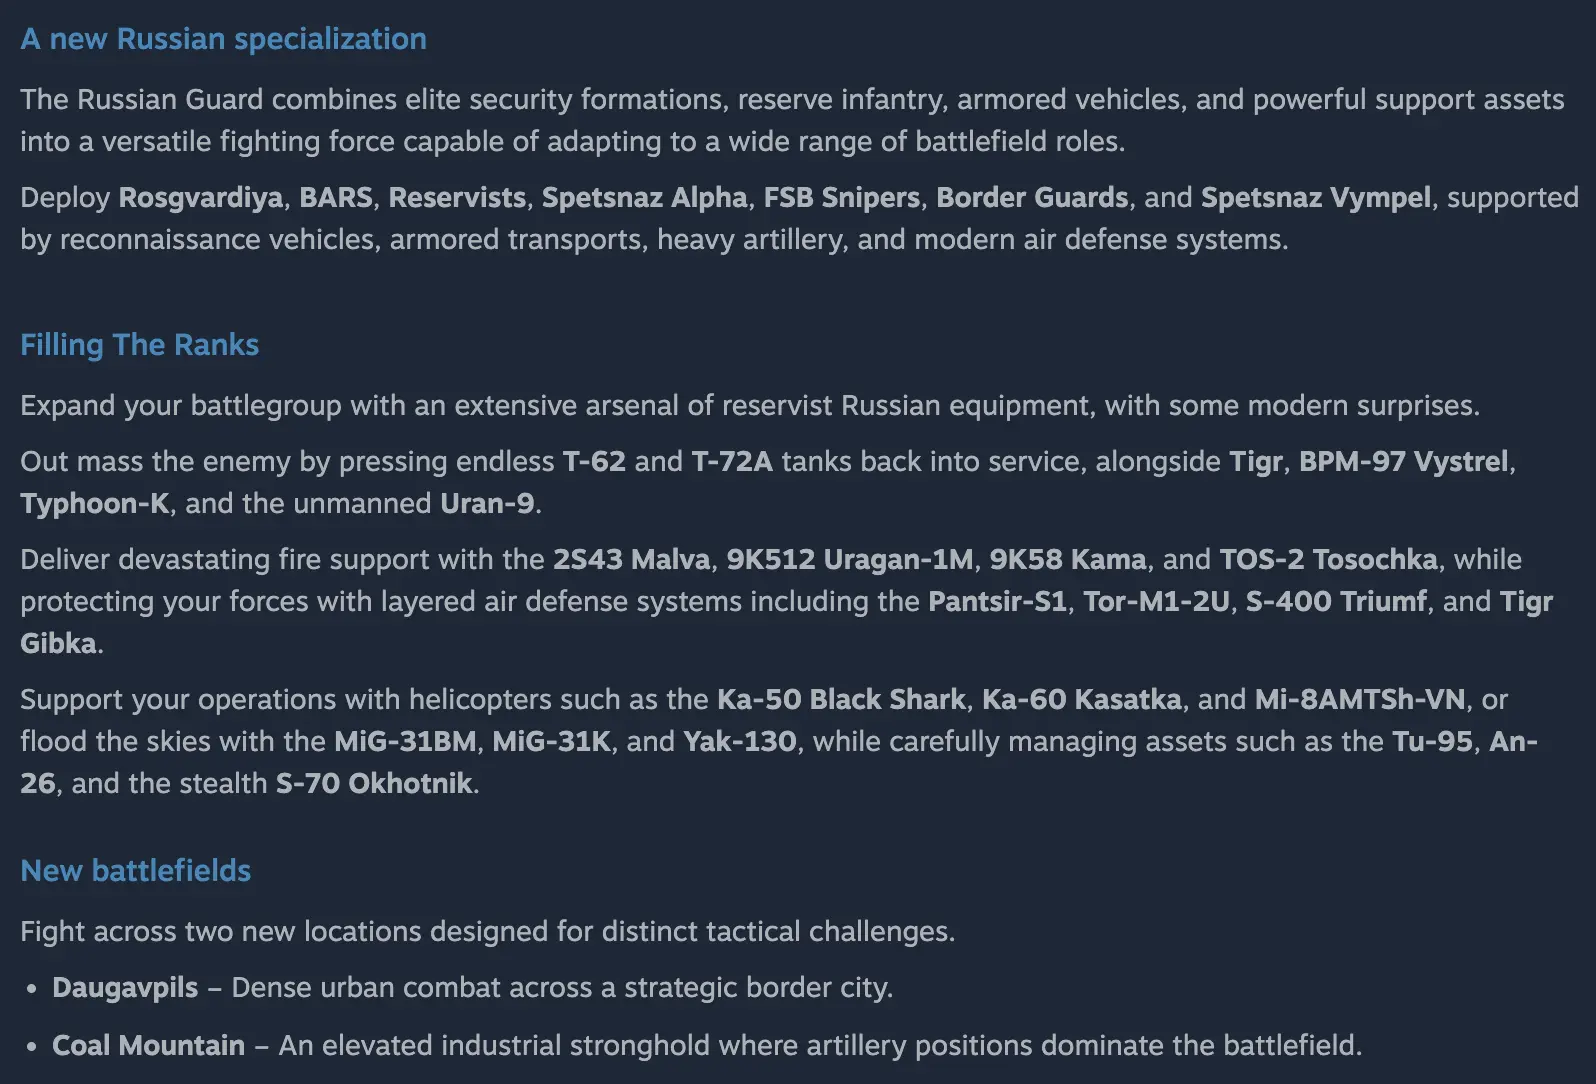
That breadth is useful because the specialization can answer many different battlefield problems.
It also makes the Arsenal easy to overfill.
If I am learning the DLC, I start with the Russian Guard specialization guide before worrying about the entire roster. It covers how I structure the force, when Guard should support rather than lead a fight, how I approach a first match and when the DLC makes sense to buy.
From there, the next guide depends on the problem.
I start with the role the second specialization needs to provide.
The Russian Guard decks and pairings guide covers Mechanized, Armor, VDV, Coastal and Motorized, including what each pairing fixes and which capabilities I protect when activation points become tight.
For a first Guard deck, that is more useful than collecting individually strong cards without deciding who owns the frontline.
The Russian Guard unit guide is where I keep the loadouts, current prices and unit-specific purchase decisions.
That includes the major Guard tools such as Termit, Vympel, Uran-9, S-70, Alpha, S-400 and Kinzhal, plus shorter battlefield roles for the wider infantry, recon, armor, artillery, AA, helicopter and aircraft roster.
I use that guide when the question is:
Which unit solves this fight, and when has the opponent already made that purchase inefficient?
Buying a stronger version of the unit that just lost is often the expensive answer.
The Russian Guard counter guide approaches the matchup from the other side: concealed MANPADS against Termit, armor and movement pressure against Vympel, mixed forest groups against Uran-9, patience against S-70, route changes around S-400 and close missile-defense coverage against Kinzhal.
The useful mindset is to identify what the Russian Guard unit needs from me and stop supplying that engagement.
A push is not finished when the capture completes.
It is finished when the force that took the position can remain there.
AA needs a useful engagement position around the new frontline.
Supply needs a route that does not turn every damaged unit into one bombing target.
Smoke needs to remain available if the next movement crosses open ground.
Recon needs to move far enough forward to show me the next threat without becoming part of the assault itself.
If those systems cannot follow, I have reached a natural stopping point.
Daugavpils is the map where I pay the most attention to influence between sectors.
The isolated Alpha/Echo side can become a self-contained fight, while central high-rises, the bridge and the ground around Bravo and Charlie allow players to affect neighboring objectives from positions that do not score directly.
The Daugavpils map guide covers the practical 5v5 player split, Alpha/Echo pocket, bridge timing, Bravo high ground, Charlie flank buildings, Delta-India side and the choice between pushing deeper or turning a breakthrough sideways.
I go there when the problem is where to deploy, not how to complete the PvE mission with the same city name.
Coal Mountain looks compact, but several routes between objectives are extremely exposed.
Tree-line timing at Alpha, shared pressure between Bravo and Delta, crest lines, the coal hill, Charlie artillery pressure and air exposure all change how much territory I am willing to take in one movement.
The Coal Mountain map guide covers those positions and the points where I stop extending a won lane.
Coal Mountain often rewards holding good cover and making the other player cross the bad ground first.
The DLC’s offensive scenario changes jobs several times during the same mission.
The Assault on Daugavpils walkthrough covers the sabotage opening, battlegroup choice, outskirts route, resupply window, counterattack, artillery observers, later reinforcement axes and final fortified position.
The most useful habit is preserving enough force between phases that the next mission state does not catch the battlegroup still recovering from the previous one.
The current Russian Guard launch content also includes Daugavpils Defense and Coal Mountain Defense.
I know the scenarios exist.
I do not yet have a route for either one that I trust enough to tell a player, “do this first, hold here, retreat here, and spend here.”
For now, I would rather leave that uncertainty visible than turn a scenario name into generic advice copied from the PvP map.
The useful questions for each defense mission are still:
Once those answers are consistent, the scenarios become much easier to teach as routes rather than descriptions.
Russian Guard has several units strong enough to attract immediate overpowered and pay-to-win arguments.
I am not using the first few days after release as a permanent balance verdict.
What matters more to me right now is whether the strong unit has:
Those questions belong in the unit and counter decisions while the matchup develops.
A label such as “OP” tells me much less about what to do in the next match.
New releases also generate reports of invalid battlegroups, deck problems and other odd behavior.
I am cautious with one-off fixes.
If I cannot reproduce what causes the problem and confirm that the same action fixes it more than once, I do not want to recommend deleting a deck, changing files or rebuilding a battlegroup as though there were one universal solution.
For now, the useful information would be:
A consistent trigger matters more than a long list of unrelated launch-day anecdotes.
A lane can be winning and still be the wrong place for the next purchase.
Once a position has enough infantry, anti-vehicle coverage, reconnaissance and support to resist a reasonable counterattack, another expensive unit may add very little.
I look across the map instead.
Can artillery influence a neighboring fight?
Can AA move to a teammate who is being attacked from the air?
Can a mobile reserve reach the center faster than the opponent’s next reinforcement?
Can a player holding a quiet flank release points without actually giving up the objective?
Broken Arrow rewards that redistribution.
A battlegroup is not only a collection of units attached to one lane. The longer the match runs, the more important it becomes to recognize when a local problem is already solved.
If I am new to the current Russian Guard content, my path is:
learn the specialization → Russian Guard guide
build the battlegroup → Russian Guard decks and pairings
choose the unit for the job → Russian Guard units
learn how to fight it → Russian Guard counter guide
play Daugavpils PvP → Daugavpils map guide
play Coal Mountain PvP → Coal Mountain map guide
clear the Russian Guard offensive scenario → Assault on Daugavpils walkthrough
The individual answer changes with the map, deck and unit.
The five permissions remain useful everywhere: information, terrain, frontline, support and point value.
If one of them is missing, I usually have something more important to do before I push.