Teamfight Manager 2 Jungle and Objective Tactics Guide
A practical Teamfight Manager 2 jungle tactics guide covering Early Jungle Style, Early Serpen Attempt, Objective Combat Strategy, Objective Finish, Morgard closing, jungle champion fit, and match review.
Updated:
Quick Answer
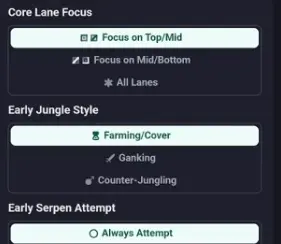
In Teamfight Manager 2, jungle control is mostly a pre-match strategy problem. You are not manually pathing, ganking, or invading during the match. You are choosing Early Jungle Style, Early Serpen Attempt, Objective Combat Strategy, Objective Finish, and Morgard closing settings that your team AI can execute.
This Is Not a Manual MOBA Jungle Guide
Teamfight Manager 2 does not play like a manual MOBA where you directly click camps, order live ganks, or path your jungler minute by minute. Your real jungle control comes from draft, role assignment, and tactical settings.
Your job is to decide:
- which champion should fill the jungle role,
- which player can execute that role,
- how much early jungle risk your team should take,
- whether early Serpen is worth contesting,
- how your team should fight around objectives,
- whether to finish objectives or turn on enemies,
- how Morgard should become tower pressure or a closing window.
The Jungle Settings That Actually Matter
Before the match, focus on the settings that change early map control and objective behavior.
| Setting | What it controls | Why it matters |
|---|---|---|
| Early Jungle Style | How aggressively your team approaches early jungle pressure, lane support, or safety | Decides whether the jungler should pressure, assist lanes, or avoid early collapse |
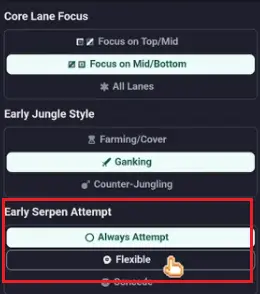
| Early Serpen Attempt | Whether your team should contest, delay, or avoid early Serpen | Prevents bad early objective fights when your draft is not ready |
| Minion Wave Management | Whether players prioritize waves or joining the team | Affects whether lanes arrive to objectives or stay in lane |
| Objective Setup | How your team groups or positions before objectives | Determines whether you start grouped, spread, or positioned for a specific fight type |
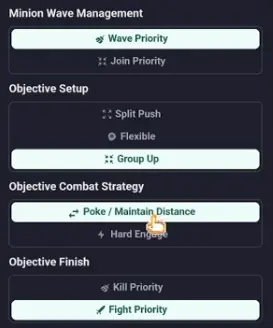
| Objective Combat Strategy | How your team fights around objectives | Helps match your comp to poke, engage, maintain distance, or pick-first behavior |
| Objective Finish | Whether your team focuses the objective or responds to enemy fights | Decides whether your team burns the objective or turns to fight |
| Morgard Buff / Side Assignment | How your team uses Morgard pressure and side lanes | Affects split pressure, siege patterns, and lane assignment |
| Closing Out | How safely or aggressively your team tries to end | Helps avoid late throws or missed siege windows |
Use these settings after draft, before the match starts. They matter more than generic jungle advice.
Quick Settings Index
Use this as a fast lookup after draft. The detailed examples below explain how to apply each setup.
| Draft goal | Early Jungle Style | Serpen approach | Objective combat | Detailed example |
|---|---|---|---|---|
| Early Serpen pressure | Aggressive / ganking / invade-leaning | Contest early | Fast engage or direct fight | Lancer Early Serpen Pressure |
| Protect a scaling carry | Safe / flexible / defensive | Delay or give bad setups | Maintain distance / protect carry | Sniper Protection Scaling |
| Pick before objective | Pressure jungle / look for openings | Contest after advantage | Pick first, then objective | Ninja or Demon Pick Before Morgard |
| Trade side pressure | Safe / flexible | Give or trade bad contests | Avoid forced 5v5 | Pyromancer or Cavalry Side-Pressure Trade |
| Behind after failed setup | Safe clear / stabilize | Give or trade | Avoid chain fights | Next-match adjustment table |
This is a quick index. Use the detailed examples below when you need the full setup.
Complete Tactic Config Examples
Use these as starting templates. Do not copy them blindly; adjust after match review.
Example 1: Lancer Early Serpen Pressure
Use this when your draft wants to fight early and your nearby lanes can move.
| Slot | Recommended setup |
|---|---|
| Draft shell | Lancer + early damage lane + engage or control support |
| Early Jungle Style | Aggressive / ganking / invade-leaning |
| Early Serpen Attempt | Contest early |
| Objective Combat Strategy | Fast engage or direct fight |
| Objective Finish | Finish if enemy is zoned; turn if enemy commits |
| Morgard plan | Force only if carry and frontline are ready |
| Review question | Did early pressure actually lead to Serpen control, lane advantage, or enemy jungle delay? |
This setup is strongest when the team can arrive together. If Lancer starts fights but the lanes arrive late, lower the early risk or draft stronger lane priority.
Example 2: Sniper Protection Scaling
Use this when your main win condition is a late-game carry.
| Slot | Recommended setup |
|---|---|
| Draft shell | Sniper + Priest / Guardian Spirit / Shieldbearer + frontline or peel |
| Early Jungle Style | Safe / flexible / defensive |
| Early Serpen Attempt | Delay or give if setup is bad |
| Objective Combat Strategy | Maintain distance or protect carry |
| Objective Finish | Avoid risky turn fights before Sniper is ready |
| Morgard plan | Stable closing once carry is online |
| Review question | Did the team survive early without giving away too much map pressure? |
This setup is not about winning every early objective. It is about avoiding the fight that prevents your carry from ever reaching the winning timing.
Example 3: Ninja or Demon Pick Before Morgard
Use this when your comp should kill one target before committing to a full objective fight.
| Slot | Recommended setup |
|---|---|
| Draft shell | Ninja / Demon + Executioner or Bomber + follow-up damage |
| Early Jungle Style | Pressure jungle / look for openings |
| Early Serpen Attempt | Contest only after advantage |
| Objective Combat Strategy | Pick first, then objective |
| Objective Finish | Turn on enemy after a clean pick |
| Morgard plan | Do not start fair 5v5; create a numbers advantage first |
| Review question | Did the comp create picks before objectives, or did it walk into grouped fights? |
If this setup keeps walking into fair 5v5s, the tactic is not matching the comp. Adjust Objective Combat Strategy before blaming the champion.
Example 4: Pyromancer or Cavalry Side-Pressure Trade
Use this when direct objective fights are bad but your comp can trade map space.
| Slot | Recommended setup |
|---|---|
| Draft shell | Pyromancer / Swordsman wave clear or Cavalry side pressure |
| Early Jungle Style | Safe / flexible |
| Early Serpen Attempt | Give or trade if direct contest is bad |
| Objective Combat Strategy | Avoid forced 5v5 unless enemy splits |
| Objective Finish | Defensive or flexible |
| Morgard plan | Trade side pressure, towers, or opposite-side map value |
| Review question | Did the trade recover enough value, or did the enemy objective snowball too hard? |
This setup is useful when fighting directly is worse than moving the map. It is not the same as doing nothing; the goal is to trade pressure instead of feeding into a stronger setup.
How to Choose Early Jungle Style
Early Jungle Style should answer one question:
Do we want the jungler to create pressure early, protect the map, or avoid risk until our comp is ready?
Choose aggressive or ganking jungle when
- Your jungler is an early tempo champion.
- Mid or bot has lane pressure.
- Your comp has early crowd control.
- You want to fight for first Serpen.
- The enemy jungle pick is slower or weaker early.
Good fits include Lancer, Berserker, Fighter, and some Gunner setups if the rest of the team can support the pressure.
Choose safe or flexible jungle when
- Your main carry needs time.
- Your lanes cannot move early.
- Your jungler loses early fights.
- Your team lacks early damage.
- First Serpen is not worth the risk.
This is safer for Sniper front-to-back comps, Priest / Guardian Spirit protection comps, or any draft that needs item timing before fighting.
Choose pressure or pick jungle when
- The enemy carry is fragile.
- The enemy support lacks peel.
- You have backline access.
- Your objective plan is to kill or chunk one target before starting Morgard.
This is where Ninja, Demon, and Executioner-style pressure become useful.
Version and Validation Note
Teamfight Manager 2 is in Early Access, so jungle settings, objective rewards, champion roles, and AI behavior can change. Treat the recommendations in this guide as starting configurations, not permanent tier-list rules.
Before updating or expanding this guide, verify three things in your current build:
| What to verify | Where to check | Why it matters |
|---|---|---|
| Objective values | Serpen and Morgard tooltips | Exact buff effects, duration, and value can change |
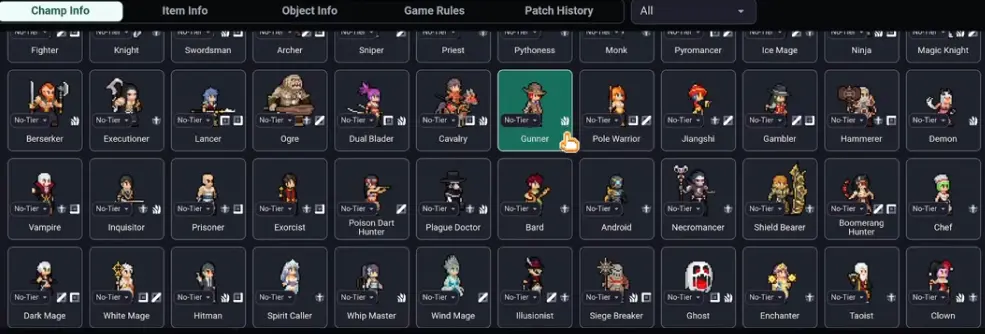
| Champion role fit | Champion Info and match review | Jungle suitability depends on skills, role tags, AI behavior, and current balance |
| Tactic execution | Tactics screen, post-match review, and objective results | A setting is only good if your team actually executes it well |
Jungle Champion Fit: Early Access Notes
These are early tactical reads. Do not treat them as final rankings. The point is to connect each champion to a setting you can test.
| Champion | Starting tactical fit | Why this might fit | Verify after match |
|---|---|---|---|
| Lancer | Aggressive jungle / objective setup | Use if the champion info and role fit support engage, tempo, or objective presence | Did Lancer arrive on time for Serpen and create usable engage? |
| Ninja | Pick pressure / backline attack | Use when the enemy carry has weak peel and your comp wants to pick before objective | Did Ninja reach the carry before Serpen or Morgard fights? |
| Gunner | Mobility pressure / flexible jungle | Use only if mobility creates real map pressure in your save | Did Gunner create pressure, or only arrive quickly to bad fights? |
| Berserker | Skirmish jungle | Use when early fights and isolated targets matter | Did skirmishes create an advantage, or did they feed tempo? |
| Fighter | CC jungle / engage support | Use when your team needs reliable fight start | Did the team have enough damage after Fighter engaged? |
| Cavalry | Stable frontline jungle | Use when your team needs safer objective presence | Did Cavalry protect the team, or get ignored while the backline died? |
| Demon | Dive / displacement pressure | Use when the enemy backline is immobile or low-peel | Did displacement create kills, or get stopped by CC and peel? |
Use champion fit as a test plan. A champion only stays in this role if the match review confirms the behavior.
Objective Decision Settings: Contest, Delay, Pick, Trade, or Defend
Do not build separate rules for every objective. Use one decision model, then apply it differently to Serpen and Morgard.
Serpen is usually the early setup check. Morgard is usually the conversion and closing check.
| Objective choice | Best used for | Use when | Tactical direction | Example fits |
|---|---|---|---|---|
| Contest immediately | First Serpen or snowball windows | Jungler is ready, lanes can move, and comp has early damage or CC | Early Serpen Attempt: contest; Objective Combat: fast fight | Lancer, Fighter, Archer, Swordsman |
| Delay | Scaling or weak early setups | Your comp needs items, protection, or better positioning | Avoid early flip; protect carry; wait for timing | Sniper, Priest, Guardian Spirit |
| Pick first | Morgard or risky 5v5s | You cannot win fair 5v5 but can kill one target first | Objective Combat: pick / cautious engage | Ninja, Demon, Executioner, Bomber |
| Trade | Bad objective setup | Enemy has better setup but side pressure is available | Give objective, pressure towers or opposite side | Cavalry, Pyromancer, Swordsman |
| Defend after giving | Behind or low-tempo states | Contesting would only add deaths | Defensive setup; avoid chain fights | Scaling or behind comps |
Objective Combat Strategy: How Your Team Should Fight
Objective Combat Strategy decides how your team behaves when the fight happens around Serpen, Morgard, or another major objective.
| Combat approach | Use when | Best with | Risk |
|---|---|---|---|
| Hard engage / fast fight | You have frontline, CC, and enough damage | Lancer, Fighter, Cavalry, Monk-style bruisers | Bad if your carry is not ready |
| Poke / maintain distance | You want to soften enemies before committing | Archer, Gambler, Bomber, Pyromancer | Bad if enemy has hard dive |
| Protect carry | Your main win condition is a scaling damage dealer | Sniper, Priest, Guardian Spirit, Shieldbearer | Bad if you lack secondary damage |
| Pick first | You cannot win a fair 5v5 but can kill one target | Ninja, Demon, Executioner, Bomber | Bad if the enemy has heavy peel |
| Defensive fight | You are behind or waiting for item timing | Wave clear, sustain, scaling comps | Bad if it gives too much map control |
Objective Finish: Kill the Objective or Turn to Fight?
Objective Finish is where many teams throw leads. Sometimes your team should finish the objective. Sometimes it should turn and fight. The wrong setting can make your team split its focus.
| Finish behavior | Use when | Avoid when |
|---|---|---|
| Focus objective | Enemy is zoned, enemy jungler is dead or late, and your team has enough damage to finish | Enemy can enter freely and wipe your team |
| Turn on enemy | Enemy walks into your setup or your comp wins the fight cleanly | Your team lacks damage or the objective is almost secured |
| Flexible / responsive | The matchup is uncertain and your comp can both fight and finish | Your comp needs one very clear behavior |
| Defensive finish | You are protecting a scaling carry or avoiding a throw | Enemy has stronger objective burst or hard engage |
Morgard Buff and Closing Out
Morgard is not just another fight. It is a conversion test: can your team turn objective control into towers, pressure, or a clean ending?
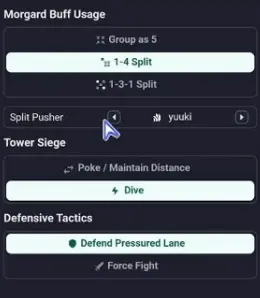
Use these rules:
| Morgard / closing plan | Use when | Best with | Watch out for |
|---|---|---|---|
| Stable closing | You have a scaling carry and want safer decisions | Sniper, Priest, Guardian Spirit, Shieldbearer | Can fail if the team never hits towers |
| Aggressive force | You are clearly ahead and can win direct fights | Lancer, Fighter, Cavalry, strong carry | Can throw if enemy has better counter-engage |
| Split pressure | You have a strong side-lane champion | Cavalry, Berserker, Swordsman, Pyromancer | Can fail if main group cannot defend |
| Poke siege | You can chip towers and enemies safely | Archer, Gambler, Bomber, Pyromancer | Can fail into hard engage |
| Defensive close | You have the buff but are not far ahead | Scaling or fragile comps | Can waste Morgard if too passive |
If the Early Jungle Plan Fails, Change the Next Setup
Do not repeat the same tactic if the first match showed a clear failure pattern.
| Failure pattern | Next-match adjustment |
|---|---|
| Aggressive jungle creates early deaths | Lower Early Jungle Style risk and delay first Serpen |
| Jungler arrives late to objective | Choose safer setup or adjust the draft toward lane priority |
| Team starts objective but cannot finish | Review Objective Finish behavior and team damage |
| Team wins Morgard but cannot push | Adjust Morgard / Closing Out plan toward siege or stable pressure |
| Pick comp walks into fair 5v5 | Change Objective Combat Strategy toward pick-first behavior |
| Scaling comp contests too early | Delay Serpen and protect carry until item timing |
| Safe jungle gives every objective for free | Add lane priority, poke, or earlier objective pressure |
How to Review Whether Your Jungle Strategy Worked
After the match, do not only check who won Serpen or Morgard. Review whether the settings produced the behavior you wanted.
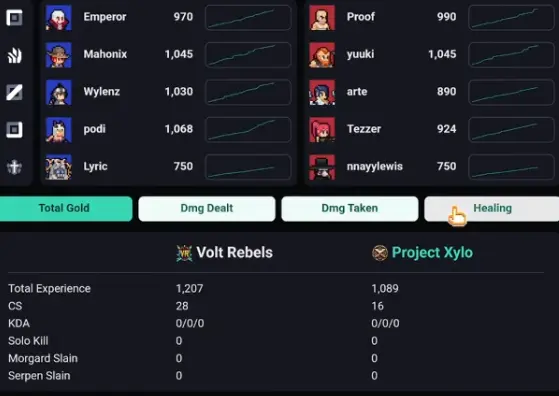
Where to look
Tactics screen
Confirm which Early Jungle Style, Serpen, Objective Combat, Objective Finish, and Closing Out settings were used.
Post-match stats or review screen
Check objective results, gold swings, kill timing, tower damage, and whether Morgard or Serpen created real map pressure.
Replay or fight timeline if available
Look at whether the team arrived together, split focus, fought too early, or failed to convert after winning.
What to check
Did the jungler follow the intended risk level?
Aggressive settings should create pressure. Safe settings should avoid early collapse.
Did the objective attempt match the draft timing?
If the team contested with late lanes or a weak carry, the Serpen or Morgard setting may be too aggressive.
Did the objective create conversion?
If Morgard or Serpen did not lead to towers, map control, or a clean reset, review Objective Finish and Closing Out settings.
Common Jungle Tactics Mistakes
Treating Serpen as mandatory
Serpen is valuable only when the setup is playable. A bad Serpen attempt can give away more than the objective is worth.
Setting Objective Combat to engage with a poke comp
Poke comps need space and time. If they are forced into hard engage behavior, they lose the advantage they were drafted for.
Winning Morgard but failing to siege
This usually means the Morgard, Objective Finish, Tower Siege, or Closing Out settings do not match the comp.
Choosing jungle champions without checking tactic fit
Lancer, Ninja, Gunner, Berserker, Fighter, Cavalry, and Demon do not want the same settings. Champion fit should lead to different tactical choices.
Reviewing only kills instead of behavior
A strategy can fail even if your team gets kills. Review whether the settings created the intended pressure, objective conversion, and closing window.
What to Read Next
If your jungle problems start during draft, read the ban/pick guide. If your team keeps overrating late-game carries and losing before they scale, read the safe picks vs scaling picks guide. If you want to track which jungle champions fit which settings, read the personal tier list guide.
FAQ
Is this a manual jungle pathing guide? +
No. Teamfight Manager 2 is a management sim, so you are not manually clicking jungle camps or ordering live ganks. This guide focuses on pre-match jungle style, Serpen attempts, objective combat, objective finish, and review decisions.
What is Early Jungle Style in Teamfight Manager 2? +
Early Jungle Style controls how your team approaches early jungle pressure, lane support, or safety. Use aggressive options when your draft can support pressure, and safer options when your carry needs time or your lanes cannot help.
When should I contest early Serpen? +
Contest early Serpen when your jungler, nearby lanes, and early damage or control are ready. If your comp is scaling or your lanes cannot move, delay, trade, or give the objective instead.
What Objective Combat Strategy should I use? +
Use hard engage when your comp can force fights, poke or maintain distance when your team wants to soften enemies first, and pick-oriented settings when your comp needs one kill before starting the objective.
How should I use Morgard buff and closing settings? +
Use Morgard and closing-out settings based on whether your comp wants to siege safely, force aggressively, split pressure, poke towers, or stabilize around a scaling carry.
How do I know if my jungle strategy worked? +
Check three things after the match: whether the jungler followed the intended risk level, whether Serpen or Morgard attempts matched the draft timing, and whether objectives created tower pressure, map control, or a clean closing window. If the team fought at the wrong time or failed to convert objectives, adjust the tactic settings before blaming the champion.