Kingdom Rush 6 Genesis Classic Rush Guide: Best Towers
Use one hero, classic towers and two spells to clear Classic Rush, with practical specialist choices, upgrade timing and Tesla strategy.
Updated:

Quick Answer
On the first Classic Rush stages, build a simple kill zone with the available Level I towers instead of saving Gold for upgrades that are not open yet.
Later, Sorcerer Mage is my safer answer to armored ground pressure, while Tesla X104 becomes the stronger late investment when one position can hit a busy route. You only get one hero, so Reinforcements should cover the lane that hero cannot reach in time.
The tab in the stage menu is labeled Classic Rush. It takes the Genesis campaign map and replaces the normal loadout with the old Kingdom Rush tower tree: one hero, the four classic tower families, and only Rain of Fire and Reinforcements.
You also have just 3 lives. The battles are not fixed at twelve waves: Classic Rush follows a full stage-length structure ranging from 5 to 15 waves, depending on the campaign stage.
That makes it much less forgiving than simply replaying an old Kingdom Rush build from memory. The roads, enemy roster and stage mechanics still belong to Genesis, while the tools used to stop them come from the original tower system.
What Towers Are Available in Classic Rush?
The tower tree begins with the four original families:
- Archer Tower
- Militia Barracks
- Mage Tower
- Dwarven Bombard
As the tower reaches its final branch, each family has two specialist choices:
Archers
- Rangers Hideout
- Musketeer Garrison
Barracks
- Holy Order
- Barbarian Hall
Mages
- Arcane Wizard
- Sorcerer Mage
Artillery
- 500mm Big Bertha
- Tesla X104
The specialist decision matters more than building the same Tier IV option every time. Musketeer is attractive when one long lane or one priority target needs sustained ranged pressure; Rangers are better suited to a road where several enemies remain inside the same firing area.
Holy Order gives me the safer defensive endpoint when a choke has to survive heavy melee pressure. Barbarian Hall makes more sense when blocking is already stable and I want the Barracks slot to contribute more offense.
The largest decisions are usually Mage and Artillery because those branches change how the whole kill zone works.
Classic Tower Upgrades Arrive as You Progress Through the Campaign
Classic towers do not use the normal Genesis tower upgrade tree.
Their permanent bonuses are added automatically as Classic Rush reaches later campaign stages. The first two stages have none of these bonuses; new effects begin appearing from Stage 3 and continue at Stages 5, 8, 11 and 16.
Stage 1 is especially restricted: only the Level I versions of the four tower families can be built. That is why trying to save for a familiar specialist immediately at Linirean Castle gets you nowhere—the higher tower levels are not available yet.
Several later milestones materially change what I buy.
From Stage 5, Mage attacks permanently reduce enemy armor, making a Mage position useful to the physical towers shooting the same target.
From Stage 8, Mage and Artillery prices are reduced by 10%. Expensive specialists become easier to fit into the same stage economy.
At Stage 11, Tesla X104 and Big Bertha ability prices drop to 75% of their normal cost.
The Stage 16 bonuses are even stronger. Mage attacks briefly halve enemy speed, while Artillery explosions deal full damage across their blast radius and Tesla’s chain jumps stop losing damage as they move between targets.
A tower that felt too expensive or too narrow several stages earlier can therefore become much more efficient later without changing its name.
Build the First Kill Zone Before Planning a Specialist
The opening Gold should answer the current road, not the tower you eventually want.
I look for the build point that covers the longest useful section of the route and put the first ranged tower there. Barracks then hold enemies inside that coverage instead of fighting far ahead where the rest of the defense cannot help.
Mage enters early when armored enemies are already part of the wave. Artillery becomes more attractive when several targets consistently reach the same choke.
This ordering is especially important with only three lives. Losing one enemy while saving for a premium upgrade is already one third of the failure limit.
Once the current waves are clean, the next purchase can be planned around a specialist rather than another emergency tower.
For a stage where the route itself is unclear, the Kingdom Rush 6 Genesis Walkthrough shows the campaign entrances, exits and major stage mechanics.
Sorcerer Mage Is My Safer Mage Specialist
Sorcerer Mage is the specialist I prefer when armored ground enemies are spending a long time inside one kill zone.
Its current tower panel shows 30–64 magic damage with a slow attack speed, so this is not a rapid-fire tower. Its value comes from making a concentrated defense work harder rather than trying to cover the whole map alone.
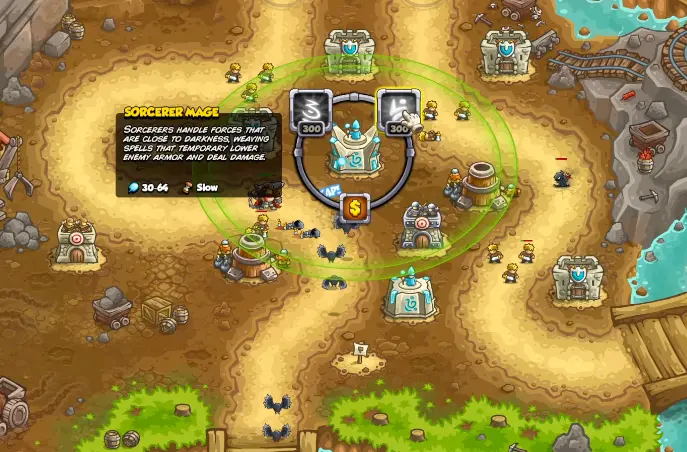
By the time Classic Rush reaches Stage 5, Mage attacks are already stripping armor permanently. That gives nearby Archers, Barracks and Artillery more value against the same enemy instead of forcing every Gold purchase into additional magic damage.
Sorcerer can also add another unit to the road, which matters when one hero and one Barracks are not enough to keep a dangerous group inside tower range.
I place it around the middle or rear half of the primary choke. Putting an expensive Sorcerer at the entrance often wastes the part of its kit that wants other towers and blockers attacking the same targets.
Arcane Wizard Is the Better Answer to One Priority Enemy
Arcane Wizard serves a different problem.
When a single durable enemy is consuming too many attacks from the entire defense, Death Ray gives the Arcane branch a way to remove that target instead of slowly grinding through its health.
That is much less useful when the run is failing because fifteen smaller enemies are leaving the map together.
Before choosing the Mage specialist, I look at the failure from the previous attempt. A large armored pack that keeps occupying the choke favors Sorcerer. One elite target surviving everything around it gives Arcane Wizard a clearer job.
There is no benefit in paying for a single-target solution while the loss is actually coming from crowd pressure.
Tesla X104 Is the Late Upgrade Worth Saving For
Tesla is the classic Artillery specialist I build around most often once the basic lanes are stable.
Its normal lightning can move through several nearby targets, so a central position beside a choke gets much more value than a pad that sees isolated enemies one at a time.
The expensive part is reaching it.
In the Classic run where I wanted Tesla, the specialist upgrade required 400 Gold. Saving that amount while another lane was still leaking produced a worse defense than simply buying the missing basic coverage first.
I only start banking the 400 when ordinary waves can already reach the exit without forcing an emergency Rain of Fire.

Overcharge makes that placement even more important. Its first rank creates a static field that deals 8–16 damage to enemies close to the tower.
The ability therefore rewards a setup where Barracks, your hero or Reinforcements hold enemies inside Tesla’s radius. Buying Overcharge on a Tesla that barely sees traffic is spending Gold on an ability with no opportunity to work.
From Stage 11 onward, Tesla ability prices are reduced by 25%, which makes Overcharge and its other upgrades substantially easier to fit into the late-wave economy.
By Stage 16, Tesla’s chain jumps deal full damage instead of weakening between targets. That is the point where a well-positioned Tesla becomes especially strong against packed routes.
Big Bertha Wins When the Road Stays Crowded
Tesla is not an automatic Artillery choice.
Big Bertha is easier to justify when enemies repeatedly arrive as dense groups and remain together long enough for heavy explosions to hit several of them at once.
I use the route geometry to choose between the two.
A central junction or narrow choke where targets keep passing close together favors Tesla’s chain damage and Overcharge field. A lane where large packs remain clustered inside one blast area gives Big Bertha a cleaner role.
The Stage 16 Artillery bonus improves both branches because explosions deal full damage across their entire radius, so the distinction becomes less about which specialist is globally stronger and more about which one has the better build point on that particular map.
Choose Rangers or Musketeer From the Shape of the Lane
The Archer specialists are much easier to decide after looking at the road.
Musketeer Garrison benefits from long sight lines. It can keep contributing to one dangerous target while that enemy spends a long time crossing the map, and its specialist abilities fit a defense that already controls crowds but needs stronger priority damage.
Rangers Hideout is more comfortable around a busy lane where several enemies remain within the same general area.
I avoid upgrading the first Archer automatically. A basic ranged tower may be covering flyers perfectly well while another section of the map still needs a Mage or blocker. Specialist Archers become worthwhile once the ranged position is already one of the towers doing the most work.
Later campaign upgrades strengthen Marksman range and eventually add a chance for double damage, so the same well-placed Archer slot becomes more attractive as Classic Rush progresses.
Holy Order Is the Safer Barracks Choice
With only one hero available, losing the main Barracks can open a lane very quickly.
Holy Order is the branch I prefer when those soldiers are responsible for the primary stopping point. A durable frontline keeps every ranged tower around it working for longer and reduces how often Reinforcements have to repair the same position.
Barbarian Hall becomes more interesting when another unit already provides the reliable block and I want more offensive pressure from the Barracks slot.
The Classic Barracks bonuses also grow substantially through the campaign. Soldier health improves, armor is added, respawn becomes faster and rally range increases. By the later stages, a Barracks position that was only a temporary stop in the early game can hold a much more important section of road.
One Hero Means Each Lane Needs a Permanent Plan
Classic Rush removes the second hero used in normal Genesis battles.
That is most noticeable on maps where pressure separates into two distant routes. I cannot leave one side deliberately weak and assume another hero will arrive when the leak begins.
The chosen hero stays near the lane where a movable blocker has the highest value. The other route gets enough permanent towers to survive routine waves without assistance.
Reinforcements then act as the temporary responder.
I drop them where a few seconds of blocking will keep enemies inside an existing Mage, Archer or Artillery range. Placing them well ahead of every tower usually wastes most of those seconds.
Rain of Fire has the opposite role. It is the reset for a group the existing defense cannot contain.
With only two spells available, spending Rain of Fire on enemies that were already dying naturally removes a large part of the recovery available for the next dangerous wave.
Selling a Tower Can Be Cheaper Than Protecting a Bad Position
Classic Rush returns 60% of the Gold spent when a tower is sold, so moving out of a bad build point is not free.
It can still be the correct choice.
During one run, a Barracks position stopped influencing the lane that was actually causing the failure. Keeping it meant tying up a build point and Gold in soldiers fighting away from the decisive choke.
Selling it and rebuilding the spot as a Mage improved the useful coverage immediately.
I make that trade when the remaining waves matter more than the Gold already lost. A Barracks still holding the main choke stays. A tower that cannot reach the dangerous route is judged by what it can do now, not by how much it cost five waves ago.
Three Failures Usually Tell Me What to Change
A Classic Rush loss becomes much easier to fix once I separate three different problems.
The run dies before the specialist comes online.
I saved too much Gold. The next attempt gets another lower-level tower or a
Barracks upgrade before I start banking for Tesla, Sorcerer or another Tier IV
branch.
One lane collapses while the hero is somewhere else.
That route was relying on hero movement instead of permanent coverage.
Reinforcements can patch one moment, but the lane needs a tower or stronger
blocker if the same leak repeats.
The specialist is fully upgraded and still feels weak.
The build point or branch is wrong for the enemy pattern. A Tesla seeing one
enemy at a time, a Sorcerer isolated from the main choke or a Death Ray purchase
against a swarm will not become efficient just because more Gold is spent on
it.
Those are much more useful signals than replacing every tower after a failed attempt.
What Changes Most in the Late Classic Rush Stages
By the final region, the classic toolkit is much stronger than it was at Linirean Castle.
Mage and Artillery have already received their cost reductions. Tesla and Big Bertha abilities are cheaper. Marksman range has improved multiple times, Barracks are sturdier and faster to recover, and the Stage 16 bonuses add some of the strongest effects in the mode.
The result is a more upgrade-heavy economy.
Early Classic Rush rewards getting enough basic towers onto the road. Later stages give well-chosen specialist positions much more reason to absorb large amounts of Gold.
I still decide those investments from the map. A late-game Tesla is powerful, but it cannot solve a lane outside its range. A Sorcerer can strengthen an entire kill zone, but it cannot replace physical coverage against everything. One hero can hold one emergency position, not two distant exits at once.
If Classic Rush is not available yet, the unlock route is covered in Kingdom Rush 6 Genesis Unlocks & Progression.