Kingdom Rush 6 Genesis Best Towers & Tier List
Rank all 15 towers, choose the right Tier IV skills, and build five-tower loadouts for armor, flyers, swarms, bosses and Veteran stages.
Updated:
Quick Answer
For most of the campaign, Royal Catapult + Scholar Mage + Elven Elite Ranger + Knights Order gives me four dependable jobs: AoE, magic damage, long-range physical damage and blocking.
The fifth slot changes with the stage. Use Archer Garrison while cheap anti-air matters, Sentry Watchtower when range is the problem, Alchemist Shack for control and true damage, or Ironbark Treant when the lane needs both explosive damage and another frontline body.
Kingdom Rush 6: Genesis has 15 towers, but a normal battle only lets you equip five. The difficult choice is rarely whether one tower has a larger damage number than another. It is whether those five slots still cover the problems the stage is about to create.
A lineup can have excellent damage and still lose because Crows are crossing a lane with no physical ranged coverage. It can stack magic and then run into an enemy that resists it. It can also spend heavily on Tier IV skills while one route still has nothing capable of holding enemies in place.
I judge the towers by what they contribute once that five-slot restriction starts forcing real tradeoffs.
Kingdom Rush 6 Genesis Tower Tier List
The Gold column below is the total cost to build the tower and reach Tier IV, before buying any Tier IV skills.
| Tower | Tier | Gold to Tier IV | First Tier IV skill I usually buy | Why I bring it |
|---|---|---|---|---|
| Royal Catapult | S | 830 | Tarred Zone | Extreme-range AoE and reliable control on shared lanes |
| Elven Elite Ranger | S | 640 | Bramble Shot | Long-range physical damage, flyers and elite control |
| Scholar Mage | S | 740 | Scroll of Knowledge | Magic damage plus a large damage buff for a developed kill zone |
| Sentry Watchtower | S | 670 | Mortal Wound | Global physical pressure and heavy priority-target damage |
| Archer Garrison | A | 550 | Eye in the Sky | Cheap anti-air and range support for nearby towers |
| Knights Order | A | 560 | Resilience | Three dependable blockers with strong staying power |
| Ironbark Treant | A | 880 | Hay Fever | Explosive damage, a 1,100-HP Treant and heavy enemy damage reduction |
| Alchemist Shack | A | 770 | Sticky Spillage | True damage, slow and strong choke-point control |
| Light Priestess | A | 680 | Circle of Silence | Magic damage, slow, silence and support around a busy lane |
| Arcane Forger | A | 780 | Hardlight Prison | Magic AoE plus long-duration control against dangerous groups |
| Cursed Crossbows | A | 620 | Cursed Bolt | Fast physical fire with true-damage burst against tougher targets |
| Dwarven Culverin | B | 900 | Sharp Pellets | Compact artillery with armor reduction and resistance support |
| Wildcat Huntresses | B | 660 | Grievous Bite | Aggressive melee damage when two strong fighters are enough to hold |
| Gold Prospectors | B | 800 | Reserve Miners | Extra Gold on long stages that have a safe early game |
| Sunray Master | B | 760 | Exoburst | Rapid ground-focused magic damage and armor stripping |
The lower tier is not a warning to ignore those towers. Several become excellent when the stage gives their specialist mechanic enough time or targets to work. The important difference is that I need a reason to spend one of five slots on them.
Royal Catapult Is Still My Safest Artillery Pick
Royal Catapult costs 110 Gold to place and 830 Gold total to reach Tier IV. At that point it deals 80–120 explosive damage with extreme range.
The three-second attack interval is slow, but the range compensates by giving the tower far more opportunities to fire. On a bend or central intersection, a Catapult can start attacking before enemies reach the main choke and continue after they leave it.
That is why I prefer it to Dwarven Culverin on maps such as Path of Peril, where one build position may need to influence several sections of road.

The first Tier IV purchase I make on most maps is Tarred Zone. Its first rank costs 100 Gold, deals another 80–120 explosive damage and slows affected enemies by 40% for 6 seconds.
That slow gives the next Catapult shot, nearby Marksmen and the blocking line more time to attack the same group.
Powerball is the better first purchase when control is already strong and I only want more AoE damage. Secure the Area adds frequent traps and short stuns, which becomes useful on a choke that is already seeing continuous traffic.
I normally buy the skills in this order:
- Tarred Zone I for immediate control.
- Powerball I once large groups are surviving the normal explosions.
- Additional Tarred Zone or Powerball ranks before spending heavily on Secure the Area.
With the Artillery Ultimate unlocked, Blazing Ball adds another large lane-clearing attack without needing extra in-stage Gold.
Scholar Mage Is More Than an Armor Counter
Scholar Mage reaches Tier IV for 740 Gold and deals 36–66 magic damage per attack.
That already gives the lineup a clean answer to armor, but the tower becomes far more valuable once Scroll of Knowledge is available.
The first rank costs 200 Gold and gives nearby towers 50% more damage for 8 seconds.
That changes where I place Scholar Mage. I do not want it isolated at the edge of the map just because armored enemies enter there. I want it around a section where several developed towers can share the buff.
A Scholar Mage beside Royal Catapult, Elven Elite Ranger and a Barracks choke can improve several expensive purchases at once.
Tome of Flames is my alternative first skill when the Mage is more isolated. Its first rank deals 40 magic damage on impact plus 32 true damage over 4 seconds.
Spare Copies adds multi-target magic projectiles, but I usually buy it after the tower’s primary job is already solved.
For a developed central kill zone, my order is:
- Scroll of Knowledge I
- Scroll upgrades if several strong towers stay inside its area
- Tome of Flames when I need the Mage itself to contribute more burst
The Mage Ultimate, Arcane Meteor, adds 620 magic damage to one target and briefly stuns nearby enemies, which gives the tower a late-game answer to a high-health threat without changing the five-tower lineup.
Elven Elite Ranger Pays for Range Before It Pays for Damage
Elven Elite Ranger only needs 640 Gold to reach Tier IV, where its basic shots deal 52–66 physical damage with extreme range.
That combination is why it became one of my most useful towers in the Stormcloud stages.
Against later Troll waves, the Ranger was already hitting targets before they reached the central defense. In Frostbite Nest, that range also mattered while the battlefield was still being revealed and flying threats were approaching from outside the main ground choke.

Bramble Shot is my first Tier IV skill on a difficult stage. For 150 Gold, its first rank deals 80–120 physical damage, stuns the target for 2 seconds and slows nearby enemies by 60% for 6 seconds.
That is enough control to matter even when the target survives the shot.
Poison-Tip Arrow becomes attractive against enemies that stay alive for longer. The first rank fires three poisoned arrows, each adding true damage over time.
Woodland Trick is the expensive crowd option. It makes normal arrows ricochet between nearby enemies, so I buy it once the Ranger is consistently shooting into groups rather than isolated targets.
For most campaign stages:
- Bramble Shot I
- Poison-Tip Arrow I against durable enemies
- Woodland Trick when enemy density is high enough to justify the Gold
Its Ultimate, Merciless Aim, periodically executes an enemy below 40% of its maximum health, giving the tower another reason to stay focused on high-value targets rather than disposable front-line units.
Sentry Watchtower Solves Maps Where Placement Is the Problem
Sentry Watchtower changes the normal placement calculation because its basic attack has global range.
At Tier IV it costs 670 Gold total and hits for 174–218 physical damage. The tradeoff is a very slow 4-second attack interval.
I use it when the stage keeps presenting valuable targets outside the reach of the rest of the defense: a flyer crossing an awkward route, an elite appearing in the rear, or two distant lanes where one normal Marksman cannot cover both.
The global range does not make positioning irrelevant. The tower still has a blind spot close to itself, and a four-second attack can waste a large shot on a target that another tower was already about to kill.
Mortal Wound is the first skill I want against durable enemies. Rank I costs 200 Gold and adds 128–160 true damage over 4 seconds on a 12-second cooldown.
If enemies are reaching the tower’s immediate area, Guardian Hound is the more urgent purchase because it gives the Watchtower a way to block and bite targets inside that weak zone.
Battle Momentum becomes better when the Watchtower is already securing kills, because each basic-attack kill strengthens and accelerates the next shot.
I do not use Sentry as my only answer to a dense flying wave. Elven Elite Ranger or Archer Garrison fires far more often. Sentry is strongest when one dangerous target anywhere on the battlefield needs to start taking damage immediately.
Archer Garrison Becomes Better When Other Towers Are Expensive
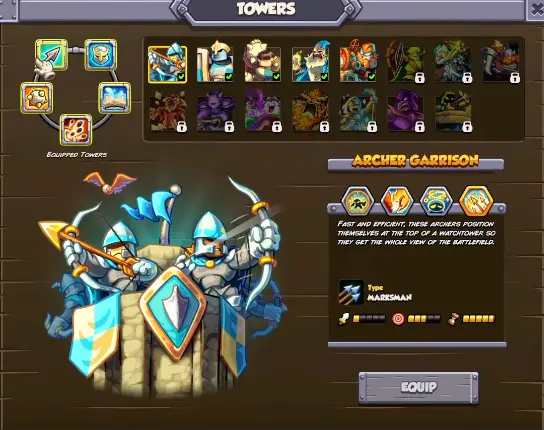
Archer Garrison reaches Tier IV for only 550 Gold, making it the cheapest Tier IV tower in the normal roster.
Its 16–26 physical damage is modest compared with Elven Elite Ranger or Sentry Watchtower, but it fires every 0.6 seconds and has great range.
That makes it useful much longer than its starting-tower status suggests.
Crows and other flyers often appear before I am ready to commit 600–800 Gold to one premium position. A cheap Archer can solve the immediate air route while the rest of the economy goes somewhere more important.
Its Tier IV skills also support the wider defense.
Eye in the Sky I costs 120 Gold and gives the Archer plus nearby towers 15% additional range. A centrally placed Archer can therefore improve a Catapult or Mage without asking them to move.
Spot Weakness is stronger when one elite or boss is the problem. Rank I marks a target for 5 seconds and makes other damage sources hit it 30% harder.
Tendon Pierce supplies a stun when the lane needs control rather than range or boss amplification.
I usually start with Eye in the Sky on normal waves and switch the spending priority toward Spot Weakness once a single durable enemy is deciding the run.
Knights Order Is Cheap Time for Every Damage Tower Around It
Knights Order costs 560 Gold to reach Tier IV and produces three soldiers with 200 HP and 40% armor each before permanent upgrades are applied.
Three bodies matter.
Wildcat Huntresses have stronger individual fighters, but the Knights are much better at simply preventing several enemies from walking farther down the road.
That extra time converts directly into Catapult shots, Mage attacks and ranged damage.
Resilience is the Tier IV skill I buy first. Its first rank costs 180 Gold and lets each knight heal 25% of total health while engaged in combat.
On a choke that is taking sustained pressure, that extends the life of the whole defense rather than adding a small amount of personal damage.
Inspired Protectors becomes worthwhile when one or both heroes are fighting nearby because each hero adds armor to the Knights.
Honor the Fallen is more offensive and activates when another knight dies. I buy it later because a frontline that is dying repeatedly usually benefits more from Resilience first.
The Barracks Ultimate, Last Stand, makes low-health Knights temporarily invulnerable. That effect is especially useful at the back half of a kill zone, where five extra seconds of blocking can give several damage towers another attack cycle.
Dwarven Culverin Needs the Right Combination Around It
Dwarven Culverin is expensive: 900 Gold to reach Tier IV, where it deals 66–86 explosive damage with only long range.
Royal Catapult reaches farther and costs less, which is why Culverin does not win the general artillery slot for me.
Its skills give it a different purpose.
Sharp Pellets I costs only 100 Gold and makes each basic hit destroy 3% of the target’s armor. That is useful when the rest of the kill zone contains physical damage.
Sulfur Blast attacks the opposite resistance. Its cloud removes enemy magic resistance, making nearby Mages more effective.
A Culverin sitting beside strong physical and magic towers can therefore help whichever damage type is being resisted.
Full Throttle is the burst option, temporarily making the cannon fire several shots in quick succession.
I bring Culverin when the map offers one compact Artillery position and the resistance-reduction skills will help the towers around it. If I only need long-range splash, Royal Catapult is the cleaner purchase.
Ironbark Treant Can Replace Two Jobs With One Slot
Ironbark Treant is one of the most unusual five-slot choices because the tower is both an Artillery position and a frontline unit.
At Tier IV, the tower itself deals 40–60 explosive damage, while its Treant has 1,100 HP and deals 56–84 explosive damage in melee.
The cost is high at 880 Gold, but one slot can supply both area pressure and a very durable body.
Hay Fever is my first skill. Rank I costs 150 Gold, deals true damage around the Treant and reduces affected enemies’ damage by 90% for 4 seconds.
That reduction is often more important than the damage. It keeps the Treant alive against a pack that would otherwise burn through its health.
The other two skills depend on how the Treant is positioned:
- Nature’s Hand works while the Treant is uprooted and can bury a qualifying enemy completely.
- Gnarly Roots works while it is rooted and traps several enemies on the path.
That means I decide how I want the Treant to behave before spending deeply on both branches.
Ironbark is one of my preferred replacements for a normal Barracks when I still want a strong body in the road but also need another source of AoE.
Alchemist Shack Is the Best Specialist When Resistance Is Annoying
Alchemist Shack deals true damage with its normal attack, so armor and magic resistance do not reduce the main damage-over-time effect in the usual way.
It costs 770 Gold to reach Tier IV.
The basic damage number looks tiny at 4–5, but judging the tower only from that line misses the repeated true damage and the Tier IV kit.
Sticky Spillage I costs only 100 Gold and slows affected enemies by 40% for 5 seconds.
That is the skill I buy first because it gives every other tower more time to attack.
Test Subject adds a temporary melee unit that deals true damage, useful when a choke needs another blocker.
Perfected Formula is the damage route, adding explosive impact damage and improving the basic damage-over-time effect.
On a compact bend with several other towers already covering the same road, Alchemist Shack can contribute damage, control and temporary blocking at once. On a spread-out map, its average range makes that package much harder to use.
Light Priestess Is a Support Tower That Still Deals Real Magic Damage
Light Priestess reaches Tier IV for 680 Gold and deals 37–69 magic damage at a much faster pace than Scholar Mage.
The reason I choose it is usually not the basic attack.
Circle of Silence I costs 120 Gold, slows enemies around the tower by 40% and silences them for 6 seconds.
Against enemies whose abilities are making the lane harder rather than their raw health alone, this is a cheap way to change the fight.
Panacea buffs another tower. The first rank gives one tower 50% more attack damage for 5 seconds.
That pairs well with an expensive Royal Catapult, Elven Elite Ranger or Sentry position that is already seeing continuous targets.
Sanctuary is for a troop-heavy choke, healing allied units and temporarily increasing their armor.
I do not bring Light Priestess simply because I want another Mage. I use it when the lane already contains something valuable enough to support.
Its Ultimate, Avatar of Light, combines a rapid beam with a short window of invulnerability for nearby allied units, making a clustered defensive position considerably harder to break.
Arcane Forger Is the Mage I Pick for Crowds and Control
Arcane Forger reaches Tier IV for 780 Gold and its normal magic attack deals 56–88 damage.
Unlike Scholar Mage, each basic shot also affects enemies around the impact point. That immediately gives it more value against a packed group.
The skill that changes difficult waves most cleanly is Hardlight Prison. Rank I costs 200 Gold and removes up to two enemies from the fight for 5 seconds.
That can be better than dealing a little more damage when two elite enemies are the reason the choke is collapsing.
Prismatic Sentries adds crystals on the path for repeated magic damage, while Slivering Discs sends damaging discs through the road and is the better purchase when the stage is feeding dense groups through the same area.
I prefer Scholar Mage when I want one dependable armor answer that can buff the towers around it. Arcane Forger moves ahead when crowd control and magic AoE are the actual problems.
Cursed Crossbows Turn a Fast Marksman Into an Elite Killer
Cursed Crossbows reach Tier IV for 620 Gold, only slightly more than Archer Garrison.
Their basic attacks are fast but not individually large: 18–28 physical damage every 0.6 seconds.
Cursed Bolt changes the matchup against durable enemies. Its first rank deals 120–180 true damage and carries a 10% instant-kill chance.
At higher ranks both the true damage and the execute chance increase substantially, so this is the skill I invest in when Crossbows are filling the elite-killer slot.
Fear Factor is the crowd-control route. Enemies killed by the tower release an effect that slows nearby targets and reduces their attack damage.
Corrupt Frenzy temporarily pushes the already-fast attack speed much higher.
That gives Cursed Crossbows a different identity from Elven Elite Ranger: Ranger offers superior reach and strong control, while Crossbows want a busier lane where rapid shots, kills and Cursed Bolt can keep triggering.
Sunray Master Is Ground Control, Not a General Anti-Air Mage
Sunray Master costs 760 Gold to reach Tier IV.
Its rapid bolts attack quickly, and its Sunray beam repeatedly damages enemies inside a small area while slowing them. The important limitation is that the beam does not target flying enemies.
That makes Sunray Master a poor choice if the Mage slot is expected to cover everything.
Exoburst is my preferred first skill. Rank I costs 100 Gold and makes every fourth rapid-fire hit deal extra damage while destroying 2% of the target’s armor.
Overcharge adds an area blast after the beam fires and applies another slow, which is better when the tower is positioned beside a heavily used choke.
Minor Elementals adds two small blockers and becomes useful when the road needs bodies more than another damage upgrade.
This tower should also not be confused with the Sunray Tower in Stormcloud Halls. The Stormcloud Halls weapon is a stage mechanic used for BURNING SUN; Sunray Master is one of the normal Mage towers you equip before entering a stage.
Wildcat Huntresses Trade a Third Body for More Offense
Wildcat Huntresses only deploy two units.
At Tier IV, each has 220 HP and 15% armor, compared with three soldiers from Knights Order. That difference is easy to feel when a large group hits the same choke.

I use them when the lane already has enough crowd control and I want the Barracks itself to help kill.
Grievous Bite is my first purchase against stronger enemies. Rank I combines physical damage with 48 true damage over 4 seconds.
For larger groups, Silver Knife bounces between targets and can be the better first purchase.
Raining Arrows is another AoE option, further pushing the tower toward offense rather than pure blocking.
When the lane is failing because too many enemies are simply walking through at once, I switch back to Knights Order instead of spending more Gold trying to force two Huntresses to behave like three blockers.
Gold Prospectors Need Enough Waves Left to Repay the Slot
Gold Prospectors bring eight dwarves at Tier IV, but their individual combat stats are much lower than the other Barracks options.
The real reason to equip them is income.

If I have brought Prospectors for economy, Reserve Miners is the skill I want. Its first rank costs 250 Gold and allows the tower to keep generating Gold while the dwarves are fighting.
That is a large additional investment, which is why I do not build the tower late.
Mad Spelunkers adds a mine cart attack and temporary dwarves, while Tunnel Blast adds damage and a stun when dwarves return to the road. Those skills improve combat, but they do not change the basic timing question:
Will the extra Gold arrive early enough to buy something important?
On a fifteen-wave stage with a stable opening, the answer can be yes. When the first four waves are already causing leaks, spending 800 Gold to reach Tier IV and then another 250 on Reserve Miners is solving tomorrow’s economy instead of today’s defense.
The Fifth Tower Should Fix the Map, Not Complete a Pattern
My safest early-to-mid campaign lineup is:
Archer Garrison + Knights Order + Scholar Mage + Royal Catapult + Elven Elite Ranger
It works because the five slots do different things.
Once the entire roster is available, the combination I start from more often is:
Sentry Watchtower + Knights Order + Scholar Mage + Royal Catapult + Elven Elite Ranger
Sentry replaces the cheap Archer slot when global range matters enough to justify its slow firing rhythm.
From there, I change one slot rather than rebuilding all five:
- Bring Ironbark Treant when another durable body and AoE are both useful.
- Bring Alchemist Shack when resistance-independent damage and slowing are more valuable than another long-range tower.
- Bring Light Priestess when one established choke contains several units and an expensive damage tower worth buffing.
- Bring Arcane Forger when packed armored enemies need magic AoE and control.
- Bring Cursed Crossbows when a busy lane contains durable targets that can justify Cursed Bolt.
- Bring Dwarven Culverin when one compact Artillery spot can also support the rest of the defense by stripping armor or magic resistance.
- Bring Gold Prospectors only when the opening is already safe enough for the economy to mature.
A stage that is failing for a specific reason rarely needs five replacements.
For the exact lanes, bosses and stage mechanics that determine those swaps, use the Kingdom Rush 6 Genesis Walkthrough.
When I Buy Tier IV Skills Instead of Another Tower
Reaching Tier IV does not mean the next Gold automatically belongs in all three skills.
A first-rank skill is attractive when it changes the next dangerous wave immediately:
- Tarred Zone keeps a crowd inside the kill zone.
- Bramble Shot stops one threatening enemy and slows the group around it.
- Scroll of Knowledge multiplies several towers that are already expensive.
- Resilience prevents the frontline from collapsing.
- Sticky Spillage gives several damage towers more firing time.
- Hardlight Prison temporarily removes elite pressure from a lane.
A second or third skill line is harder to justify while another route is still missing a basic answer.
I spend deeper once the tower is already sitting on one of the most productive positions on the map. At that point, improving the tower that fires through most of the stage can outperform adding a weak tower on a build point that barely sees enemies.
The permanent upgrades and the Ultimate unlocks use a separate progression system. If those upgrades or a tower itself are still locked, the requirements are in Unlocks & Progression.
Classic Rush Uses a Different Tower Roster
These choices apply to the normal Genesis roster.
Classic Rush replaces it with the original-style Archer, Barracks, Mage and Artillery branches, uses one hero and changes which specialist upgrades are available.
For Sorcerer Mage, Arcane Wizard, Tesla X104, Big Bertha and the rest of that setup, use the Classic Rush Guide.