Kingdom Rush 6 Genesis Best Heroes & Hero Tier List
Compare all 12 heroes, choose strong two-hero pairs, and pick talents for split lanes, bosses, flyers and heavy frontline pressure.
Updated:
Quick Answer
For the early campaign, Gerald + Zefira gives you a sturdy ground hero and a much more mobile magic attacker. Switch to Zefira + Bolin when flyers, long roads or two distant lanes matter more than another blocker.
Later, pair a durable ground hero such as Malik or Rhodes with a mobile damage hero such as Zefira, Drakkan or Ashbite rather than sending two heroes to compete for the same choke.
Kingdom Rush 6: Genesis lets you bring two heroes into a normal battle. That makes the second slot just as important as the first.
A powerful melee hero can hold one lane beautifully and still be the wrong choice beside another slow melee hero when the map splits. Two ranged heroes can cover a huge amount of road but struggle badly once a dense ground wave reaches the exit. The strongest pair is usually the one that divides the battlefield cleanly instead of doubling one job.
Hero upgrades reinforce those differences. Every hero has three main skills, normal stat upgrades, an Ultimate and two mutually exclusive Talents. By Level 10, a hero has enough points to complete the tree with one Talent, but not both.
I choose the Talent from the job I expect that hero to perform on the next map, not from a single universal build.
Kingdom Rush 6 Genesis Hero Tier List
| Hero | Tier | Strongest role | Talent I usually prefer | Good partner |
|---|---|---|---|---|
| Zefira | S | Mobile magic, resistance reduction, split-lane response | Weakening Aura | Gerald, Malik, Rhodes |
| Malik | S | Durable frontline, elite removal, AoE melee | Foehammer | Zefira, Bolin, Ashbite |
| Drakkan | S | Flying magic, silence, distant-lane response | Arcane Affinity on compact maps; Magic Phasing on wide maps | Malik, Rhodes, Oni |
| Ashbite | S | Flying physical pressure, true-damage AoE, heavy late-game damage | Spitfire | Malik, Rhodes |
| Rhodes | A | Pure frontline durability and sustained blocking | Impervious | Bolin, Zefira, Drakkan |
| Oni | A | Elite killing, true damage, armor stripping | Duel Fervor for long fights | Zefira, Drakkan |
| Illiana | A | Stuns, armor reduction and ranged support | Airborne Bliss when kept mobile | Rhodes, Malik |
| Gemina | A | Illusion blocking, magic pressure and extra bodies | Solid Light | Bolin, Drakkan |
| Ignus | A | Mobile true damage and crowded ground fights | Reverse Entropy | Rhodes, Malik |
| Gerald | A | Early frontline, armor support and safe blocking | Battle Vigor | Zefira, Bolin |
| Bolin | A | Long-range physical damage, mines and high-health targets | Sharpened Rounds | Gerald, Malik, Rhodes |
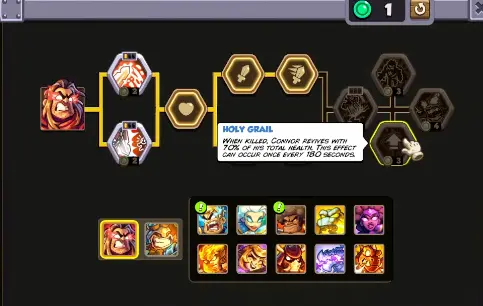
| Connor | B | Ability burst and aggressive melee | Holy Grail for safer campaign play | Zefira, Bolin |
B Tier does not mean Connor lacks damage. It means he asks for more careful timing and support than the heroes above him. His strongest windows are excellent; his weaker moments are less forgiving.
The later Steam roster and the mobile versions do not unlock heroes in exactly the same way. If a hero shown here is unavailable on your version, the platform differences are covered in Unlocks & Progression.
Gerald + Zefira Is the Early Pair I Trust Most
Gerald and Zefira divide the opening campaign naturally.
Gerald has the health and armor to occupy a real ground choke. Zefira can fight at range, use magic damage and move between distant parts of the map far more efficiently.
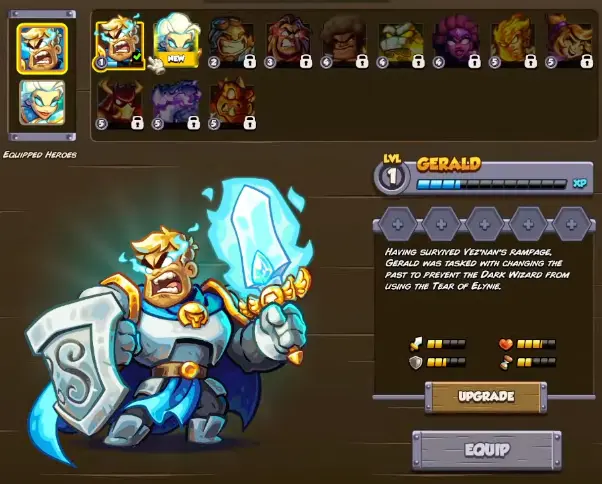
For Gerald, I work toward Inspire Courage early. At its highest rank it raises the armor of nearby allied units by 40% for 10 seconds, which gives a Barracks-heavy choke much more staying power.
His other important survival tool is Fated Survivor, which can prevent a death and restore a large portion of his health. Together, those skills make Gerald much harder to remove than his basic attack numbers suggest.
For the Talent, Battle Vigor is my normal campaign choice. Gerald regenerates 3% of his maximum health per second while blocking, which rewards exactly the position where I already want him.
Hardened Steel is the alternative when dangerous melee hits are the main problem, giving him a 35% chance to block melee attacks.
His Ultimate, Divine Blade, deals 200 true damage to the main target, stuns nearby enemies for a second and damages them as well. I save it for an elite standing inside a larger group rather than using it on the first enemy that enters the lane.
Gerald becomes less comfortable once the map repeatedly asks him to cross large distances. That is where Zefira starts carrying more of the pair.
Zefira Is the Most Flexible Early Hero
Zefira solves movement, magic damage and control without demanding a permanent spot on the road.
Dazzling Hammer gives her magic AoE and a short stun. At Rank III it deals 80–100 magic damage in the area.
Astral Blink matters even more on large maps. When Zefira travels a long distance, she teleports instead of walking; at Rank III she also gains 50% more damage for 8 seconds after the move.
That means repositioning her before a dangerous wave is not just faster. It can actively increase her output.
Her third line, Shielding Blades, raises her resistances while damaging nearby enemies and eventually adds a slow.
For most mixed defenses I take Weakening Aura as the Talent. Nearby enemy resistances are reduced by 30%, which improves the damage coming from Zefira and the towers fighting around her.
Spell Proficiency instead gives her basic attacks a 20% critical-hit chance. I use that when Zefira is spending most of the stage attacking from range rather than sitting inside a concentrated kill zone.
Her Ethereal Spears Ultimate deals 210 magic damage in total across a target area, giving the early pair another answer to grouped enemies without moving Gerald away from the main block.
Bolin Works Best When Someone Else Holds the Road
Bolin becomes much more valuable once flying enemies, long paths and high-health targets start making pure melee pairs feel slow.
His ranged attack is the main attraction, but his skills give him several ways to influence a lane without standing in front of the enemy.
Smoke Mortar fires three bombs and leaves smoke that slows enemies passing through the area.
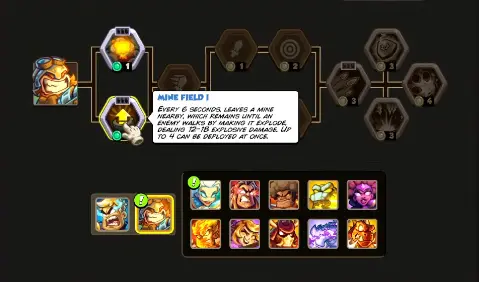
Mine Field becomes more useful the longer Bolin stays near the same section of road. At Rank III he can maintain up to 8 mines, each dealing 24–36 explosive damage.
Giant Slayer is the reason I like him against durable non-boss enemies. At Rank III, his basic attacks add damage equal to 3% of the enemy’s health; the effect is reduced against bosses.
His Talent depends on the enemy mix.
Sharpened Rounds makes basic attacks ignore 25% of enemy armor, which is my default when Bolin is being used to solve armored physical targets.
Explosive Rounds makes every fifth shot deal 24–36 explosive damage and is more useful when the lane is dominated by groups rather than one durable enemy.
Bolin’s weakness is still the frontline. Gerald + Bolin works because Gerald keeps enemies busy. Zefira + Bolin provides excellent range and mobility, but the tower setup then needs to supply more of the actual blocking.
Connor Is Strongest During His Ability Windows
Connor felt underwhelming to me when I first treated him like another Gerald.
He is not.
His skill tree is built around bursts of offense and dangerous low-health windows rather than simply standing on the road forever.
Arterial Slash III deals 52–78 physical damage around him and another 36 true damage over 8 seconds.
Earthshatter III creates 8 fissures, each capable of dealing 74–106 physical damage to enemies caught on the path.
Retribution III blocks the next melee attack and counters for 96–144 physical damage.
The Talent is the important commitment.
Battleborn increases Connor’s skill damage by 40% while below 40% health. It can produce much larger offensive windows, but it also asks you to leave a melee hero in a dangerous health range.
For normal campaign progression I prefer Holy Grail. Once every 180 seconds, Connor can revive after death with 70% health, making a bad melee exchange much less expensive.
His Ultimate, Templar Rage, is the moment to push him aggressively into an important fight. It stuns nearby enemies for one second, then gives Connor 55% attack speed, 100% extra attack damage and 30% movement speed for 10 seconds.
I move him into the dangerous group shortly before using it rather than triggering the Ultimate while he is still travelling across the map.
Malik Gives a Ranged Partner Room to Work
Malik is not simply a higher-stat Gerald. His kit is built around surviving a large enemy and disrupting the lane around him.
Unbreakable gives Malik a temporary health shield based on the health of the enemy he is blocking. The tougher his opponent, the more useful that shield can become.
Obliterate provides a very different kind of control. At its highest rank, Malik can knock the target completely out of the battle, with the cooldown reduced to 28 seconds.
His Hammernado Ultimate deals 160–240 physical damage over 5 seconds and slows nearby enemies, so the hero can pressure a group rather than only hold one target.
For most campaign maps, Foehammer is my preferred Talent because Malik’s basic attacks gain area damage. A hero standing inside the busiest choke gets much more from hitting several nearby enemies.
Lone Wulf gives Malik 25% extra damage when no friendly units are nearby. That becomes useful on a separate lane where he is intentionally working away from Barracks, Reinforcements and the second hero.
Malik + Zefira gives me one dependable ground anchor and one mobile magic hero. Malik + Bolin works when the towers already provide enough magic damage and I want the second hero to stay safely behind the fight.
Rhodes Is the Hero I Use When the Lane Must Stay Closed
Rhodes is slower and less damaging than many late heroes, but the defensive numbers tell the story.
By Level 10, Rhodes reaches 405 health and 50% armor before considering additional skill effects.
Strong Crust III restores 50% of maximum health and adds another 50% armor for 6 seconds. A hero that looked close to breaking can suddenly become extremely difficult to remove.
Twisting Top lets Rhodes move through a group while dealing repeated physical damage and slowing enemies by 30% at the highest ranks.
Sunbeam III adds frequent true damage on an 8-second cooldown.
For a normal choke I choose Impervious, which gives Rhodes another 20% armor while above 75% health.
The alternative, Unstoppable, makes him immune to stuns and slows. That becomes the better Talent when control effects are the reason he is failing to hold the position.
Rhodes pairs especially well with heroes that do not want to stand on the road: Bolin can keep shooting, Zefira can move between lanes, and Drakkan can handle distant magic pressure while Rhodes stays where the defense cannot afford to open.
Gemina Creates Her Own Frontline
Gemina is much less durable than Rhodes or Malik, but she does not need to provide every blocker with her own health bar.
Her kit creates illusions.
Forward Illusion repeatedly sends an illusion into the lane to damage and block an enemy. At Rank III it deals 36–54 magic damage on the charge.
Guarding Decoy lets Gemina dodge an attack and leave another blocking illusion behind.
Mirror Slashes then scales with those active illusions: Gemina and each illusion attack the enemies they are holding.
That makes Solid Light my default Talent. It raises illusion health to 110 and extends their duration to 8 seconds, strengthening the part of her kit that is already creating extra bodies.
Last Effort makes illusions explode on death for 48–72 magic damage in an area. I prefer it when the stage is sending dense groups and I am happy for the illusions to die as another source of AoE.
Her I Am Legion Ultimate sends illusions through the road, deals magic damage and leaves up to three new illusions behind.
Gemina is useful when the tower setup needs more temporary blockers without committing the second hero to another slow tank.
Ignus Turns Movement Into True Damage
Ignus is a melee hero, but his kit is far more mobile than a traditional frontline character.
Fireball deals true damage at range, while Flame Rush jumps between enemies three times. At Rank III each jump deals 120–180 true damage.
That makes Ignus valuable on routes where a stationary blocker would spend too much time waiting for enemies to reach him.
His two Talents create a clear choice.
Melting Core deals 8 true damage per second to nearby enemies. It is the aggressive option for a hero who will remain inside a dense melee group.
Reverse Entropy heals Ignus for 15% of maximum health whenever he uses one of his skills. I prefer it when Ignus is moving repeatedly between fights and needs to recover without leaving the action for long.
Supernova adds another AoE true-damage burst, dealing 240–360 true damage to each nearby enemy over 3 seconds.
Ignus works best beside a hero who can hold one predictable lane while he moves toward whichever group needs damage.
Illiana Turns Stuns Into Extra Damage
Illiana’s basic defenses are poor compared with the tanks. Her value comes from keeping enemies controlled while Sparky adds another source of damage.
Glitter Bomb III stuns enemies for 6 seconds.
That is already a long window for towers and Barracks to attack, but it also activates Illiana’s Easy Prey line: Sparky dives onto stunned enemies for additional physical damage.
Tag! III supplies a different advantage. Sparky’s flame bounces between targets for 75–105 true damage and reduces their armor by 25%.
That combination makes Illiana especially useful beside a strong physical tower setup.
Her Talent depends on how close she is getting to melee.
Elvish Nimbleness gives Illiana a 40% chance to dodge melee attacks and is the safer choice when she is regularly being caught on the road.
Airborne Bliss doubles her basic-attack damage while flying. On maps where she can stay mobile and use that state consistently, it is the more aggressive option.
I pair her with Malik or Rhodes when I want her skills working without asking her to become the main blocker.
Oni Is Built to Stay on a Dangerous Target
Oni is at his best when there is one elite enemy I actually want a hero to keep fighting.
Death Strike III deals 235–245 true damage to a single target.
Hellish Blink III teleports Oni onto a nearby leading enemy, strikes three times and permanently strips armor during the attack.
His own survival improves when his health falls because Netherfocus gives him a recovery tool below half health.
For a boss or durable elite, I prefer Duel Fervor. While Oni continues blocking the same enemy, his attacks heal him for 50% of the damage dealt.
Lethal Combo instead doubles the damage of his next basic attack after using a skill. It is better for an aggressive burst build where Oni is moving from target to target rather than staying in one duel.
His Sword Torment Ultimate deals 160–180 true damage across an area, so he still contributes when the dangerous target has smaller enemies around it.
Oni + Drakkan is a strong division of labor: Oni stays on the ground target, while Drakkan deals with distant lanes and magic-sensitive enemies.
Drakkan Covers Ground Heroes Cannot Reach Quickly
Drakkan is ranged, flying and deals magic damage. That alone gives him a useful role on maps where roads are far apart.
His skills push him further toward control.
Nullifying Pulse III deals 72–108 magic damage in an area and silences affected enemies for 12 seconds.
Double Dragon III creates a magical copy that remains active for 16 seconds, increasing the amount of battlefield Drakkan can influence at once.
Deconstruct adds another magic AoE around Drakkan himself.
The Talent decision is almost entirely about map shape.
On compact stages I prefer Arcane Affinity, reducing his skill cooldowns by 20%. More Nullifying Pulses and more clones are worth more than movement when every important target is already close.
On a large split map, Magic Phasing gives Drakkan long-distance teleportation. That is where he becomes one of the easiest heroes to reposition between two emergencies.
Drakkan also gains 100% magic resistance through his tree, making him an especially comfortable responder around magic-heavy enemies.
His Arcane Storm Ultimate sends magic meteors across the battlefield rather than forcing him to abandon his current lane.
Ashbite Has the Strongest Late Combination of Mobility and Staying Power
Ashbite is a flying ranged hero, but he is unusually durable for that role.
At Level 10 he reaches 500 health, while his basic ranged attack climbs to 48–72 physical damage.
His skills also give him several ways to ignore normal resistance problems.
Blazing Breath III deals 64–96 true damage in a cone.
Searing Sneeze III stuns nearby enemies for 4 seconds and leaves embers that deal 128 true damage over 8 seconds.
Feeding Time changes Ashbite from ranged support into a temporary melee attacker. He lands for eight seconds and bites for 80–120 physical damage; at Rank III, killing the target restores 40% of his maximum health.
For general use I prefer Spitfire. Ashbite’s normal attacks add a burn that deals 32 true damage over 4 seconds, so the Talent keeps improving every basic attack while he flies around the map.
Melting Fury is more specialized. Ashbite’s burning skills begin reducing enemy armor by 1% per second, which is valuable when the rest of the defense contains strong physical damage and durable armored targets.
His Wildfire Barrage Ultimate spreads multiple 64–96 true-damage fireballs over a large section of road.
Ashbite pairs cleanly with Malik or Rhodes. The ground hero stays committed to the choke while Ashbite uses his speed to answer the lane that changes.
Talent Choices That Change the Hero’s Job
The Talent does not need to be the same on every map.
| Hero | Safer / general choice | Switch when |
|---|---|---|
| Gerald | Battle Vigor | Use Hardened Steel when heavy melee hits are the main threat |
| Zefira | Weakening Aura | Use Spell Proficiency when she spends most of the battle attacking away from the main kill zone |
| Bolin | Sharpened Rounds | Use Explosive Rounds against numerous lighter enemies |
| Connor | Holy Grail | Use Battleborn when you are deliberately playing around low-health burst |
| Malik | Foehammer | Use Lone Wulf when Malik holds an isolated lane alone |
| Rhodes | Impervious | Use Unstoppable against heavy stun and slow effects |
| Gemina | Solid Light | Use Last Effort when illusion deaths can contribute useful AoE |
| Ignus | Reverse Entropy | Use Melting Core when he stays inside dense melee groups |
| Illiana | Airborne Bliss | Use Elvish Nimbleness when she is being forced into melee |
| Oni | Duel Fervor | Use Lethal Combo for faster burst and frequent target switching |
| Drakkan | Arcane Affinity | Use Magic Phasing on large split maps |
| Ashbite | Spitfire | Use Melting Fury when armor stripping benefits the rest of the defense |
The Ultimate becomes available through the Talent side of the tree, so I do not delay that branch indefinitely just to finish every basic stat node first. A well-timed Ultimate usually changes a difficult wave more than one small percentage upgrade.
Best Hero Pairs for Different Stages
Gerald + Zefira — Early Campaign
Gerald stays where enemies need to be stopped. Zefira responds to the lane that changes.
This pair covers both physical and magic damage without asking two heroes to stand on top of each other.
Zefira + Bolin — Flyers and Long Routes
Both heroes can contribute without entering every melee fight, and Zefira can move much faster when the pressure switches sides.
The tower setup needs a dependable Barracks or another blocking source because neither hero should spend the entire stage acting as the main wall.
Malik + Zefira — Balanced Mid-Campaign Pair
Malik takes the dangerous ground position while Zefira moves.
This is one of the easiest combinations to use on an unfamiliar stage because a dense melee wave and a distant leak do not require the same hero.
Rhodes + Bolin — Hold One Choke and Shoot Everything Else
Rhodes is difficult to remove once his defensive tree develops. That gives Bolin time to use mines, Smoke Mortar and ranged attacks from behind the line.
I use this combination when the map has one critical ground route and a long approach that rewards ranged fire.
Malik + Ashbite — Mobile Late-Game Pair
Malik supplies the permanent frontline; Ashbite has the health, range and movement to work almost anywhere else.
This pairing handles large maps more comfortably than two heroes that both need to remain inside the main choke.
Oni + Drakkan — Elite Pressure and Distant Coverage
Oni stays attached to the dangerous ground enemy. Drakkan deals magic damage, silences abilities and can respond to the other side of the battlefield.
On a compact stage, Arcane Affinity lets Drakkan cast more often. On a wide stage, Magic Phasing makes the pair much easier to split.
Move Heroes Before the Leak Starts
Two-hero control works much better when the assignment happens before a heavy wave enters the map.
On a split route, I leave the tougher ground hero on the choke that absolutely cannot open and place the faster ranged or flying hero on the lane most likely to change.
When both heroes start together and only move after an enemy has already passed the towers, the relocation itself becomes part of the failure.
Boss stages require a slightly different split. One hero can stay close to the boss, but the second should remain capable of stopping ordinary enemies that continue moving toward the exit. A small enemy slipping behind two heroes attacking the boss costs the same life as a much larger target.
For the routes and stage-specific pressure that determine those positions, use the Kingdom Rush 6 Genesis Walkthrough.
Do Not Replace a Leveled Hero Only Because a New One Appeared
Later heroes often arrive with stronger or more unusual kits, but familiarity still matters.
A hero already carrying the right skills for the current stage can outperform a newly available character whose upgrade tree does not yet match the job you are asking it to do.
The useful reason to swap is a role change:
- the current pair cannot reach two distant lanes quickly enough;
- a fragile ranged pair needs a real ground anchor;
- armor or magic resistance has changed which damage type is valuable;
- repeated stuns or slows are disabling the frontline;
- one elite enemy is surviving long enough to demand focused true damage.
Hero XP, starting levels, catch-up XP and Steam/mobile availability are handled through the progression systems rather than the battlefield choice itself. If the hero you want is still unavailable or underleveled, check Unlocks & Progression.
Hero Party changes the selection again because it allows four heroes and removes normal spells. Its four-hero positioning and restrictions are covered in Challenge Modes.