How I Fix Triggers and Memory Order When a Spell Feels Wrong
My way to trace a broken spell chain: find what each Trigger belongs to, see which Modifier it changes, check the activation condition, then test one effect.
Updated:
Quick Answer
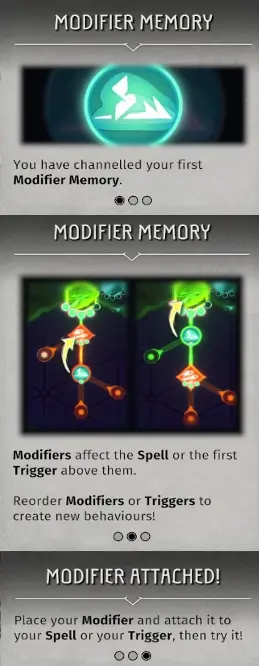
When a Trigger or Modifier does not behave the way I expected, I read the Canvas from the base Spell downward instead of treating every Memory as a global bonus. A Trigger belongs to the Spell or Trigger it is attached beneath. A Modifier affects the Spell or the first Trigger above it. Then I check the Trigger condition — Spawn, distance, or whatever the card requires — and test one visible result before changing anything else.
The first Trigger I found looked simple.
Attach it to a Spell.
Get another effect.
Then I added a Modifier.
Then another Trigger appeared.
Suddenly the useful question was no longer:
Is this Memory good?
It was:
What exactly is this Memory modifying?
That distinction fixed most of the spell setups that initially felt broken.
The Spell Canvas is not just a collection of bonuses.
Position changes ownership.
If I move one Memory across a Trigger boundary, I may have changed which effect it belongs to even though every icon still looks connected.
I Read Every Spell Chain From the Top Down
The basic Trigger rule is:
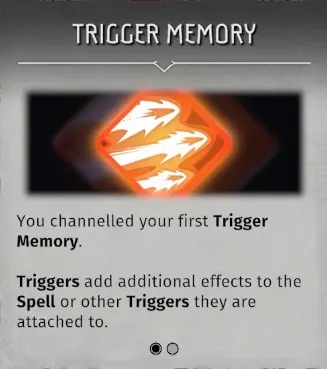
Triggers add additional effects to the Spell or other Triggers they are attached to.
So the first thing I identify is the base Spell.
Then I follow the branch downward.
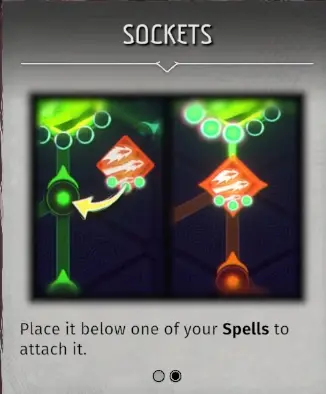
The socket tutorial makes the physical rule clear:
Place the Trigger below the Spell you want it attached to.
My basic reading order is therefore:
Spell → Trigger → anything attached beneath that Trigger
That gives me the structure before I start worrying about damage numbers.
Modifiers Are Where Order Really Starts to Matter
Modifiers follow a different rule:
Modifiers affect the Spell or the first Trigger above them.
This is the sentence I come back to whenever moving a Memory changes the spell in a way I did not expect.
If my branch looks like:
Spell
→ Trigger A
→ Modifier
I read that Modifier as affecting Trigger A.
If I move the same Modifier onto another branch where there is no Trigger between it and the Spell, I expect it to modify the Spell instead.
So I do not ask:
Where did I put the Modifier?
I ask:
What is the first Trigger above it now?
That is the more useful question.
Moving a Memory Only Matters If Its Relationship Changes
I initially overcomplicated Memory order because I assumed every rearrangement must create a different result.
That is not the rule I use anymore.
The better question is:
Did this move change what the Memory belongs to?
If I move a Modifier but the same Trigger is still the first Trigger above it, I do not automatically expect a dramatic difference.
If I move the Modifier past that Trigger and another effect now sits above it, that is a structural change.
That is when I expect different behavior.
This saves me from endlessly moving pieces around a Canvas that was already wired correctly.
Inner Storm Is My Easiest Modifier Test
I prefer testing a connection with something I can actually see.
Inner Storm is a good example.
Its Common Modifier effect is:
Leaves a trail of lightning that lasts 1 second and applies 10 Static.
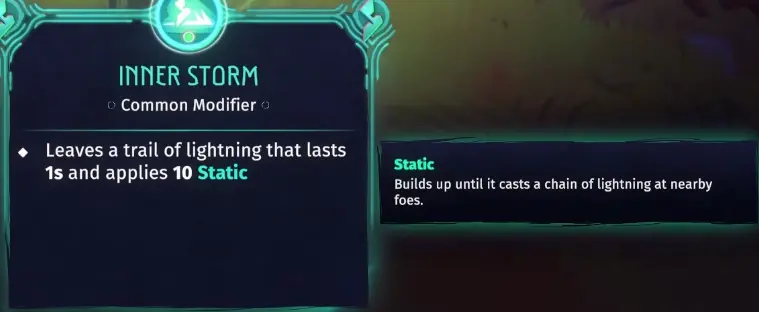
After I attached it to my projectile setup, the fireballs started leaving lightning behind them.
That told me the connection was doing something real.
I did not have to infer it from the Canvas.
I could see the result.
That became my preferred testing method:
make one change
→ leave the Watcher’s Heart
→ cast the Spell
→ look for the new behavior
→ only then add another Memory
If I add three new effects before testing, I lose track of which piece created the behavior I am seeing.
I Test Behavior Before I Judge Damage
When a Memory seems broken, I do not begin by staring at the damage number.
I first look for the behavior the card promises.
For Inner Storm:
lightning trail.
For a projectile Trigger:
additional projectile.
For a movement effect:
different movement pattern.
For a status Memory:
the expected status actually appearing.
If the behavior happens, I know the connection is probably working.
Then I can decide whether the numbers are good enough.
That prevents me from confusing two completely different problems:
The Memory is wired incorrectly.
and:
The Memory works, but the build is weak.
I fix those in different ways.
I Check What the Base Spell Already Does
Another source of confusion is forgetting that the base Spell may already be creating effects before I attach anything.
Exae Aura is a good example.
The version I used showed:
- 40 Damage
- 2.0s Duration
- 12 Length
- 20 Static
- Overflow
Static builds until it produces chain lightning at nearby foes.
Overflow appears after prolonged use, forces a cooldown, and allows lightning bolts to fire while moving.
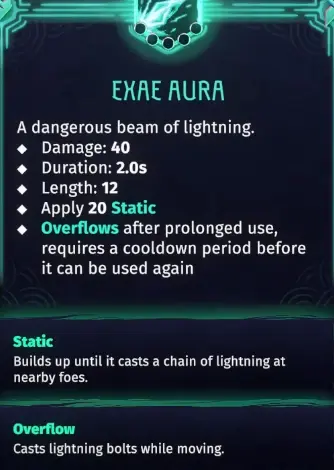
If I add another lightning Memory and then see lightning everywhere, I do not automatically credit the new Trigger for all of it.
I first ask:
What was Exae Aura already doing?
Then I add one effect and compare.
That baseline matters even more once a build has several lightning, Static or movement effects happening at once.
A Correct Connection Still Needs the Correct Trigger Condition
A Trigger can be attached perfectly and still appear inactive.
That is because connection and activation are separate questions.
The Trigger card tells me when it fires.
I found conditions such as:
Triggered on Spawn
and other triggers that care about different events.
So I separate the two rules:
Connection tells me which branch owns the Trigger.
Condition tells me when the Trigger activates.
If I forget the second rule, a working Trigger can look completely broken.
For example, if a Trigger waits for a Spawn event, repeatedly holding the base Spell may not reproduce the event I am trying to test.
I need to trigger the condition the card actually names.
First Snow Shows Why I Read the Whole Trigger Card
First Snow is a useful example because its card gives me several pieces of information at once.
It is:
Triggered on Spawn
and the version I found showed:
- 0.5s Duration
- 15 Chill
- a 15% damage increase shown on the card
The card also states that Trigger damage relies on the base damage of the Spell.
That last line is easy to overlook.
It means I cannot judge First Snow only by looking at First Snow.
If I move it beneath a different base Spell and its damage changes, I do not immediately assume something is wrong.
The Spell feeding the Trigger is part of the calculation.
This is also why I do not compare the same Trigger across two Spells without checking the base Spell first.
My Troubleshooting Order When the Spell Feels Wrong
When a setup suddenly stops making sense, I do not rebuild everything.
I follow the same sequence.
1. Identify the base Spell
I remind myself what the Spell already does without the new Memory.
That is my baseline.
2. Follow the branch downward
I identify every Trigger attached beneath that Spell.
I do not assume two nearby icons belong to the same chain.
3. Check each Modifier from the bottom upward
For each Modifier, I ask:
What is the first Trigger above this node?
If that is not the effect I wanted to change, the likely problem is already visible.
4. Read the Trigger condition
I check whether it activates on:
- Spawn;
- distance;
- another event;
- or some other condition shown on the card.
A Trigger cannot prove it works until I actually create the required event.
5. Test one visible result
I look for one clear behavior.
For Inner Storm, that is the lightning trail.
I do not judge the whole build at once.
6. Add the next Memory only after the first one makes sense
This takes a little longer immediately.
It saves much more time after the Canvas becomes complicated.
I Do Not Fix a Wiring Problem by Rebuilding the Whole Spell
This was one of my worst habits early on.
Something did not activate.
So I changed the base Spell.
Then I moved another Trigger.
Then I replaced a Modifier.
Now I had four new variables instead of one problem.
I do not do that anymore.
If the Spell itself was already clearing rooms well, I assume the core build is still usable.
I diagnose the new Memory first.
Only if the connection is correct and the result is still bad do I return to the wider build decision.
That wider question —
Which base Spell, Memory upgrade or Spell Form is actually worth using?
— belongs in my Spellcrafting Guide.
This page stays focused on:
Why is the chain not behaving the way I expect?
Before a Guardian, I Remove Effects I Never Verified
Normal rooms are where I experiment.
A Guardian is where I want certainty.
Before I commit to a major fight, I open the Watcher’s Heart one more time and look for anything I added without properly testing it.
I check for:
- a Trigger whose condition I rarely activate;
- a Modifier sitting under the wrong Trigger;
- a status payoff after I stopped producing that status;
- a Memory I added because it looked strong but never verified;
- or a branch I changed and forgot to test.
If I find one, I either fix it or remove it.
I would rather enter a Guardian with a smaller chain I understand than a crowded Canvas full of effects I am only assuming work.
The Four Questions I Use When a Memory Seems Broken
If I need the shortest possible check, I use four questions.
What base Spell owns this branch?
Then:
What Trigger is directly above this Modifier?
Then:
What condition is supposed to activate the Trigger?
Then:
What visible behavior should appear when it works?
If I can answer all four, I usually know where the problem is.
The Canvas felt complicated when I tried to read every Memory simultaneously.
It became much easier when I started reading one branch as a sequence:
Spell → Trigger → Modifier → activation condition → visible result
Once that chain is clear, Memory order stops feeling random.
I can move pieces because I know what relationship I am changing, rather than moving them until something happens.