How I Complete the Cannon Quest and Build Doombringer 3000
I reach Strength 4, lift the cannon, build it, upgrade to Doombringer 3000 and prepare enough furniture value to fire at Furnox.
Updated:
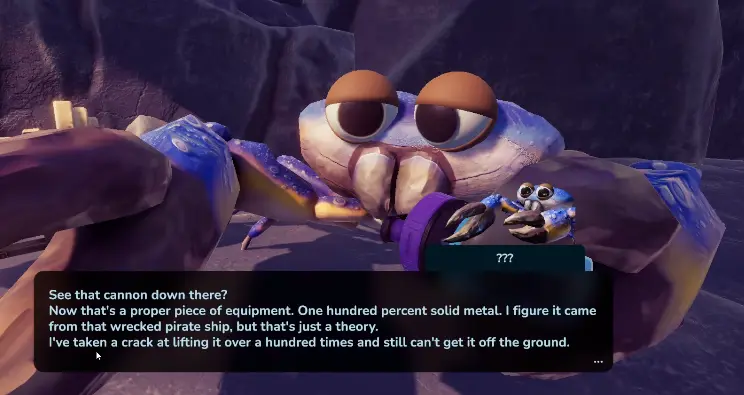
Quick answer: the first cannon blocker is Strength 4. I stop trying to move it below that threshold, raise Strength and return. Lifting it gives me the Kettlebell recipe and advances the Cannon Foundation route. Later, I build the working Cannon, finish Sheldon’s next mission and talk to Fish for the Doombringer 3000 upgrade. That stage needs Sheldon, 3 Hamsters and a Steel Helmet in my run. Once the upgraded Cannon is ready, I fill its inventory until the displayed furniture value reaches 1,000, aim it at Furnox and fire.
The Cannon quest fooled me twice.
The first time, I thought the cannon itself was bugged because I could interact with it but could not pick it up.
Later, after I finally moved it, I assumed the quest was nearly finished.
It was not.
The Cannon route is really several different progression gates stacked on top of each other:
Strength
→ lift the cannon
→ Cannon Foundation
→ build the Cannon
→ Sheldon
→ Doombringer 3000
→ furniture-value firing
Each gate needs a different solution.
Once I stopped trying to solve all of them as if they were the same cannon problem, the route became much easier to follow.
The First Cannon Requirement Is Strength 4
Sir Worcestershire eventually gives me:
Pick up the cannon
When I try before I am ready, the game gives the actual requirement:
Strength 4 required
This is not:
- an Axe requirement;
- a hidden button;
- a positioning puzzle;
- a missing cannon part.
I simply need more Strength.
How I Reach Sir Worcestershire’s Cannon Quest
The Cannon is part of Sir Worcestershire’s progression rather than a free-standing world puzzle.
The useful route checkpoint for me is reaching his side of the map after unlocking the traversal needed to cross the water.
The Wooden Shoes let me cross and reach his island.
From there, I follow his requests instead of immediately hunting for the Cannon.
His progression introduces several fitness-related items, including:
- Dumbbells;
- Weight Bench;
- Barbell;
- Strength upgrades.
Eventually he gives the Cannon challenge directly.
If I can see the Cannon but Sir Worcestershire has not told me to pick it up yet, I keep progressing his quests.
Finish the Training Equipment Before Forcing the Cannon
The Weight Bench and Barbell are not random side furniture in this route.
They are part of the progression leading into the Strength check.
My useful mental order is:
training equipment → Strength progression → Cannon
That prevents me from treating the Cannon as the active objective too early.
Why Strength 3 Is Still Too Low
I reached the Cannon once at:
Strength 3
The requirement was:
4
There is no partial success here.
Being one point short still means I cannot lift it.
So once I see that I am under the threshold, I leave.
If several other progression objectives are open at the same time, I continue with the larger route in my Chop Chop Inc Progression Guide rather than repeatedly travelling back to the Cannon.
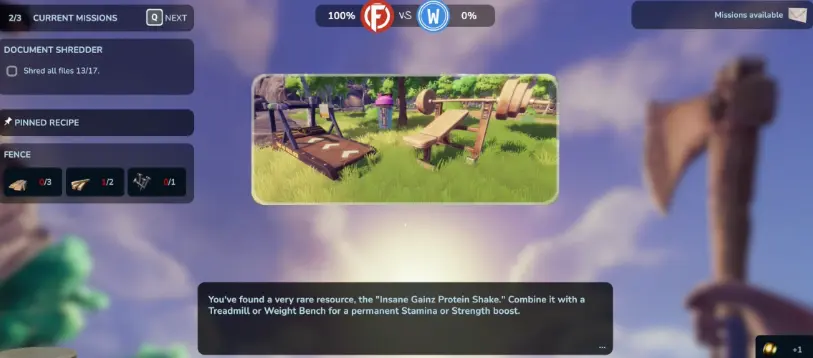
Insane Gains Protein Shake Gives Me Permanent Stat Progression
One of the useful Strength items I find is the:
Insane Gains Protein Shake
Its description connects it with the Treadmill or Weight Bench for permanent stat progression.
For this Cannon blocker, I care about Strength.
I do not sell the shake simply because it has value.
If I am below Strength 4, removing the progression gate is worth more than a small cash boost.
One Protein Shake Route Uses 10 Raw Eggs
One straightforward Protein Shake request I complete asks for:
10 Raw Eggs
If my chickens already produce eggs and I am still blocked by Strength, I keep ten instead of selling everything.
That prevents an annoying loop:
sell eggs
→ discover Cannon stat gate
→ receive useful Protein Shake request
→ wait for chickens again
If I have already reached Strength 4, I do not interrupt a more important progression project just to collect another shake for this Cannon step.
The threshold is what matters.
Use the Weight Bench for Strength
Having the Protein Shake alone is not the entire solution.
I use the Strength side of the training progression and then check the actual stat afterward.
My sequence is:
- keep the Protein Shake;
- keep the Weight Bench available;
- use the Strength progression;
- check my character stats;
- return once Strength is at least 4.
I do not judge success by the training animation.
I check the number.
My Successful Cannon Lift Happened at 4.6 Strength
In one completed run, my Strength reached:
4.6
The Cannon then became available to pick up.
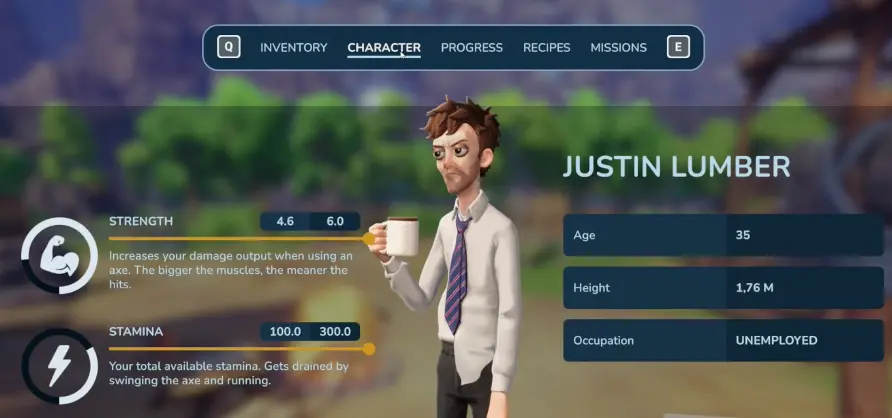
So the useful rule is:
below 4 → Cannon blocked
4 or higher → return and try again
I do not keep grinding Strength just to create a larger margin.
Lift the Cannon and Get the Kettlebell Recipe
Once I meet the stat requirement, I return to the same Cannon.
I do not need another special tool.
I interact with it normally and lift it.
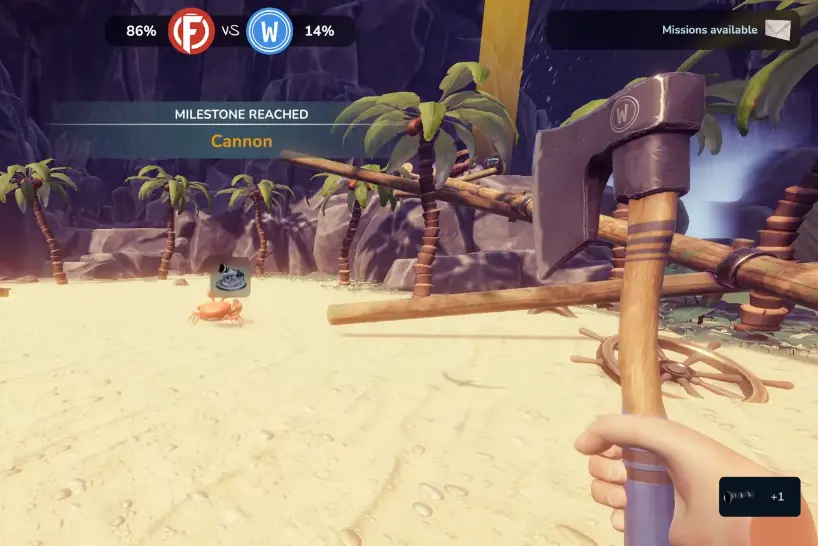
The reward is:
Kettlebell
This is where the original Cannon blocker ends.
But the Cannon quest itself continues.
Cannon Foundation Is the Next Stage
After the successful lift, the route moves into the:
Cannon Foundation
At this point I stop thinking about Strength.
The problem has changed from:
Can I move the Cannon?
to:
Can I build the infrastructure needed to use it?
This distinction matters.
Training more Strength does not solve a Foundation material shortage.
I read the current construction requirements and work on those instead.
Continue the Cannon Unlock Through Fish
The next Cannon progression also takes me back to Fish.
This was easy to miss because the original challenge began with Sir Worcestershire.
Once the Foundation objective is active, I check Fish rather than assuming every following step stays with the same NPC.
The Cannon route starts branching into:
- construction;
- Hamsters;
- Metal;
- later Sheldon progression.
At this point I stop treating it as a simple fitness quest.
The Working Cannon Build Uses Hamsters, Screws and Ingots
Later, when I am ready to assemble the working Cannon, the resource cost becomes much more substantial.
In my completed build, I prepare:
- 2 Hamsters
- 5 Screws
- 16 Ingots
- the Cannon I already recovered earlier
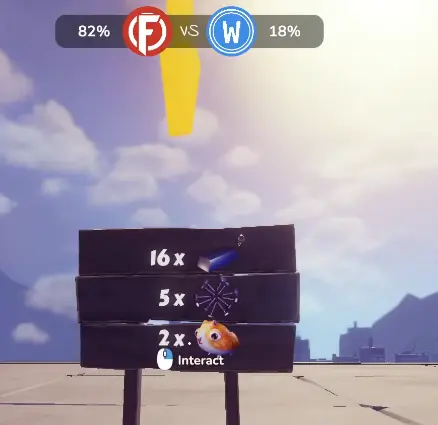
This is where Metal supply matters much more than additional training.
If I am missing Ingots, I go gather Metal.
If I am missing Screws, I craft Screws.
If I am missing Hamsters, I work on that supply.
I do not return to the Weight Bench expecting another Strength point to help.
I Get the Two Hamsters Before Finishing the Cannon
Hamsters become a repeated Cannon resource.
For this build, I make sure I have the two I need before I commit all the easier Metal components.
That prevents me from ending up with most of an expensive build ready while the difficult biological requirement is still missing.
I do not turn this page into a complete Hamster guide.
For the Cannon route, the important decision is simply:
if the build asks for Hamsters, get those before assuming Metal is the only blocker.
The Cannon Can Hold Goods After It Is Built
Once the Cannon is assembled, its function becomes clearer.
It has an inventory that can hold goods.
That is important later because the Cannon progression eventually cares about the value of the furniture inside, not just whether the Cannon physically exists.
At first, however, I continue Sheldon’s story before worrying about optimizing the payload.
Build the Hamster Drone for Sheldon
The next important Cannon-related story step runs through Sheldon.
I build a Hamster Drone and use it to send him on his next mission.
The build itself has several small components and needs another Hamster.
I do not reproduce its full crafting sequence here because the Cannon is the Owner Page, not the Hamster Drone.
The important part is what happens afterward.
Sheldon returns and starts planning a much stronger attack on Furnox.
That conversation leads directly into the upgraded Cannon.
Sheldon Sends Me Back to Fish for a Cannon Upgrade
After Sheldon’s drone mission, he wants a much more serious Cannon setup.
He talks about adding components such as:
- a seat;
- a lever;
- a sight;
- a helmet.
Then I return to Fish.
Fish gives me the next major Cannon recipe:
Doombringer 3000
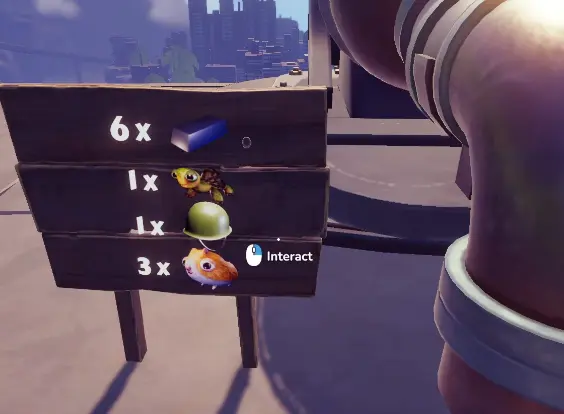
This is the real late Cannon upgrade.
Doombringer 3000 Needs Sheldon, 3 Hamsters and a Steel Helmet
The most obvious blockers shown when I inspect the Doombringer 3000 are:
- Sheldon
- 3 Hamsters
- Steel Helmet
That explains why I do not try to complete this upgrade immediately when it first appears.
I already know Hamsters are useful elsewhere.
Now I need another three for the Cannon route alone.
I collect those deliberately instead of using every available Hamster on another optional machine.
Put Sheldon Into the Doombringer
Sheldon himself is part of the Cannon setup.
After the preceding drone mission and conversation, I bring him back to the new Cannon and place him into the seat.
That clears one of the unusual upgrade requirements.
This is another reason I do not treat the Doombringer as a normal crafting recipe.
Some of its “materials” are really story-state requirements.
I Do Not Search the Whole Map for the Steel Helmet
The Steel Helmet became the main blocker in my Doombringer build.
The game clearly showed that I needed one.
What was less obvious was where I was supposed to get it.
I did not keep searching every environment for a loose helmet indefinitely.
Later in my run, the Steel Helmet became craftable and I made it.
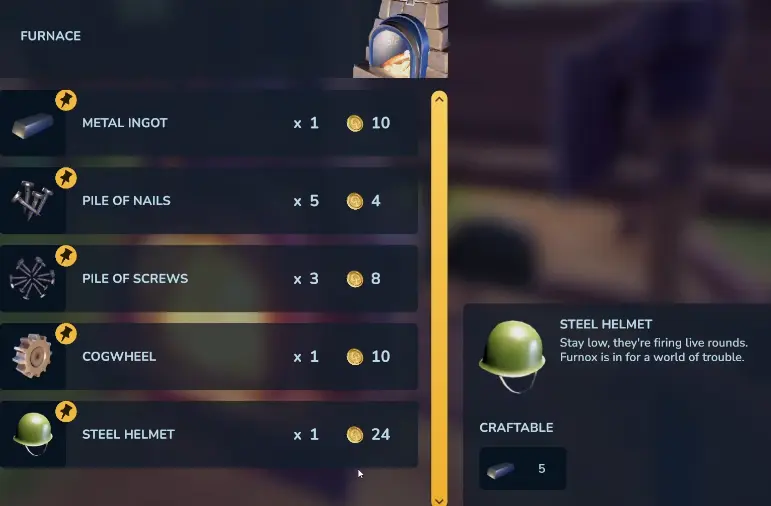
I do not claim a fixed world location for it here because I have not verified one.
If the Helmet is still unavailable in my crafting options, I continue the surrounding progression instead of inventing a location.
Finish the Doombringer Before Farming Cannon Ammunition
Once Sheldon, the Hamsters and Steel Helmet are handled, I finish the Cannon upgrade.
Only then do I start putting serious effort into its payload.
Before that point, producing hundreds of pieces of furniture just because I know the Cannon will need them later can waste storage and resources.
I finish the permanent Cannon upgrade first.
Then I solve the furniture-value requirement.
The First Doombringer Shot Needs 1,000 Furniture Value
After the upgraded Cannon is ready, the inventory display shows the actual firing target.
For my first major shot, I need:
1,000 total furniture value
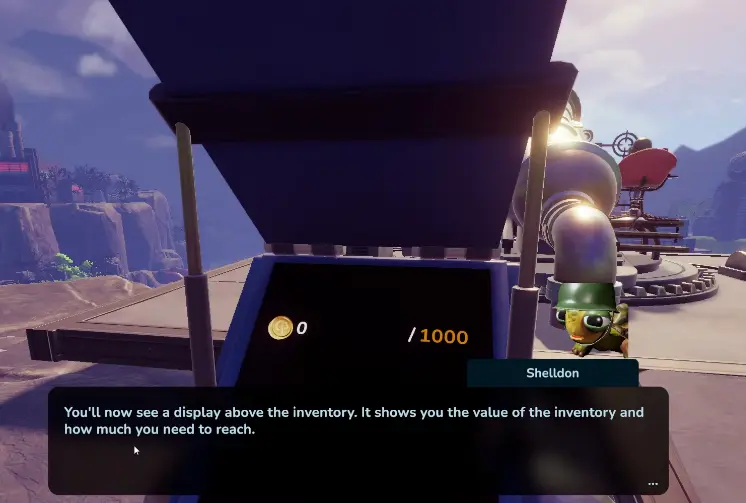
This changes how I prepare the payload.
I am no longer asking:
Which exact chair does the Cannon want?
I am asking:
What is the cheapest, easiest furniture volume I can produce to reach the displayed total?
I Use Cheap Repeatable Furniture for Cannon Value
This is where Bober becomes especially useful.
I already have an automation setup capable of making repeatable furniture such as Carved Birds.
Instead of manually assembling a large pile of expensive furniture, I can let Bober produce cheap repeatable output while I do something else.
I keep the exact:
- Production Limit;
- Amount per Cycle;
- recipe setup;
- Bober troubleshooting
in my Chop Chop Inc Automation Guide.
For this Cannon page, the important decision is:
use automation to solve the high-volume furniture problem once the Cannon actually asks for volume.
I Do Not Sacrifice Rare Materials Just to Reach 1,000 Faster
A high-value furniture recipe can make the Cannon meter rise quickly.
That does not automatically make it the best choice.
If one piece consumes:
- Metal;
- Electric Wood;
- Crystal Wood;
- another progression resource;
I compare that cost with simply making more cheap furniture.
For the Cannon, quantity can be easier to replace than advanced resources.
I would rather send a large pile of cheap items toward Furnox than discover I used the Crystal or Metal reserve needed for the next permanent unlock.
How I Fire the Cannon
Once the inventory value reaches the displayed target, I finish the firing sequence.
I:
- fill the Cannon inventory to the required value;
- use the front ignition/candle interaction;
- turn or aim the Cannon toward Furnox;
- use the firing control.
The furniture is converted into the Cannon’s attack payload.
If the Cannon is built but will not fire, the first thing I check is the inventory value display.
The physical Cannon being complete does not mean its payload is ready.
Later Cannon Shots Can Ask for More Than 1,000
I do not assume:
1,000 is the permanent Cannon requirement.
Later in the same run, another Cannon shot required:
3,000 value
So I treat the number on the current Cannon display as the source of truth.
My rule is:
check the current value target every time.
That prevents me from producing 1,000 worth of furniture, returning later and assuming the Cannon is broken because the next objective wants more.
This Is When High-Volume Automation Becomes Worth It
The change from ordinary furniture sales to:
1,000
and later:
3,000
of Cannon value is exactly the kind of workload that makes automation useful.
Early in the game, manually producing a few pieces is fine.
At this stage, manually repeating the same cheap recipe dozens or hundreds of times is no longer a good use of my time.
That is why the Cannon and Bober work well together.
The Cannon owns the required value and firing decision.
The Automation Guide owns how I configure Bober to produce that volume efficiently.
Strength Still Helps Later, but It Is Not the Same Cannon Gate
I continue raising Strength later because stronger character stats make other parts of the game easier.
That does not mean every later Cannon problem is solved with more Strength.
I separate the stages:
Cannot lift original Cannon → check Strength 4.
Cannot build Cannon → check construction materials and Hamsters.
Cannot finish Doombringer → check Sheldon, 3 Hamsters, Steel Helmet and current upgrade requirements.
Cannot fire → check Cannon inventory value and firing state.
That diagnostic order saves much more time than continuing to train whenever anything Cannon-related stops.
What I Check If the Cannon Quest Is Stuck
The Cannon will not move
I check:
Is Strength at least 4?
If not, I train.
I am at Strength 4 but still do not have the lift objective
I finish Sir Worcestershire’s current training progression first.
I lifted the Cannon but the quest is not finished
That is expected.
I move into the Cannon Foundation stage.
I have the Foundation but cannot build the Cannon
I check the actual construction list.
In my completed route, the later Cannon build uses the recovered Cannon along with Hamsters, Screws and a substantial Ingot requirement.
Sheldon is not advancing the Cannon story
I finish his Hamster Drone route and talk to him again after his mission.
I cannot find the Doombringer 3000
I return to Fish after Sheldon gives me the Cannon-upgrade objective.
Doombringer is almost complete but one requirement remains
I check:
- Sheldon;
- three Hamsters;
- Steel Helmet;
- any remaining visible material requirement.
Steel Helmet is missing
I check whether the recipe has become craftable.
I do not assume an unverified fixed pickup location.
The completed Cannon will not fire
I look at the Cannon inventory value.
If the displayed target is not met, I add more furniture before troubleshooting anything else.
When I Spend and When I Save
The Cannon chain asks for several different resource types.
I spend aggressively when the resource finishes a permanent step:
- reaching Strength 4;
- completing the Cannon;
- finishing Doombringer 3000.
I become more conservative when I am only trying to raise payload value.
For payload, cheap repeatable furniture is preferable to burning rare progression material.
That is also why I do not sell every:
- Egg;
- Hamster-related resource;
- Metal supply;
the moment I obtain it.
The Cannon route reuses several things that looked expendable earlier.
My Full Cannon Quest Order
The route I use now is:
Reach Sir Worcestershire
→ complete his training-equipment progression
→ accept Pick Up the Cannon
→ see Strength 4 requirement
→ leave if Strength is below 4
→ use permanent Strength progression
→ return at Strength 4+
→ lift the Cannon
→ receive the Kettlebell recipe
→ unlock the Cannon Foundation
→ continue the Cannon route through Fish
→ prepare the working Cannon build
→ use the recovered Cannon + required Hamsters, Screws and Ingots
→ finish Sheldon’s Hamster Drone progression
→ return to Sheldon
→ talk to Fish for Doombringer 3000
→ place Sheldon in the Cannon
→ supply 3 Hamsters
→ craft the Steel Helmet once available
→ finish Doombringer 3000
→ fill the Cannon inventory to the current furniture-value target
→ aim at Furnox and fire
The first time I get stuck, the answer is Strength 4.
Later, Strength is no longer the question.
The Cannon quest keeps changing what kind of blocker it is, and the fastest route is recognizing which stage I am actually on.
FAQ
How much Strength do I need to lift the cannon in Chop Chop Inc? +
The cannon shows a Strength 4 requirement. I can lift it once my Strength reaches at least 4; my successful run happened at 4.6.
What does Doombringer 3000 need in Chop Chop Inc? +
My Doombringer 3000 build shows Sheldon, three Hamsters and a Steel Helmet among its key requirements. I finish Sheldon's preceding route and make sure the Helmet is craftable before trying to complete the upgrade.