How I Set Up Automation in Chop Chop Inc
I start Chop Chop Inc automation with Bober, control furniture production, then expand into the Work Hall and connected machine automation.
Updated:
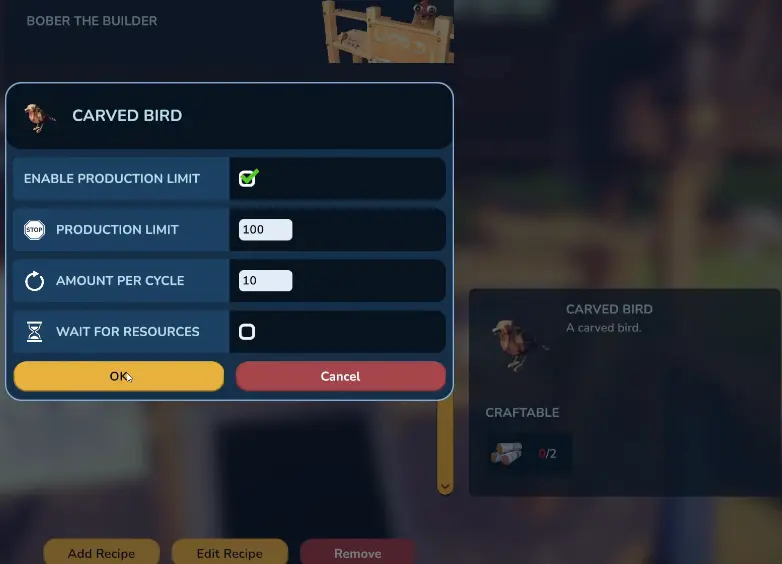
Quick answer: I start automation with Bober, not the Work Hall. I add a useful recipe to his Automatic Furniture Crafter, set a Production Limit and Amount per Cycle, then supply the exact input the recipe needs. My regular Carved Bird setup uses a limit of 100 with 10 per cycle. Later, when the Cannon needs a much larger volume of furniture, I raise that same recipe to 1,000. I move into the Work Hall only when processing and moving materials between several machines becomes a bigger bottleneck than furniture crafting itself.
Automation looked like an obvious “build everything” upgrade when I first started seeing automatic machines.
It is not.
An automatic machine saves me from repeating a production step.
It does not solve a bad resource supply.
That distinction determines almost every automation decision I make.
If I have plenty of a material and hate processing it:
that is an automation problem.
If I cannot get enough of the material in the first place:
that is a progression or supply problem.
I only invest heavily in automation once I know which problem I actually have.
My Chop Chop Inc Automation Order
The order I use is:
- finish Bober’s Carving Bench;
- automate one repeatable furniture recipe;
- set a production limit instead of letting it run blindly;
- feed Bober abundant input materials;
- use the automatic output for sales or progression;
- increase production only when a high-volume objective needs it;
- build the Work Hall when several production steps are becoming repetitive;
- add the Inventory and Distribution System when machine-to-machine logistics matter;
- automate Furnace or Saw processing according to my actual bottleneck;
- add automatic transfer controls after moving output becomes repetitive too.
I do not need a complete factory before automation becomes useful.
Bober already gives me a meaningful reduction in manual work much earlier.
Bober Is My First Useful Automation Upgrade
Bober is the first automation system I actually build around.
His Carving Bench gives me access to repeated furniture production without requiring the entire later Work Hall network.
That matters because furniture is already one of the most repetitive parts of the normal economic loop.
I am constantly making things for:
- missions;
- city requests;
- ordinary sales;
- later high-volume objectives.
Automating that work gives me value before I have any reason to build a full production network.
Build Bober’s Carving Bench First
The Carving Bench itself is not free.
The build includes:
- 4 Clamps
- 1 Vice
- 10 Piles of Nails
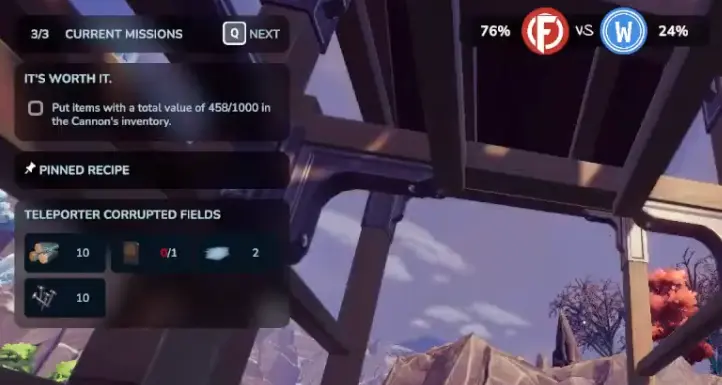
The supply shop makes some of those parts deceptively expensive.
In my run:
- a Clamp was listed at 69 coins;
- a Pile of Nails was 8 coins.
That means the ten Nails alone would cost another 80 coins if I bought all of them.
I therefore do not buy automation parts one by one just because I currently have the cash.
If I am close to finishing the whole bench, I commit.
If an access structure, city project or other permanent progression unlock needs the same money first, I usually finish that instead.
The larger progression order I use is in my Chop Chop Inc Progression Guide.
How I Start a Bober Automation Job
Once Bober’s production setup is ready, I start with Add Recipe.
My basic setup is:
- choose the recipe;
- open its production settings;
- enable a Production Limit if I want a fixed cap;
- choose the Amount per Cycle;
- decide whether I want Wait for Resources enabled;
- give Bober the exact material the recipe requires.
The important part is step 6.
Automation still uses the real recipe inputs.
Bober does not create materials from nothing.
Production Limit Is My Most Important Setting
The setting I use most is:
Production Limit
It gives me a ceiling for the current job.
Without a useful limit, a repeatable recipe can keep consuming materials that I later need for:
- a bridge;
- an Axe upgrade;
- a city project;
- another machine;
- a Cannon requirement.
A production limit turns the machine from:
“make this forever”
into:
“make this much, then stop.”
That is much safer while several systems still share the same resources.
My First Carved Bird Setup Uses a Limit of 100
One of my first useful automated recipes is Carved Bird.
I use it because the input is simple and I can supply Birch without sacrificing one of my harder progression resources.
For this regular production job, I configure:
Production Limit: 100
and:
Amount per Cycle: 10
I leave Wait for Resources unchecked in this setup.
The important number here is not specifically 100.
The important idea is that I am controlling how far the job is allowed to run.
If I only need a few mission items, I can use a smaller limit.
If I deliberately need huge output later, I can increase it.
Amount per Cycle Is Different From the Production Limit
I keep these two settings separate.
Production Limit controls the total amount I allow the job to make.
Amount per Cycle controls how much it attempts during an individual production cycle.
In my Carved Bird setup:
Production Limit: 100
but:
Amount per Cycle: 10
I do not automatically raise both numbers together.
For an expensive recipe, a large per-cycle setting can drain materials too aggressively.
For abundant Birch production, I am more comfortable allowing larger repeated batches.
What I Do With Wait for Resources
The third control is:
Wait for Resources
It appears directly alongside the production limit and cycle controls.
In both Carved Bird configurations shown in this guide, I leave it unchecked and manually supply the input I want Bober to consume.
That gives me tighter control over material usage.
If I am experimenting with a recipe that I want to remain ready while its inputs are temporarily unavailable, this is the control I would use for that behavior.
For scarce resources, I still prefer controlling the production limit rather than leaving a large automatic job ready to consume whatever I acquire next.
Feed Bober the Exact Recipe Input
After configuring my Carved Bird job, I go out for Birch.
I had several Birch-related materials available, but the recipe wanted the specific raw input:
Birch Logs
That distinction matters when an automatic recipe looks like it is not working.
In this run I had 57 Birch Logs available.
I gave Bober 30.
Once the correct input was supplied, he started producing Carved Birds automatically.
That is when automation became useful for me.
Instead of standing beside the same crafting station repeating the same action, I could leave and work on another objective.
I Use Bober to Create Sale Output While I Progress Elsewhere
Carved Birds also give me a simple way to turn spare Birch into sellable furniture.
The loop changes from:
gather → manually craft repeatedly → sell
to:
supply Bober → leave → return → collect output → sell
It is not completely passive income.
I still provide the resource and handle the output.
But it removes the part I was repeating most.
That is enough to make it valuable.
I prefer this kind of automation early because Birch is much easier for me to replace than later special materials.
I Do Not Automate My Rarest Recipe First
An advanced recipe can look like the obvious automation choice because the finished item is valuable.
That is not how I choose.
I automate based on:
- how often I make the item;
- how reliable the input is;
- whether the input is still needed for progression;
- whether the output solves a current objective.
That usually pushes cheap repeatable furniture above rare decorative recipes.
If I am still struggling to find Metal, Electric, Crystal or another special wood, I solve that supply problem first.
Those resource routes belong in my Special Wood Guide.
The Cannon Changes My Bober Settings
Later, the Cannon creates a very different production problem.
It needs a large amount of furniture value.
At that point I no longer want a modest production batch.
I want volume.
This is where I return to the same Carved Bird recipe and dramatically increase its limit.
Instead of:
100
I set:
1,000
while keeping:
Amount per Cycle: 10
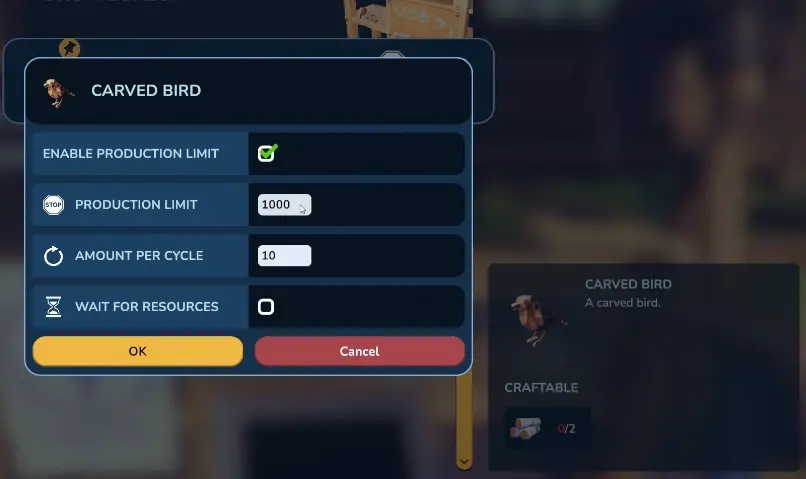
This is the clearest example of why I do not recommend one universal “best Bober setting.”
The same recipe can need a completely different production limit depending on what I am trying to accomplish.
Why 100 Is Not Better Than 1,000
For normal production:
100 can be plenty.
For the Cannon:
1,000 can make sense.
The difference is not the efficiency of the machine.
It is the objective.
A 1,000-item limit would be excessive if I only wanted some sale inventory.
A 100-item limit can be too conservative when I deliberately need a huge pile of cheap furniture.
My automation settings follow the job.
They are not permanent factory rules.
The exact Cannon requirements and upgrade route stay in my Cannon Quest Guide.
What I Check When Bober Stops Producing
Bober can look broken even when nothing is wrong with the system.
I check four things.
Is the Recipe Actually Added?
Finishing Bober’s station does not automatically queue everything he can make.
I confirm that the recipe exists in his active production list.
Does He Have the Correct Input?
This is the first thing I check.
Automatic crafting still consumes the same material the recipe expects.
For my Carved Bird setup, that means Birch Logs.
Having another processed Birch item does not necessarily satisfy the recipe.
Did I Hit the Production Limit?
If I tell the machine to stop at 100 and it reaches 100, stopping is correct.
I edit the job rather than rebuilding the automation setup.
Is the Recipe Unlocked?
If the item cannot be selected at all, more raw material will not fix the problem.
I check Bober’s recipe progression instead.
When I Move Beyond Bober
Bober solves a specific problem:
repeated furniture production
Eventually my workshop develops a different problem.
I now have multiple production stages and spend too much time:
- processing raw materials;
- carrying outputs;
- moving between machines;
- repeating the same intermediate steps.
That is when the Work Hall becomes important.
Work Hall Is the Next Automation Scale Change
I do not think of the Work Hall as “better Bober.”
It solves a larger problem.
Bober automates a furniture recipe.
The Work Hall begins tying several production systems together.
I build it once the repeated work is no longer limited to the final furniture step.
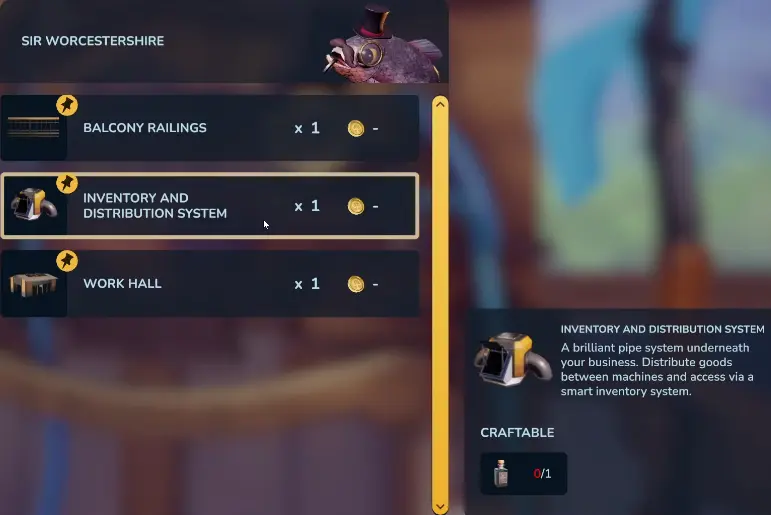
The most important system that appears here is the:
Inventory and Distribution System
What the Inventory and Distribution System Does
The game’s description calls it:
a pipe system underneath your business
used to distribute goods between machines and access them through a smart inventory system.
That solves a different problem from Bober.
Bober reduces:
manual furniture crafting
The Inventory and Distribution System reduces:
manual logistics between machines
That is why I consider this the real scale change in Chop Chop Inc automation.
I am no longer just asking one character to make more furniture.
I am starting to design how the workshop moves materials through an entire production chain.
When I Build the Work Hall
My trigger is:
production repetition has become the bottleneck.
I am ready for the Work Hall when:
- I already have reliable inputs;
- several machines are being used repeatedly;
- manually processing intermediate materials is taking time;
- moving outputs between machines is becoming annoying.
I delay it when my real problem is still:
- access to another region;
- a recipe I have not unlocked;
- lack of a special resource;
- a city project;
- another permanent progression gate.
Automation cannot fix a route I have not unlocked yet.
The Normal Furnace Is Already Fast Enough Early
The Automatic Furnace was lower on my priority list than I initially expected.
The normal Furnace already lets me process Metal Wood into Ingots without a huge waiting period.
So the Automatic Furnace does not primarily solve:
“Metal takes too long to smelt.”
For me it solves:
“I am tired of manually repeating this every time I return with Metal.”
That is a later problem.
If I only need a few Ingots for one project, I keep using the normal Furnace.
If Metal processing becomes part of several repeated production chains, the automatic version becomes more attractive.
Automatic Furnace Does Not Fix a Metal Shortage
This distinction matters enough that I check it before building the machine.
If I have:
lots of Metal Wood but hate processing it
then an Automatic Furnace can help.
If I have:
almost no Metal Wood
then an Automatic Furnace changes nothing.
It will just sit there waiting for the same resource I am already missing.
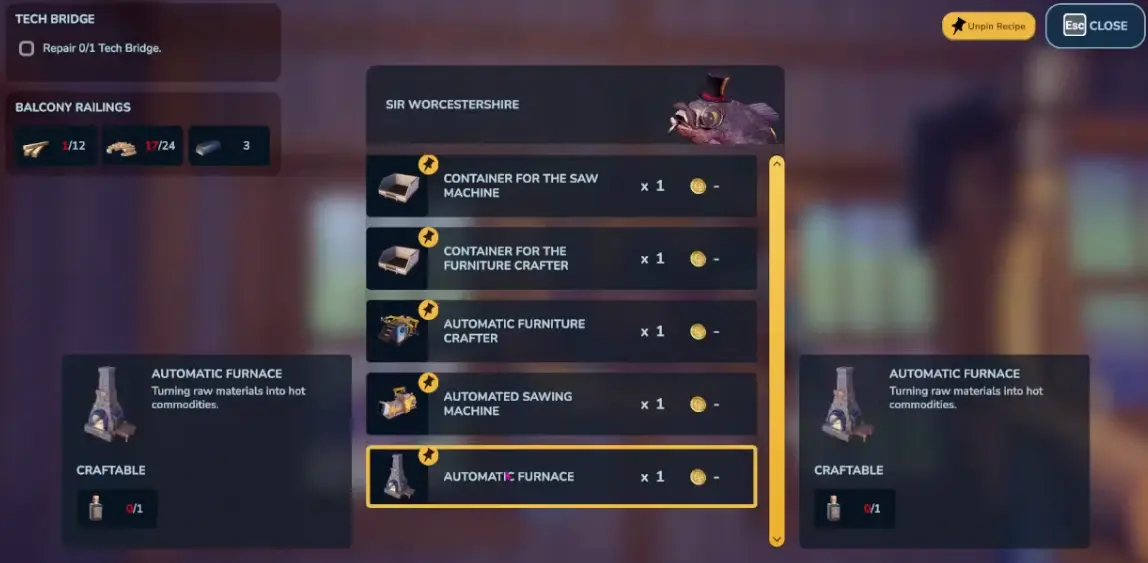
The resource route remains more important than the machine when supply is the actual bottleneck.
I Use the Same Logic for Automated Sawing
Saw automation becomes useful for the same reason.
Early on, I am not processing enough advanced wood for manual sawing to bother me much.
Later I start returning with larger amounts for:
- construction;
- machine requirements;
- furniture batches;
- city projects;
- upgrades.
At that point, converting raw wood into usable processed material becomes a repeated task.
That is when automated Sawing begins saving meaningful time.
My test is simple:
Do I regularly have raw wood waiting to be processed?
If yes, automation can help.
If I cannot find enough of the raw wood itself, the automatic Saw still does not solve my problem.
Automatic Button Saw Machine Solves a Later Problem
The later automation network introduces another upgrade:
Automatic Button Saw Machine
This does not solve exactly the same problem as automating the Saw itself.
Its description indicates that it automatically transfers Saw Machine products to the Work Hall inventory.
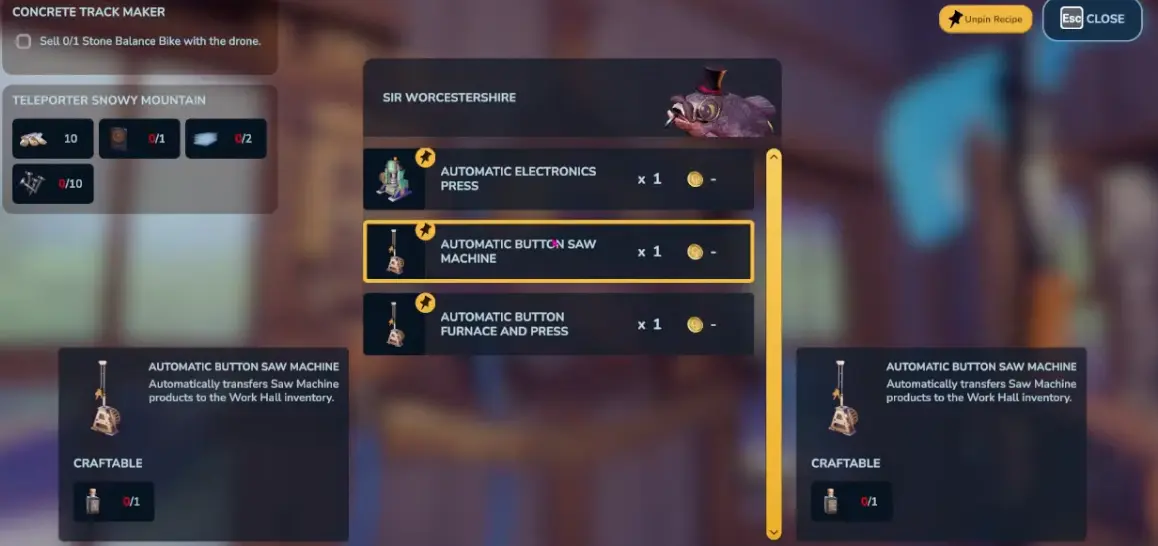
I separate the upgrades like this:
Automated Sawing → removes the repeated processing action.
Automatic Button Saw Machine → reduces the repeated movement of finished Saw output.
I solve those problems in that order.
There is no reason to optimize output transfer when I am not yet producing enough output for transfer to be annoying.
The Same Automation Logic Extends to Other Machines
The later production system reaches beyond furniture, Furnace and Sawing.
Once several machine-control and transfer options become available, I stop asking:
Which automatic machine is the most advanced?
I ask:
Which manual task am I doing too often right now?
If the answer is:
furniture crafting → Bober stays the priority.
Metal processing → Furnace automation moves up.
wood processing → Saw automation moves up.
moving products between machines → distribution and transfer systems move up.
That gives me a workshop designed around my actual workload.
Hamsters Are Another Reason I Do Not Build Everything at Once
Some machinery also intersects with Hamster progression.
At that point, a Hamster may already be useful for another active route or machine.
I do not casually commit one to a half-finished automation project just because I have unlocked the recipe.
I make sure the prerequisite that is hardest to replace is already available before buying all the easy components around it.
This prevents a workshop full of expensive machines that cannot actually run.
I Keep Rare Materials Away From Large Automatic Jobs
Automation makes material management more important.
It does not make it disappear.
I am especially careful with:
- Walnut;
- Stone Wood;
- Metal Wood;
- Metal Ingots;
- Glass;
- Electric Wood;
- Crystal Wood.
If one of those is still needed for a major progression unlock, I protect that supply.
I would rather manually make a few pieces of furniture than discover Bober or another machine consumed the material needed for the next bridge or permanent upgrade.
How I Decide Whether an Automation Upgrade Is Worth It
I use three checks.
Is the Input Supply Reliable?
If I can barely obtain the resource, automation is premature.
Am I Repeating the Manual Step Often?
One occasional batch does not justify an expensive machine.
Is the Machine Competing With a More Important Unlock?
If automation and access both want the same rare materials, access usually wins.
The broader unlock order belongs in the Progression Guide.
If all three conditions are satisfied, automation is usually worth the investment.
The Automation Setup I Actually Use
My practical route is:
Bober’s Carving Bench
→ one useful repeatable recipe
→ Production Limit 100 for normal Carved Bird production
→ Amount per Cycle 10
→ supply the required Birch Logs
→ let Bober produce while I work elsewhere
→ collect or sell the output
→ raise the same Carved Bird recipe to 1,000 when the Cannon needs high volume
→ build the Work Hall once several production steps are becoming repetitive
→ use the Inventory and Distribution System when moving goods between machines becomes a problem
→ add Furnace or Saw automation according to the processing step I repeat most
→ add automatic transfer only when finished-output movement becomes another bottleneck
The most useful automation upgrade is not always the newest machine.
It is the one that removes work I am already doing too much of.
FAQ
Do I need the Work Hall before Bober can automate furniture? +
No. I use Bober's Automatic Furniture Crafter before the Work Hall becomes my main production system. The Work Hall matters later when several machines and shared inventory become part of the same production chain.
Why did Bober stop producing in Chop Chop Inc? +
I first check whether the recipe is enabled, whether Bober has the correct input material, whether the production limit has already been reached, and whether the recipe itself is unlocked.