This is the progression route I use through Chop Chop Inc, from the first bridge and city projects to Hamsters, Batteries, Snowy Mountain and the Work Hall.
I tested the Sacrifice Bowl with Golden Wood, eggs, chicken, a duck and a hamster. These are the combinations I can verify and when I actually use them.
I upgrade from Wooden to Stone, Metal and Crystal axes based on real chopping needs, material supply and whether progression needs the resources first.
I do not throw rare items into the bowl just to see what happens.
That page owns the combinations I have actually verified.
I Separate Progression, Blockers and Cleanup
This is the system that keeps my run organized.
Main progression
Anything that permanently opens:
a region;
target audience;
traversal system;
recipe family;
machine network;
production system.
That usually gets my resources first.
Current blocker
This is the one thing preventing the progression objective I already chose.
It might be:
a stat;
Battery;
Hamster;
Metal;
special wood;
another machine;
one quest character.
I solve that blocker instead of switching to five unrelated missions.
Later cleanup
This includes:
photographs;
Rubber Ducks;
Stone Figures;
secrets;
rare achievements;
optional faction cleanup.
I collect them when they overlap with my current route.
I do not let them replace the main route by default.
Target Audiences Become the Spine of the Midgame
Once city progression begins opening target audiences, I stop treating the
game as one long Chester quest.
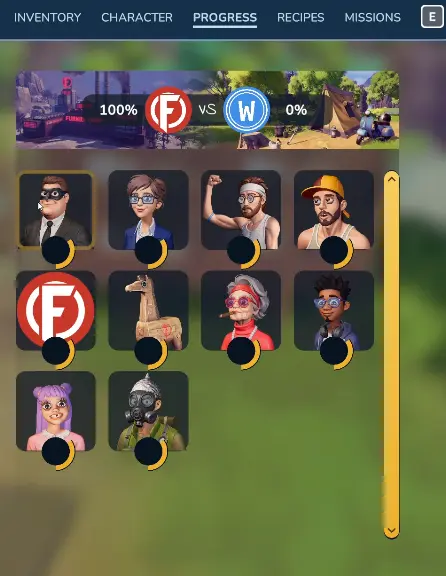
The Progress screen exposes eight named groups:
Discreet Book Club
City Administration
Church of Eternal Gains
Union of Questionable Safety Practices
Champagne Committee
Spreadsheet Militia
League of Little Rascals
Tactical Tinfoil Society
Once the audience branches start opening, I use them to judge which city project can expose something new instead of trying to clear the whole mission list.
I do not fully complete one audience before touching another.
That can force me into a huge resource grind.
Instead, I ask:
What does this branch unlock for me right now?
A cheap mission using materials I already collect is easy to fit in.
A large order that consumes the same rare material as a permanent unlock can
wait.
I Do Not Try to Empty the Mission Screen
My priority test is simple.
Does this open a region, audience or permanent system?
I usually do that first.
Does it remove the blocker on that unlock?
That becomes the current job.
Can I finish it naturally while doing the current route?
I take the free progress.
Does it consume a large stockpile I need somewhere more important?
I leave it.
That is why a mission being old does not automatically make it important.
It can stay on the screen while I open something that changes the rest of the
run.
The 35% Citizen Goal Is My Long-Term Compass
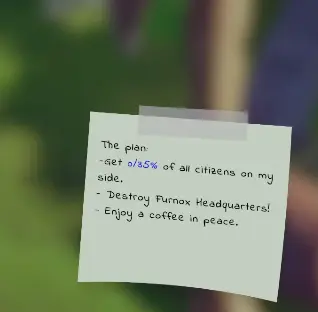
The Plan eventually gives me one especially useful long-term number:
35% of the city’s citizens on my side
I use the 35% citizen target as my long-term progression check. It keeps city and audience expansion more important than clearing every small mission.
That changes how I read progression.
I am not trying to produce a clean mission tab.
I am trying to turn:
city projects
→ target audiences
→ support
into enough progress for the larger Furnox objective.
If one project opens another audience while another only produces cash, I
usually value the audience more.
The World Often Opens Before I Can Finish It
Chop Chop Inc constantly shows me future content early.
I can encounter:
locked bridges;
electrical devices;
advanced trees;
new machines;
Cannon requirements;
unfinished regional routes;
before the system needed to complete them exists.
I no longer interpret that as:
I missed something nearby.
I interpret it as:
Remember this and come back when progression catches up.
This is especially important for Batteries.
It also applies to later equipment and regional gates.
If the required recipe does not exist yet, I leave.
I Scout New Regions Instead of Trying to Clear Them
My first trip into a newly opened region is usually reconnaissance.
I look for:
a new NPC;
a target-audience branch;
a new material;
a traversal unlock;
a permanent machine;
a return-later gate;
a fast way back.
I do not assume every visible activity needs to be completed before I leave.
That keeps exploration connected to progression instead of turning every new
region into a completion sweep.
Snowy Mountain Is a Real Progression Branch
Snowy Mountain becomes much more important once the Tech Bridge route opens.
It is not only an optional mountain-climbing area.
The region connects to:
Crystal Trees
Crystal Wood
Glass
later Grindstone progression
the Crystal Axe
The exact resource and Axe mechanics remain on their dedicated pages.
For the Hub, I mainly treat Snowy Mountain as the point where another material
tier and equipment tier become available.
There is also a completion objective for reaching the summit:
King of the Hill
In the August 10 achievement snapshot, it had a 16.9% completion rate.
I therefore treat the summit as a real completion target, but I do not force
the climb before the route itself is useful.
Chester Is Missing Three Photographs
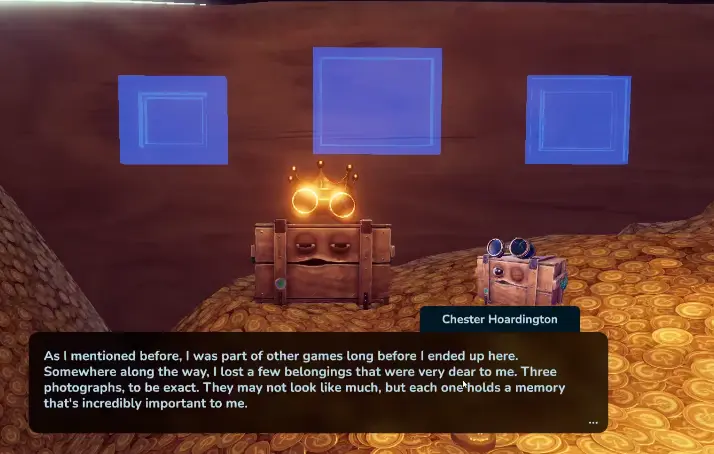
Chester eventually tells me that he has lost:
three photographs
Chester asks me to recover three photographs. I keep the objective in the background and collect them as normal exploration takes me through the relevant areas.
One memory is identified as:
Chester in the Snow
I also find a Memory Photo while following a beach treasure route.
I do not stop normal progression and search the whole map blindly for all three
as soon as Chester mentions them.
I keep the objective active.
As more areas open, I take the photographs when their routes overlap with
something else I am already doing.
The Secret Developer Room Is Optional
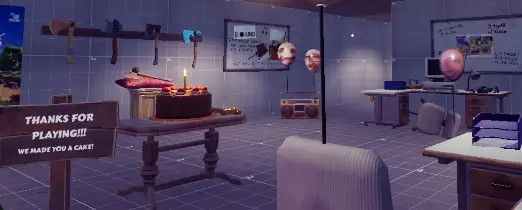
There is a real hidden developer area tied to the achievement:
You found our secret base
The objective is to find the secret developer room.
The developer room is a genuine achievement secret, but it is optional exploration rather than part of the normal workshop or Furnox progression.
In the August 10 snapshot, this achievement had an 11.8% completion rate.
The room includes the game’s thank-you area and developer references.
I treat it as later exploration cleanup.
I do not use it as a prerequisite for:
target audiences;
Batteries;
Work Hall;
Cannon progression;
Furnox.
Chop Chop Inc Has 21 Achievements in My Snapshot
The August 10 achievement set contains 21 goals.
The early achievements track normal progression, including:
getting the Wooden Axe;
completing the tutorial;
finding Bober;
building the House;
reaching the first Chester money milestone.
The completion rates fall sharply as the game opens.
In that snapshot:
Wooden Axe — 97.3%
Tutorial — 78.9%
Find Bober — 63.0%
Build House — 56.9%
Work Hall progression — 26.8%
Reach the top of the mountain — 16.9%
Find the secret developer room — 11.8%
That is another reason I do not try to turn the early game into a 100% cleanup
run.
A lot of the deeper objectives are naturally completed much later.
Full Faction Completion Is Much Deeper Than Unlocking a Faction
The same August 10 snapshot shows much lower completion for finishing the
individual audience branches:
League of Little Rascals — 7.0%
Tactical Tinfoil Society — 4.9%
Church of Eternal Gains — 4.9%
City Administration — 4.6%
Union of Questionable Safety Practices — 4.1%
Spreadsheet Militia — 4.0%
Discreet Book Club — 3.1%
Champagne Committee — 2.9%
I use those numbers as a reminder that:
unlocking an audience is not the same thing as finishing its whole chain.
Early on, opening more useful branches matters to me more than taking one
branch all the way to 100%.
Full faction cleanup becomes much easier after:
travel is faster;
resource routes are open;
better Axes exist;
production is automated;
expensive materials are no longer expedition resources.
Chicken King Is Later Cleanup
One of the rare objectives is:
Hail thee, King Nugget!
which asks me to kill the Chicken King.
Its August 10 completion rate was 4.4%.
I leave it in my later cleanup list.
I do not turn every chicken-related activity into a hunt for the King while
larger progression systems are still missing.
There is enough evidence that it is a real completion objective.
I do not currently need a separate character-style Chicken King page just to
repeat that fact.
Stone Figures Are Another World-Cleanup Objective
The achievement:
My kind of Zen
requires destroying all Stone Figures.
Its completion rate was 4.0% in the same snapshot.
I destroy one when I naturally pass it.
I do not start a full-map sweep while important travel routes and permanent
systems are still locked.
That turns normal exploration into partial completion without forcing a long
cleanup too early.
Furnox Is a Late Objective
The late achievement:
Bye Bye Furnox
is tied to finally bringing Furnox down.
Its completion rate in the August 10 snapshot was 3.2%.
That fits the way I use the 35% citizen target.
Furnox is the long-term destination.
It is not something I try to force as soon as the corporation appears on the
Progress screen.
The Cannon eventually becomes part of that push, but I keep its Strength,
construction, Doombringer and firing requirements in the
Cannon Quest Guide.
I Pick Up Rubber Ducks While Doing Something Else
Rubber Ducks appear as recurring exploration finds.
I collect them when I see them while I am already:
opening a route;
visiting a new region;
gathering special wood;
doing an audience mission;
checking a nearby secret.
I do not abandon a useful progression route to perform a full-world Duck sweep.
I use the same rule for Stone Figures and photographs.
Natural overlap first.
Dedicated cleanup later.
Money Is a Tool, Not My Main Progress Score
There are three achievement milestones for money held in Chester’s inventory:
1,000
10,000
100,000
If I am deliberately chasing one of those achievements, I make sure the money
is actually sitting with Chester.
But outside that situation, I am comfortable spending.
I spend money when it opens:
a region;
permanent machine;
target audience;
production chain;
required component for progression.
I can rebuild cash later.
A permanent unlock changes the rest of the run immediately.
Permanent Unlocks Beat Convenience Purchases
This is the spending distinction I use through most of the game.
A permanent unlock changes what I can do.
A convenience upgrade makes something I can already do faster.
If both need the same scarce resource, I usually choose the permanent unlock.
That can mean delaying:
another Axe Mark;
optional furniture;
an automation machine;
a faction order;
a large sale batch.
The exception is when efficiency itself has become the blocker.
If I am spending most of every session chopping advanced trees, the
Axe Upgrades Guide
becomes more relevant.
If I am spending most of it repeating production, I switch to the
Automation Guide.
Batteries Are a Return-Later Gate
Electrical requirements are one of the clearest examples of the game showing
future progression early.
If I see a Battery requirement but cannot craft Batteries yet:
If I have no verified reason to sacrifice something difficult to replace, I
keep it.
The Rule I Use for Every New Discovery
By the middle of Chop Chop Inc, I use the same question for almost everything:
Does this change what I can do next?
If yes:
prioritize it.
If it removes the blocker on that priority:
solve it.
If it is a cheap side objective already on my route:
take the free progress.
If it is only interesting:
remember it and come back later.
Chop Chop Inc gives me more missions, machines, resources and secrets than I
need to finish immediately.
The run becomes much smoother once I stop treating every new discovery as the
next main quest.
Chop Chop Inc. FAQ
What should I prioritize first in Chop Chop Inc?+
I prioritize anything that permanently opens a region, target audience, recipe family or production system. If a visible objective needs something I cannot make yet, I leave it and continue progression instead of forcing that gate.
Where does money need to be for Chop Chop Inc money achievements?+
The achievement descriptions track money in Chester's inventory. The three milestones are 1,000, 10,000 and 100,000, so I move money back to Chester when I am deliberately working toward those achievements.