How I Beat Lacerta in the Reservoir and Final Lair Fight
My two-fight Lacerta strategy, including the swamp dive warning, both preparation camps, the evolved maw phase, healing windows, and final finisher.
Updated:
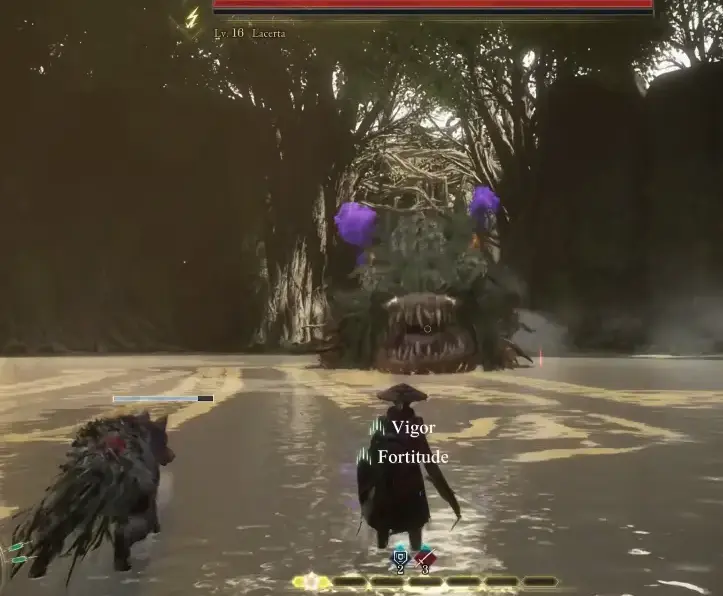
Quick Answer
Lacerta appears in two fights. The Reservoir version is shown as Lv. 13 and retreats after I deal enough damage. I then complete the control panel and Lightning Stone route before facing the Lv. 16 version in its lair. The safest adjustment is to stop attacking when Lacerta dives into the swamp, move until it resurfaces, and reset again when it evolves into the large open-maw form. I only heal after a completed attack or while Koo has created space.
Lacerta is easy to misread because the route and the boss fight overlap.
I first meet it inside the Reservoir, but I cannot finish it there. It retreats, the story turns back toward the gate mechanism, and the actual kill happens after I open the surface route.
The game UI also confirms that these are not identical versions of the boss:
- the Reservoir encounter displays Lv. 13 Lacerta;
- the final lair fight displays Lv. 16 Lacerta.
That three-level jump matches what I feel in the second battle. Lacerta keeps the swamp-dive behavior I already learned, then adds a more aggressive evolved form with a much larger exposed mouth.
The hidden Lacerta’s End achievement unlocks after the final victory. In the achievement data snapshot I checked, it had a 9.5% completion rate, compared with 23.4% for Rangifer’s End. This is the first point where the completion drop between two named Nushi fights becomes especially large.
I Prepare at the Reservoir Camp Before the First Fight
After activating both underground generators, I enter the Reservoir and find a campsite before the Nushi territory.
I always activate it.
The first Lacerta encounter is scripted to end in a retreat, but it can still consume enough healing to make the following control-panel route unpleasant. Starting clean lets me learn the dive without carrying damage from the generator rooms.
I rest here when:
- the second generator route already used healing;
- normal enemies are taking several exchanges to kill;
- I changed equipment and have not tested the new setup;
- Koo’s support resources are not ready.
I continue without spending Amber when:
- my healing is still comfortable;
- both generators were completed cleanly;
- the only reason I want to shop is that a Nushi is nearby;
- I already have a blade and ranged option that work against normal enemies.
There is no confirmed elemental item that the game requires for Lacerta. The direct instruction at the Reservoir is to watch how the boss moves and identify its weakness through the encounter.
The First Lacerta Fight Is a Movement Test
The Reservoir version is displayed as Lv. 13.
I do not treat this encounter as a damage race. My first goal is learning what Lacerta does before and after it disappears beneath the swamp-covered floor.
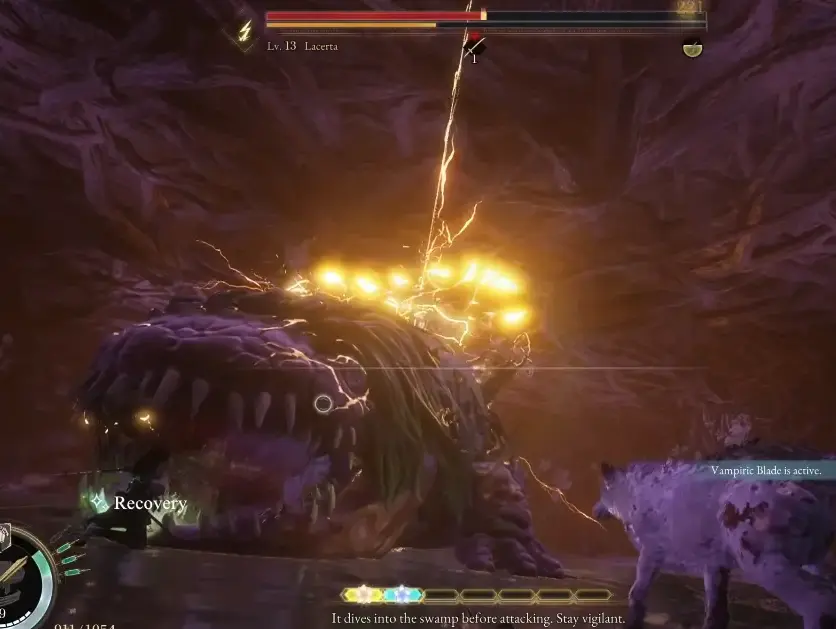
The on-screen warning is specific:
Lacerta dives into the swamp before attacking.
That means the dive is not an opening for blind pursuit.
When Lacerta disappears, I:
- stop the current melee string;
- move away from the last visible position;
- keep enough camera space to read the reappearance;
- avoid healing until I know where the attack will land;
- punish only after Lacerta finishes the resurfacing action.
My early mistakes came from standing over the dive point and waiting to parry something I could no longer see.
I get more consistent results by treating every dive as a reset. The boss gives up its visible body and I give up the current combo.
I Use Short Punishes Instead of Chasing the Head
Lacerta’s size makes its face look like the obvious permanent target.
I do not chase it through every turn.
I attack after:
- a completed lunge or body movement;
- a missed resurfacing attack;
- a Koo interruption;
- an animation that leaves the head low and stationary.
I disengage when:
- the head begins pulling away;
- the body starts sinking;
- electrical effects begin building around the boss;
- I can no longer see both Lacerta and the edge of the attack.
One short punish is more valuable than a longer combo that forces me to trade with the dive.
I use Koo when Lacerta is already committed or recovering. I do not spend the command while the boss is disappearing into the swamp because that can waste the support action on an unavailable target.
Lacerta Retreating Is the Correct Result
After enough damage, Lacerta escapes farther into its route.
I do not reload and I do not search the Reservoir for another health bar.
The retreat changes the progression problem from combat to navigation:
- follow the route toward the gate control panel;
- discover that the panel lacks power;
- follow Koo to a usable Lightning Stone;
- insert the stone;
- return to the surface;
- pass through the opened route toward Lacerta’s lair.
The Lightning Stone does not become an equippable anti-Lacerta weapon. It powers the gate mechanism.
For the full generator and control-panel sequence, use How to Open the Gate.
I Use the Surface Camp as My Final Build Check
After the control panel accepts the Lightning Stone, I return above ground and follow the newly opened route.
There is another campsite before the final boss sequence.
This is the camp where I decide whether a purchase or equipment change is actually necessary.
I spend Amber when:
- I cannot refill the healing I expect to use;
- the route between camps is already exhausting my resources;
- an empty Spirit Stone slot can be filled with an effect I will use;
- repeated attempts fail before I see the evolved form.
I save Amber when:
- I consistently reach the evolved phase;
- the last failure came from the swamp dive or phase transition;
- I already have enough recovery for another clean attempt;
- the merchant upgrade would only add damage without fixing my positioning.
Reaching the second form is evidence that the build can complete the fight. Once I am getting that far, I work on the transition instead of buying after every death.
The Final Fight Begins at Level 16
The lair version is displayed as Lv. 16 Lacerta.
I start with the same short-punish rhythm learned in the Reservoir, but I expect less room for recovery.
My opening plan is:
- stay at a distance where I can see the head and front body;
- let Lacerta commit first;
- dodge the swamp dive and uncertain wide attacks;
- use a short melee punish after the recovery;
- use Koo to extend a safe opening or create a healing window;
- reset before the next movement begins.
I do not assume that a move is safe to parry simply because it comes from the front. The dive is easier to handle through movement until I can read the exact reappearance point.
I Do Not Confuse Lightning with a Required Weakness
Lacerta displays strong electrical effects during combat.
That does not mean the Lightning Stone from the control panel should be saved, equipped, or used against it. The stone has already completed its purpose by opening the route.
I also do not claim a separate elemental weakness without a clear in-game confirmation.
My reliable advantage comes from reading the dive and using the boss’s recovery, not from forcing an unverified elemental loadout.
The Evolved Maw Is the Real Phase Change
Later in the final fight, Lacerta evolves and the game tells me to adapt to a new attack.
Its silhouette changes dramatically. The front opens into a huge mouth, and purple growths become visible around the upper body.
I do not continue the previous combo through this transition.
I use the first evolved cycle to answer three questions:
- how far the mouth attack reaches;
- whether Lacerta is about to dive or attack from the visible position;
- how long it remains stationary after the new move.
Only after I see the recovery do I commit again.
The boss can look vulnerable while the mouth is open, but that is exactly when I am most likely to attack into an active hitbox. I wait for the attack to finish, then close distance.
How I Use Koo in the Second Phase
I keep Koo for situations where the support creates a specific benefit.
I call Koo:
- after Lacerta completes the new maw attack;
- when I need enough room to heal;
- when the boss is stationary and I can follow with melee;
- when support buffs can be used during a confirmed opening.
In my documented run, Vigor and Fortitude were active during the evolved form. I treat those as support from my equipped setup, not universal requirements for every build.
I do not call Koo in the middle of a swamp dive. I wait until Lacerta is visible and committed again.
When I Heal
The safest healing windows are after:
- a missed resurfacing attack;
- the evolved maw animation has fully ended;
- Koo has forced enough separation;
- Lacerta has moved to the opposite side of the arena and is not already starting another dive.
I do not heal:
- while standing at the point where Lacerta disappeared;
- immediately after taking damage at close range;
- during the phase transition without confirming that the new attack has ended;
- just because my health is not full.
I heal when the next confirmed hit would threaten the attempt, not whenever a small amount of health is missing.
I Use the Finisher Prompt Instead of Continuing Normal Attacks
At the end of the fight, Lacerta can present a large red finisher prompt.
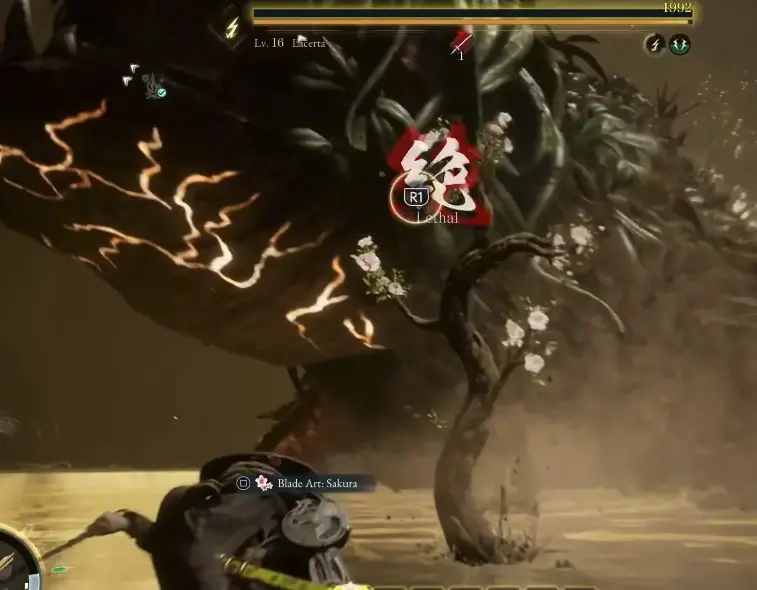
I press the displayed finisher input rather than starting another Blade Art or normal combo.
On the PlayStation interface shown in my run, the prompt uses R1. Other control layouts should follow the button displayed on screen.
This prevents the last part of the fight from becoming another unnecessary exchange at low resources.
When I Backtrack and When I Retry
I return to the camp or merchant when:
- I reach the final arena with depleted healing;
- I cannot survive long enough to see the evolved form;
- normal enemies before the boss are consuming my boss resources;
- I changed equipment but forgot to refill or activate the setup;
- I never activated the surface campsite.
I retry immediately when:
- I already reach the giant-maw phase;
- I died while learning the new attack;
- the build still produces clear damage during safe openings;
- I missed the finisher prompt;
- my last failure came from healing during a dive.
A failed evolved-phase attempt usually gives me more useful information than a new purchase.
What Unlocks After Lacerta
The final victory unlocks Lacerta’s End and lets Emma absorb another Nushi power.
The Reservoir retreat does not unlock it.
Once the finisher and post-fight sequence begin, I stop searching the arena for another combat condition and return to the Walker when the story moves on.
For the complete story route around both encounters, use the Beast of Reincarnation walkthrough. For the control panel between the two fights, use How to Open the Gate. For the previous named Nushi, use the Rangifer boss guide.
FAQ
Do I use the Lightning Stone as a weapon against Lacerta? +
No. The Lightning Stone is inserted into the Reservoir control panel to open the route above ground. It is a progression item, not a consumable or required elemental attack for the Lacerta fight.
Is the first Lacerta encounter supposed to end without killing it? +
Yes. The level 13 Reservoir encounter ends when Lacerta retreats toward its lair. The final level 16 battle happens after the surface route has been opened.