Tabletop Tavern Dwarf Cannons Build Guide
A practical Tabletop Tavern Dwarf cannons build guide for Deepstone Hold, covering Hrothgar, early gear, Cragflayers, crossbows, Storm Forged Battery, anti-large artillery, Thunderhorde Chargers, Abyssal Delveknights, rain fights, shops, campfires, and final battle setup.
Updated:
Quick Answer
The Tabletop Tavern Dwarf cannons build works because Deepstone Hold can create a sturdy line while cannons delete the most dangerous targets before they reach you. Start with stable Dwarf infantry and ranged support, take gear when the army is healthy, pivot into Storm Forged Battery or other cannon options once you can protect them, and aim your first shots at large units, monsters, cavalry, dragons, and other high-impact threats.
Why Dwarf Cannons Work
Dwarf cannons are strong because they solve one of the scariest problems in Tabletop Tavern: large and high-impact enemies reaching your line.
A normal army may need to grind through monsters, cavalry, dragons, and heavy targets after they hit the frontline. A cannon build tries to remove those units before they create the problem.
| Build piece | Why it matters |
|---|---|
| Durable Dwarf frontline | Holds enemies in place while cannons fire |
| Ranged support | Helps clear infantry and exposed targets |
| Cannons / artillery | Removes large, armored, or high-impact threats |
| Anti-large tools | Protects against cavalry, monsters, and dragons |
| Backline guards | Stops fast units from reaching artillery |
| Gear and prestige | Turns stable units into long-term campaign anchors |
| Campfire and route choices | Keep the artillery army healthy before final battles |
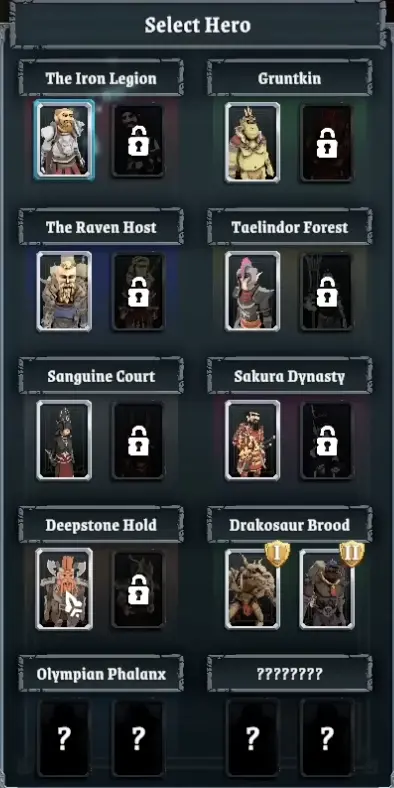
Start With Deepstone Hold
Use Deepstone Hold for the Dwarf cannon route.
The faction gives you the right campaign shape: sturdy units, gear value, and a natural transition into ranged and artillery play.
| Panel item | What it means for this build |
|---|---|
| Stonevein Salvagers | Optional post-battle gear helps the build scale when the army is healthy enough to take gear |
| Oathcarved | Fallen comrades make survivors stronger; treat it as a survival-scaling bonus, not a reason to throw units away |
| Hrothgar Goblinslayer | Good learning hero for a stable Deepstone Hold run |
| Ancestral Hatred | Helps against Gruntkin matchups when that enemy type appears |
| Cragflayers gain Rage | Cragflayers become more dangerous when damaged; in the checked tooltip, Rage deals 2x damage below 50% health |
| Abyssal Delveknights | A late-game legendary direction with armor, armor-piercing, monster-slayer value, and strong leadership, but not required for the cannon core |
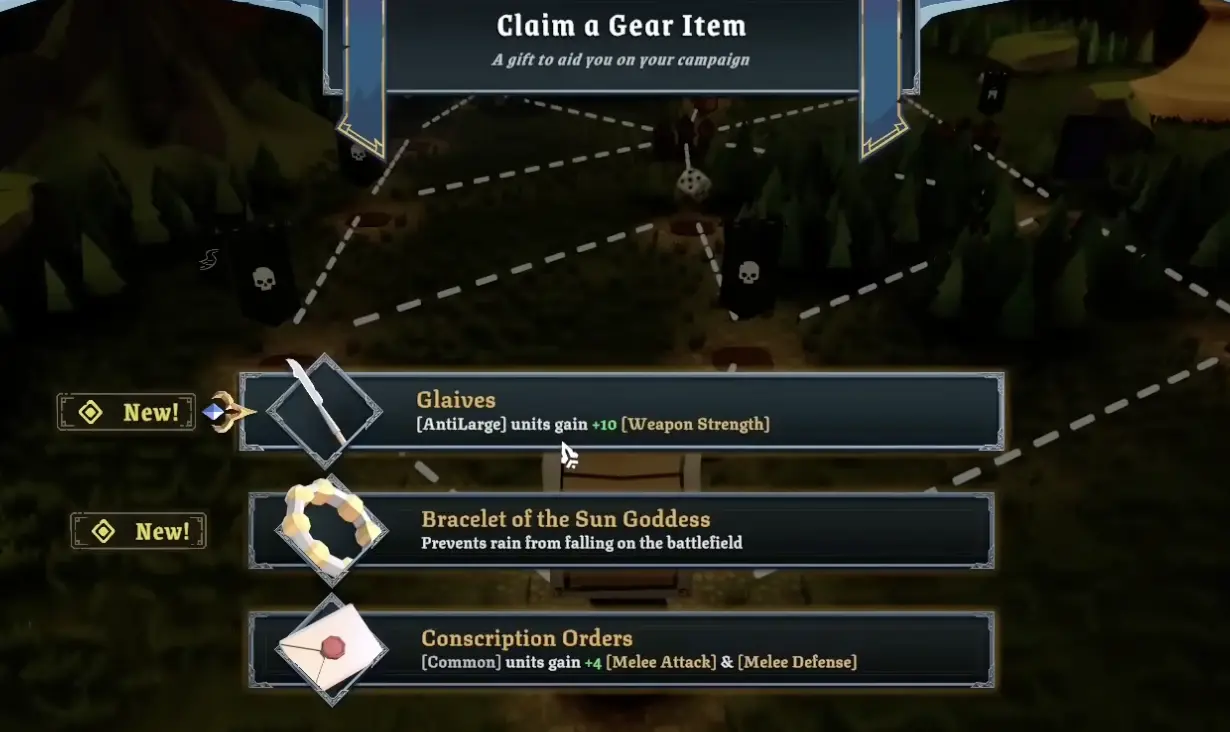
Early Gear: Take Stability First
Your first gear choices should make the early army easier to pilot.
You do not need to force a perfect cannon item immediately. The early goal is to survive cleanly, keep your best units healthy, and build enough gold or reward momentum to reach artillery.
| Gear direction | Good when… | Why |
|---|---|---|
| Common-unit combat stats | Your early army is mostly common units | Makes the first fights safer |
| Anti-large weapon strength | You expect cavalry, monsters, or large targets | Helps before cannons fully come online |
| Weather control | Your army depends heavily on ranged accuracy or safe firing | Reduces awkward weather risk |
| Gear from Stonevein Salvagers | The army is healthy after a fight | Adds scaling without spending shop gold |
| Sell later if outgrown | A gear piece stops helping the current build | Converts old early power into flexibility |
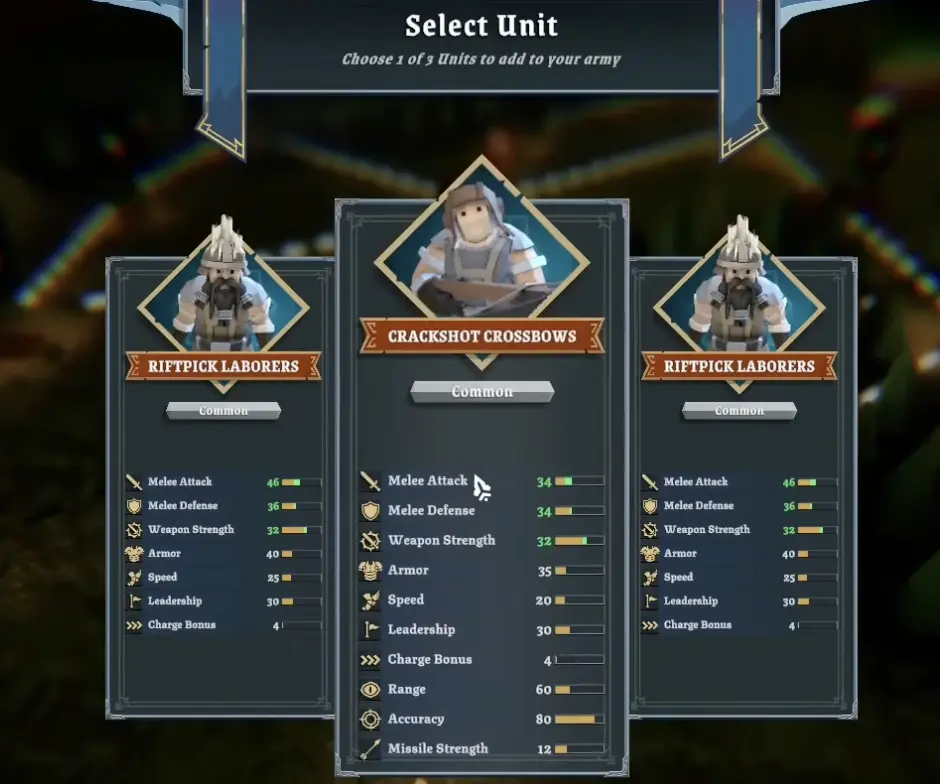
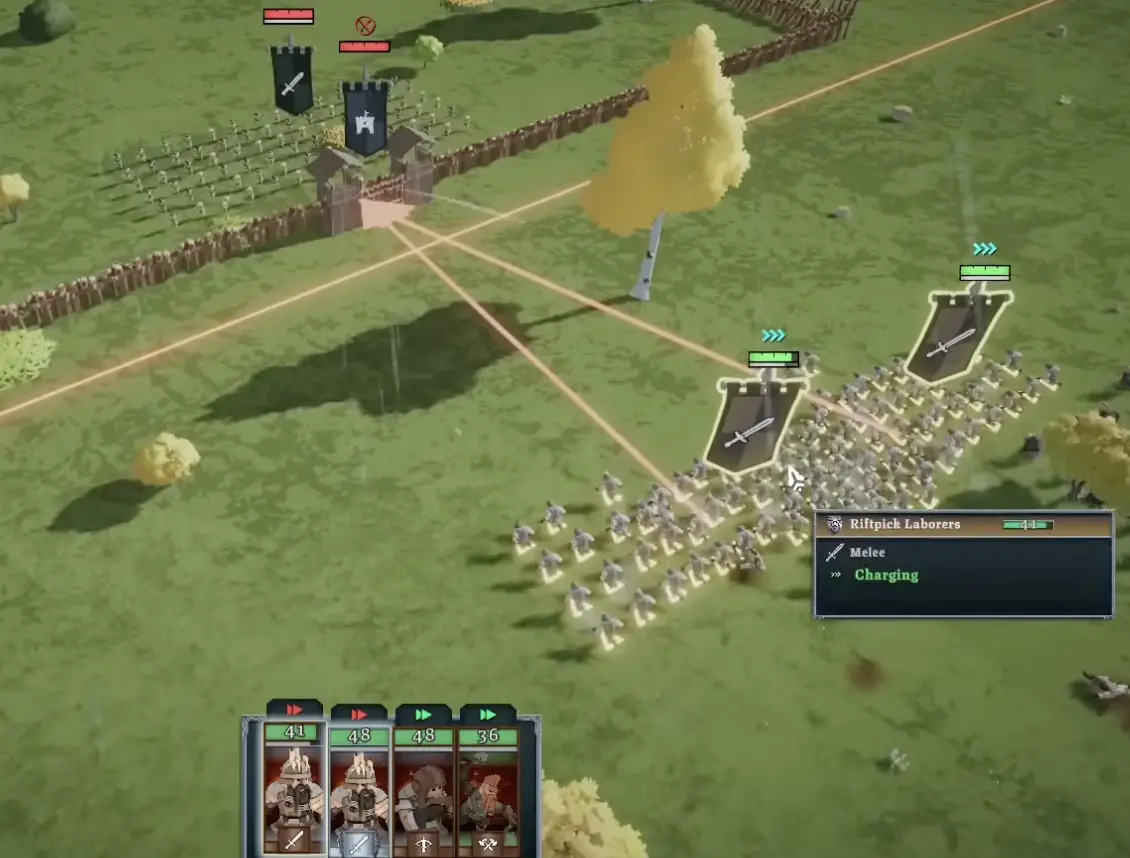
Early Game: Crossbows, Laborers, and Cragflayers
Before cannons become the center of the build, you still need a real army.
Early Dwarf runs usually need three things: bodies to hold, ranged damage to support, and a way to answer cavalry or large units.
| Early piece | Role |
|---|---|
| Riftpick Laborers / sturdy melee bodies | Hold the line and protect ranged units |
| Crackshot Crossbows or other early ranged units | Add safe damage while enemies walk in |
| Cragflayers | Aggressive Dwarf damage piece; Rage makes them more dangerous when damaged |
| Anti-large gear or units | Protects the army before cannons can delete large threats |
| Backline guard | Stops cavalry or fast units from reaching ranged units |
| Prestige opportunities | Turns repeated unit lines into stronger campaign anchors |
When to Pivot Into Cannons
Do not buy cannons just because you see them.
Buy cannons when the army can protect them. The ideal timing is when you already have a frontline, at least one backline guard, and enough route stability to keep the artillery alive.
| Pivot signal | What it means |
|---|---|
| Frontline can hold | Enemies will not instantly reach the cannons |
| You have a backline guard | Cavalry and Outriders have to fight through protection |
| You can target large units early | Cannons immediately solve a real problem |
| You have enough gold | Buying artillery does not prevent healing or key recruits |
| Terrain gives firing lanes | Cannons can shoot before enemies connect |
| You already have ranged support | The army is not relying on cannons to do every job |
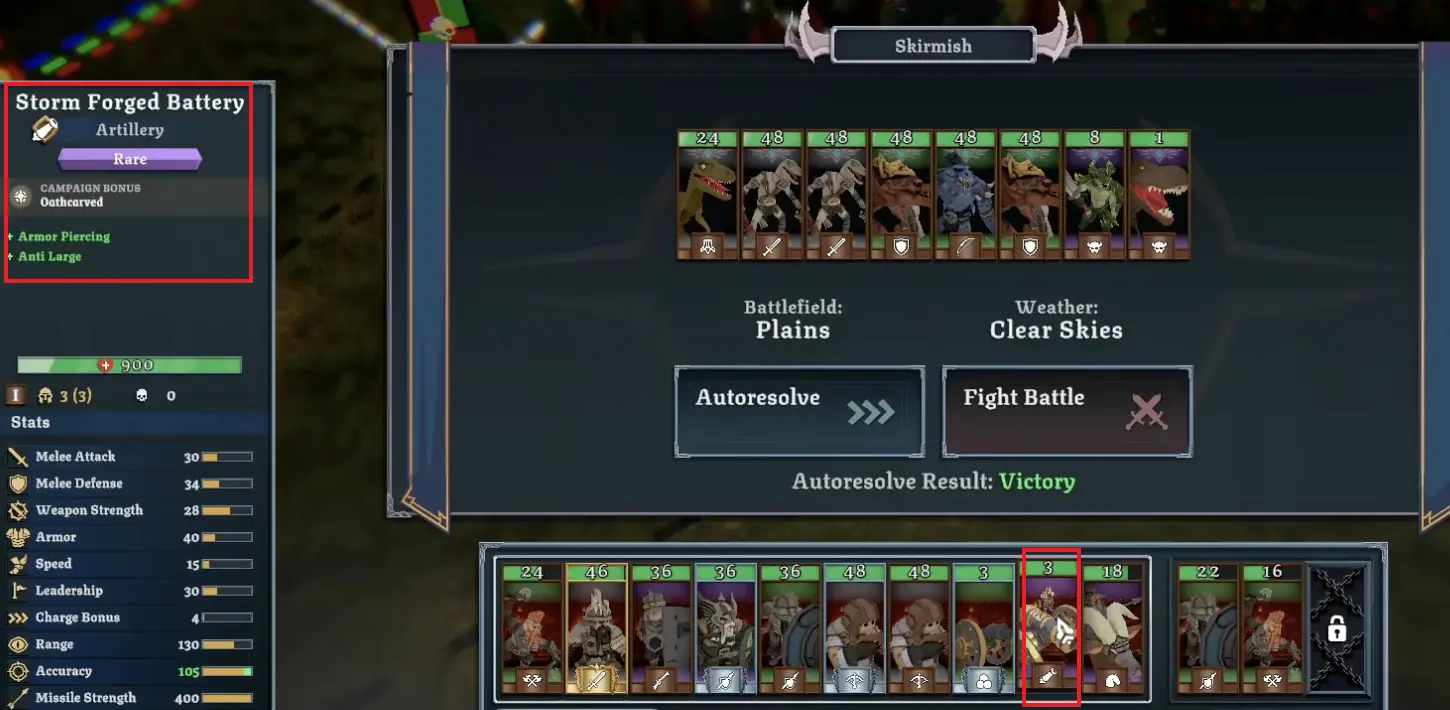
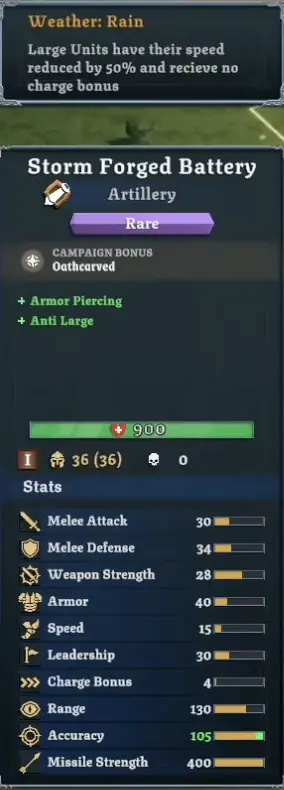
Storm Forged Battery: Your Anti-Large Artillery Core
Storm Forged Battery is the cleanest example of why the Dwarf cannon route works.
It gives the build long-range pressure and anti-large damage, which is exactly what you want against monsters, dragons, cavalry, and other large threats.
| Cannon trait or role | Why it matters |
|---|---|
| Long range | Starts dealing damage before melee contact |
| Anti Large | Excellent into monsters, cavalry, dragons, and other large enemies |
| Armor Piercing | Helps against heavily armored targets |
| High missile impact | Lets each shot matter against priority targets |
| Backline position | Keeps it safer while the frontline holds |
| Needs protection | Cannot defend itself well if fast units reach it |
Cannon Target Priority
The most common cannon mistake is letting artillery fire randomly into low-value infantry while a monster or cavalry unit walks in.
Use cannon shots to delete the threat that would damage your formation the most.
| Priority | Target | Why |
|---|---|---|
| 1 | Large monsters, dragons, and dinosaurs | They can break the line if they arrive healthy |
| 2 | Cavalry or other fast large threats | They can reach cannons or ranged units quickly |
| 3 | Enemy artillery | Remove long-range pressure if your cannons can reach it |
| 4 | Elite armored units | Armor-piercing shots give good value |
| 5 | High-value ranged clusters | Good if no large target is active |
| 6 | Low-value infantry | Only after real threats are controlled |
Protecting Cannons
A cannon build is a protected-backline build.
The frontline does not need to kill everything by itself. It needs to stop enemies long enough for artillery to work.
| Threat to cannons | Answer |
|---|---|
| Cavalry dive | Keep anti-large or sturdy melee close to the artillery lane |
| Enemy Outriders | Leave a guard near the cannons, not only at the front |
| Fast melee flank | Anchor one side on terrain or use a reserve guard |
| Forest / blocked sight | Reposition before the fight instead of firing into bad terrain |
| Your frontline chasing too far | Hold formation and let enemies come in |
| Enemy artillery duel | Counterfire, pressure it with fast units, or move the cannons |
Rain Can Help This Build
Rain is often bad for ranged-heavy armies, but the Dwarf cannon build can sometimes benefit from it if the enemy relies on large units.
In the checked weather tooltip, Rain reduces Large Units speed by 50% and removes their charge bonus. That means cavalry, monsters, and other large threats have a harder time reaching full impact.
| Rain situation | What to do |
|---|---|
| Enemy has many large units | Accept the fight if your cannons have clear lanes |
| Enemy relies on cavalry charges | Use rain to reduce their impact |
| Your ranged units need precise small shots | Check whether the weather hurts your other damage sources |
| Terrain blocks artillery lines | Rain does not matter if cannons cannot shoot |
| Enemy is mostly infantry | Do not overvalue rain just because it helps against large units |
Thunderhorde Chargers: Useful, Not Required
Thunderhorde Chargers can appear as an attractive Dwarf shop or reward direction because they add mobile armored pressure.
They are useful if you need a unit that can move faster than the rest of your Dwarf line, help pressure exposed targets, or add charge impact. They are not required for the cannon build.
| Thunderhorde Chargers use | Why it helps |
|---|---|
| Mobile pressure | Gives the slow Dwarf army a way to reach exposed targets |
| Charge utility | Can punish enemies already pinned by the frontline |
| Armored presence | Less fragile than many fast units |
| Flank support | Helps stop enemies from freely wrapping around the cannon line |
| Not the cannon core | The build still depends on frontline plus protected artillery |
Abyssal Delveknights: Late-Game Anchor, Not a Requirement
Abyssal Delveknights are the Deepstone Hold signature legendary direction, but they are not required for the cannon build to function.
Use them as a late-game stabilizer if they fit the route. Their value is that they can act as a durable, high-leadership, armor-piercing monster-slayer piece while the cannons handle priority targets from range.
| Abyssal Delveknights role | Why it matters |
|---|---|
| Armored front or anchor piece | Helps the army hold under pressure |
| Armor Piercing | Useful into heavy targets |
| Monster Slayer direction | Supports the cannon plan against large threats |
| High leadership | Less likely to collapse when the line gets messy |
| Slow Dwarf pacing | Fits a hold-and-shoot army better than a chase army |
| Optional power spike | Strong if affordable, but not mandatory |
Town Sieges and Gate Fights
Dwarf cannons can make garrison and gate fights much easier if you have time and firing lanes.
In a garrison fight, the goal is not to rush every unit into the gate. Let artillery do the work when it can.
| Siege situation | Dwarf cannon answer |
|---|---|
| Gate needs to break | Use cannons or melee instead of wasting weak projectiles |
| Enemy waits behind defenses | Let artillery force movement |
| Your frontline is damaged | Consider visiting, healing, or skipping greed |
| Cannons have clear angle | Let them fire before committing infantry |
| Fast enemies exit or flank | Keep guards near the cannons |
| Reward is low-value | Do not risk the run just because the army looks strong |
Campfires: Rest, Train, Scout, or Scavenge
Campfires are especially important for Dwarf cannons because the build wants to enter hard fights with a healthy frontline and protected artillery.
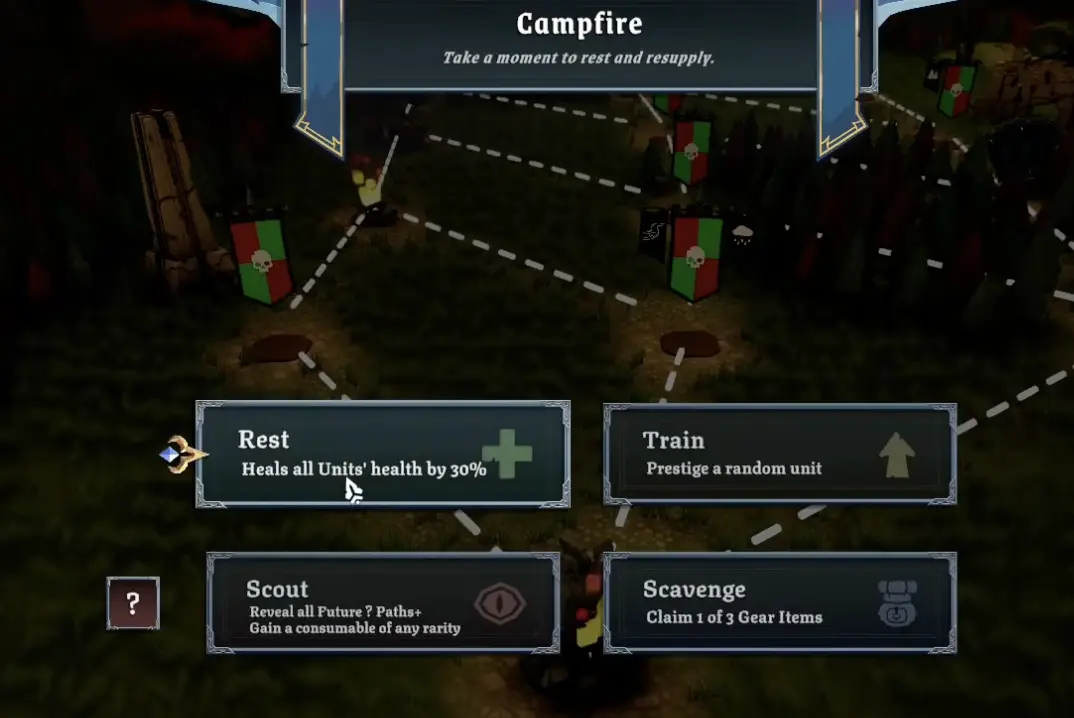
| Campfire option | Pick it when… |
|---|---|
| Rest | Frontline or cannon guards are damaged before a hard fight |
| Train | The army is healthy and a prestige roll can improve a key unit |
| Scout | You need to know whether the next route has recovery, shop, or danger |
| Scavenge | The army is healthy and gear can improve the cannon plan |
Shops, Interest, and Buying Power
Shops are where this build often becomes real.
The goal is not to buy every shiny Dwarf unit. The goal is to buy the exact role your army is missing.
| Shop need | Good purchase direction | Why |
|---|---|---|
| No artillery yet | Storm Forged Battery or another cannon option | Creates the build’s main win condition |
| Cannons are exposed | Bullwark, sturdy riflemen, armored infantry, or guards | Protects the artillery core |
| Need mobile pressure | Thunderhorde Chargers if affordable and useful | Adds flank pressure and charge utility |
| Need late-game anchor | Abyssal Delveknights if the army can afford them | Adds durable armor-piercing monster-slayer value |
| Need anti-large | Anti-large units or anti-large gear | Stops cavalry, monsters, and large enemies |
| Need more ranged damage | Crossbows, guns, or ranged support | Helps clear non-large targets |
| Need health safety | Potions or recovery support | Keeps core units alive |
| Already stable | Prestige, gear, or higher-tier packs | Converts a strong run into a final-battle-ready army |
Prestige and Unit Quality
Prestige matters because a cannon army does not want endless weak bodies. It wants reliable units that can hold their job.
| Prestige target | Why |
|---|---|
| Frontline anchors | Stronger frontline means safer cannons |
| Cannon guards | Keeps backline protection reliable |
| High-kill ranged units | Preserves damage growth |
| Bullwark or durable ranged support | Can shoot while helping the line stay stable |
| Key anti-large unit | Better answer to cavalry and monsters |
| Avoid random prestige | Do not combine away a role the army still needs |
Final Battle Setup for This Build
For general final battle preparation, use the Tabletop Tavern Campaign Guide. This section focuses only on what the Dwarf cannon build specifically needs.

| Build-specific check | What you want |
|---|---|
| Cannon safety | Artillery has guards, clear lanes, and no easy cavalry path into it |
| Opening target priority | First cannon shots are assigned to large, fast, or high-impact threats |
| Terrain check | Forests, gates, rivers, and corners do not block your firing plan |
| Potion plan | Healing or emergency tools are saved for frontline anchors, cannon guards, or key artillery support |
Bertha Barrelstorm and the Artillery Direction
After learning the Dwarf cannon style, Bertha Barrelstorm is the kind of hero direction that makes more sense.
Her bonuses support artillery and ranged play, which fits the cannon identity. She is not required to learn the build, but she is a strong long-term direction once you understand how to protect artillery.
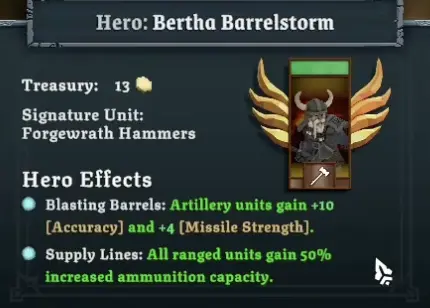
| Bertha direction | Why it fits |
|---|---|
| Artillery accuracy | Makes cannon shots more reliable |
| Missile strength support | Improves ranged and artillery damage |
| Ammo support | Helps ranged-heavy armies keep firing |
| Same safety problem | Still needs frontline and backline protection |
| Better after practice | Stronger once you already understand cannon control |
Common Dwarf Cannon Mistakes
| Mistake | Why it hurts | Better move |
|---|---|---|
| Buying cannons before frontline | Artillery gets dived or forced to stop firing | Build a stable line first |
| No cannon guard | Cavalry or Outriders reach the backline | Keep anti-large or sturdy melee nearby |
| Random cannon targeting | Big threats arrive alive | Assign opening shots to priority targets |
| Chasing with slow Dwarfs | The line opens and ranged units become exposed | Hold shape and let enemies come in |
| Ignoring terrain | Cannons cannot fire cleanly | Check lanes before deployment |
| Taking gear while damaged | The army dies before gear matters | Heal or Rest first |
| Overvaluing Thunderhorde Chargers | Mobile pressure does not replace the cannon core | Buy them only when the core is already stable |
| Forcing Abyssal Delveknights every run | A signature unit can be too expensive for the current route | Take them when they solve the current army problem |
| Treating Rage as a suicide plan | Damaged Cragflayers can still die | Use Rage as a bonus, not a reason to throw units away |
| Skipping final battle setup | The build loses its safety advantage | Plan cannon lanes, guards, and first targets before starting |
FAQ
Is the Dwarf cannon build good in Tabletop Tavern? +
Yes. The Dwarf cannon build is strong because Deepstone Hold can build a durable frontline while cannons remove large units, monsters, cavalry, dragons, and other priority targets before they fully reach your army.
Which faction should I use for a Dwarf cannon build? +
Use Deepstone Hold. It gives a durable Dwarf army shape, Stonevein Salvagers for optional post-battle gear, Oathcarved as the battle bonus, and a natural path into ranged and artillery play.
What does Rage do for Cragflayers? +
In the checked guide snapshot, Rage deals 2x damage when the unit is below 50% health. Hrothgar’s hero panel gives Cragflayers Rage, making them more dangerous when damaged, but you should still avoid throwing them away.
When should I buy cannons in a Dwarf run? +
Buy cannons after you have enough frontline and backline protection. Cannons are strongest when enemies are forced to walk into your line while the artillery fires safely.
What should Dwarf cannons target first? +
Target large enemies, monsters, dragons, cavalry, artillery threats, and other high-impact units first. Do not waste the opening cannon shots on low-value infantry if a dangerous large target is moving in.
Are Thunderhorde Chargers required for Dwarf cannons? +
No. Thunderhorde Chargers are useful mobile armored pressure if you find them, but the cannon build does not depend on them. Treat them as a flexible support pick, not the core of the build.
Are Abyssal Delveknights required for Dwarf cannons? +
No. Abyssal Delveknights are a strong late-game armored and armor-piercing monster-slayer direction, but the cannon build works as long as you have a protected artillery core and enough frontline.