Tabletop Tavern Campaign Guide
A practical Tabletop Tavern campaign guide explaining chapters, route choices, healing, villages, towns, campfires, gold, events, upgrades, final battles, and difficulty modifiers.
Updated:
Quick Answer
A Tabletop Tavern campaign is won by managing the whole route, not by winning one isolated fight. A full campaign has three chapters, each ending in a final battle. Between those fights, you need to choose routes that match your army state: heal damaged core units, recruit missing roles, avoid greedy garrisons before hard fights, use campfires wisely, and deposit gold only when the current run is already stable.
What This Campaign Guide Solves
Winning a single battle in Tabletop Tavern does not mean the campaign is safe.
Most failed runs are caused by route decisions before the final battle:
- you take one extra fight while core units are already damaged
- you sack a town when you needed recovery
- you deposit gold before buying the unit that would stabilize the run
- you skip a campfire and enter a final battle with no healing left
- you take unknown routes with no recovery behind them
- you overuse autoresolve and lose control over key-unit health
This guide focuses on the campaign layer: chapters, route choices, healing, towns, campfires, gold, upgrades, and final battle preparation.
Campaign Structure: Three Chapters and Final Battles
A full Tabletop Tavern campaign has three chapters before you finish the campaign with a character. Each chapter ends with a final battle, so your route choices are really about reaching those checkpoints in good condition.
| Campaign layer | What it means for your run |
|---|---|
| Chapter map | You choose a route through fights, towns, events, shops, campfires, treasure, and unknown nodes |
| Regular fights | You gain gold, units, gear, consumables, or other rewards, but your units can be damaged |
| Management between nodes | You rotate reserves, use potions, recruit, deposit gold, and choose rewards |
| Final Battle | The chapter-ending fight checks whether your whole route was stable |
| Next chapter | The campaign continues, and your army state still matters |
| Full campaign clear | You finish after surviving the three-chapter structure with the character |
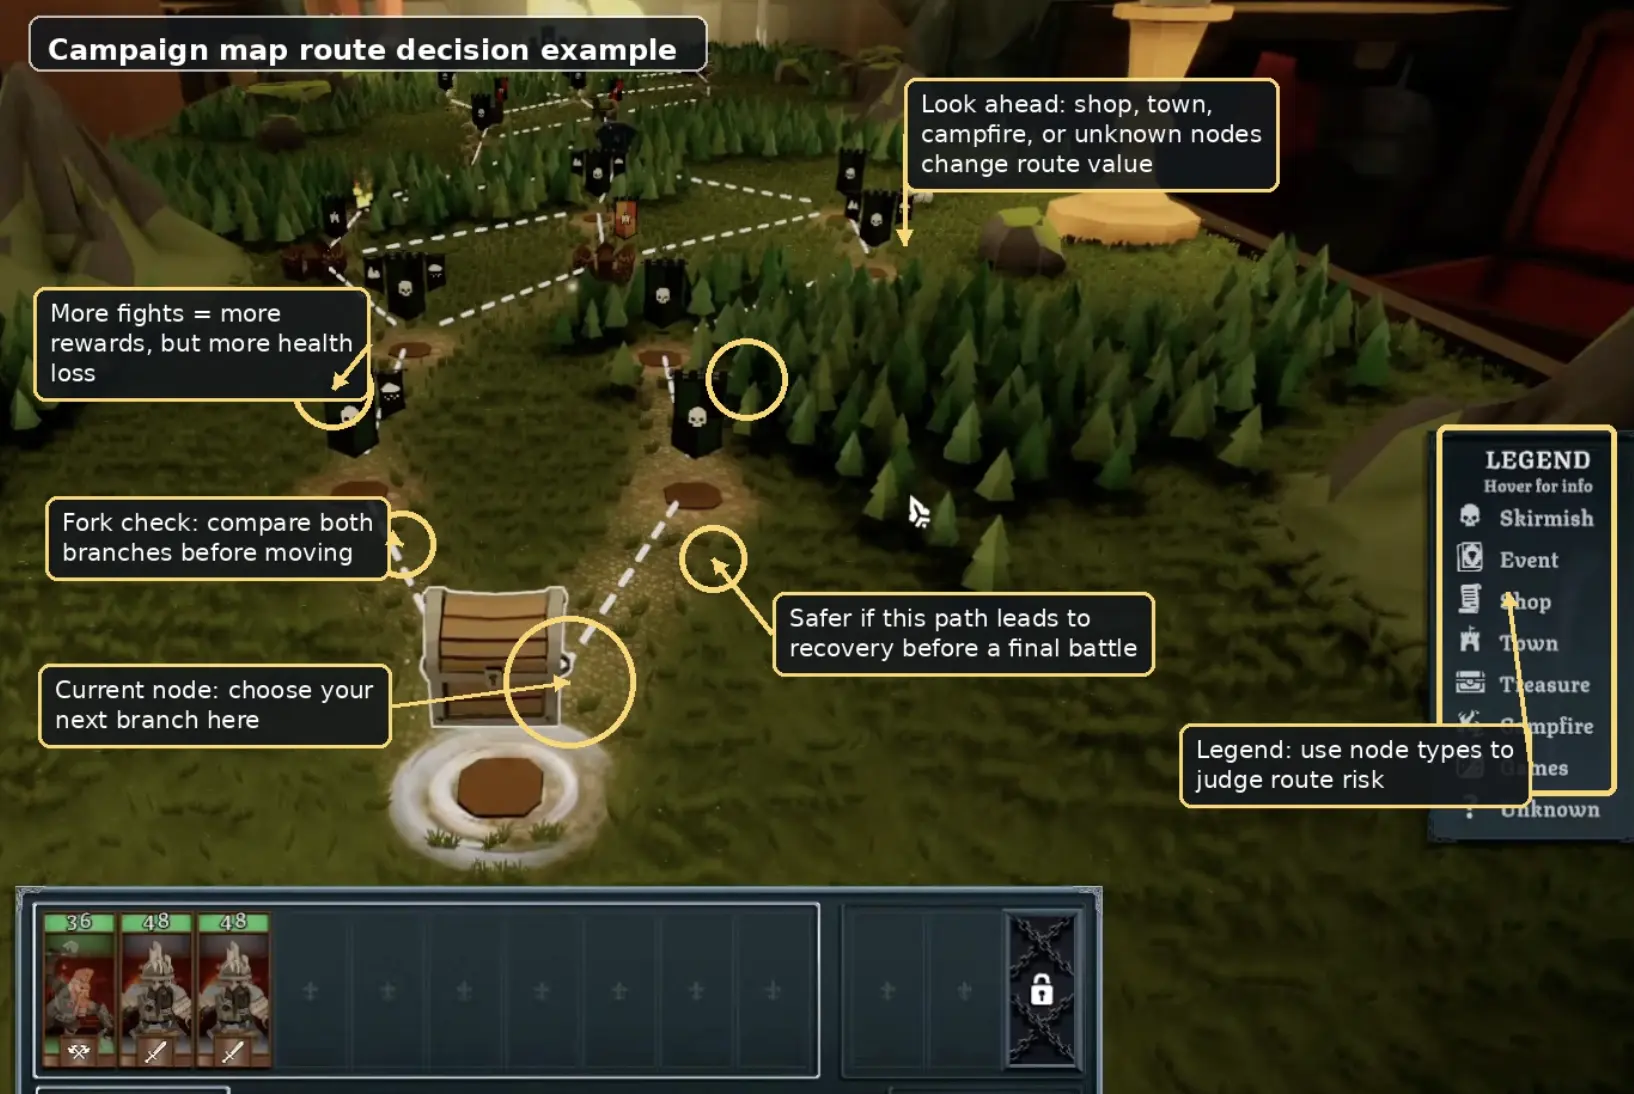
Read the Campaign Map Before Choosing a Node
Before clicking the next node, check the route shape, not just the immediate reward.
The map legend matters because each node type changes the risk of the next few turns.
| Node type | What it usually means | Beginner use |
|---|---|---|
| Skirmish / battle | Fight for rewards and progress | Good when healthy or when you need gold and units |
| Event | Risk/reward choice, often with a roll | Good when you have enough health or gold to handle a bad outcome |
| Shop | Spend gold on units, gear, consumables, or power | Strong when you know what role is missing |
| Town / village | Recovery, recruiting, deposit, or garrison choices | Best when the army needs safety or utility |
| Treasure | Reward-focused node | Good when your army can afford non-healing rewards |
| Campfire | Rest, Train, Scout, or Scavenge | One of the strongest flexible nodes |
| Unknown | Hidden node type | Safer when followed by recovery, risky before final battles |
How to Choose a Route on the Campaign Map
A route is not good just because it has more rewards. A route is good if it gives your current army what it needs before the next hard fight.
| Situation at the fork | Priority choice | Avoid |
|---|---|---|
| Your army is damaged or a final battle is close | Choose recovery first: village, town, tavern, campfire, or shop if it can fix the army | Greedy garrison, extra battle chain, or unknown route with no recovery |
| You have gold but your army is missing a role | Shop, town recruit, or recruit/unit reward node | Depositing all gold before you have frontline, anti-large, ranged damage, or a guard |
| You are strong but low on gold | Safe battle, bounty-style reward, or controlled fight | Spending gold on weak event rolls or unnecessary healing |
| You lack anti-large | Recruit, shop, or unit reward that can add pikes, spears, cavalry counters, or anti-large tools | Entering cavalry, monster, or large-unit fights blindly |
| You lack ranged damage or artillery pressure | Shop, recruit node, or reward route that can add safe damage | Taking only melee bodies when your army already has enough frontline |
| You have a strong carry unit but it is hurt | Recovery route, reserve rotation, or potion-friendly stop | Forcing another hard fight before the carry can heal |
| You see a question-mark route | Take it only if the next node after it gives recovery or safety | Unknown route directly into a final battle |
| Your army is healthy and ahead | Battle, shop, controlled garrison, or reward-heavy route | Wasting a strong position on low-value recovery |
Good and bad route shapes are easier to remember than individual node rules.
| Route pattern | Evaluation | Why |
|---|---|---|
| Battle → Village/Town → Final Battle | Good beginner route | You gain rewards, then recover before the hard fight |
| Battle → Campfire → Final Battle | Very good route | Campfire can Rest, Train, Scout, or Scavenge based on army state |
| Shop → Battle → Final Battle | Good if you have gold | You can buy a missing role before the hard fight |
| Easy Battle → Shop → Campfire | Strong route | You gain gold, buy power, then recover or scout |
| Garrison → Battle → Final Battle | Risky | Too many health losses before the checkpoint |
| Unknown Event → Unknown Event → Final Battle | Risky for beginners | Too much uncertainty without recovery |
| Battle → Battle → Battle with no recovery | Only if very healthy | Rewards are good, but damage can snowball fast |
Fight Nodes: Do Not Spend Health Blindly
Fight nodes are useful because they give gold, units, gear, consumables, or other rewards, but they also spend army health. Before taking a fight, ask whether the reward is worth the damage your army may take.
Campaign Health Management
Health management is the campaign’s real resource system.
Reserve slots, villages, taverns, campfires, and potions all affect whether your army reaches the next final battle intact. The cleanest way to play is to choose the lowest-cost healing tool that solves the current problem.
| Healing source | Checked value or effect | Best use | Avoid when… |
|---|---|---|---|
| Reserve slots | Units placed in reserve recover after the next battle | One or two important units are damaged, but the army can still fight | Too many deployed units are already hurt |
| Village stay | Heals all units by 30% in the checked tooltip | Several units are damaged and you need broad recovery | You are already healthy and need power instead |
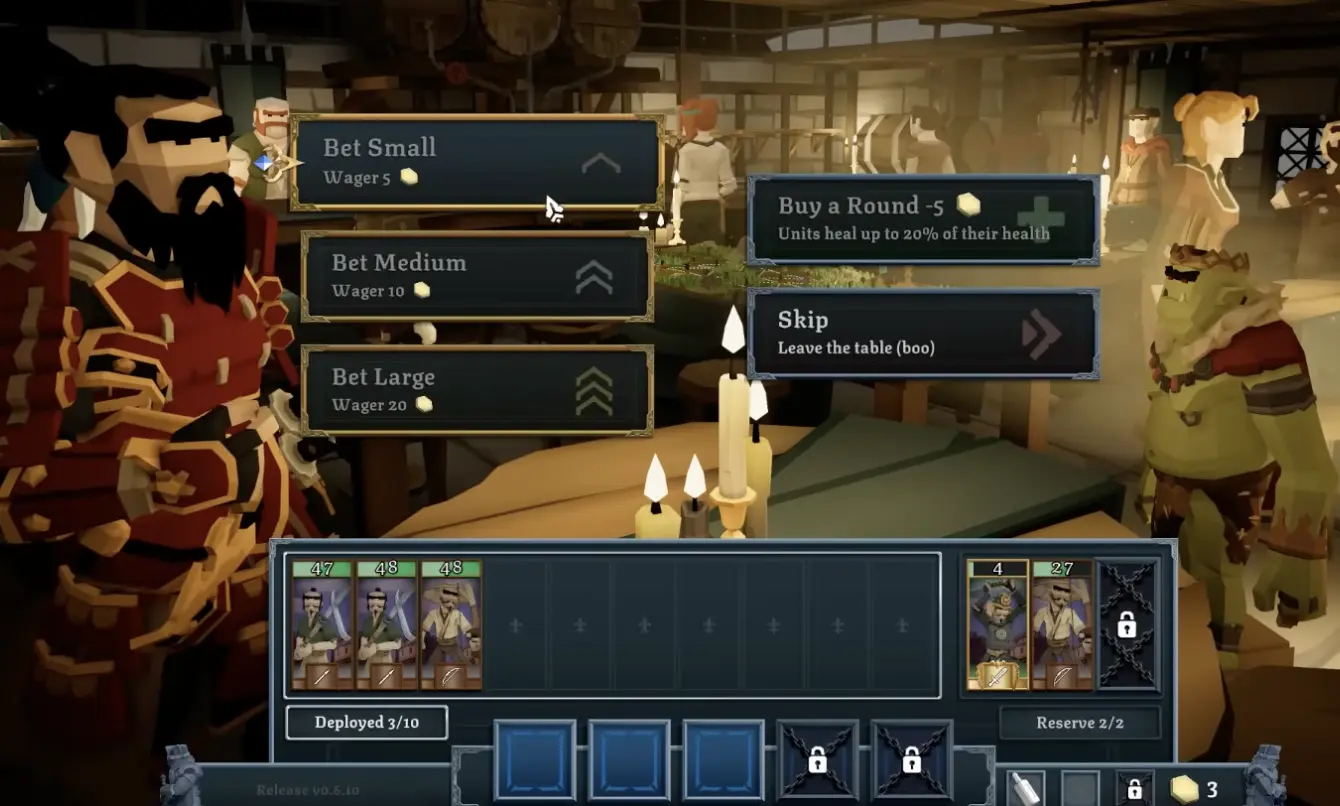
| Tavern: Buy a Round | Units heal up to 20% in the checked tooltip | Moderate army-wide recovery when available | You need the gold for a critical recruit or shop |
| Campfire Rest | Heals all units by 30% in the checked campfire tooltip | Strong recovery before a hard fight or final battle | The army is healthy enough to Train, Scout, or Scavenge |
| Potions | Varies by potion; some heal part or all of a unit | A key unit is low and must stay useful | The target is a disposable filler unit |
Campfire Choices After the Health Check
Campfires are powerful because they are not only healing nodes. They are flexible decision nodes.
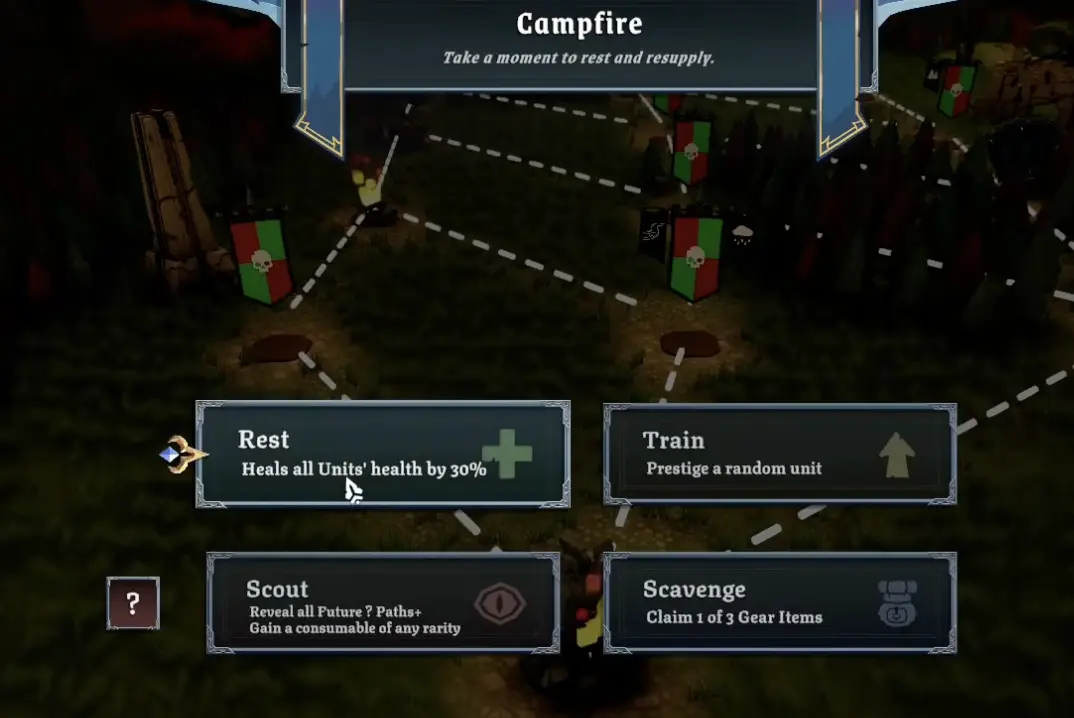
| Campfire option | Pick it when… | Do not pick it when… |
|---|---|---|
| Rest | Multiple important units are damaged or a hard fight is close | The army is already healthy |
| Train | The army is healthy and a random prestige helps | You need reliable healing right now |
| Scout | Unknown paths could decide the route | The next route is already obvious |
| Scavenge | You are healthy and gear would improve the build | Your army needs recovery more than gear |
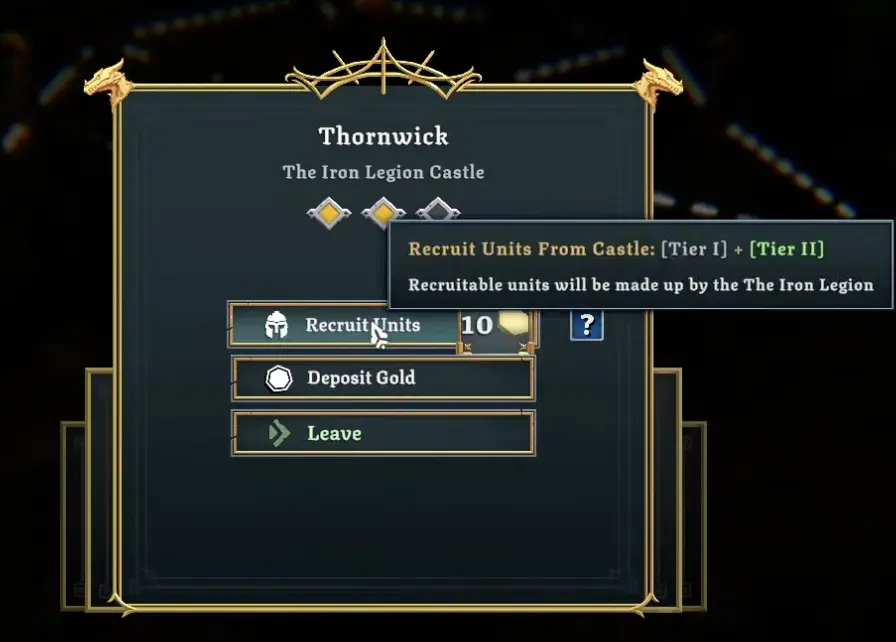
Towns, Villages, and Garrisons
Settlements are not just loot nodes. They can heal, recruit, deposit gold, or tempt you into a dangerous garrison fight.
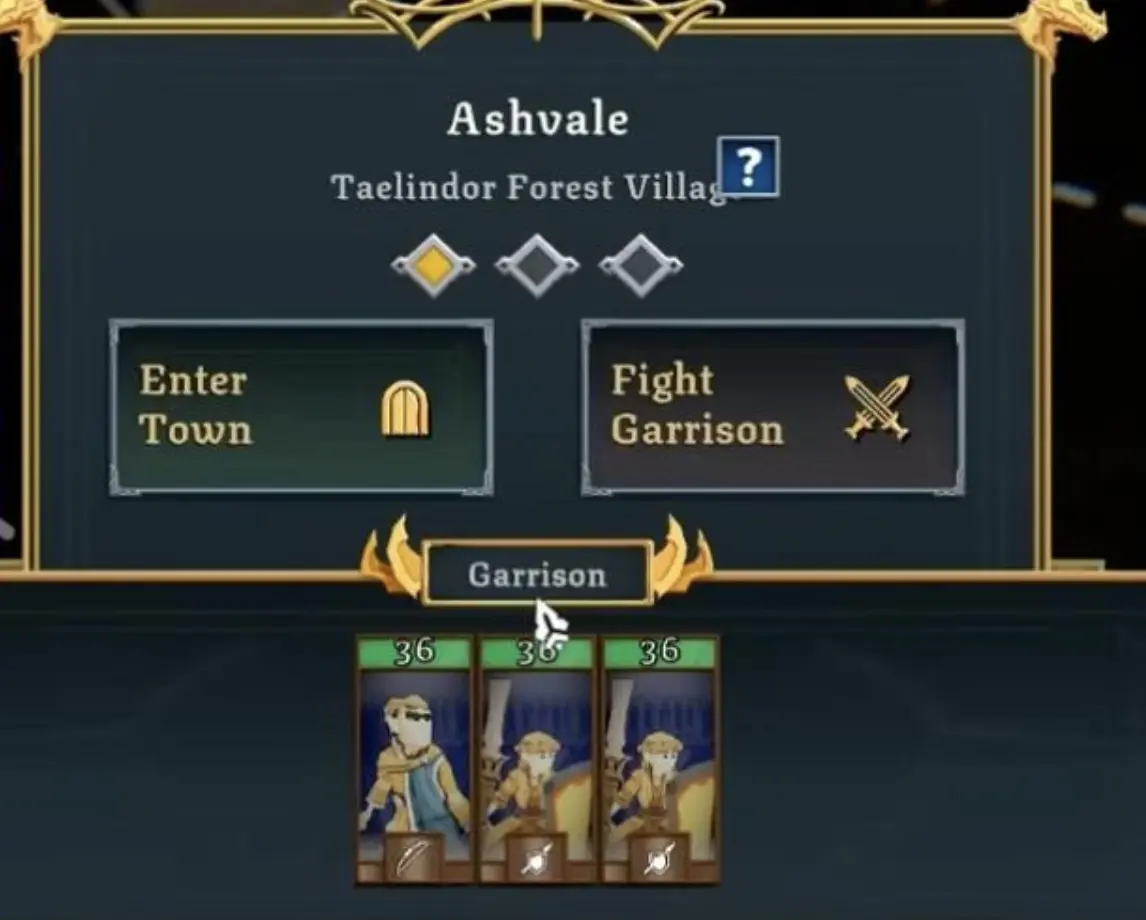
| Settlement choice | Best use | Main risk |
|---|---|---|
| Stay / recover | Your army is damaged and needs broad healing | You skip a more aggressive reward |
| Recruit locally | You are missing frontline, anti-large, ranged damage, or a guard | You spend gold that might be needed later |
| Deposit gold | Your current run is stable and you want post-run upgrade progress | You weaken the current run if you deposit too early |
| Fight garrison | Your army is healthy, the reward matters, and you can handle walls or defenders | Strong garrisons can cost the run |
| Leave / skip greed | The next fight matters more than the settlement reward | You miss loot, but preserve the army |
Gold: Spend, Save, or Deposit?
Gold has two jobs: saving the current run and improving future runs.
The mistake is treating every gold choice the same. Sometimes you should buy power. Sometimes you should heal. Sometimes you should deposit.
| Gold choice | Use it when… | Avoid when… |
|---|---|---|
| Spend on healing | Several important units are damaged | The army is already healthy |
| Spend on recruits | You are missing a key role | You already have enough bodies and need quality instead |
| Spend in shop | A shop can fix damage, anti-large, ranged damage, or gear needs | The purchase is only a small luxury |
| Save gold | A better shop, town, or event is coming | The army is currently too weak to survive |
| Deposit gold | The run is stable and future upgrades matter more | You still need immediate survival tools |
| Gamble / roll spending | The reward is worth the risk and you can afford failure | Losing gold would break the route |
Events and Dice Rolls
Events can give strong rewards, but they are not always safer than battles.
Before choosing an event route, check your army state and gold. Some events can ask for rolls, and some rolls can be modified or supported by resources depending on difficulty and event rules.
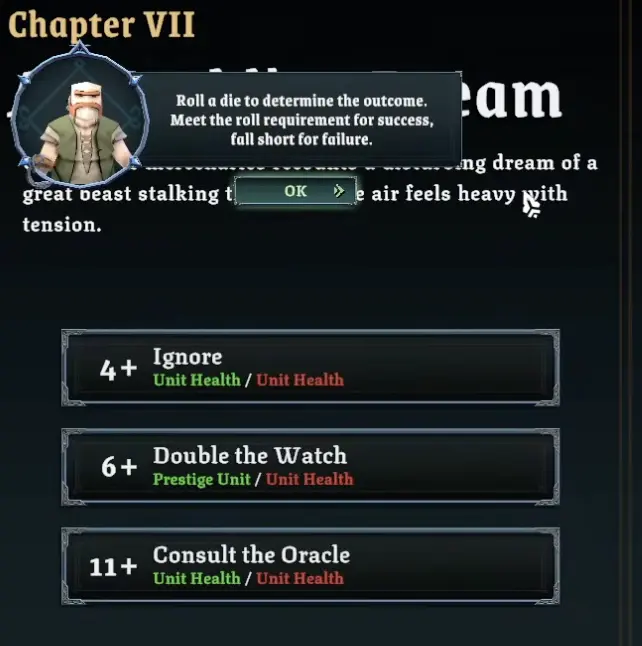
| Event situation | Good decision |
|---|---|
| You are healthy and have spare gold | Take reasonable event risks |
| You are damaged but the next node is recovery | Event risk can be acceptable |
| You are damaged and final battle is close | Avoid risky event chains |
| The reward is a missing role or key upgrade | Consider spending resources on the roll |
| The reward is minor | Do not spend important gold chasing it |
| Higher difficulty removes roll modification | Treat events as less controllable |
Shops: Buy What the Army Is Missing
A shop is strongest when it fixes a specific weakness.
Do not buy randomly just because you reached a shop. Check your army first.
| Missing piece | Shop target |
|---|---|
| Frontline is weak | Durable infantry, shielded units, armored units, or high-model bodies |
| Cavalry or monsters are scary | Pikes, spears, anti-large units, or anti-large gear |
| Damage is too slow | Ranged units, artillery, monsters, elite units, or damage gear |
| Backline keeps dying | Guards, anti-large defenders, or fast interceptors |
| Key units are low | Potions or healing options |
| Build has a clear carry | Gear or consumables that support that carry |
| Army slots are full | Upgrade quality, not just body count |
Preparing for Final Battles
Final battles are where earlier route mistakes become obvious.
Before a final battle, check whether your army can actually hold, kill, and recover.

| Final battle check | Good sign | Fix before entering |
|---|---|---|
| Frontline health | Melee units can hold without instantly collapsing | Take recovery, reserve damaged units, or buy replacements |
| Damage source | Ranged, artillery, monsters, or elite melee can finish enemies | Shop, recruit, or reward route for damage |
| Anti-large answer | Cavalry, monsters, and large enemies are not unanswered | Add pikes, spears, anti-large gear, or focused ranged damage |
| Backline safety | Ranged and artillery have guards if needed | Keep anti-large or sturdy melee near them |
| Healing left | Reserve, potion, town, village, or campfire choices kept the army stable | Do not take one more greedy fight |
| Gold plan | You did not spend away every recovery option | Save enough for healing, shop, or emergency recruit |
| Manual battle plan | You know the first target before the fight starts | Check enemy army before deployment |
Difficulty Modifiers Change the Campaign Layer
Higher difficulties do not only make enemies stronger. They can change the campaign economy, healing, shops, garrisons, events, and autoresolve information.
| Modifier type | Why it matters |
|---|---|
| Hidden autoresolve health preview | You lose information before committing to autoresolve |
| Higher shop prices | Shops become less reliable as emergency fixes |
| Harder final battles | Every chapter checkpoint needs stronger preparation |
| Stronger enemy armies | Manual battle mistakes cost more |
| Reduced healing | Villages, settlements, or reserve recovery become less forgiving |
| Stronger garrisons | City greed becomes much more dangerous |
| Event roll restrictions | Events become harder to control |
| Gold penalties | Deposits, shops, recruiting, and route choices become tighter |
Post-Run Upgrades
After a run, deposited gold, victory gold, and carried gold can feed long-term upgrades. These upgrades matter because they make future runs less fragile.
| Upgrade direction | Why it helps future campaigns |
|---|---|
| Gold generation | Gives more room for shops, healing, recruits, and deposits |
| Shop value / better deals | Makes shops stronger route targets |
| Gear management | Helps gear-focused builds and collection progress |
| Potion slots | Lets you carry more emergency tools |
| Reserve slots | Improves health management between battles |
| Extra gear slots | Lets more units benefit from build-defining gear |
Safe Campaign Route Template
Use this as a simple mental model, not a fixed rule.
| Run state | Main goal |
|---|---|
| Early chapter | Build the basic army shape: frontline, damage, anti-large, and backline safety |
| Damaged state | Prioritize recovery before chasing extra rewards |
| Healthy state | Take controlled fights, shops, garrisons, or reward-heavy routes that solve a real problem |
| Pre-final battle | Stop greed-checking the route and use the Preparing for Final Battles section above |
Common Campaign Mistakes
| Mistake | Why it hurts | Better move |
|---|---|---|
| Judging only the next node | You miss the danger of the following final battle or garrison | Read two or three nodes ahead |
| Depositing gold too early | Future upgrades do not save a collapsing current run | Spend first if the current army needs healing or power |
| Taking unknown routes before hard fights | You may enter the final battle with no recovery | Take unknown nodes only when the follow-up route is safe |
| Fighting every garrison | Settlement fights can cost more health than the reward is worth | Fight garrisons when healthy and the reward matters |
| Using campfire Scavenge while damaged | Gear does not help if the army dies first | Rest when health is the urgent problem |
| Ignoring reserve slots | Damaged key units keep taking avoidable losses | Rotate important units before they collapse |
| Buying random shop items | Gold disappears without fixing the army | Buy to solve a named problem |
| Overusing autoresolve | You lose control over key-unit health | Manual fight when threats or damaged units matter |
| Pushing difficulty too soon | Campaign systems become harsher before you understand them | Learn the route, healing, and gold loop first |
FAQ
How many chapters are in a Tabletop Tavern campaign? +
A full Tabletop Tavern campaign has three chapters before you complete the campaign with a character. Each chapter ends with a final battle, and your army condition still matters as you move between chapters.
How should I choose routes in Tabletop Tavern? +
Choose routes based on what your army needs before the next hard fight. If core units are damaged, prioritize recovery. If you lack a role, look for shops, recruit nodes, or unit rewards. Avoid greedy garrisons or unknown routes right before final battles.
How much does village healing restore in Tabletop Tavern? +
In the checked guide snapshot, staying in a village heals all units by 30%. Treat exact values as tooltip data that may change after balance updates.
How much does tavern healing restore in Tabletop Tavern? +
In the checked guide snapshot, the tavern Buy a Round option heals units up to 20% of their health. Use it when several units are hurt but you still need the run to keep moving.
Should I fight town garrisons in Tabletop Tavern? +
Fight garrisons only when your army is healthy and the reward is worth the risk. If the army is damaged or a final battle is close, entering town, recruiting, depositing gold, or healing is usually safer.
When should I deposit gold in Tabletop Tavern? +
Deposit gold when the current run is stable. If you still need healing, units, shops, or a key power spike, spend gold on survival first and deposit later.
What should I upgrade first after a campaign run? +
Prioritize upgrades that improve gold generation, shop value, gear management, potion capacity, or reserve slots. Early upgrades are strongest when they make future runs safer and more flexible.