Tabletop Tavern Beginner Guide
A practical Tabletop Tavern beginner guide for your first campaign, covering faction picks, first-battle plans, pike counters, artillery threats, shielded units, healing, route choices, towns, campfires, and final battle prep.
Updated:
Quick Answer
For your first Tabletop Tavern campaign, pick a faction with a simple first-battle plan, not just the coolest hero. If you want a safe start, use infantry and pikes / anti-large units to stop cavalry, keep ranged units protected, and play manual battles when the enemy has artillery or fast flankers. Your first goal is not to win every fight greedily. Your first goal is to reach the final battle with a healthy frontline, one clear damage source, enough healing, and no major backline weakness.
What This Beginner Guide Solves
Tabletop Tavern looks simple at first: pick a faction, place units, win battles, collect rewards.
The first campaign usually goes wrong for more specific reasons:
- cavalry charges hit your ranged units before you understand anti-large units
- enemy artillery shoots freely because nobody was assigned to stop it
- shielded units soak ranged fire from the front
- damaged units keep fighting instead of healing in reserve
- you sack towns or take fights when your army needs recovery
- you choose a route because it looks rewarding, not because your army can survive it
- you reach the final battle with no healthy frontline
This guide focuses on the first full run: what to pick, what to do in the first battles, and how to avoid the most common beginner deaths.
Pick a Faction With a First-Battle Plan
The faction table should not only tell you what a faction is good at. It should tell you what to do after you click start.
| Starting direction | Why it is beginner-friendly | First-battle plan |
|---|---|---|
| Iron Legion / balanced infantry start | Simple army roles: frontline, pikes, ranged support | Put durable infantry in front, keep ranged behind, and use pikes or anti-large units to catch cavalry instead of chasing it |
| Deepstone Hold | Durable Dwarf units, gear value, and a natural artillery route | Hold a stable line, protect ranged units, take gear only when healthy, then build toward artillery or anti-large tools |
| Sanguine Court with Sister Morvayne | Very strong if you like active manual battles | Use all-army Outrider deployment to start closer, rush enemy ranged or artillery, and surround weak units before they stabilize |
| Other unlocked factions | Can be strong, but may ask for more specific unit knowledge | Read the faction bonus first, then identify the first role your army lacks: frontline, ranged damage, anti-large, or healing |
For a first campaign, the safest mindset is:
- Pick a faction with a clear battlefield job.
- Identify your anti-cavalry or anti-large unit before battle.
- Keep ranged units behind protection.
- Avoid greedy fights if your first few trades go badly.
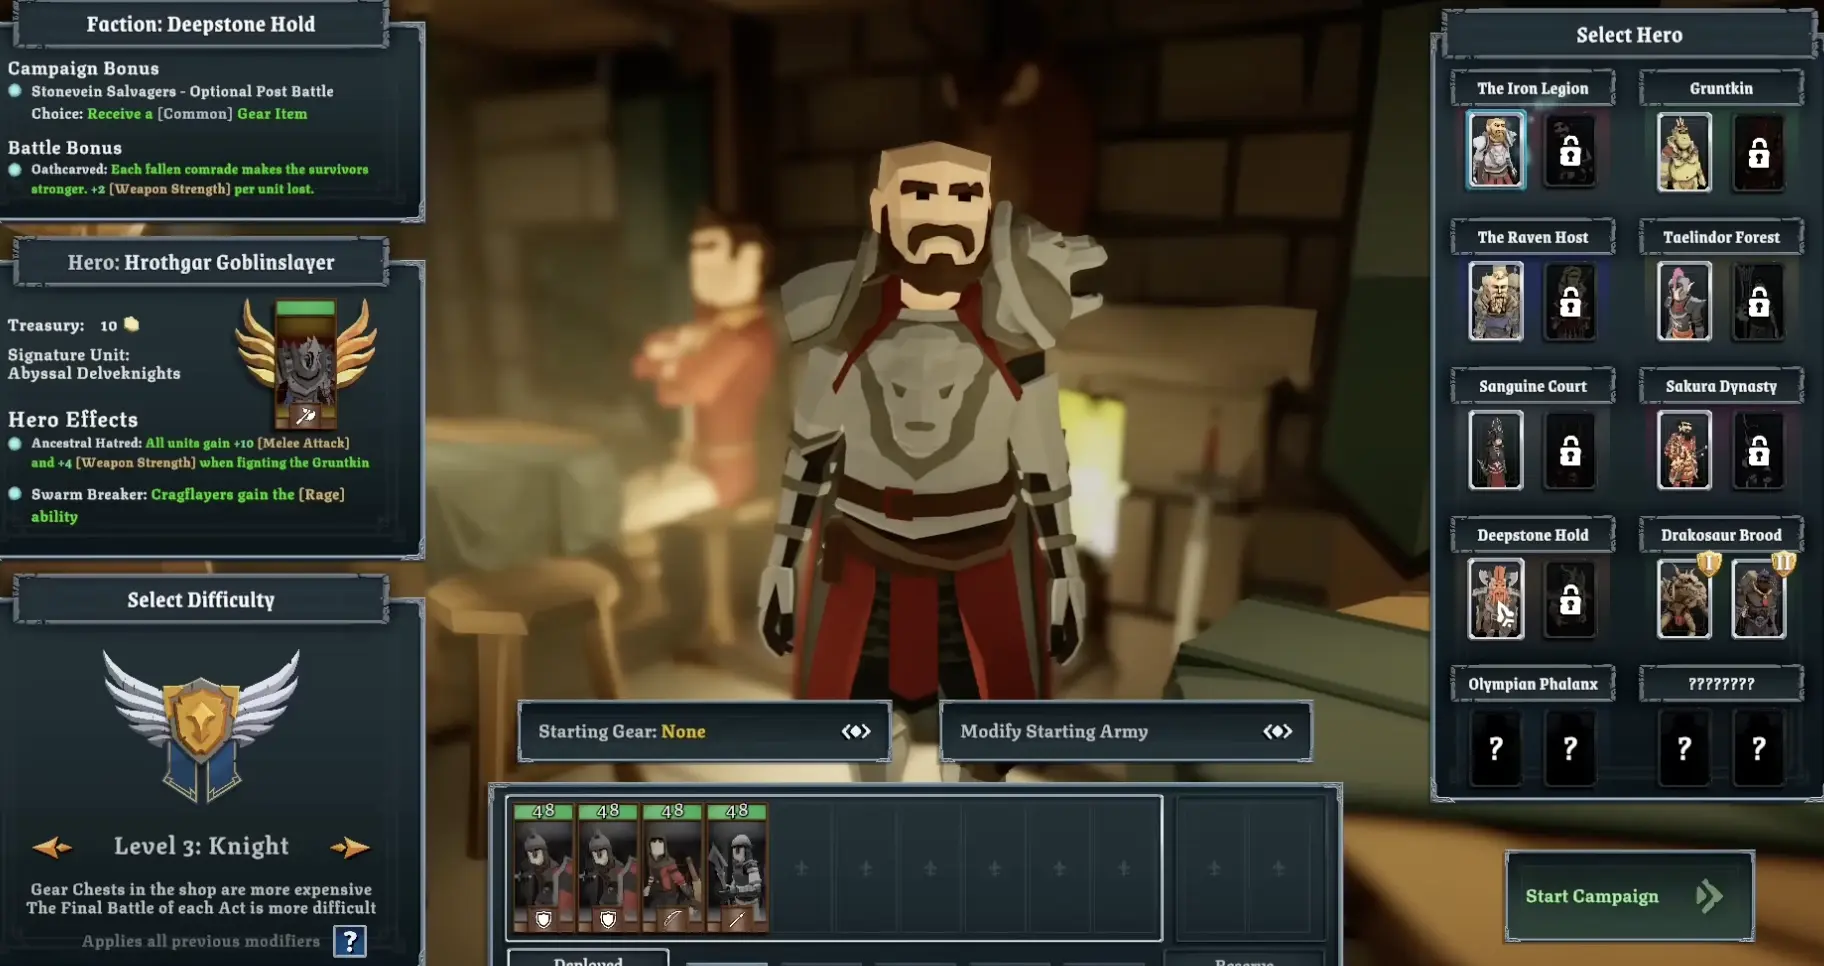
Deepstone Hold: Simple Durable Start
Deepstone Hold is a good beginner direction because the faction teaches stable army structure.
You are not trying to sprint across the map. You are trying to make enemies walk into a sturdy line while your ranged units, gear choices, and later artillery do the work.
| Deepstone tool | First-run value |
|---|---|
| Durable units | Easier to keep a stable formation |
| Stonevein Salvagers | Can offer common gear after battle when the army is healthy enough to take it |
| Dwarf-style pacing | Rewards patient positioning more than chasing |
| Ranged / artillery direction | Gives a clear long-term damage plan |
| Anti-large potential | Helps against cavalry, monsters, and large enemies later |
Deepstone Hold First-Battle Plan
For your first Deepstone Hold battle, play slowly. The faction is good at holding shape, not chasing everything across the map.
| Step | What to do |
|---|---|
| 1. Put durable infantry in the center | Let enemies come into your line instead of spreading out early |
| 2. Keep ranged units behind the line | Do not leave crossbows or other ranged units alone on a flank |
| 3. Identify cavalry or large threats before start | If the enemy has cavalry, keep anti-large or sturdy melee near the backline |
| 4. Do not chase routing units too early | Slow Dwarf units can expose your ranged units if they run forward |
| 5. Take stable post-battle rewards | If the army is healthy, Stonevein Salvagers gear can support long-term scaling |
| 6. Build toward artillery later | Do not rush cannons before you have a frontline that can protect them |
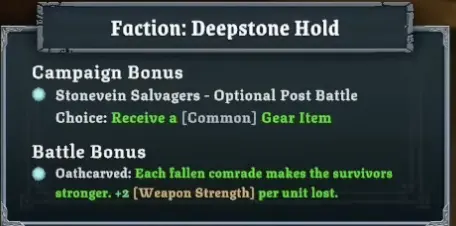
Sanguine Court: Strong, But More Active
Sanguine Court is one of the most searchable factions because it plays very differently.
With Sister Morvayne, all units gain Outrider. That means your army can deploy outside the normal box and start fights much closer to the enemy. This is powerful, but it also asks for more control.
| Sanguine Court tool | First-run use |
|---|---|
| All-army Outrider | Deploy forward or wide to pressure enemy ranged units |
| Raise Dead | Add common bodies after battles to fill the army |
| Morale resistance | Helps messy melee fights stay stable longer |
| Fast contact | Stops archers and artillery from shooting freely |
| Common units | Use them to pin and surround, not as your only real damage |
| Necrotic Chimerae goal | Later power spike once you understand the faction |
The first Sanguine battle plan is simple:
- Put a few bodies close enough to pin the enemy front.
- Send one group wide toward ranged units or artillery.
- Do not send every unit into the same blob.
- Pull weak units out before they die.
- Use Raise Dead to replace bodies, but keep looking for real damage units.
For the full aggressive build, use the dedicated Sanguine Court Build Guide.
Read the Hero and Faction Panel
Before starting, read the faction and hero panel carefully. It tells you what kind of run the game is pushing you toward.
| Panel line | What to ask |
|---|---|
| Campaign Bonus | What does this faction gain between battles? |
| Battle Bonus | What advantage applies during fights? |
| Hero Effects | Does this hero change deployment, economy, units, gear, or consumables? |
| Signature Unit | What late-run unit should I watch for? |
| Treasury | How much early gold do I have for shops, healing, or events? |
| Starting army | Do I already have frontline, ranged damage, anti-large, and a guard? |
A strong hero is not always a beginner-friendly hero. A beginner-friendly hero gives you a plan you can actually execute.
Which Hero Should Beginners Pick?
Do not turn your first run into a full hero tier list. For beginners, the better question is: does this hero give me a plan I can understand in the first battle?
| Hero | Faction | Beginner fit | Why |
|---|---|---|---|
| Hrothgar Goblinslayer | Deepstone Hold | Safest learning pick | Durable army shape, clear gear route, and a natural transition into ranged or artillery play |
| Sister Morvayne | Sanguine Court | Strong but more active | All units gain Outrider, so you need better target control and more active deployment |
| Bertha Barrelstorm | Deepstone Hold | Better after learning artillery | Artillery accuracy and missile strength bonuses matter more once you understand cannon protection |
| Other heroes | Varies | Read the panel first | Pick only after you understand what the hero changes: economy, deployment, units, gear, or combat |

Your First Battle Formation
A beginner formation should be boring and readable.
Do not scatter every unit randomly just because deployment allows it. Give each group a job.
| Role | Where to put it | Job |
|---|---|---|
| Frontline | Center or slightly forward | Hold enemy infantry in place |
| Pikes / anti-large | Near cavalry approach or backline | Stop cavalry, monsters, and large threats |
| Ranged units | Behind frontline, not alone | Shoot safe targets without being dived |
| Fast units / Outriders | Flank or wide angle | Pressure artillery, archers, or exposed units |
| Backline guard | Near ranged or artillery | Intercept cavalry and enemy Outriders |
| Damaged unit | Reserve if possible | Heal instead of risking death |
The first battle is not the time to prove you can micro every unit. It is the time to keep the army shape clean.
First Common Death: Cavalry Charges
Many new players lose early fights because cavalry arrives faster than expected. The answer is not to chase cavalry with random infantry. The answer is to make cavalry hit the wrong target.
Pikes, spears, and other anti-large units are your beginner safety net.
| Cavalry problem | Beginner answer |
|---|---|
| Cavalry charges your ranged units | Keep pikes or anti-large units near the backline |
| Cavalry circles your frontline | Anchor one side on terrain or a corner when possible |
| You have only one pike unit | Use it defensively, not as a chasing unit |
| You have two pike units | Deploy one and rotate the other through reserve if damaged |
| Enemy cavalry commits early | Let it crash into anti-large instead of pulling your whole line apart |
| Your ranged units are exposed | Move them closer to guards before the fight starts |
A simple anti-cavalry setup:
- Put frontline infantry in the middle.
- Put ranged units behind them.
- Place pikes slightly behind or beside the frontline.
- Do not move the pikes too far forward.
- When cavalry commits, let the anti-large unit meet it.
- After cavalry is controlled, send fast units or ranged fire into safer targets.
Managing Ranged Threats: Artillery, Archers, and Your Backline
The biggest ranged-threat mistake is treating enemy artillery and your own backline as separate problems. They are connected.
If the enemy has artillery, you need a unit assigned to pressure it. If you have ranged units or artillery, you need a unit assigned to protect them.
| Threat | What to do before battle |
|---|---|
| Enemy artillery | Assign an Outrider, cavalry unit, fast melee unit, long-range unit, or your own artillery to pressure it |
| Enemy archers | Send fast pressure or force them to turn away from your frontline |
| Enemy Outriders | Keep a guard near your ranged units |
| Enemy cavalry | Keep pikes, spears, or anti-large units near likely dive paths |
| Your ranged units | Do not leave them alone in a corner with no protection |
| Your artillery | Keep a guard close and avoid blocked lines of sight |
Do not send your whole army after artillery. Send the unit assigned for that job, while the rest of the army keeps its formation.
Shielded Units: Do Not Shoot the Front Forever
Shielded units are a common beginner trap. If your ranged units shoot shielded enemies from the front, damage can feel weak or inefficient.
The solution is not always “bring more archers.” The solution is often better target choice or better angle.
| Situation | Better move |
|---|---|
| Shielded unit is facing your archers | Shoot a different unshielded target first |
| Shielded unit is pinned in melee | Move ranged units to a side angle if safe |
| Shielded unit is losing melee | Keep pressure on it while it is stuck |
| Shielded unit protects enemy ranged units | Flank around it instead of wasting frontal shots |
| No safe ranged angle exists | Use melee, armor-piercing, artillery, or flanking pressure |
| Your units auto-target shields | Manually retarget to a better enemy when needed |
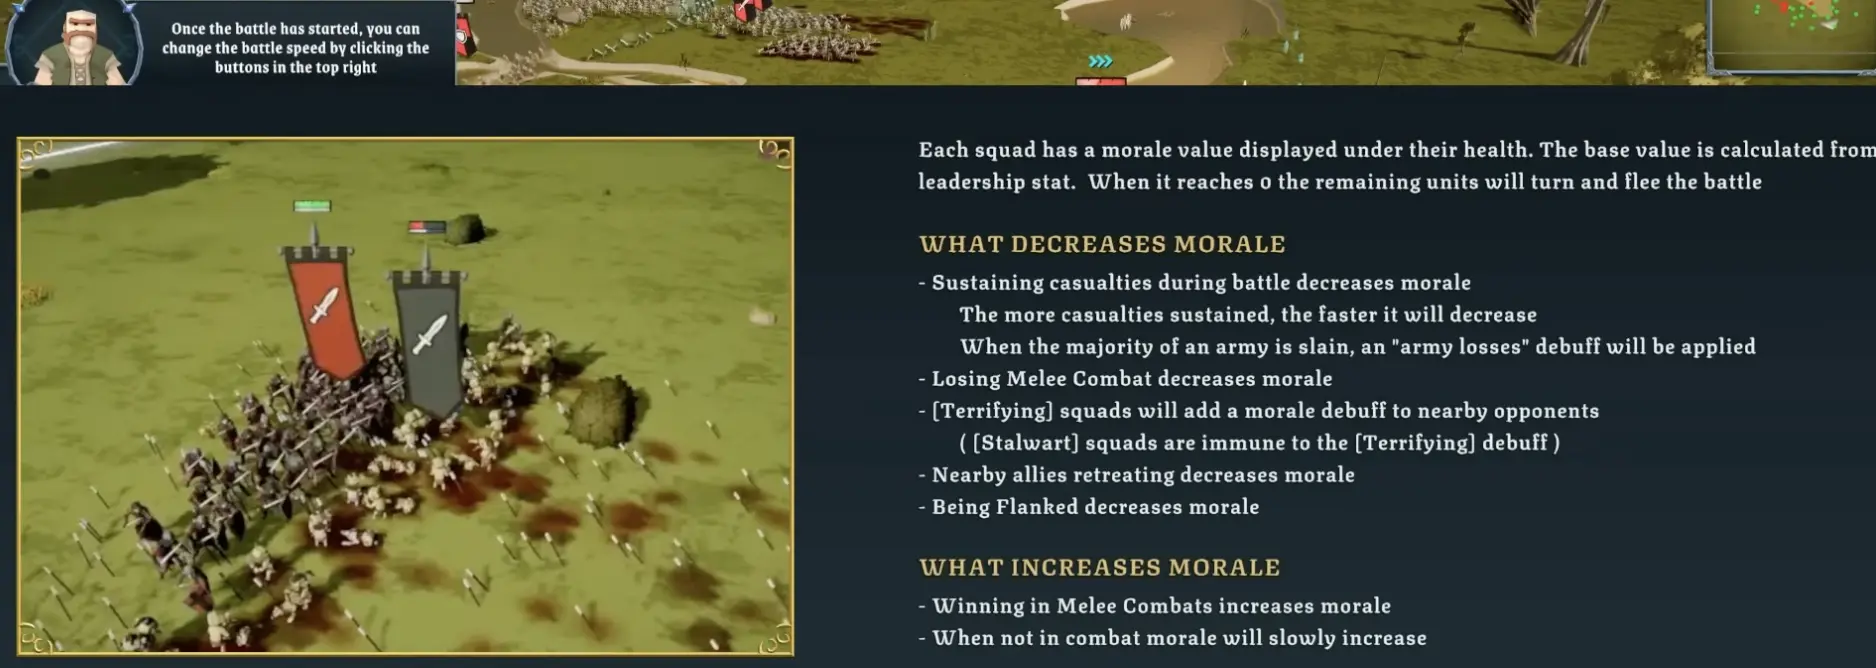
Flanking, Morale, and Wide Formations
You do not need to kill every enemy model to win the battle. Morale matters.
Flanking, casualties, losing melee combat, terrifying units, nearby allies retreating, and army losses can all push units toward breaking. Beginners often fight everything from the front, which turns easy wins into expensive trades.
| Tool | How to use it |
|---|---|
| Frontline pin | Hold enemies in place |
| Side or rear hit | Add morale pressure and reduce the enemy’s ability to trade well |
| Fast unit flank | Hit archers, artillery, or engaged infantry from a better angle |
| Wide formation | Let one unit tie up multiple enemies if it has enough bodies |
| Terrifying unit | Bring it near unstable enemies to add pressure |
| Manual target control | Break one unit, then roll the advantage into the next |

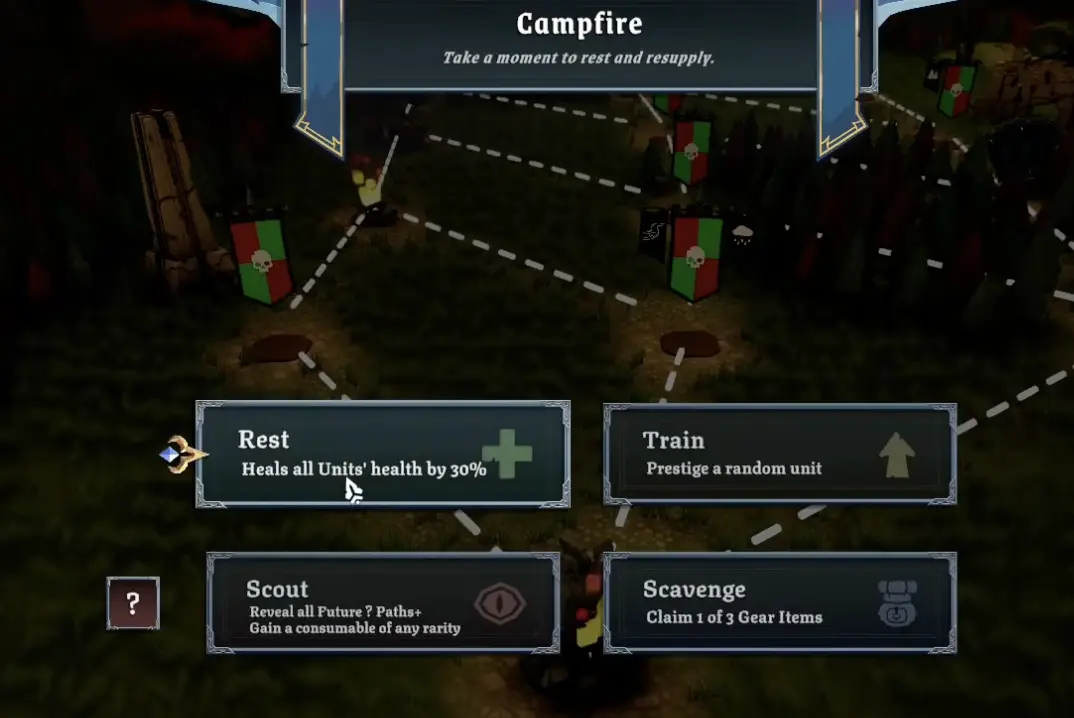
Campaign Health Management
Health management is the difference between winning a battle and winning the campaign.
Do not think of reserve, villages, taverns, campfires, and potions as separate systems. They are one health-management chain.
| Health tool | Use it when… | Beginner priority |
|---|---|---|
| Reserve slots | One or two important units are hurt | First option if you can still win the next fight |
| Tavern healing | Several units need recovery and you have gold | Good when the whole army is bruised |
| Village / town recovery | Your route gives a safe healing stop | Usually better than a risky garrison when damaged |
| Campfire Rest | A hard fight or final battle is coming | Strongest when multiple core units are hurt |
| Campfire Train | Army is healthy and a random prestige would help | Take when you do not need healing |
| Campfire Scout | Route uncertainty is the biggest risk | Good before unknown paths or dangerous branches |
| Campfire Scavenge | Army is healthy and gear matters | Do not take it just because it looks exciting |
| Potions | A key unit is low before a dangerous fight | Save for rare, carry, artillery, monster, or frontline core units |
Towns and Garrisons
Towns are not only loot nodes. They are recovery, recruitment, deposit, and risk-management nodes.
A garrison fight can be worth it, but it can also damage the exact units you need for the next final battle.
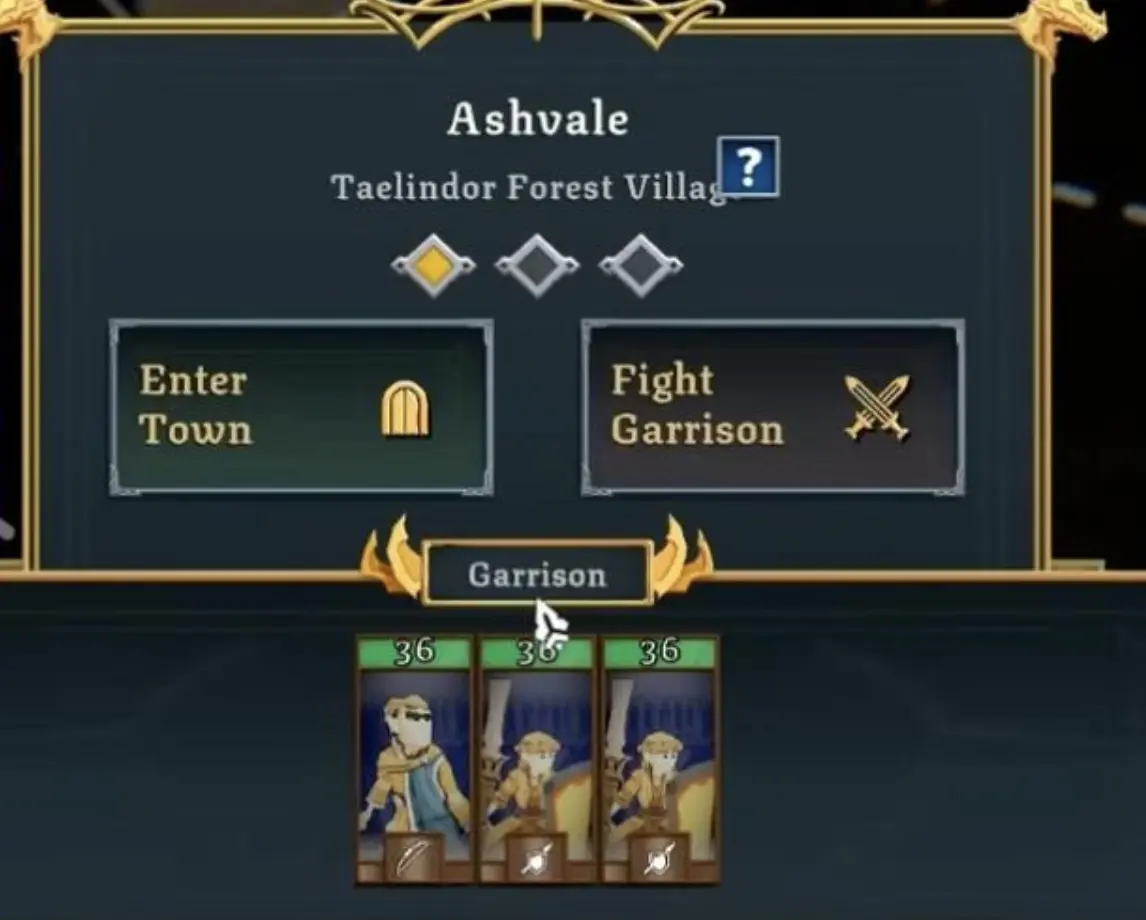
| Choose this | When |
|---|---|
| Enter town / stay | Your army is damaged or you need safer recovery |
| Recruit | You need a missing role such as frontline, anti-large, ranged damage, or guard |
| Deposit gold | The run is stable and you want upgrade progress |
| Fight garrison | Your army is healthy and the reward is worth the risk |
| Skip greed | A final battle is near and your core units are already hurt |
How to Choose a Route on the Campaign Map
This is where many first runs go wrong.
A route is not good just because it has more rewards. A route is good if it gives your current army what it needs before the next hard fight.
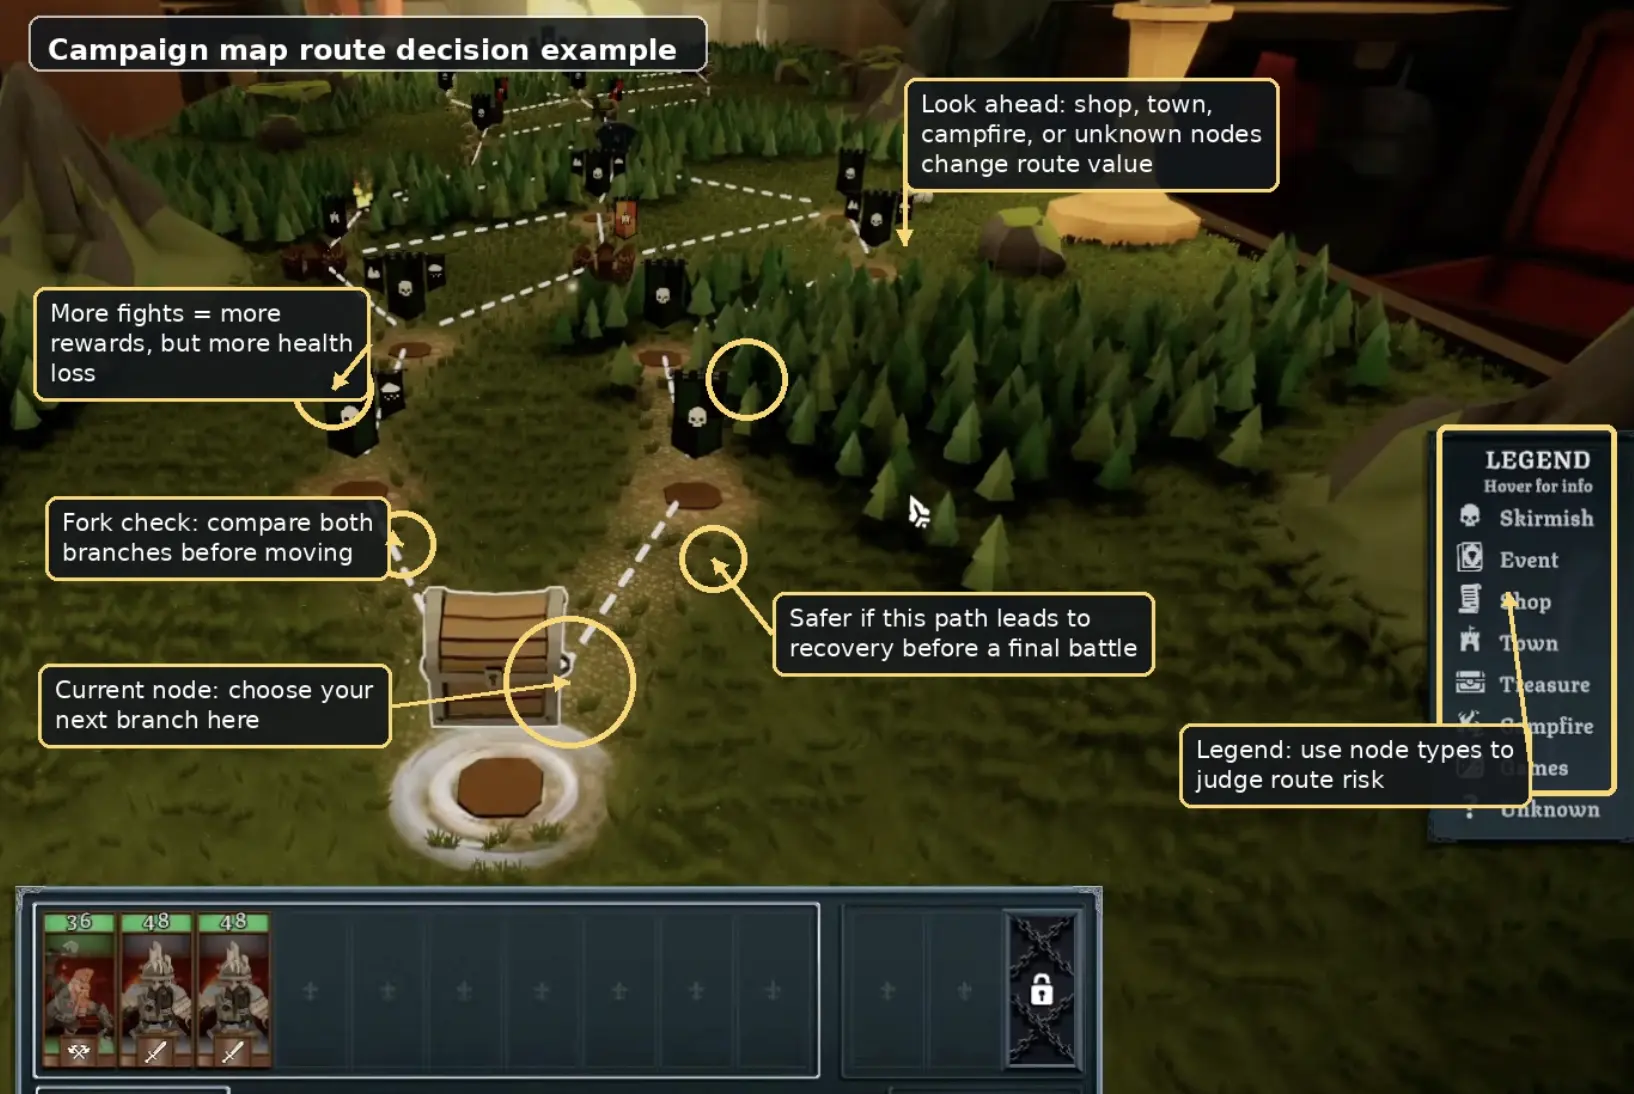
| Situation at the fork | Priority choice | Avoid |
|---|---|---|
| Your army is damaged or a final battle is close | Choose recovery first: village, town, tavern, campfire, or shop if it can fix the army | Greedy garrison, extra battle chain, or unknown route with no recovery |
| You have gold but your army is missing a role | Shop, town recruit, or recruit/unit reward node | Depositing all gold before you have frontline, anti-large, ranged damage, or a guard |
| You are strong but low on gold | Safe battle, bounty-style reward, or controlled fight | Spending gold on weak event rolls or unnecessary healing |
| You lack anti-large | Recruit, shop, or unit reward that can add pikes, spears, cavalry counters, or anti-large tools | Entering cavalry, monster, or large-unit fights blindly |
| You lack ranged damage or artillery pressure | Shop, recruit node, or reward route that can add safe damage | Taking only melee bodies when your army already has enough frontline |
| You have a strong carry unit but it is hurt | Recovery route, reserve rotation, or potion-friendly stop | Forcing another hard fight before the carry can heal |
| You see a question-mark route | Take it only if the next node after it gives recovery or safety | Unknown route directly into a final battle |
| Your army is healthy and ahead | Battle, shop, controlled garrison, or reward-heavy route | Wasting a strong position on low-value recovery |
Good and bad route shapes are easier to remember than individual node rules.
| Route pattern | Evaluation | Why |
|---|---|---|
| Battle → Village/Town → Final Battle | Good beginner route | You gain rewards, then recover before the hard fight |
| Battle → Campfire → Final Battle | Very good route | Campfire can Rest, Train, Scout, or Scavenge based on army state |
| Shop → Battle → Final Battle | Good if you have gold | You can buy a missing role before the hard fight |
| Easy Battle → Shop → Campfire | Strong route | You gain gold, buy power, then recover or scout |
| Garrison → Battle → Final Battle | Risky | Too many health losses before the checkpoint |
| Unknown Event → Unknown Event → Final Battle | Risky for beginners | Too much uncertainty without recovery |
| Battle → Battle → Battle with no recovery | Only if very healthy | Rewards are good, but damage can snowball fast |
Final Battle Preparation
Before a final battle, stop asking only “can I win the next node?” Ask “can I win the final battle after this?”

| Final battle check | Good sign |
|---|---|
| Frontline health | Melee units can hold without instantly collapsing |
| Damage source | Ranged, artillery, monsters, or elite melee can finish enemies |
| Anti-large answer | Cavalry, monsters, and large enemies are not unanswered |
| Backline safety | Ranged and artillery units have guards if needed |
| Healing left | Reserve, potion, town, village, or campfire choices kept the army stable |
| Gold plan | You did not spend away every recovery option |
| No greedy last node | You did not damage the army right before the final fight |
| Manual battle plan | You know the first target before the fight starts |
Beginner Build Directions
These are safe first-run directions, not strict tier lists.
| Build direction | Core idea | Good for beginners because… |
|---|---|---|
| Pike + ranged core | Anti-large units protect ranged damage | It solves early cavalry problems clearly |
| Deepstone frontline + gear/artillery | Durable units hold while damage scales | It teaches stable positioning and reward planning |
| Balanced infantry + pikes + archers | Simple frontline and backline roles | Easy to understand and adjust |
| Sanguine Outrider pressure | Start close, rush ranged/artillery, surround enemies | Powerful, but better if you like active control |
| Monster or Signature Unit carry | Protect one strong unit and build around it | Good once you understand healing and target priority |
Common Beginner Mistakes
| Mistake | Why it hurts | Better move |
|---|---|---|
| Picking a faction without a first-battle plan | You do not know what your army is supposed to do | Choose a faction and immediately identify frontline, damage, anti-large, and guard roles |
| Ignoring cavalry charges | Ranged units or artillery get deleted early | Use pikes, spears, or anti-large units defensively |
| Letting artillery free-fire | Your formation takes damage before melee starts | Assign a fast or long-range answer before battle |
| Leaving ranged units alone | Enemy Outriders or cavalry can dive them | Keep a backline guard nearby |
| Shooting shielded units from the front forever | Ranged damage becomes inefficient | Flank, change target, or use a better angle |
| Using wide formation everywhere | Thin lines can collapse or get punished by artillery | Use wide formations only for a clear purpose |
| Healing only when everything is low | Recovery options become too late | Start reserve rotation and healing earlier |
| Taking Scavenge while badly damaged | You needed health more than gear | Use the health decision tree first |
| Fighting every garrison | City fights can drain the army | Enter town when damaged |
| Overusing autoresolve | You lose control over key-unit damage | Manual fight when artillery, cavalry, or damaged core units matter |
FAQ
What is the best first faction in Tabletop Tavern? +
For a safer first run, pick a faction with clear roles. Iron Legion is good for basic infantry and pike play, Deepstone Hold is good for durable units and gear/artillery routes, and Sanguine Court is strong if you want an aggressive Outrider style.
Which hero should beginners pick in Tabletop Tavern? +
Hrothgar Goblinslayer is a safe learning pick for Deepstone Hold because the army shape is durable and readable. Sister Morvayne is stronger for active players because all units gain Outrider, but she needs better target control.
How do I survive cavalry in my first Tabletop Tavern run? +
Use pikes, spears, or other anti-large units. Do not chase cavalry with slow infantry. Anchor your line, let cavalry commit into anti-large units, and keep a spare anti-large unit near your ranged or artillery backline.
How do I counter artillery in Tabletop Tavern? +
Check the enemy army before deployment. If the enemy has artillery, assign an Outrider, cavalry unit, fast melee unit, long-range unit, or your own artillery to pressure it immediately.
How do shielded units work in Tabletop Tavern? +
Shielded units are harder to punish from the front with ranged fire. If possible, shoot them from the side or rear, flank them with melee units, or switch ranged fire onto unshielded targets first.
How should beginners choose routes in Tabletop Tavern? +
Pick routes based on what your army needs before the next hard fight. If core units are damaged, choose healing, town, village, or campfire routes. If your army is healthy but weak, look for shops or recruit nodes. Avoid greedy garrisons right before final battles.
When should I heal units in Tabletop Tavern? +
Heal before your army is already collapsing. Rotate damaged core units into reserve, use taverns or villages when several units are hurt, take Campfire Rest before hard fights, and save potions for important low-health units.
Should beginners use autoresolve? +
Use autoresolve only for very safe fights. Manual battles are better when enemy artillery, cavalry, Outriders, large units, or damaged key units are involved.