Tabletop Tavern Combat Guide
A practical Tabletop Tavern combat guide covering manual battles, artillery counters, outriders, cavalry, shielded units, flanking, morale, formations, target priority, weather, terrain, and garrison gates.
Updated:
Quick Answer
Manual battles in Tabletop Tavern are won before the first clash. Read the enemy army, assign an answer to artillery, protect your ranged units from cavalry and Outriders, avoid shooting shielded units from the front, and use flanking to break morale instead of grinding every enemy head-on. Autoresolve is fine for clearly safe fights, but manual control is better whenever the enemy has artillery, cavalry, large units, shielded lines, or threats that can punish your backline.
What This Combat Guide Solves
Most combat losses do not happen because one unit is weak. They happen because the army has no plan.
Common combat problems include:
- enemy artillery fires for free while your army walks forward
- cavalry reaches your ranged units before your pikes or guards react
- Outriders appear near your backline and force chaos immediately
- ranged units shoot shielded targets from the front for too long
- the frontline wins slowly but takes too much damage
- large units or monsters hit your army before you have anti-large pressure
- garrison gates waste your time because the wrong units are attacking them
This guide gives you a clean combat decision order: read the enemy, assign jobs, stop immediate threats, then use flanking and target priority to win with fewer losses.
Manual Battle vs Autoresolve
Manual battle is not always required, but it is the safest option whenever the matchup has a specific threat you can manage better than the simulation.
| Situation | Better choice | Why |
|---|---|---|
| Enemy has artillery | Manual battle | You need to pressure it before it farms free damage |
| Enemy has cavalry or large units | Manual battle | Positioning anti-large units matters more than raw army value |
| Enemy has Outriders | Manual battle | You need backline guards and fast reactions |
| Enemy has shielded infantry protecting ranged units | Manual battle | You may need flanks or target switching |
| Your key units are damaged | Manual battle | You can protect them, reserve them, or avoid exposing them |
| Your army clearly outmatches the enemy | Autoresolve can be acceptable | Only if expected damage is safe for the campaign |
| You need kill progress on one unit | Manual battle | You can feed targets to the carry |
| You are tired but the fight is dangerous | Manual battle or avoid the fight | Fatigue is not a good reason to lose a run |
Read the Enemy Army Before Deployment
Before placing your units, inspect the enemy army and traits. You are looking for threats that change deployment.
| Enemy sign | What it means | Your deployment response |
|---|---|---|
| Artillery | Your army can take damage before melee starts | Assign an artillery answer before the battle; use the artillery counter section below |
| Cavalry / Large / Anti-large matchup | Backline and monsters can be punished quickly | Keep pikes, spears, or anti-large tools near likely dive paths |
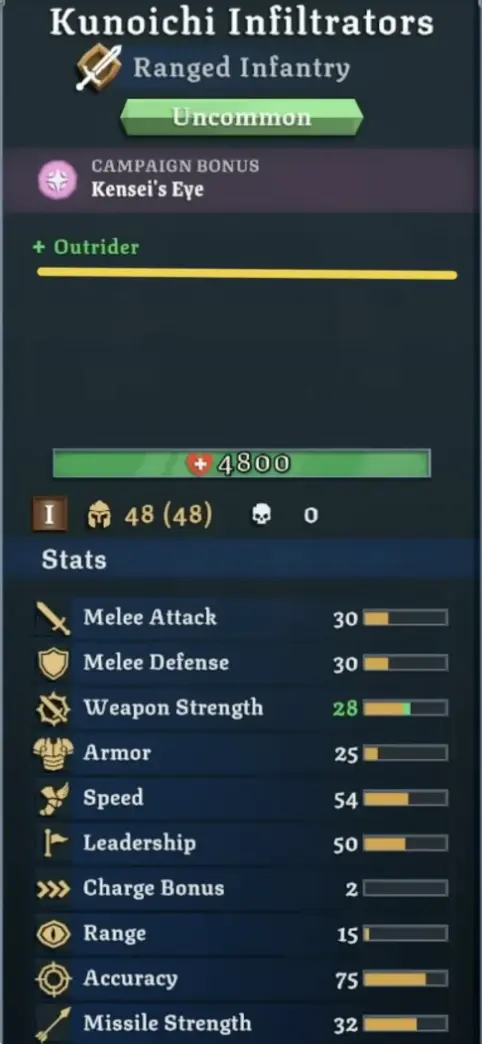
| Outrider | Enemy units may start outside normal positions | Guard ranged units and do not leave artillery isolated |
| Shielded units | Frontal ranged damage may be inefficient | Plan side angles, flanks, or better target choices |
| Armored units | Low-piercing damage may struggle | Use armor-piercing, artillery, monsters, or focused melee |
| Terrifying units | Nearby units may suffer leadership pressure | Keep morale-stable units nearby and avoid isolated panic |
| Fast ranged units | They can kite or reposition | Use fast pressure, long range, or terrain control |
| Many weak bodies | You may be outnumbered but not outmatched | Use wide formations, morale pressure, and flanks |
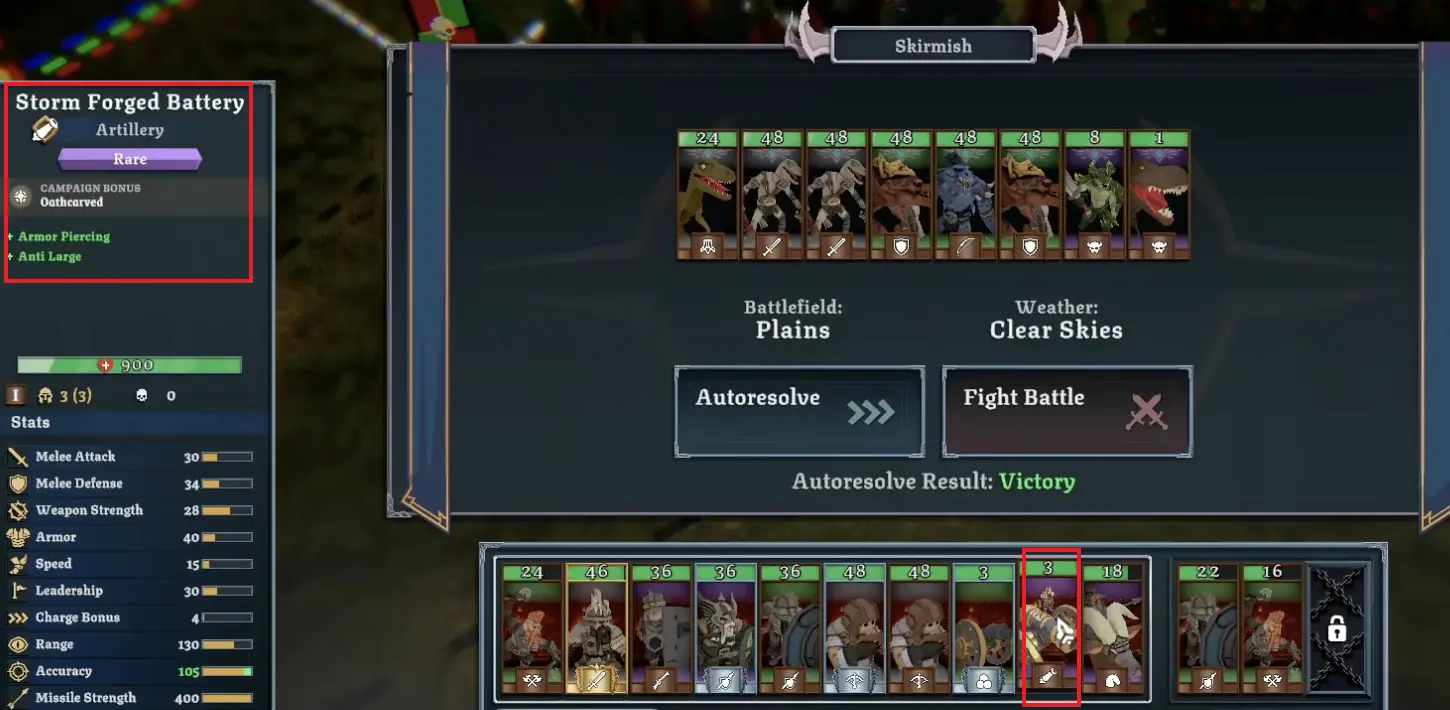
How to Counter Artillery
Artillery is one of the most important combat threats because it starts hurting you before the main fight begins.
The mistake is sending your whole army forward and hoping the artillery stops. It will not. You need a dedicated answer.
| Artillery answer | When it works | Risk |
|---|---|---|
| Outrider unit | You can deploy close or wide and reach artillery quickly | It may be isolated if unsupported |
| Cavalry | The enemy backline is exposed and not protected by pikes | Bad into anti-large or tight formations |
| Fast melee | The battlefield has a clear route to the artillery | Can get stuck in infantry |
| Long-range unit | You can outrange or safely pressure the artillery | Line of sight or terrain may block shots |
| Your own artillery | You can win the artillery duel or force movement | Needs protection and clear firing lines |
| Ignore temporarily | Only if the artillery is blocked, low impact, or unreachable | Usually a bad default |
A simple artillery plan:
- Identify the artillery before deployment.
- Assign one unit or group to pressure it.
- Keep your main army in formation.
- Do not send every unit after the same target.
- Watch for enemy cavalry or guards protecting the artillery.
- Once artillery is controlled, return pressure to the main fight.
Protect Your Backline
Your own ranged units and artillery are only useful if they survive.
Backline protection is not passive. You should decide before the fight which unit will stop cavalry, Outriders, or fast flankers.
| Backline threat | Protection plan |
|---|---|
| Cavalry dive | Keep pikes, spears, or anti-large units near ranged units |
| Enemy Outriders | Place a guard close enough to react immediately |
| Fast melee flank | Do not deploy ranged units completely alone |
| Enemy artillery pressure | Move, counterfire, or pressure the artillery early |
| Forest or terrain blocking vision | Keep guards closer because threats appear late |
| Your own artillery turning slowly | Protect it before the enemy reaches it |
Control Groups and Deployment
Control groups are useful, but they are not fixed rules. There is no universal setup where Group 1 must always be frontline or Group 2 must always be ranged.
Use the table below as a recommended starter setup. Change it based on faction, army size, unit roles, and enemy threats.
| Suggested group | Typical units | Job |
|---|---|---|
| Group 1: Frontline | Durable infantry, shielded units, high-model melee | Pin enemies and hold the center |
| Group 2: Ranged damage | Archers, crossbows, gunners, other ranged units | Focus exposed targets and avoid shielded fronts |
| Group 3: Fast pressure | Cavalry, Outriders, fast melee, flankers | Reach artillery, archers, or rear angles |
| Group 4: Artillery / long range | Cannons, batteries, long-range support | Kill priority targets and force enemy movement |
| Group 5: Guard / reserve reaction | Pikes, spears, anti-large, spare melee | Protect ranged units and intercept dives |
Shielded Units: Change the Angle or Change the Target
Shielded units punish lazy ranged targeting. If your arrows or small projectiles keep hitting shields from the front, the fight becomes inefficient.
You have three good options: shoot from a better angle, use a different damage type, or ignore the shielded unit until a better target appears.
| Shielded unit situation | Better response |
|---|---|
| Facing your ranged units from the front | Switch targets or move for a side angle |
| Pinned in melee | Flank with melee or shoot from the side if safe |
| Protecting enemy archers or artillery | Flank around it or break the formation instead of waiting forever |
| Already losing morale | Keep pressure until it breaks |
| Armored and shielded | Use armor-piercing, artillery, monsters, or rear pressure |
| Only target in range | Consider moving ranged units instead of wasting shots |
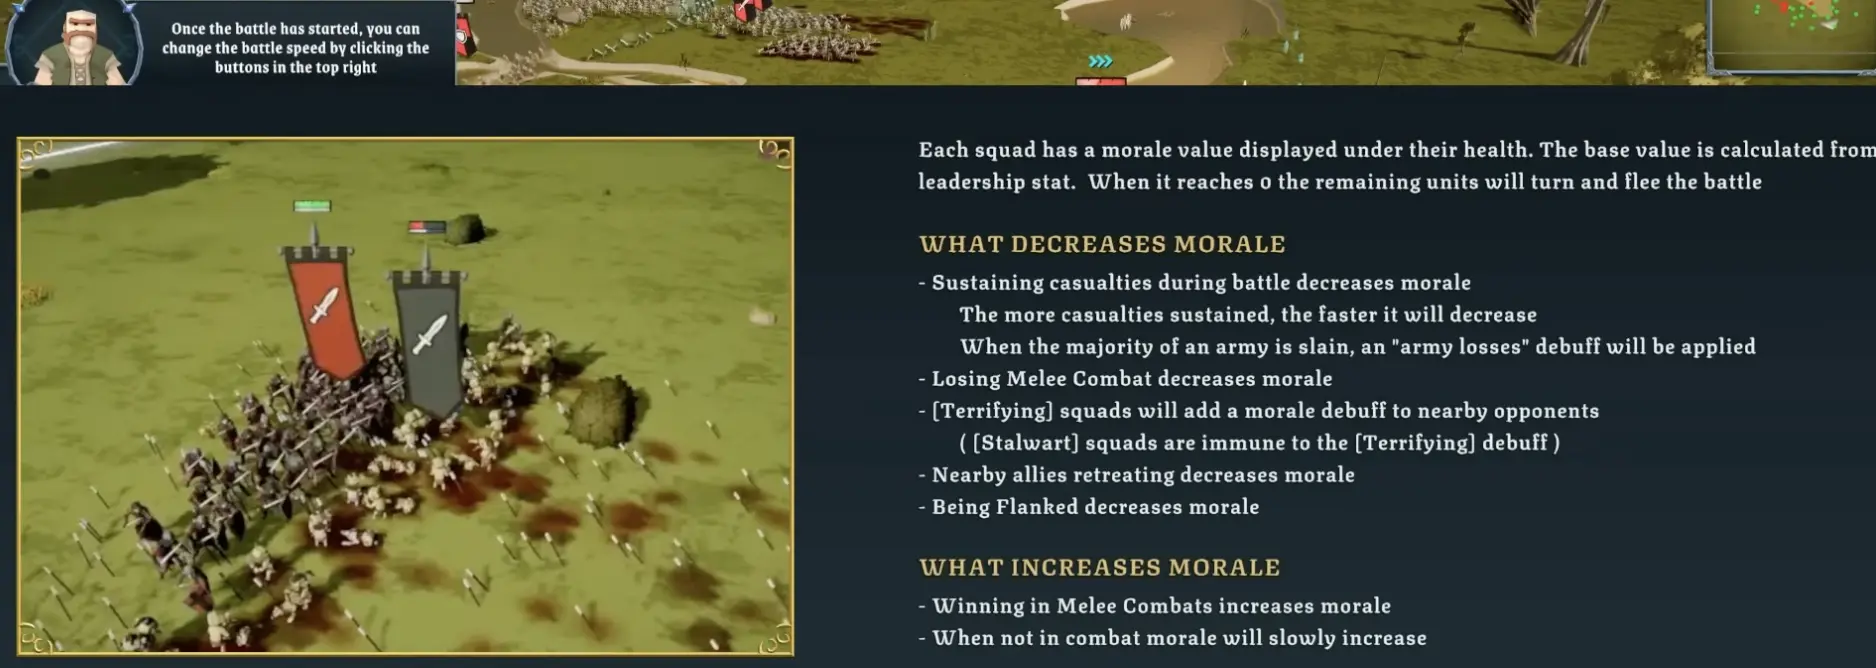
Flanking and Morale
You do not need to destroy every unit directly. You can break the army.
Flanking works best when the enemy is already fixed in place. First, use your frontline or durable units to pin the enemy. Then use side attacks, rear attacks, fast sweeps, terrifying units, or focused pressure to create morale problems.
A pinned enemy is not automatically broken. The morale pressure usually comes from what happens next: being hit from a bad angle, losing nearby allies, taking heavy casualties, or facing terrifying units while already unstable.
| Morale pressure tool | How to use it |
|---|---|
| Side attack | Hit an engaged unit from the side to add pressure without fully overcommitting |
| Rear attack | Hit an already engaged unit from behind for stronger morale pressure |
| Fast unit sweep | Use cavalry, Outriders, or fast melee to hit archers, artillery, or isolated backline units |
| Terrifying unit nearby | Move it near unstable enemies to add leadership pressure |
| Focused casualties | Break one weak or low-health unit, then roll the advantage into the next fight |
| Army-loss chain | Once several enemy units break, keep pressure on the next unstable target instead of spreading damage randomly |
Wide vs Compact Formations
Formation width is a tool. It is not always good or bad.
A wide formation helps one unit contact more enemies or cover more space. A compact formation keeps units safer, easier to support, and harder to isolate.

| Formation choice | Use when… | Avoid when… |
|---|---|---|
| Wide frontline | You need to pin many weak units or prevent a surround | Enemy cavalry, artillery, or monsters can punish thin lines |
| Compact frontline | You need a stable center and easier support | You are being surrounded by many small units |
| Ranged spread | Enemy artillery or area damage is a concern | Enemy cavalry or Outriders can dive isolated units |
| Ranged compact | You need easier guarding | Enemy artillery has clean shots |
| Fast unit wide deployment | You need flanks or artillery pressure | You cannot control several groups at once |
| Corner / terrain anchor | You need to reduce cavalry angles | You trap yourself with no escape or firing lanes |
Target Priority
Target priority changes by army, but the basic logic is simple: stop the thing that can ruin your formation first.
| Priority | Target | Why |
|---|---|---|
| 1 | Enemy artillery that can fire freely | It deals damage before the main fight and forces bad movement |
| 2 | Cavalry, Outriders, or fast flankers threatening your backline | They can delete ranged units or artillery quickly |
| 3 | Exposed enemy ranged units | They are dangerous but often fragile when reached |
| 4 | Large units, monsters, or high-impact charge units | They can break lines if ignored |
| 5 | Isolated or low-morale units | Breaking one unit can create a morale chain |
| 6 | Shielded or armored infantry | Handle after immediate threats, unless they are protecting enemy ranged/artillery or blocking your damage route |
| 7 | Low-impact melee already pinned safely | Clean up after the dangerous targets are controlled |
Anti-Large, Cavalry, and Monsters
Large units and cavalry are dangerous because they move quickly, charge hard, or disrupt formations.
The answer is not always more damage. Often, it is better positioning.
| Threat | Best answer |
|---|---|
| Cavalry charging ranged units | Pikes, spears, anti-large, or guarded backline |
| Large monster hitting frontline | Anti-large units, artillery, focused ranged fire, or strong melee pin |
| Fast large unit flanking | Keep one anti-large unit in reserve instead of committing everything forward |
| Cavalry circling wide | Anchor on terrain or keep a second line |
| Enemy large unit slowed by weather | Punish it before it reaches full impact |
| Your own cavalry | Use it for flanks, artillery pressure, and exposed targets, not frontal suicide charges |
Weather, Terrain, and Garrison Gates
Weather and terrain change fights. They can make a dangerous enemy weaker, block firing lines, or turn a garrison fight into a completely different problem from an open-field battle.
| Map factor | Combat effect | What to do |
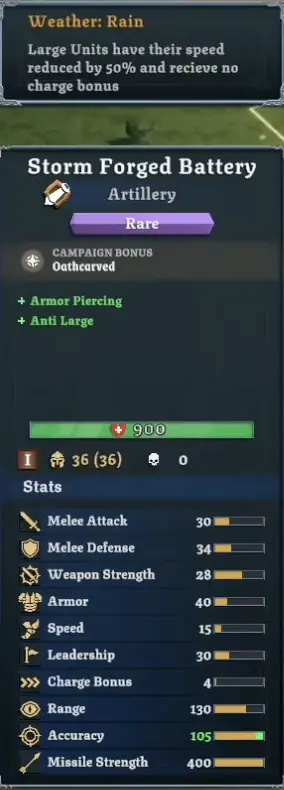
|---|---|---|
| Rain against large units | Large units are slower and lose charge bonus in the checked tooltip | Punish cavalry and monsters before they reach ideal impact |
| Forests or blocking terrain | Ranged lines and artillery shots can be obstructed | Move for clear angles before committing |
| Open ground | Cavalry and artillery have more room to work | Protect backline and avoid loose ranged deployment |
| Corners or terrain anchors | Fewer flank angles | Useful when defending with pikes or ranged units |
| Narrow approaches | Frontline can hold more efficiently | Good for durable units, artillery, or anti-large traps |
| Wide open flank | Fast units can punish isolated targets | Keep guards or use your own fast units first |
Garrison Gates Are Not Normal Targets
Garrison fights can include gates, and gates change the fight.
Artillery and melee are better for breaking gates. Small projectiles struggle, so do not waste your whole ranged plan shooting a gate if the damage is poor. Gates can also shoot projectiles at your troops while you assault them, and enemies can suffer army losses and morale penalties when a gate falls.
| Gate situation | Better response |
|---|---|
| You need to break a gate quickly | Use melee or artillery rather than relying on small projectiles |
| Small projectiles are barely working | Retarget them or move them into a better combat role |
| Gate is shooting your troops | Do not let fragile units sit under gate fire for too long |
| Enemy morale is close to breaking | Breaking the gate can add army-loss and morale pressure |
| Your artillery is available | Use it to force progress instead of grinding slowly |
| Your army is already damaged | Consider whether the garrison is worth the health cost |
Battle Opening Checklist
Use this checklist before pressing start.
| Check | Question to answer |
|---|---|
| Artillery | Does the enemy have artillery, and have you assigned an answer from the artillery counter section? |
| Backline safety | Can cavalry or Outriders reach your ranged units quickly? |
| Anti-large | Do you have pikes, spears, or another answer to cavalry and monsters? |
| Shielded units | Are your ranged units about to waste shots into shielded fronts? |
| Terrain | Are forests, gates, corners, or open ground changing the fight? |
| Damaged units | Should any key unit stay back, avoid contact, or be protected? |
| First target | What is the first enemy unit you must stop? |
| Fallback plan | If the first move fails, which unit protects the army shape? |
Common Combat Mistakes
| Mistake | Why it hurts | Better move |
|---|---|---|
| Ignoring artillery | You spend health before melee starts | Assign a specific artillery answer |
| Sending every unit after one threat | Your formation collapses elsewhere | Send one group, keep the army shape |
| Leaving ranged units alone | Cavalry and Outriders punish them | Keep a guard or anti-large unit nearby |
| Shooting shielded fronts forever | Damage becomes inefficient | Change angle, change target, or use another tool |
| Chasing cavalry with slow infantry | Your line opens and ranged units become exposed | Let anti-large units hold likely charge paths |
| Overusing wide formations | Thin lines get punished by fast or heavy units | Use width only when it solves a clear problem |
| Using control groups too rigidly | You fight the interface instead of the battle | Treat groups as suggestions and adapt |
| Ignoring gates in garrison fights | The wrong damage type wastes time and health | Use melee or artillery to break gates |
| Forgetting weather | A matchup may change without you adjusting | Check weather and terrain before engaging |
| Autoresolving dangerous fights | You lose control over key-unit health | Manual battle when threats matter |
FAQ
When should I use manual battle instead of autoresolve in Tabletop Tavern? +
Use manual battle when the enemy has artillery, cavalry, Outriders, large units, shielded formations, or when your own key units are damaged. Autoresolve is safest only when the matchup is clearly favorable and expected damage does not threaten the campaign.
How do I counter artillery in Tabletop Tavern? +
Check the enemy army before deployment. If the enemy has artillery, assign a fast unit, Outrider, cavalry unit, long-range unit, or your own artillery to pressure it early while the rest of your army keeps formation.
How should I use control groups in Tabletop Tavern? +
Use control groups as a recommended organization tool, not a fixed rule. A simple setup is frontline, ranged units, fast flankers, artillery, and backline guards, but you should adjust groups based on faction, army size, and enemy threats.
How do shielded units work in Tabletop Tavern? +
Shielded units are inefficient targets from the front. Attack them from the side or rear, pin them in melee, use armor-piercing or artillery tools, or ignore them temporarily if a better target is exposed.
How do gates work in Tabletop Tavern garrison fights? +
Garrison gates are different from normal open-field targets. Artillery and melee are better for breaking gates, while small projectiles struggle. Gates can shoot at your troops, and enemies can suffer army losses and morale penalties when a gate falls.
Does weather matter in Tabletop Tavern combat? +
Yes. Weather can change combat matchups. In the checked guide snapshot, rain reduces large unit speed by 50% and removes their charge bonus, which makes cavalry and large-unit charges much weaker.