How I Survive Pathogenic’s Stomach and Fight Ossified Macrophage
The Stomach combines corrosive acid, a closing death zone, crowded rooms, and a two-form boss. This is how I decide when to fight, shop, or leave.
Updated:
Quick Answer
The Stomach is the first organ where the environment, route, and Build all punish me at the same time.
My safer order is:
- Move away from the entrance before opening the editor.
- Watch where the corrosive acid is firing before crossing the room.
- Clear the nearest safe branch and locate the boss route.
- Return only for known Health, Stamina, Armor, or a useful shop item.
- Stop exploring before the closing death zone removes the safe route.
- Enter Ossified Macrophage with one forward attack, close-range protection, movement, and resources saved for phase two.
When I am still learning the organ, I use the official setting that disables the Stomach death zone. That removes the timer pressure without removing the enemies, acid hazards, or boss mechanics.
Why the Stomach Is Different
The earlier organs let a high-damage Build hide several weaknesses.
I can reach the Stomach while still carrying:
- poor rear coverage;
- low Stamina;
- a slow-turning body;
- no projectile control;
- unsupported active abilities;
- too little Health for one positioning mistake.
The Stomach exposes those problems while also introducing its own environmental pressure:
- corrosive acid jets;
- poisoned or unsafe areas;
- narrow curved passages;
- enemies appearing from several directions;
- a death zone that closes through the level;
- a boss with a second form.
The room is no longer asking only whether I can kill its enemies.
It is asking whether I can kill them without losing the route.
Corrosive Acid Is Part of the Fight
The Stomach’s most recognizable hazard is the corrosive acid firing through its green chambers.
I do not treat it as background decoration.
Acid changes:
- where I can stop;
- which direction I can retreat;
- when I can collect DNA;
- whether a narrow passage is still safe;
- where I should fight an enemy;
- how long I can keep the editor open.

Watch One Cycle Before Crossing
When I enter a room with an acid jet, I do not immediately sprint across it.
I first identify:
- where the acid originates;
- which part of the passage it covers;
- how long the safe opening lasts;
- whether enemies are waiting on the far side;
- where I can stop after crossing.
I move after the active spray passes, not while it is already covering the route.
Do Not Stop in the Jet to Fight
If an enemy appears while I am crossing, I keep moving toward the safe pocket.
I do not turn the whole body inside the acid just to preserve the perfect firing angle.
My order is:
- leave the acid;
- recover Stamina;
- establish a firing lane;
- attack from safe ground.
The enemy can survive for another second.
The Build should not spend that second taking environmental damage.
Do Not Chase DNA Through Active Acid
Loose DNA and Cores can appear close to the hazard.
I collect them after the room is stable and the jet cycle is readable.
I leave them temporarily when:
- ranged enemies are still firing;
- Stamina is empty;
- the pickup sits inside the active spray;
- the death zone is already approaching;
- reaching it would require a second unsafe crossing.
A small DNA pickup does not justify losing the Health needed for the boss.
I Do Not Rely on a Fixed Acid Damage Number
I have not confirmed one universal damage value that remains identical across:
- difficulty settings;
- defensive mutations;
- Armor states;
- Pathogen loadouts.
I therefore make a simpler decision:
Acid contact is always a positioning failure, not an acceptable damage trade.
If the Build touches the hazard, I leave immediately instead of waiting to count another damage tick.
How to Disable the Stomach Death Zone
Pathogenic includes a separate option to turn off the closing death zone in the Stomach.
I use it when the timer is preventing me from learning:
- acid timing;
- room layouts;
- shop locations;
- the correct body shape;
- Ossified Macrophage’s second form.
The option is part of Difficulty Customization in the game settings.
Difficulty Customization can also adjust:
- enemy Health;
- Heart pickup rates.
What Turning Off the Death Zone Changes
It removes the pressure from the closing zone.
That gives me more time to:
- inspect rewards;
- return to a shop;
- learn the acid cycle;
- test a body layout;
- clear optional nearby rooms;
- prepare before the boss.
What It Does Not Change
Turning off the death zone does not automatically remove:
- corrosive acid jets;
- ordinary enemy attacks;
- projectile pressure;
- body-shape problems;
- the Ossified Macrophage;
- the boss’s second form.
It makes the route easier to learn.
It does not turn the Stomach into an empty level.
My Route Through the Stomach
The rooms are procedurally generated, so I do not follow a fixed left-right walkthrough.
I use the same decision sequence on every seed:
Secure the entrance → read the acid → locate the boss → collect short known value → commit
Secure the Entrance First
I do not open the editor the moment the organ loads.
The entrance can immediately contain poison, nearby enemies, or a narrow route with very little personal space.
My first actions are:
- Move into a safe pocket.
- Identify the nearest ranged enemy.
- Check the acid direction.
- Clear enemies beside the body.
- Collect nearby resources.
- Open the map after the room is safe.
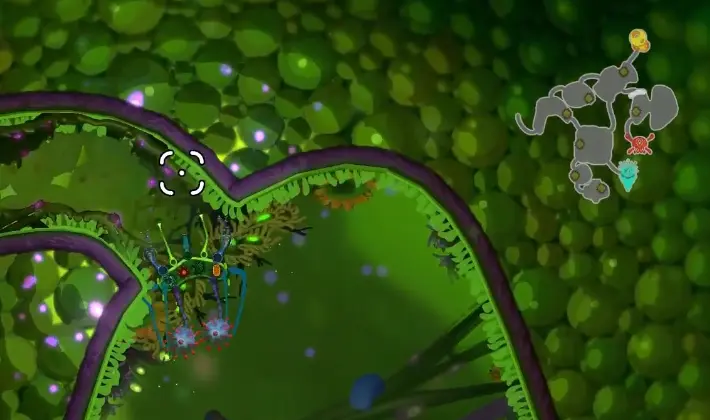
Locate the Boss Route
Once the boss appears on the minimap, I stop exploring without a purpose.
The marker lets me divide the remaining rooms into:
- useful detours;
- unnecessary risk.
Clear Short Known-Value Branches
I explore another room when:
- it is close to the boss route;
- the acid crossing is already understood;
- the current Health is stable;
- I know a shop or reward is there;
- the Build still lacks Range, Stamina, or close-range protection.
I stop when:
- the remaining branch is long and unknown;
- the death zone is closing;
- the next acid crossing is more dangerous than the likely reward;
- one normal hit could end the run;
- the Build already passes the boss check.
The goal is not a completed map.
The goal is a prepared boss attempt.
The Shop Reveal-and-Return Rule
I sometimes open a Stomach shop without buying anything.
That is useful because it turns a random future purchase into a known route decision.
I remember:
- what the shop contains;
- how many Cores I am missing;
- which weakness the item would fix;
- how dangerous the return route is.
I return after clearing a nearby room when:
- I am only a few Cores short;
- the shop has Health;
- the shop has Range and enemies keep reaching me first;
- the shop has Stamina and the main weapon stops firing too early;
- the route back remains safe.
I do not return when:
- the desired item is only another speculative weapon;
- the acid route has become unsafe;
- the death zone is approaching;
- Health is already critical;
- the current Build is ready for the boss.
What I Buy Before the Boss
Health When One Hit Can End the Run
I buy Health when the Build already clears ordinary enemies but cannot survive one unnoticed projectile.
More damage does not fix a one-hit attempt.
Range When the Weapon Works Too Late
I buy Range when:
- the weapon deals enough damage after connecting;
- enemies reach the body before the first useful hit;
- another weapon would require an unsupported slot;
- I need to fight across acid or narrow passages.
Range lets the current Build begin working sooner.
Stamina When I Cannot Finish a Safe Crossing
Stamina helps both combat and acid movement.
I prioritize it when:
- the weapon empties before the room is safe;
- the body cannot cross the hazard and still retreat;
- I repeatedly stop firing while enemies are advancing;
- the boss attempt needs longer repositioning windows.
One Stomach run chose another Stamina container over slower enemy projectiles because the Build was already running dry during ordinary fights.
Close-Range Protection When Enemies Reach the Body
I use:
- Freeze;
- an Orbiting Blade;
- a Tentacle;
- a rear automatic attack;
- a wide projectile-clearing swipe.
A forward gun does not protect the body after an enemy has crossed its firing range.
Ossificator Does Not Need Another Full Explanation Here
Ossificator can support an Armor-focused route when it is already connected to a working Overcharge engine.
I do not repeat its full timer, purchase thresholds, and Nanobot route in this page.
Use the Nanobot Unlock Guide for the complete Ossificator and eight-Armor decisions.
For the Stomach, my only rule is:
I do not sacrifice Health, movement, or a working firing lane for an Armor engine that has not started functioning yet.
Do Not Take Genetic Reshuffle Before the Boss
One of my weakest Stomach attempts began with a readable but imperfect Build.
Then I accepted Genetic Reshuffle.
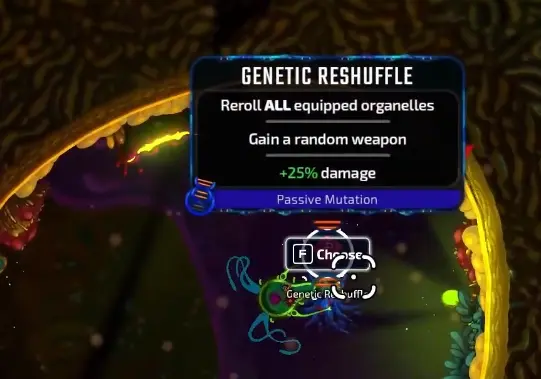
The reward offered:
- every equipped Organelle rerolled;
- one random weapon;
- +25% damage.
After accepting it:
- attacks pointed in unexpected directions;
- some Organelles contributed very little;
- previous connections disappeared;
- active controls changed;
- the boss was already close.
The numerical reward improved.
The actual Boss Build became worse.
I only accept a late reshuffle when the current setup already has no realistic way to survive.
My Four Stomach Build Checks
Before Ossified Macrophage, I need four jobs covered.
A Forward Attack
The weapon must work in the direction I naturally move.
A high-rarity attack pointing into a wall is not useful.
A Close-Range Answer
The Stomach repeatedly spawns enemies beside or behind the body.
Freeze, an Orbiting Blade, a Tentacle, or a projectile-clearing swipe can prevent a small enemy from draining the run.
Enough Movement for Acid and Phase Two
I want at least one meaningful improvement to:
- Movement Speed;
- Stamina;
- Thrust;
- Dodge cooldown;
- Dodge charges.
A large body with starting movement is not ready for the organ.
A Trigger That Works During the Boss
I inspect active Organelles before entering.
Room-clear and kill-only triggers can be strong while exploring but unreliable at the start of a boss.
The normal attack must remain useful while active effects recharge.
Best Pathogens for the Stomach
Bacterium: Safest First Recommendation
Bacterium is my first choice for learning the Stomach.
Its readable front makes it easier to:
- aim through narrow passages;
- judge acid crossings;
- place a close-range side defense;
- reverse without losing track of the firing lane.
I use the Ricochet Laser Core or another ranged hybrid rather than filling every available slot.
Fungal Spore: Strongest Developed Option
Fungal Spore can support several connected weapons and cover more than one approach angle.
That is valuable in rooms where enemies appear around the body.
Its weakness is size.
I make sure it has:
- movement beyond the starting value;
- enough Stamina for acid crossings;
- one clear primary firing direction;
- no unnecessary weapons making the layout wider and harder to read.
Helminth: Use Controlled Melee, Not Pure Melee
Helminth can perform well when the main attack is wide enough to remove projectiles or clear the narrow route.
I add:
- Freeze;
- projectile control;
- one ranged attack;
- enough movement to disengage.
I do not chase an enemy through an acid jet just to maintain melee damage.
Amoeba: Build Space Before the Stomach
Amoeba starts with limited layout space.
I prioritize:
- external slots;
- internal connections;
- one dependable forward attack;
- movement.
I do not enter the Stomach with an unfinished Amoeba whose weapons still compete for the same few slots.
Nanobot: Keep the Body Compact
Nanobot’s modular shape can be built into a clean ranged hybrid.
I avoid attaching new squares in a way that makes the body too wide for the curved passages.
The Health-to-Armor trait helps defensive progression, but it does not replace actual Health needed for the boss.
lil collector: Favor Automatic Coverage
Wall-based movement can make a narrow forward weapon harder to aim.
I prefer:
- orbiting attacks;
- automatic side coverage;
- bouncing projectiles;
- area damage;
- effects that continue working while the body changes angle.
Diatom: Split Movement and Defense
In co-op, I give the two players different jobs.
One player keeps the main ranged lane active.
The other watches:
- enemies near the body;
- acid timing;
- the retreat route;
- Freeze or close-range control.
Two players firing the same active weapon do not help when neither is watching the hazard.
Why Freeze Works in the Stomach
Freeze is especially useful because the organ already divides my attention between enemies and acid.
A frozen enemy temporarily stops:
- advancing;
- firing;
- blocking the safe crossing;
- forcing the body to turn;
- attacking while Stamina recovers.

Freeze is strongest when paired with:
- a ranged attack that can finish the target;
- Range;
- Stamina;
- Viscous Secretion or another projectile-control effect;
- close-range coverage.
Freeze creates time.
It does not replace the damage needed to use that time.
Ossified Macrophage Attack Names Used Here
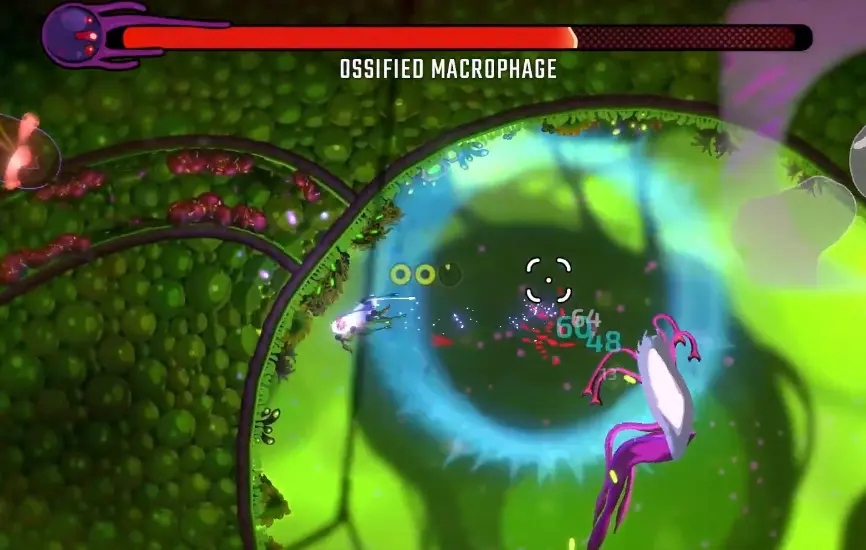
The boss UI identifies it as Ossified Macrophage.
I did not find official individual attack names, so the labels below are descriptive:
- Outer-Shell Barrage
- Add Trap
- Shell Break
- Phase-Two Chase
These labels are meant to help identify the pattern, not claim that the game uses those exact names.
Phase One: Outer-Shell Barrage
During phase one, I keep enough distance to read the projectile pattern and the boss’s movement.
I do not circle closely around the shell.
A wide or slow body can take contact damage while trying to rotate.
My order is:
- Establish a firing lane.
- Attack from Range.
- Move when the projectile pattern begins to close.
- Clear an enemy blocking the escape route.
- Let Stamina recover before returning to sustained fire.
- Preserve one Dodge or emergency effect.
Do Not Empty Stamina for the Shell
Breaking the shell quickly feels like progress, but the second form begins immediately afterward.
I stop firing before the Stamina bar is completely empty.
The last part of phase one should leave me with enough movement to reset the fight.
Add Trap: Kill What Controls the Route
The boss fight can include another enemy applying pressure while I focus on the main target.
I do not automatically attack the closest sprite.
I prioritize:
- a ranged enemy creating a crossfire;
- an enemy behind the body;
- an enemy blocking the safest side;
- the boss when the route is open.
The fight becomes much harder when I let an add occupy the only safe space between the boss and the wall.
The Shell Break Is Not the Victory
When the outer form breaks, I do not move forward.
The boss enters a second form.
My transition order is intentionally short:
- Stop advancing.
- Move toward the open side.
- Identify the nearest blocking threat.
- Re-establish the firing lane.
- Resume damage.
This is shorter than the Heart transition process because the important decision is simply to avoid remaining beside the breaking shell.
Phase Two: The Chase Becomes the Real Test
The second form increases close-range pressure.
My first phase-two attempts failed because I entered the transition with:
- too little Health;
- most protection already removed;
- an unfamiliar firing pattern;
- too little Stamina;
- no clean route away from the boss.
I now use shorter damage windows:
- Fire while the boss is inside the forward lane.
- Move before the route closes.
- Clear the nearest add.
- Recover Stamina.
- Turn the main attack back toward the boss.
- Repeat.
I do not chase the boss into acid or a narrow dead end.
What My Phase-Two Failures Changed
I no longer judge the Build by whether it can break the shell.
I judge whether it still works afterward.
That means:
- I do not enter with one unnoticed hit between me and death.
- I keep one movement option unused.
- I do not accept a new Build immediately before the fight.
- I stop firing when empty Stamina would prevent retreat.
- I remove an add controlling the route.
- I create distance after the shell breaks.
Raw damage reaches the second form.
Survivability determines whether the attempt can use that damage again.
When I Should Leave the Stomach
After the boss, I move the run toward the next organ rather than reopening the entire Stomach for speculative value.
I only return for something when:
- the route still permits it;
- the reward is known;
- the death zone is disabled or safely distant;
- Health is stable;
- the reward solves a later-organ problem.
I do not take another unknown acid route simply because part of the map remains incomplete.
Common Stomach Mistakes
Treating Acid as Background
I watch the hazard cycle before crossing and fight from safe ground.
Forgetting the Closing Death Zone
I stop opening long unknown branches when the safe route begins shrinking.
Entering the Boss as Soon as I Find It
I clear short known-value branches first.
Buying Another Weapon Instead of Movement
A fourth attack does not help when the body cannot leave the acid or phase-two pressure.
Taking Genetic Reshuffle Before the Boss
The +25% damage did not compensate for losing a readable Build.
Using a Large Pathogen Without Stamina
Wide bodies need more time and space to cross the same hazard.
Spending Everything During Phase One
The shell break begins another form.
Repeating the Full Ossificator Explanation
Armor generation is useful, but it is not the central Stomach mechanic. I use the dedicated Nanobot guide for that system and keep this page focused on acid, routing, and the boss.
What to Read Next
Use the Pathogenic Best Builds Guide for the complete Ricochet Laser Core, Frozen Blade Shell, Armor Reactor, and Pathogen-specific Build directions.
Use the Nanobot Unlock Guide for Ossificator, Armor sources, and the eight-Armor requirement.
Continue to the Heart Boss Guide for the Atrioventricular Node, limb priorities, laser patterns, and phase-two arms.
Use the Achievements Guide for the Stomach achievement and the complete 41-achievement route.
Return to the Pathogenic Guide Hub for the full progression and reading order.
FAQ
Can I turn off the Stomach death zone in Pathogenic? +
Yes. Open the game settings and use the Stomach death-zone option under Difficulty Customization. It removes the closing-zone pressure, but ordinary enemies, acid hazards, and the Ossified Macrophage still need to be handled.
How much damage does the Stomach acid deal? +
I have not verified one fixed damage value that remains identical across every difficulty and defensive setup. I treat contact as repeated environmental damage and leave immediately instead of testing how many ticks the current build can survive.
Which Pathogen is easiest for the Stomach? +
Bacterium is my safest first recommendation because its front is easy to read and aim. Fungal Spore can be stronger with a developed multi-weapon layout, but its larger body needs more movement support around acid and narrow passages.