How to Beat the Atrioventricular Node in Pathogenic
The Heart boss ended my strongest run after its first form collapsed. This is how I clear space, handle each pattern, and prepare for phase two.
Updated:
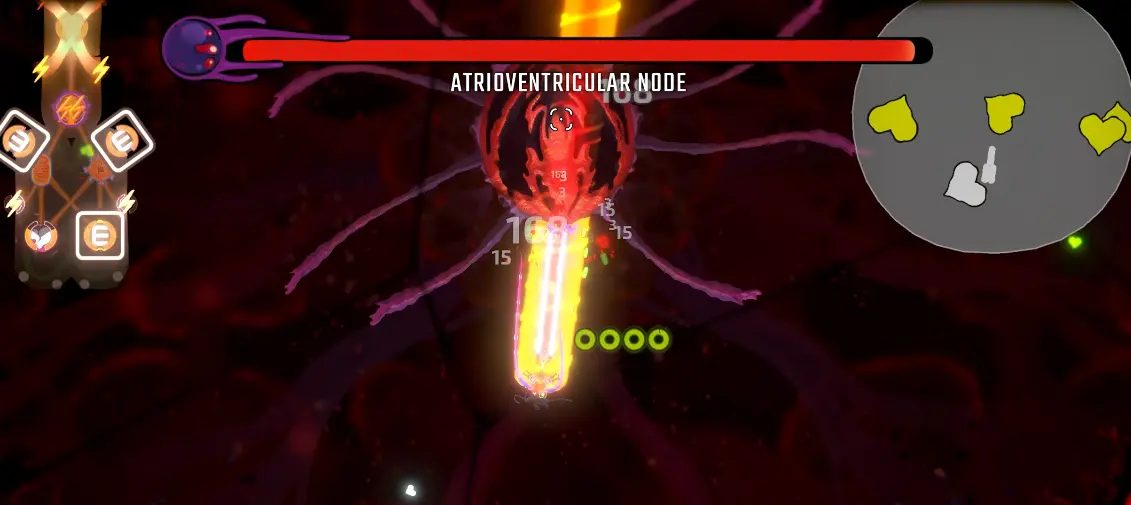
Quick Answer
The Pathogenic Heart boss is called the Atrioventricular Node.
My most reliable plan is:
- Enter with one sustained ranged attack and a trigger that works against a single boss.
- Clear one side of the arena instead of trying to destroy every limb immediately.
- Remove sniper or melee adds when they overlap the boss pattern.
- Damage the central node while the escape lane is open.
- Keep Stamina and at least one Dodge for the transformation.
- Move away as soon as the first form collapses.
- Use short damage windows during phase two rather than holding fire until I am trapped.
The Ricochet Laser Core is my safest solo setup. The Frozen Blade Shell is the better choice when adds and projectiles keep closing the escape lane.
What Makes the Pathogenic Heart Boss Difficult?
The Atrioventricular Node attacks on several layers at once.
I have to track:
- the central boss;
- limbs controlling parts of the arena;
- bright laser lines crossing the room;
- curved chains of projectiles;
- summoned enemies;
- Health pickups;
- the direction of my own weapons;
- the transformation into phase two.
A Build can have enough damage to reach the second form and still be completely unprepared to survive it.
That was the mistake in my first serious attempt.
The Build produced large damage numbers, but its body had become wide, its movement had not scaled with it, and too much Stamina was spent during the first form.
When the boss transformed, I could still deal damage.
I could not create enough distance to keep dealing it.
My Heart-Specific Build Check
I do not repeat the general pre-route checklist from the Nanobot guide here.
Before the Atrioventricular Node, I check three things that matter specifically to this fight.
Does My Main Trigger Work Against One Boss?
The Heart does not begin with a normal room-clear loop.
Effects based only on:
- finishing a room;
- finishing without losing Health;
- killing an enemy;
- entering another room;
may be inactive at the start.
Adds can eventually activate kill-based effects, but I do not rely on them as the main engine.
I prefer Overcharge from:
- successful attacks;
- sustained combat;
- another repeatable action that works on the central node.
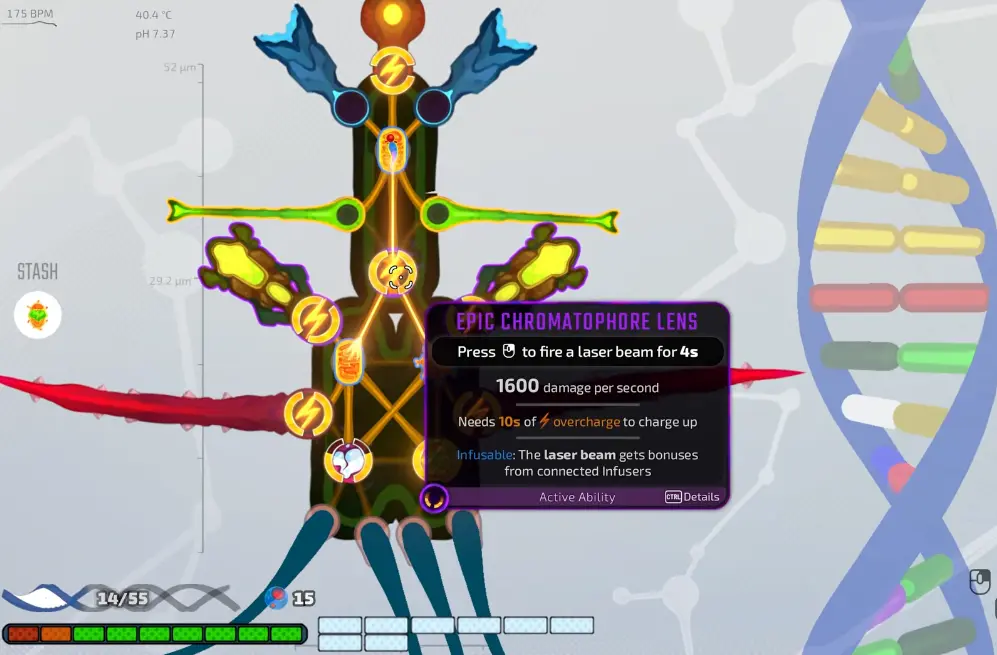
The tested Epic Chromatophore Lens showed:
- 1,600 damage per second;
- a 4-second beam;
- 10 seconds of Overcharge required to charge it.
That is strong burst damage only when the rest of the Build can keep it available.
Can I Keep One Side of the Arena Open?
I do not need complete freedom in every direction.
I need one reliable escape lane.
Before entering, I choose the side that best matches:
- my main weapon direction;
- the body’s turning radius;
- the available Dodge direction;
- the position of my close-range defense.
During the fight, I remove the limb or add controlling that side first.
Can I Keep Attacking While the Active Abilities Recharge?
A Build made entirely from active beams can look extremely strong in the editor.
It becomes helpless when every beam is empty.
I keep one normal attack that:
- fires without a long charge;
- points into a predictable lane;
- works while I am moving;
- can kill an add without using the boss burst.
Best Builds for the Atrioventricular Node
Ricochet Laser Core: My Safest Solo Choice
The Ricochet Laser Core is my preferred Bacterium and Fungal Spore setup.
Its core structure is:
- one laser or fast projectile weapon;
- Elastosome or another projectile-bounce effect;
- enough Range to attack without touching the limbs;
- one close-range defense;
- one movement improvement.
The Heart arena rewards bounce because a projectile can remain useful after the central target moves or a limb blocks the direct line.
I use the normal weapon for adds and safe damage windows.
I save Chromatophore Lens or another charged burst for a clear opening on the central node.
Why It Works
The Build does not need to rotate toward every small enemy.
Ricochets and secondary coverage continue dealing damage while I preserve the forward lane.
What Makes It Fail
The Build becomes unsafe when I keep accepting wider Evolutions without adding:
- Movement Speed;
- Stamina;
- Thrust;
- another Dodge.
A larger firing platform is still a larger target.
Frozen Blade Shell: Best for Add Control
The Frozen Blade Shell combines:
- Freeze;
- Kinetosome or another Orbiting Blade;
- Viscous Secretion or projectile control;
- a stable ranged attack;
- enough Stamina to move between damage windows.
I use this when summoned enemies are the part of the fight ending the run.
Freeze temporarily removes one threat from the pattern.
Kinetosome handles enemies that have already reached the body.
The ranged weapon remains focused on the central node or the limb controlling the escape lane.
When I Choose It
I prefer Frozen Blade Shell when:
- adds repeatedly reach my side;
- the body turns slowly;
- the screen becomes difficult to read;
- I keep losing the escape route during phase one;
- raw damage is already sufficient.
When I Do Not Choose It
I do not add Freeze as the final piece when the Build lacks enough damage to kill affected targets before they recover.
Control creates the opening.
Another weapon still has to use it.
Armor Reactor: Useful Only When It Is Already Running
The Armor Reactor is viable when Ossificator and its Overcharge engine are already functioning before the Heart.
I do not buy Ossificator in the final room and expect it to save the boss attempt.
The complete Armor generation route belongs in the Nanobot Unlock Guide.
For this fight, the important question is simpler:
Is the Armor engine already generating value without weakening the main attack?
If not, I use the slot for movement, control, or sustained damage instead.
Builds I Avoid at the Heart
Pure Melee Without Projectile Control
The Build must cross laser and projectile patterns before it can deal damage.
I only keep a melee-heavy setup when it also has:
- Freeze;
- a shield;
- projectile clearing;
- high movement;
- a wide attack that does not require staying inside the boss.
Kill-Only Overcharge
Adds can activate it, but the opening may leave the active abilities empty.
I use kill-based triggers as secondary charge, not the only engine.
Large Body With Starting Movement
This was the direct cause of my failed phase-two attempt.
The damage still worked.
The body could not leave the expanding attack area.
Which Pathogen Is Best for the Heart Boss?
The Heart has separate Steam achievements for all seven Pathogens, so I eventually need more than one winning setup.
For a first clear, I use the Pathogen whose movement I understand best.
Bacterium
Bacterium is my easiest solo starting point.
Its readable front works naturally with the Ricochet Laser Core.
I prioritize:
- one forward ranged weapon;
- projectile bounce;
- side protection;
- movement before another wide Evolution.
Helminth
I use a controlled melee hybrid rather than pure melee.
The important additions are:
- Freeze or projectile control;
- an attack wide enough to clear space;
- enough speed to disengage;
- one ranged option for the central node.
Fungal Spore
Fungal Spore supports several connected attacks and can become extremely strong against the Heart.
Its risk is body size.
I stop filling slots when the Build already has:
- sustained central damage;
- one add-control system;
- movement;
- a working boss trigger.
Amoeba
Amoeba needs space before specialization.
I prioritize slots and internal connections early, then decide whether the available rewards support Ricochet Laser Core or Frozen Blade Shell.
A small unfinished Amoeba is not the Build I take into the Heart.
Nanobot
Nanobot works well with a compact hybrid or an established Armor Reactor.
Its Health-to-Armor trait does not make actual Health optional.
Before the fight, I keep enough Health to survive the transformation even when recent pickups have converted into Armor.
lil collector
Wall-based movement makes a narrow forward beam harder to aim consistently.
I favor:
- automatic attacks;
- orbiting coverage;
- area damage;
- ricochets;
- effects that keep working while the body changes angle.
Diatom
Diatom is the co-op Pathogen.
I divide the jobs instead of giving both players the same Build:
- one player controls central ranged damage;
- the other handles adds, Freeze, and close-range protection.
Duplicating the same active beam can leave both halves vulnerable at the same time.
Phase One: Control the Arena Before Chasing Damage
My goal in phase one is not to remove every target as quickly as possible.
I want to create one usable side of the arena.
My order is:
- Identify the limb or add blocking the preferred escape lane.
- Focus that target.
- Keep the central node inside the edge of the main firing range.
- Clear long-range adds when their attacks overlap the boss pattern.
- Shift damage to the center while the lane is open.
- Stop attacking when Stamina is nearly empty.
- Preserve at least one Dodge for the transformation.
Crossing Laser Grid
The most visually obvious pattern places several bright beams across the arena.
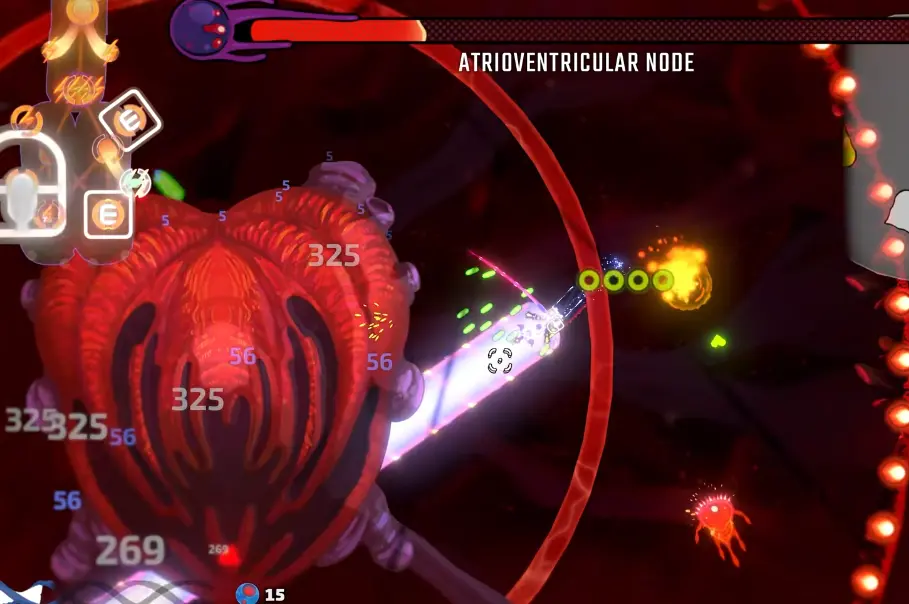
I handle it in three steps:
- Read where two beams will intersect.
- Move toward the widest open wedge.
- Fire only when the weapon already points through that opening.
I do not rotate through the center merely to maintain damage.
A few seconds without attacking cost less than being pinned between two beams.
When I Dodge
I use Dodge when:
- the safe wedge closes unexpectedly;
- an add blocks the opening;
- the body is too wide to pass normally;
- the beam crosses the current retreat path.
I do not Dodge only to keep the damage number rising.
Radial Pulse Chains
Another pattern sends curved or circular chains of bright projectiles through the arena.
I do not try to cross every line toward the boss.
I move parallel to the chain until I see one clean gap, then pass through once.
The mistake is repeatedly changing direction.
A large body that hesitates between two gaps can be hit by both.
Limbs: Remove the One Controlling Your Route
I do not divide damage equally across every limb.
I identify which one is:
- blocking the preferred side;
- forcing me toward the center;
- overlapping the main weapon lane;
- trapping me beside an add.
I remove that one first.
Once the lane opens, I return damage to the central node.
Destroying every limb before attacking the center can make phase one unnecessarily long and consume too much Health.
Adds: Kill the Attack, Not the Closest Sprite
I prioritize adds by what they are doing.
My order is:
- long-range enemies creating a crossfire;
- enemies already beside or behind the body;
- enemies blocking the escape lane;
- melee enemies moving toward a Health pickup;
- slow enemies outside the current fight area.
An add near the center is not automatically the most dangerous one.
The enemy attacking from outside the screen can be the reason an otherwise readable laser pattern becomes impossible.
The 5,000-Damage Turgosome Unlock
One Heart attempt produced a single hit of 5,000 damage.
That triggered:
UNLOCKED: TURGOSOME — Deal 5000 damage in a single hit
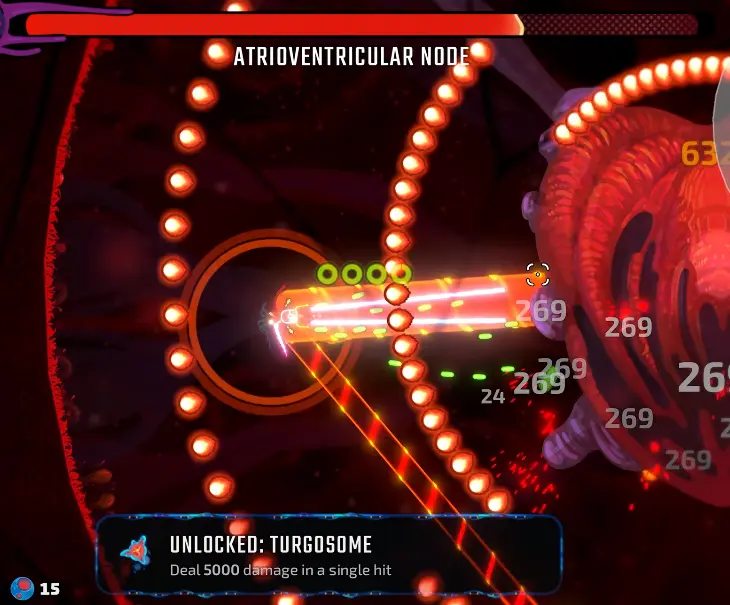
This is the main lesson I take from the fight:
A large hit can shorten one damage window, but it cannot create the next safe position.
I do not repeat this example in the general Build guide. This Heart fight is where the number matters.
The First Collapse Is Not the Victory
After enough damage, the central target appears to fail.
I do not move toward it.
The Atrioventricular Node changes form and expands the space it controls.
My transition order is:
- Stop advancing.
- Move toward open space.
- Find the new arm positions.
- Kill an add blocking the route.
- Let Stamina begin recovering.
- Turn the main weapon toward the new center.
- Resume damage.
This is the most important operation in the entire fight.
Phase Two: Arm Extension and Reduced Space
The second form grows long arms and controls more of the arena.
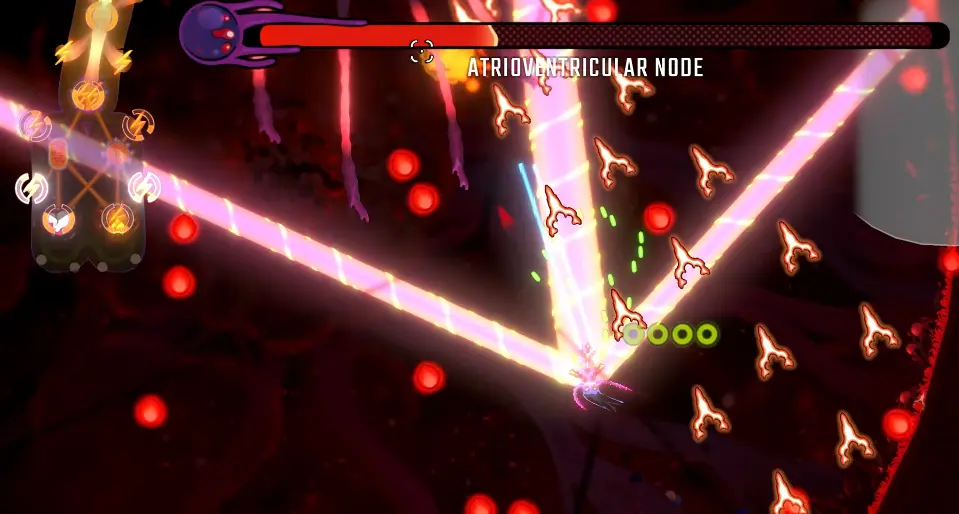
In the failed attempt, I dropped to:
- two Health;
- then one Health;
- then died while trying to leave the expanded attack area.
The problem was not the damage output.
The Build had:
- reached phase two;
- unlocked Turgosome;
- maintained several active beams;
- continued damaging the boss.
It lacked:
- enough Movement Speed;
- remaining Stamina;
- a clean side of the arena;
- enough Health for another positioning mistake.
How I Play Phase Two
I use shorter attack cycles than in phase one.
My loop is:
- Fire while the arms leave a lane open.
- Stop before the lane fully closes.
- Move along the outer edge.
- Clear the add nearest the next safe space.
- Recover Stamina.
- Turn back toward the center.
- Fire again.
I do not hug the central target.
The arms make close-range damage uptime look attractive until both exits close.
Save Dodge for a Blocked Route
I use Dodge to:
- cross between two arms;
- leave a closed lane;
- pass a dense projectile chain;
- reach a safe Health pickup;
- recover after being pushed toward the center.
I do not use the final Dodge simply to extend an active beam.
When I Stop Attacking to Heal
I collect Health when:
- the closest add is dead;
- the route does not cross the boss;
- the arms are retracting;
- Stamina needs to recover anyway;
- one more hit could end the run.
I ignore the pickup temporarily when:
- it sits behind the central node;
- a laser line is already forming across it;
- reaching it would rotate the main body through several threats;
- another add controls the same lane.
A visible Heart pickup is an opportunity, not guaranteed recovery.
Difficulty Customization: Use It to Learn the Fight
Pathogenic includes Difficulty Customization in the Settings menu.
The documented settings can change:
- enemy Health;
- the drop rate of Health pickups.
When the Atrioventricular Node is blocking all further progression, I lower the difficulty for a practice attempt.
The goal of that run is not to prove the Build is ready for Antibiotics.
It is to learn:
- where the laser openings appear;
- how much space the body needs;
- which limb blocks my preferred side;
- when the transformation begins;
- how far the second-form arms extend.
After I can consistently reach phase two with recovery remaining, I return to the intended difficulty.
What I Am Not Claiming
I have not confirmed that lower difficulty removes any Heart attack.
I also have not confirmed that the boss uses a different moveset at each difficulty.
The verified effect is on enemy Health and recovery availability, so I treat it as a larger learning margin rather than a different fight.
The separate option that disables the closing death zone applies to the Stomach, not the Heart boss.
How I Adjust for Antibiotics
Pathogenic has Heart achievements for:
- Antibiotics Low;
- Antibiotics Mid;
- Antibiotics High;
- Antibiotics Max.
I have not verified a separate list of new Atrioventricular Node attacks at each Antibiotics level.
I adjust the Build by reducing its failure points.
Antibiotics Low
I keep the normal winning structure but remove one speculative item.
I want:
- sustained damage;
- one add-control effect;
- one movement upgrade;
- a trigger that works on the boss.
Antibiotics Mid
I stop relying on the first good damage item carrying the entire run.
I add:
- another survivability option;
- better Stamina;
- a secondary attack that works while the main active ability charges.
Antibiotics High
I use a Pathogen and body shape I already know.
I do not test:
- a new movement system;
- a late Genetic Reshuffle;
- an unverified active chain;
- a large Evolution without movement.
Antibiotics Max
I use the most developed loadout and most repeatable Build available.
My priority is:
- sustained main damage;
- movement;
- control;
- Health or Armor margin;
- secondary damage.
At Max, I would rather enter with less theoretical burst and more ways to survive the second form.
The Achievements Guide shows how to combine Antibiotics clears with the seven Pathogen-specific Heart achievements.
Does Dying Count as a Heart Clear?
No.
Reaching phase two or reducing the boss to low Health does not complete:
- the Heart achievement;
- the current Pathogen’s Heart achievement;
- an Antibiotics Heart achievement.
The clear requires the Atrioventricular Node to be fully defeated.
A successful run showed:
- the Heart reaching 0 BPM;
- Endless Mode unlocking;
- Antibiotics progression becoming available.
The route beyond the Heart remained closed, so an ordinary Heart clear did not immediately open the Brain.
What Progress Survives a Heart Death?
Already-triggered progression can remain saved even when the boss attempt fails.
Nanobot was unlocked before entering the boss.
The run later died in phase two, but Nanobot was still available on the selection screen afterward.
That means I separate two objectives:
- secure the unlock when its condition triggers;
- defeat the Heart as a later objective.
The same principle does not mean a partial Heart attempt counts as a clear.
Common Heart Boss Mistakes
Building Around Kill Triggers
Adds do not guarantee that the main active ability is ready at the opening.
Trying to Destroy Every Limb
I remove the one blocking movement, then return damage to the center.
Following a Health Pickup Through a Closed Pattern
I wait until the route is safe instead of treating the pickup as automatic recovery.
Emptying Stamina Before the Transformation
Phase two is where I need movement most.
Continuing to Fire During the First Collapse
I move first and rebuild the lane.
Entering With a Wide Body and Base Speed
A large Build can deal enough damage and still be physically unable to escape the arms.
Using the Wrong Build for the Pathogen
I do not force a narrow Bacterium laser layout onto lil collector or a developed Amoeba strategy onto its first few Evolutions.
What to Read Next
Use the Pathogenic Best Builds Guide for the full Ricochet Laser Core, Frozen Blade Shell, Armor Reactor, and Pathogen-specific starting directions.
Use the Nanobot Unlock Guide for the eight-Armor objective that can be completed before this fight.
Use the Pathogenic Stomach Guide if the run is still collapsing before the Lungs and Heart.
Use the Pathogenic Achievements Guide to plan all seven Pathogen Heart clears and Antibiotics Low through Max.
Return to the Pathogenic Guide Hub for the complete progression and reading order.
FAQ
Can I lower the difficulty for the Pathogenic Heart boss? +
Yes. Difficulty Customization can reduce enemy health and improve Health pickup rates. I use it to learn the Atrioventricular Node’s patterns before returning to standard difficulty or starting Antibiotics clears.
Does dying during the Heart boss remove Nanobot or another unlock? +
No. A progression unlock that has already triggered remains saved. Nanobot was still selectable after I unlocked it before the Heart and then died during the boss fight.
Does the 5,000-damage Turgosome popup mean I defeated the Heart? +
No. It only confirms the separate Turgosome condition of dealing 5,000 damage in one hit. The Atrioventricular Node still needs to complete both forms and reach 0 BPM.