How I Unlock Nanobot by Reaching 8 Armor
Nanobot needs eight Armor at the same time. This is the Pathogen, Armor route, shop logic, and 7/8 recovery plan that made the unlock repeatable.
Updated:
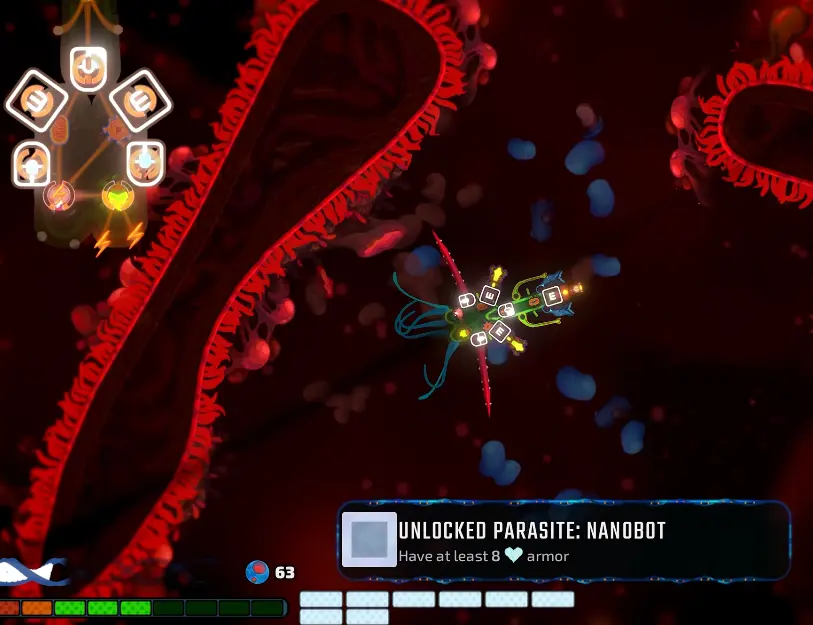
Quick Answer
To unlock Nanobot in Pathogenic, I have to hold at least eight Armor at the same time during one run.
Armor that has already absorbed a hit no longer counts. Reaching seven and then losing one point puts the attempt back at six.
My most repeatable approach is:
- Start with Bacterium for its readable body shape and straightforward firing lanes.
- Build one dependable forward attack before adding extra weapons.
- Take direct Armor rewards whenever Health is already safe.
- Buy Viscous Secretion or Freeze support to reduce incoming pressure.
- Use Ossificator only when enough rooms remain to sustain its 60-second Overcharge requirement.
- At six Armor, backtrack only for known rewards.
- At seven Armor, stop testing new layouts and take the safest available route.
- Confirm the unlock before entering the Heart boss.
The Heart boss does not need to be defeated. The unlock triggers immediately when the current Armor total reaches eight.
What Is the Nanobot Unlock Requirement?
The locked Nanobot card states:
To unlock: Have at least 8 Armor
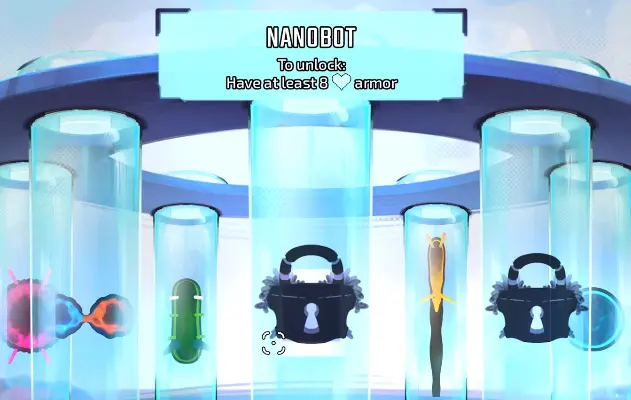
The wording matters.
It does not say:
- collect eight Armor pickups;
- gain eight Armor over several runs;
- finish the Heart with eight Armor;
- defeat a specific boss;
- use a particular Pathogen.
It checks the current Armor total.
If I reach seven Armor and one hit removes a point, the attempt is back at six. The point that absorbed damage does not remain in a hidden progression counter.
The unlock appears immediately after the eighth point is added. I do not need to carry the full stack into the results screen.
Best Starting Pathogen for the Nanobot Unlock
I recommend Bacterium for the first serious attempt.
Bacterium is not required, but its conventional bilateral shape gives me a clear front, readable side slots, and a movement pattern that is easier to control while protecting Armor.
That matters more than a flashy starting trait.
The unlock run is lost most often through:
- turning a wide body through enemy fire;
- leaving the rear completely unprotected;
- placing a forward weapon on an awkward side-facing slot;
- testing an unfamiliar movement rule;
- taking contact damage while trying to line up an active ability.
Bacterium lets me concentrate on the Armor objective instead of learning a second problem at the same time.
Why I Do Not Start With Amoeba
Amoeba offers much more freedom later, but its opening is less predictable.
It starts small and grows by adding new sections, which is excellent for a custom endgame layout. For this unlock, however, I want a firing lane that works immediately rather than spending early Evolutions fixing the body.
Why I Do Not Start With Helminth
Helminth can build strong melee and defensive setups, but its movement and attack direction require more deliberate positioning.
I use it when I already understand the route, not for the first eight-Armor attempt.
When Another Pathogen Is Fine
I use another Pathogen when:
- its loadout is much more developed;
- I already have defensive Plasmid upgrades for it;
- I can reliably keep its weapons facing forward;
- its movement feels more natural to me than Bacterium;
- I am combining the run with another unlock objective.
The correct Pathogen is the one that loses the least Armor to ordinary rooms.
Where Armor Actually Comes From
Pathogenic uses procedural rooms and reward placement.
I cannot give a reliable list such as “the third Skin room always contains Armor” or “the left Lung branch always drops two Armor.” Those locations change.
What I can give is a list of the Armor sources that appeared and how I use each one.
| Armor source | Verified effect | How I use it |
|---|---|---|
| Direct Armor pickup | Adds Armor to the current HUD total | Clear the room first, then collect it before leaving |
| Armor reward choice | Can offer one or multiple Armor; one reward gave +3 Armor | Take it when current Health can survive the next room |
| Health or Armor route choice | Offers recovery or progress toward eight Armor | Take Health if one normal hit could end the run |
| Ossificator | Spawns 1 Armor after being Overcharged for 60 seconds | Buy early enough that several rooms remain |
| Experiment starting condition | One modifier starts the run with 3 Armor | Treat as unverified for this unlock, not the primary route |
Direct Armor Pickups Are Random, Not Organ-Locked
I found Armor in several different sections of the body, including early rooms, the Lungs, and the Heart circulation route.
The useful pattern was not the organ name.
It was the room state:
- reward branches;
- cleared side rooms;
- choice nodes;
- rooms reached after a boss;
- paths that became accessible after another objective.
That means my route does not depend on copying the exact rooms from one seed.
It depends on preserving the Armor when it appears.
Multiple-Armor Rewards Can Rescue a Slow Start
One reward added three Armor at once.
That is why I do not abandon a run merely because the Skin or Intestines provide only one or two early points.
A single later choice can move the attempt from two to five, or from four to seven.
I restart only when the Build itself can no longer protect future Armor.
Ossificator: The Only Named Armor Engine I Plan Around
The most useful named Organelle for this objective is Ossificator.
Its tooltip states:
Spawns 1 Armor after being Overcharged for 60 seconds
That exact duration changes how I value it.
Ossificator is not an instant Armor pickup.
It is a long-term engine.
I buy it when:
- several rooms remain before the Heart;
- the Build can maintain or repeatedly extend Overcharge;
- a support slot is available;
- I already have a reliable Overcharge trigger;
- the run is stable enough to survive while the timer builds.
I skip it when:
- the next room is a boss;
- Overcharge lasts only one or two seconds at a time;
- fitting it disconnects the main weapon;
- I need Health immediately;
- the Build has no trigger that can keep it active.
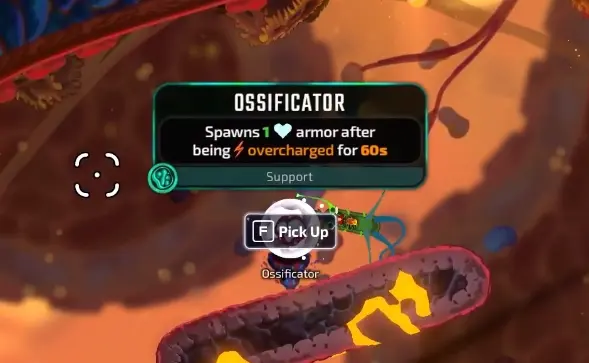
Check the Trigger Before Buying Ossificator
Finding Ossificator is only half the setup.
I still need a repeatable way to create Overcharge.
Useful trigger patterns include:
- successful attacks from connected Organelles;
- kills during ordinary rooms;
- entering combat;
- beginning a room with Overcharge;
- completing a room under a stated condition.
For boss preparation, I prefer a trigger based on successful attacks.
A kill-based trigger works well in normal rooms but can stall against a single boss until adds appear.
A room-clear trigger does nothing during a long fight.
Viscous Secretion Is One of the Best Defensive Mutations
The mutation that slowed enemy projectiles in my unlock attempt is Viscous Secretion.
Its documented effect is:
Enemy projectiles move 25% slower
I value this more than another small damage increase once I have five or more Armor.
Slower projectiles give me:
- more time to read overlapping attacks;
- a safer route to nearby pickups;
- more time to reverse a wide body;
- fewer panic Dodges;
- a better chance of protecting the final Armor point.
It does not directly create Armor.
It reduces how quickly the existing stack disappears.
That distinction is important. Most successful defensive choices do not increase the HUD number; they stop enemies from lowering it.
Freeze Is the Other Control Effect I Prioritize
I used two types of Freeze support during the route:
- a continuous beam that freezes enemies held inside it;
- a passive reward stating that frozen enemies take 50% more damage.
The exact reward name was less important than the tooltip interaction.
The continuous beam stopped one threat from acting, while the 50% damage increase helped the other attacks finish that target before it recovered.
I take Freeze when:
- several enemies are attacking from different directions;
- the body cannot turn quickly;
- a rear or side attacker is repeatedly removing Armor;
- the main weapon already deals enough sustained damage;
- the run needs control more than another unsupported gun.
I do not build around Freeze alone.
The Build still needs enough damage to kill a frozen enemy before the effect ends.
Build One Stable Firing Lane First
The Nanobot objective does not require a special Armor-only Build.
It requires a Build that stops ordinary hits.
My first priority is one dependable attack facing the direction I naturally travel.
That attack can be:
- a rapid projectile weapon;
- a laser;
- a frontal spread;
- another ranged weapon with enough Range to begin firing early.
I then add one answer for enemies reaching the body:
- Freeze;
- an Orbiting Blade;
- a Tentacle;
- a rear automatic attack;
- a push effect;
- a projectile-clearing melee strike.
I do not fill every slot.
A small readable Build protects Armor better than a crowded layout with five attacks pointing in different directions.
Do Not Depend on Long-Charge Active Abilities
Several active effects required around 10 seconds of Overcharge before they could fire.
They were useful as extra damage, but I could not treat them as the only answer to a dangerous room.
If enemies spawn beside me while every active ability is empty, the Armor stack becomes the price of waiting.
Before attaching an active effect, I check:
- What charges it?
- Can the current Build activate that condition?
- How long will it take?
- Does the effect point into a useful lane?
- What happens while it is not ready?
I keep a basic attack that works without charging.
My Armor Threshold Rules
The most repeatable part of the route is not a particular room seed.
It is changing my behavior as the Armor total rises.
At Zero to Three Armor: Explore for Value
I still take short unknown branches.
The run needs:
- a first Armor source;
- DNA;
- Cores;
- a useful Evolution;
- one dependable weapon;
- movement or control.
I am willing to test a new item here because the protected stack is still small.
At Four to Five Armor: Stabilize the Build
I stop collecting unrelated weapons.
I spend on:
- Viscous Secretion;
- Freeze;
- Range;
- Stamina;
- Movement Speed;
- a usable close-range answer;
- Ossificator with a working trigger.
I still explore short branches, but every new piece needs to solve a known problem.
At Six Armor: Backtrack for Known Value
This is where I stop gambling on long unknown routes.
I return for:
- a visible Armor pickup;
- a previously revealed reward;
- Health;
- a shop I can now afford;
- an Ossificator already left behind;
- DNA that immediately unlocks a useful defensive Evolution.
During the successful route, I returned through the Lungs for Armor I knew was still available rather than entering the next major fight immediately.
At Seven Armor: Protect the Last Point
Seven Armor is the real failure state.
The unlock feels close enough that it becomes tempting to rush, but one ordinary hit resets part of the progress.

At seven, I do not:
- enter an optional dangerous room for Cores;
- accept Genetic Reshuffle;
- replace the forward weapon;
- take a larger body without movement;
- chase loose DNA through enemy fire;
- spend every Core on speculative damage;
- enter a boss while known Armor remains accessible.
I clear the safest available route first.
What to Do When Armor Does Not Drop Early
The map is procedural, so some attempts will not resemble the successful route.
I do not assume the run is dead just because the first organ gives very little Armor.
If I Have Zero or One Armor After the Skin
I continue when:
- the Build clears rooms safely;
- Health is stable;
- useful shops or reward rooms remain;
- I have already improved movement;
- the next organ can still generate direct Armor rewards.
I restart when the Build is already taking repeated contact damage and has no reliable firing lane.
If I Reach the Stomach With Only Two or Three
I stop treating the run as a direct speedrun.
I prioritize:
- Viscous Secretion;
- Freeze;
- Range;
- Health;
- movement;
- an Overcharge engine;
- known side rooms before the boss.
The Stomach can consume a fragile Armor stack very quickly. Surviving it with a stable Build is more important than forcing the count upward in one room.
If a Boss Removes Most of the Stack
I do not restart automatically.
The Lung boss removed nearly all of my protection, but the run continued to produce Armor afterward.
I continue when:
- the main weapon still clears ordinary rooms;
- unopened rewards remain;
- the next section still has shops and choices;
- Health is not critical;
- I can rebuild the stack without changing the whole layout.
Losing Armor is recoverable.
Losing the ability to protect future Armor is the real reason to restart.
When I Buy, Reroll, or Skip
I Buy When the Purchase Protects the Current Stack
Good purchases include:
- Ossificator with enough route remaining;
- Viscous Secretion;
- Freeze support;
- Projectile Range;
- Stamina;
- Movement Speed;
- Health when the run is fragile;
- a weapon upgrade that shortens dangerous fights without changing direction.
I Reroll When the Shop Cannot Solve the Current Problem
I reroll when:
- every offer is unsupported damage;
- the Build urgently needs movement;
- Health is critical;
- I need a compatible Overcharge trigger;
- the current items cannot connect to the layout.
One late shop was reached with 43 Cores.
That did not mean every item was worth buying.
A large Core total gives me options; it does not make an incompatible item useful.
I Skip When the Item Creates Another Weakness
I leave an item when:
- it has no valid slot;
- it points away from the firing lane;
- it disconnects an existing Infuser;
- it needs a trigger I do not have;
- it adds another active key I cannot manage;
- it replaces the stable weapon protecting six or seven Armor.
When I Backtrack
I backtrack only when I know the destination.
Good reasons include:
- visible Armor;
- Health needed before a boss;
- an affordable shop;
- a reward I deliberately left;
- DNA that immediately unlocks a required slot;
- a short safe route before a one-way transition.
I do not backtrack to:
- reopen an empty Armor room;
- test whether a pickup respawns;
- search every completed room for a random drop;
- add one more weapon to a stable Build;
- chase a reward whose location I do not know.
Re-entering the same room did not reproduce a collected Armor pickup.
Once it is gone, I move toward a new source.
Make the Final Check Before the Heart Route
The Heart circulation route is the last major opportunity in the successful attempt.
It also becomes one-way.
At its entrance, I found a choice between Health and Armor.
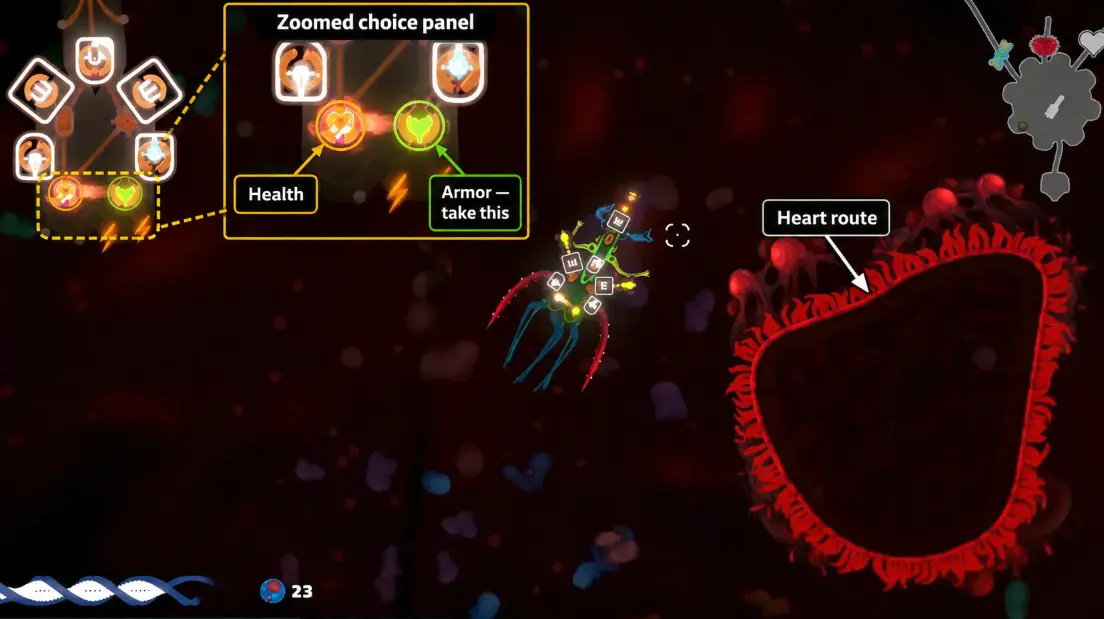
Before crossing, I check:
- Is known Armor still behind me?
- Is a shop still accessible?
- Did I leave Health in the Lungs?
- Can the current body reverse cleanly?
- Are the active abilities connected?
- Do I have a working trigger against normal enemies?
- Is the route ahead safer than the remaining branches?
After entering, I cannot plan around returning to the previous organ.
When I Choose Armor
I choose Armor when:
- Health can survive another room;
- the current total is close to eight;
- the Build is already avoiding most attacks;
- another defensive effect is active;
- the Armor reward immediately advances the objective.
When I Choose Health
I choose Health when:
- the next hit may end the run;
- Armor is low enough that the unlock is not immediate;
- the body is difficult to move;
- I am entering an unfamiliar section;
- the Build needs time to charge its attacks.
An Armor objective is worthless if the run ends before the next pickup.
The Final Push From Five to Eight
The last section did not require a new Build.
It required preserving the one that was already working.
The Armor total moved:
- from five;
- to seven;
- then to eight.
During that stretch, I:
- stayed behind the established firing lane;
- finished enemies before collecting nearby resources;
- did not replace the main weapons;
- took the Freeze damage bonus;
- avoided another speculative reroll;
- treated every incoming hit as more important than optional DNA.
The unlock triggered as soon as the eighth point appeared.
I did not need to enter or defeat the Heart boss.
Does Nanobot Stay Unlocked If the Run Dies?
Yes.
The unlock is saved when the notification appears.
I later died during the Heart fight, but Nanobot was still available on the Pathogen selection screen.
That means the correct priority is:
- Reach eight Armor.
- Confirm the unlock notification.
- Recover Health if possible.
- Continue the run normally.
I no longer need to protect all eight Armor after the notification.
What Nanobot Does After Unlocking It
Nanobot is listed as:
Nanobot — Modular Machine
Its starting trait is:
50% of Health pickups become Armor

This does not mean every Health pickup becomes Armor.
It means recovery becomes less predictable:
- some pickups restore Health;
- some become Armor;
- entering a boss at low actual Health remains dangerous;
- a room that normally guarantees healing may instead strengthen protection.
Nanobot also grows by attaching new modular squares to its body.
That makes it well suited to players who like designing connections and external firing lanes deliberately.
Is Nanobot Worth Unlocking Early?
Yes, especially when I enjoy:
- modular body layouts;
- Armor-focused defensive Builds;
- planning weapon and Infuser connections;
- adapting the body around the rewards found;
- long-term loadout and achievement progression.
It is not automatically stronger than every other Pathogen.
Nanobot vs Amoeba
Amoeba offers freer shaping from a small starting body.
Nanobot gives me a more structured modular layout and a trait that directly changes Health and Armor economy.
I prefer Nanobot when I want more defensive consistency after the opening.
Nanobot vs Fungal Spore
Fungal Spore is strong for slot-heavy combinations and can support many simultaneous attacks.
Nanobot is more deliberate: each added section affects how the body connects and where the next weapon can point.
Nanobot vs Diatom
Diatom is tied to the co-op route, so I do not treat it as a direct solo replacement for Nanobot.
The Pathogenic Best Builds Guide covers how these body types change the value of lasers, Freeze, Armor, and movement.
The Nanobot Steam Achievement Is a Separate Objective
Unlocking Nanobot does not complete the Steam achievement named Nanobot.
That achievement requires:
Defeat the Heart boss with Nanobot
The order is therefore:
- Unlock Nanobot by reaching eight Armor.
- Select Nanobot for a later run.
- Build through the normal organ route.
- Defeat the Heart while using Nanobot.
The complete achievement route is covered in the Pathogenic Achievements Guide.
Mistakes That Cost Me the Unlock
Treating Armor as Cumulative
Only the current HUD total matters.
Rushing at Seven Armor
Being one point away made me less patient exactly when the run required more patience.
Buying Ossificator Too Late
Its 60-second Overcharge condition cannot provide emergency Armor in the next room.
Taking Damage for Optional DNA
DNA improves a later Evolution. The eighth Armor completes the objective immediately.
Changing the Whole Build Near the Goal
A higher damage number did not compensate for losing familiar firing directions and triggers.
Saving Cores While One Hit From Death
A Core total has no value when refusing to buy Health ends the run.
Entering a Boss Before Checking Known Rewards
I mark the boss, finish short safe branches, then commit.
What to Read Next
Use the Pathogenic Best Builds Guide for Laser Bounce, Freeze, Ossificator, Overcharge, and Nanobot Build templates.
Use the Pathogenic Stomach Guide when the Armor stack keeps collapsing after the Intestines.
Use the Pathogenic Heart Boss Guide for the fight immediately after the successful unlock route.
Use the Pathogenic Achievements Guide for the separate achievement that requires defeating the Heart with Nanobot.
Return to the Pathogenic Guide Hub for the complete progression and reading order.
FAQ
Does unlocking Nanobot award the Nanobot Steam achievement? +
No. Unlocking the playable Pathogen and earning the Steam achievement are separate objectives. The Nanobot achievement requires defeating the Heart boss while playing as Nanobot.
Does the eight-Armor requirement change on Antibiotics? +
I found no separate Antibiotics requirement on the locked Nanobot card. The current unlock text still asks for at least eight Armor, so I recommend completing it on a normal run before adding difficulty modifiers.
Can the Experiment that starts with three Armor make the unlock easier? +
It may shorten the climb if its starting Armor contributes to the current total, but I have not verified that shortcut after launch. Experiments also change other run rules, so the normal route remains the confirmed and more reproducible method.