The Builds I Trust After the First Two Organs
I stopped judging builds by the biggest damage number. These are the combos, Pathogen starts, and upgrade decisions that kept my runs alive.
Updated:
Quick Answer
The most reliable general build I have used is the Ricochet Laser Core:
- one dependable laser or projectile weapon;
- Elastosome for wall and enemy bounces;
- enough Range to start dealing damage before contact;
- one movement upgrade before taking a wider Evolution;
- one close-range answer for enemies that reach the body.
For crowded Stomach rooms, I prefer the Frozen Blade Shell:
- Kinetosome for orbiting close-range damage;
- Freeze to stop one active threat;
- Viscous Secretion to slow enemy projectiles;
- Stamina and Range before another damage modifier.
For Armor-focused runs, I use the Armor Reactor:
- Ossificator;
- a repeatable Overcharge trigger;
- a stable forward weapon;
- defensive control that prevents Armor from disappearing faster than it is generated.
The strongest Build is not the one with the highest isolated damage number. It is the one that can attack forward, protect its blind side, retreat, and activate its own triggers.
My Four Checks for Every Build
I use the same four checks before calling any Build strong.
1. Can It Clear the Forward Lane?
I need one attack that deals dependable damage in the direction I naturally move.
It does not need to be the rarest weapon.
It needs to:
- point toward the next threat;
- begin attacking before contact;
- remain usable while moving;
- connect to the support chain;
- work without waiting for a rare room-clear condition.
A large damage number does not help when the weapon points into a wall.
2. What Happens When an Enemy Reaches the Body?
Later organs repeatedly place enemies beside or behind me.
I need at least one answer:
- an Orbiting Blade;
- Freeze;
- a Tentacle;
- a rear automatic attack;
- a wide melee strike;
- a push or projectile-clearing effect.
I do not need equal damage in every direction.
I need enough protection to stop one weak enemy from draining Health or Armor while I aim at the main group.
3. Can the Body Retreat?
A Build can clear the entire screen and still fail because the evolved body has become too wide to move.
Before adding another major damage component, I want one improvement to:
- Movement Speed;
- Thrust;
- Stamina;
- Dodge cooldown;
- Dodge charges;
- Dodge invulnerability.
This check becomes more important in the Lungs and Heart, where the environment can move the body even when I am not ready.
4. Can the Trigger Activate in the Next Fight?
I read the trigger before buying or attaching an active Organelle.
I check whether it needs:
- successful attacks;
- kills;
- a room clear;
- a room clear without losing Health;
- sustained Overcharge;
- a connected Mitochondrion;
- entering combat.
A kill-based trigger can be excellent in ordinary rooms and nearly empty at the start of a boss.
A room-clear trigger cannot help during a long phase.
The Build needs at least one engine that works against the exact encounter ahead.
Tested Pathogenic Organelle Tier List
This list ranks only pieces with enough direct evidence to judge their practical value.
It is not an attempt to classify every item in the 120-plus pool.
| Tier | Organelle or Mutation | Verified role | Why I rank it here |
|---|---|---|---|
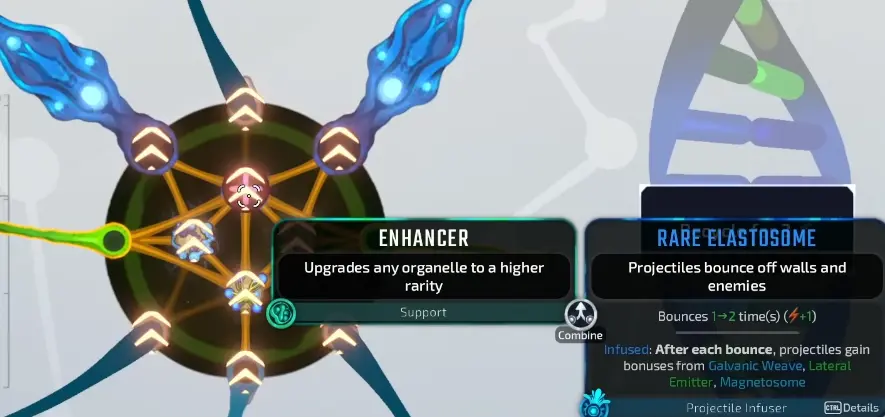
| S | Elastosome | Projectiles bounce from walls and enemies; the tested Rare version increased one bounce to two | Adds damage, room coverage, and blind-angle protection without requiring another weapon |
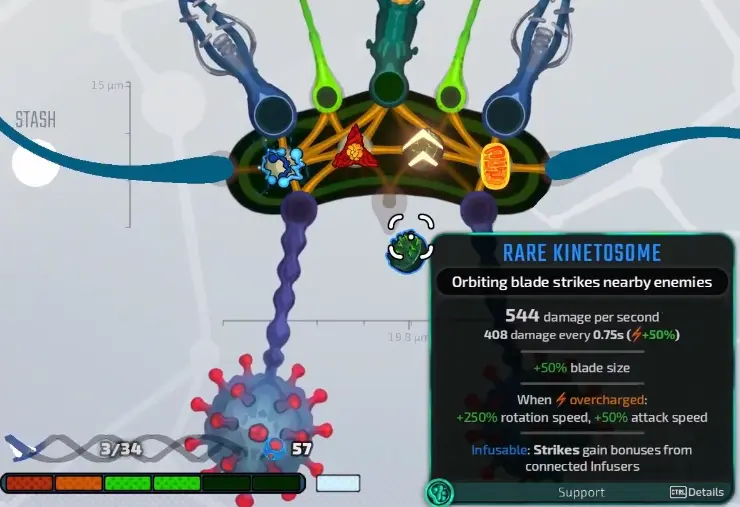
| S | Kinetosome | Orbiting Blade; tested Rare version showed 544 DPS, 408 damage every 0.75s, and +50% blade size | Solves the close-range weakness of ranged Builds while the main weapon keeps firing forward |
| S | Viscous Secretion | Enemy projectiles move 25% slower | Improves reaction time, movement, pickup safety, and boss survival without changing the weapon layout |
| A | Chromatophore Lens | Active laser; tested Epic version showed 1600 DPS for 4 seconds | Exceptional burst when the Build can reliably provide the required Overcharge |
| A | Cluster Ejector | Fires five short-range projectiles | Strong with bounce and spread control, but needs Range or safe positioning |
| A | Ossificator | Generates Armor after sustained Overcharge | Excellent in long defensive runs, but too slow to function as emergency protection |
| B | Actin Whip | Flexible melee lash; tested version showed 200 DPS | Solid early contact damage, but less valuable when the Build cannot safely approach ranged enemies |
Why Elastosome Is My Best General Pick
Elastosome does more than increase damage.
It lets the same projectile:
- hit another enemy;
- return through a narrow room;
- continue after striking a wall;
- cover an angle outside the forward lane;
- stay useful for longer.
That means it improves both offense and safety.
I take it immediately when the current Build already uses:
- lasers;
- rapid projectiles;
- Cluster Ejector;
- another weapon that creates several independent shots.
I skip it when the current Build is almost entirely melee or its projectiles disappear too quickly to benefit.
Why Kinetosome Is S Tier
The tested Rare Kinetosome showed:
- 544 damage per second;
- 408 damage every 0.75 seconds;
- +50% blade size;
- +250% rotation speed while Overcharged;
- +50% attack speed while Overcharged.
Those numbers are useful, but the real value is positional.
Kinetosome continues striking enemies that have already crossed the safe range of the main gun.
It lets me keep the ranged weapon aimed forward instead of rotating the entire body toward every small attacker.
Why Chromatophore Lens Is Not S Tier
The tested Epic Chromatophore Lens displayed:
- 1600 damage per second;
- a 4-second laser;
- a requirement of 10 seconds of Overcharge.
That is excellent burst damage.
It stays in A tier because the trigger cost matters.
Without a repeatable Overcharge engine, it becomes a powerful tooltip attached to an ability that is empty during the room where I need it.

Combo 1: Ricochet Laser Core
My shorthand name: Ricochet Laser Core
Best general use: Bacterium, Fungal Spore, developed Amoeba
Main pieces: Elastosome, laser or rapid projectiles, Range, movement
This is the most reliable offensive structure I have used.
The important sequence is:
- Establish one working ranged weapon.
- Connect the weapon to useful Infusers.
- Add Elastosome.
- Improve Range or projectile lifetime.
- Fix movement before taking a wider body.
- Add one close-range defense.
- Scale the existing projectile chain instead of starting another unrelated attack.
Why Bounce Beats Another Small Damage Bonus
A normal damage increase improves the first target.
Elastosome can improve:
- the first target;
- a second target;
- enemies behind cover;
- enemies outside the main firing lane;
- rooms with curved or narrow walls.
It turns positioning into additional damage.
Cluster Ricochet Variant
When I find Cluster Ejector, I use a variation I call Cluster Ricochet:
Cluster Ejector + Elastosome + Range or spread control
Cluster Ejector produces five short-range shots.
Elastosome gives those shots more opportunities to hit after the first impact.
The problem is still Range.
I do not add Cluster Ejector when enemies are already reaching the body before the current weapon starts connecting.
I first fix:
- Projectile Range;
- Movement Speed;
- Stamina;
- a close-range blind spot.
The Failure That Changed This Build
The strongest laser attempt did not die because the damage stopped working.
It died after the body became wider while Movement Speed remained near its starting value.
By the Lungs, the Build could:
- bounce attacks through rooms;
- hit around walls;
- clear ordinary enemies;
- create a large amount of visual damage.
It could not back away quickly enough.
That is the only place I need this example:
A wider body is not an upgrade until the movement system can carry it.
I now take the first useful movement improvement before adding another large Evolution or a fourth offensive component.
Combo 2: Frozen Blade Shell
My shorthand name: Frozen Blade Shell
Best general use: Stomach, narrow routes, mixed enemy groups
Main pieces: Kinetosome, Freeze, Viscous Secretion, Range or Stamina
This is my safest control Build.
The roles are separate:
- the main ranged weapon opens the fight;
- Freeze removes one active threat;
- Kinetosome protects the immediate area;
- Viscous Secretion makes the remaining projectile patterns easier to read;
- Stamina keeps the main firing lane active.
Why This Works Better Than Pure Freeze
Freeze creates time.
It does not finish the room by itself.
I still need enough damage to kill the frozen enemy before it resumes attacking.
The ideal order is:
- Freeze the threat controlling the escape lane.
- Keep the main weapon firing from Range.
- Let Kinetosome punish anything that reaches the body.
- Reposition while projectiles are slowed.
- Finish the frozen target before changing lanes.
The 2,844-Damage Example
One Freeze-focused setup displayed a 2,844-damage hit after the Build had already added:
- Range;
- Stamina;
- repeated Freeze support;
- a stable source of damage.

The useful lesson is not that every Freeze Build should deal exactly 2,844 damage.
It is that control creates a clean window for the damage already present.
Combo 3: Armor Reactor
My shorthand name: Armor Reactor
Best general use: Nanobot unlock, long normal runs, defensive progression
Main pieces: Ossificator, repeatable Overcharge, forward damage, projectile control
Ossificator generates one Armor after remaining Overcharged for 60 seconds in the tested version.

That means the Build needs two layers:
- something that generates Overcharge reliably;
- enough defense to survive while the Armor timer progresses.
I prefer an attack-based trigger because it remains available against normal enemies and bosses.
I am less willing to depend on:
- room-clear triggers;
- room-clear-without-damage triggers;
- kill-only triggers before a boss;
- short Overcharge bursts that cannot sustain the timer.
When I Buy Ossificator
I buy it when:
- several rooms remain;
- the support slot is already usable;
- the Overcharge engine is connected;
- the current damage is stable;
- Armor serves a real objective.
I skip it when the boss is the next room or the Build still lacks Health, movement, or a working forward attack.
The full eight-Armor route belongs in the Nanobot Unlock Guide, so I do not repeat the complete Armor progression here.
Combo 4: Amoeba Slot Engine
My shorthand name: Amoeba Slot Engine
Best general use: Amoeba runs that have not chosen a final identity
Main rule: space first, specialization second
Amoeba starts with very little usable space.
When I try to force a polished Laser, Freeze, or melee Build immediately, the layout reaches a wall before the middle organs.
My order is:
- Prioritize additional slots.
- Add internal space for Infusers and Mitochondria.
- Keep one simple forward attack.
- Delay the final specialization.
- Choose the Build identity after enough connections exist.
I do not spend early resources trying to perfect a weapon chain that the current body cannot physically support.
Once the Amoeba has enough space, I choose from what the run actually provided:
- Elastosome and lasers become Ricochet Laser Core;
- Kinetosome and Freeze become Frozen Blade Shell;
- Ossificator and Overcharge become Armor Reactor;
- multiple projectile supports can become Cluster Ricochet.
This is the clearest example of why a Build is an order of decisions, not a fixed inventory screenshot.
What I Build First on Every Pathogen
These are starting directions rather than absolute final Builds.
Random rewards still determine the exact result.
Bacterium: Ricochet Laser Core
Bacterium is my easiest starting point for a ranged Build.
Its readable front makes it easier to:
- keep the main weapon aimed forward;
- add side protection without losing orientation;
- test projectile bounce;
- judge when a wider Evolution becomes too slow.
I start with one ranged attack, then look for Elastosome, Range, and movement.
Helminth: Controlled Melee Hybrid
I do not force Helminth into a copy of the Bacterium Build.
I start with:
- one dependable forward melee attack;
- Kinetosome or another side-defense option;
- Freeze or projectile control;
- enough movement to disengage.
Pure melee becomes dangerous when ranged enemies keep firing while I cross the room.
I only remain fully melee when the Build can also:
- clear projectiles;
- close distance safely;
- attack a wide area;
- protect the rear.
Tri-Phase Tendril and Gyrase Wheel are natural future candidates for this style, but I do not rank them until I have tested their full-release performance across later organs.
Fungal Spore: Connected Multi-Weapon Build
Fungal Spore works best for me when several attacks share a deliberate support network.
I still choose one primary lane.
My structure is:
- one main ranged weapon;
- one secondary weapon covering another angle;
- shared Infusers where possible;
- one survival or control tool;
- movement before another body expansion.
The trap is using every available slot simply because the body can hold another weapon.
The Build should gain stronger connections, not merely more visual effects.
Amoeba: Slots First
With Amoeba, I prioritize body development before theme.
I do not decide “this is a Laser Build” in the first few rooms.
I first create enough room to support:
- a main weapon;
- an Infuser;
- a Mitochondrion;
- close-range protection;
- movement.
After that, I specialize.
Nanobot: Armor Reactor or Compact Hybrid
Nanobot’s modular squares let me build the body connection by connection.
I prefer:
- one compact forward lane;
- Ossificator only with a real Overcharge engine;
- one side-defense component;
- enough actual Health to survive when recovery pickups convert into Armor.
Nanobot’s trait changes recovery economy, but it does not make Health irrelevant.
lil collector: Automatic and Orbiting Coverage
lil collector’s wall-based movement makes a stable central firing lane harder to maintain.
I favor attacks that keep working while the body changes angle:
- Kinetosome;
- automatic side attacks;
- area damage;
- bouncing projectiles;
- effects that do not demand a perfectly aligned front.
I avoid building the entire run around one narrow beam until I know I can consistently aim it from the wall path.
Diatom: Split the Jobs
Diatom is designed around two-player control.
I do not give both halves the same role.
A cleaner division is:
- one player handles ranged damage and the main target;
- the other manages close-range defense, control, or adds.
Duplicating the same active triggers on both halves can create a lot of visual damage without solving movement or rear protection.
Update 4 Organelles in the Current Pool
Update 4 introduced seven notable Organelles.
They remain high-value search targets, but I do not force them into the tested Tier List until I have enough full-run evidence.
Tri-Phase Tendril
A three-hit melee combo whose third strike deals triple damage.
I would evaluate it by asking:
- Can I consistently finish the third strike?
- Does the body remain in safe contact range?
- Can Freeze or projectile clearing protect the combo?
- Does the final hit connect often enough to justify the risk?
Gyrase Wheel
A sustained saw blade that continues attacking while Stamina remains.
This immediately makes Stamina part of the damage calculation.
I would pair it with:
- Stamina containers;
- Freeze;
- Viscous Secretion;
- enough movement to leave contact range.
Mucus Emitter
Creates a large, slow-moving damaging bubble.
Its likely value is area denial rather than immediate burst.
I would test it in:
- narrow Stomach routes;
- rooms with predictable approach lanes;
- Builds that can push or hold enemies inside the bubble.
Bacteriophage Launcher
Spawns bacteriophages that damage immune cells and can multiply from dying enemies.
Later balancing increased its Stamina cost and reduced minion durability, so I would not use its original Update 4 values as a current Tier argument.
It appears best suited to rooms with multiple ordinary enemies rather than a boss opening with no kill chain.
Pyroflagellum
Leaves a burning trail while Dodging.
This rewards movement through a controlled route.
I would avoid it when:
- the body already struggles to turn;
- the room punishes crossing the center;
- I am Dodging reactively rather than planning the trail.
Mitotic Nidus
Creates a clone that uses weapons connected to the internal Organelle.
Its value depends on the connected weapon.
A clone using a strong supported weapon may be excellent.
A clone copying a badly aimed or unsupported weapon only duplicates the weakness.
Ruptosome
Makes projectiles from connected weapons explode into shrapnel.
This has obvious potential with:
- Cluster Ejector;
- rapid projectiles;
- Elastosome;
- dense enemy groups.
It is one of the Update 4 pieces I would test first for a future Tier update.
How I Change the Build on Antibiotics
Pathogenic tracks Heart clears on Antibiotics Low, Mid, High, and Max.
I do not invent exact enemy multipliers when the interface does not show them.
I change the Build through priorities.
Normal and Low
I am still willing to:
- test one new connection;
- take a wider Evolution;
- depend on one strong damage engine;
- clear a short unknown branch for value.
Mid
I want the Build to pass all four checks before the Stomach:
- forward damage;
- close-range protection;
- movement;
- repeatable trigger.
I stop carrying Organelles that only become useful after another unlikely reward.
High and Max
Movement and defense effectively move up a Tier.
My order becomes:
- working main damage;
- first movement upgrade;
- control or projectile defense;
- reliable boss trigger;
- second damage chain.
I avoid:
- entering with only two survivable hits;
- large bodies without Movement Speed;
- kill-only Overcharge as the only engine;
- late Genetic Reshuffle;
- unsupported Update 4 experiments;
- relying on one rare item to complete the Build.
A High or Max Build should have redundancy.
When the main active ability is empty, the normal weapon must still work.
When an enemy reaches the body, one secondary system must still respond.
Do You Need a Special Build for the Secret Level?
The official launch description confirms that Pathogenic contains a secret level.
I have not verified that access requires:
- a particular Organelle;
- a specific Pathogen;
- a damage threshold;
- an Antibiotics level;
- one of the Update 4 items;
- a special Build combination.
I therefore do not recommend a “secret-level Build” yet.
Until the route is confirmed, I prepare a flexible late-game Build:
- enough movement for unfamiliar rooms;
- one ranged and one close-range answer;
- a repeatable trigger;
- recovery remaining;
- no dependence on a single room-clear effect.
That is useful preparation without pretending it opens the route.
My Shop Rules
Buy
I buy when the item completes a job the Build already needs.
Examples:
- Elastosome for a working projectile chain;
- Kinetosome when enemies reach the body;
- Viscous Secretion before dense projectile rooms;
- Range when attacks begin too late;
- movement before a wider Evolution;
- Chromatophore Lens when Overcharge is already reliable.
Reroll
I reroll when:
- every offer needs an unsupported slot;
- the Build lacks movement;
- the main attack needs Range;
- the next boss requires a trigger I do not have;
- Health or defense is now the limiting factor.
Skip
I skip when:
- the item creates a new problem;
- it duplicates a direction already covered;
- the active ability cannot charge;
- the body has no safe place to attach it;
- the Build is already readable and boss-ready.
I skip Chromatophore Lens without an Overcharge engine.
I skip Ossificator when the boss is next.
I skip another melee weapon when ranged enemies already control the room.
Return Later
I return when:
- the shop is close;
- the route is already safe;
- I am only a few Cores short;
- the item solves a specific weakness;
- no one-way transition has been crossed.
I do not reopen the whole map for a speculative upgrade.
Builds That Look Strong but Still Fail
Pure Melee Without Projectile Control
The damage can be excellent against isolated targets.
The Build collapses when several ranged enemies keep firing while I cross the room.
I add Freeze, reflection, a wide projectile-clearing strike, or one ranged weapon.
Pure Ranged Without Contact Protection
A screen full of projectiles does not stop an enemy already touching the body.
Kinetosome, a Tentacle, Freeze, or one automatic side attack usually fixes this more efficiently than another forward gun.
Glass Cannon With Two Health
A Build can clear ordinary rooms and still fail the boss-readiness check.
When two unnoticed hits end the run, I buy Health, Armor, movement, or control before adding another multiplier.
Too Many Active Abilities
Several strong active Organelles can create a Build that is technically powerful but impossible to operate.
I avoid a layout where:
- every effect needs a different trigger;
- several actions share the same input;
- none of the abilities are ready at the start of a room;
- the basic attack has been neglected.
The normal firing lane must remain functional while the active systems charge.
- every effect needs a different trigger;
- several actions share the same input;
- none of the abilities are ready at the start of a room;
- the basic attack has been neglected.
The normal firing lane must remain functional while the active systems charge.
What to Read Next
Use the Nanobot Unlock Guide for the complete eight-Armor route and Ossificator decisions.
Use the Stomach Guide for Freeze, narrow-room positioning, shops, and the Ossified Macrophage.
Use the Heart Boss Guide for limb priority, adds, the second form, and the final movement check.
Use the Achievements Guide to combine Pathogen Heart clears with Antibiotics progression.
Return to the Pathogenic Guide Hub for the complete route and reading order.
FAQ
Does upgrading an Organelle fix a bad slot direction? +
No. An Enhancer can raise rarity, but it does not turn a side-facing weapon into a useful forward attack. I fix the slot, body shape, or firing lane before spending another upgrade.
Is the Tier List the same for Diatom in co-op? +
Not completely. Diatom lets two players control separate halves, so an Organelle that is awkward in solo play can become useful when one player manages ranged damage and the other handles movement or close-range protection.
Do I need a special build to enter the secret level? +
I have not verified a specific Organelle or damage requirement for secret-level access. I do not recommend sacrificing a working run for an unconfirmed combination.