How I Am Working Through All 41 Achievements
Pathogenic’s 100% route is less about one perfect run and more about stacking Heart clears, Experiments, loadouts, and difficulty goals efficiently.
Updated:

Quick Answer
Pathogenic has 41 Steam achievements.
I split the 100% route into five jobs:
- Defeat all seven organ bosses, including the Brain.
- Defeat the Heart with all seven Pathogens.
- Clear the required Antibiotics levels.
- Complete all 15 Experiments.
- Fully unlock all seven Pathogen loadouts.
The efficient part is combining objectives. A Heart clear can also count for the Pathogen I am using and the selected Antibiotics level, so I do not farm those as three separate routes.
I leave the Brain and Overachiever for last because the Brain route requires progression beyond a normal Heart clear.
The Best Order for All 41 Achievements
I do not try to complete the list from top to bottom.
That creates unnecessary duplicate Heart runs and makes the hardest Experiments arrive before the useful Plasmid upgrades are unlocked.
My route is:
Phase 1: Get One Normal Heart Clear
I begin with the Pathogen whose movement and weapon layout I understand best.
The first full clear should naturally complete:
- Skin;
- Intestine;
- Stomach;
- Liver;
- Lung;
- Heart;
- the Heart achievement for the Pathogen used.
If I use Bacterium, for example, the same successful run can complete both Heart and Bacterium.
This first clear also opens more meta progression, making later Pathogen and Experiment runs less fragile.
Phase 2: Unlock the Remaining Pathogens
Before scheduling seven Heart clears, I make sure all seven Pathogens are actually selectable:
- Bacterium;
- Helminth;
- Fungal Spore;
- Amoeba;
- Nanobot;
- lil collector;
- Diatom.
Nanobot has the clearest dedicated requirement:
Hold at least 8 Armor at the same time.
I complete that unlock before committing to the Nanobot Heart achievement.
The full route is covered in the Nanobot Unlock Guide.
Phase 3: Combine Pathogen and Antibiotics Clears
Once Antibiotics levels are available, I pair them with Pathogens whose Heart achievements are still unfinished.
Instead of doing:
- four Antibiotics Heart clears;
- then six more Pathogen Heart clears;
I use four unfinished Pathogens for:
- Antibiotics Low;
- Antibiotics Mid;
- Antibiotics High;
- Antibiotics Max.
That can remove four Pathogen achievements and four difficulty achievements in the same four runs.
I save the Pathogen I handle most consistently for Max.
I do not assign Max to a Pathogen whose movement or body shape I am still learning.
Phase 4: Complete Experiments While Finishing Loadouts
Experiments alter the run rules, while loadout achievements require long-term progression with each Pathogen.
I combine them when possible.
For example, when a Pathogen still needs:
- more Heart progression;
- more Plasmid unlocks;
- a Core-holding condition;
- another boss requirement;
I use that Pathogen for an unfinished Experiment instead of starting another ordinary run.
Phase 5: Finish Brain and Overachiever
I leave these until the rest of the account is stronger:
- Brain — defeat the Brain boss;
- Overachiever — defeat the Brain boss on Antibiotics Max.
A normal Heart clear does not automatically open the Brain route. My first successful Heart run unlocked later progression, but the route beyond the Heart remained closed.
That is why I do not plan Brain as part of the first completion attempt.
All Seven Organ Boss Achievements
These are the main progression achievements.
- Skin — Defeat the Skin boss.
- Intestine — Defeat the Intestine boss.
- Stomach — Defeat the Stomach boss.
- Liver — Defeat the Liver boss.
- Lung — Defeat the Lung boss.
- Heart — Defeat the Heart boss.
- Brain — Defeat the Brain boss.
The first six follow the normal organ route.
Brain requires additional progression and is hidden in the Steam list until revealed.
Where the Normal Route Starts Getting Hard
The completion-rate decline shows the largest early wall clearly:
- Skin: 94.2%;
- Intestine: 79.1%;
- Stomach: 58.2%;
- Liver: 40.1%;
- Lung: 21.8%;
- Heart: 10.7%;
- Brain: 0.5%.
I do not keep forcing the same weak Build after repeated Stomach or Heart deaths.
I step back and improve:
- movement;
- Plasmid progression;
- boss-safe triggers;
- side coverage;
- Health and Armor management.
Use the Stomach Guide and Heart Boss Guide for those two major walls.
Heart Achievements for All Seven Pathogens
Each Pathogen has a separate achievement for defeating the Heart:
- Bacterium
- Helminth
- Fungal Spore
- Amoeba
- Nanobot
- lil collector
- Diatom

Do Not Force the Same Build Onto Every Pathogen
I made the least progress when I tried to copy one successful layout onto a body that did not support it.
Before each Heart run, I identify:
- where the useful external slots point;
- whether the body can strafe or rotate;
- how quickly it gains new slots;
- what the starting trait changes;
- which movement method the game recommends.
A ranged layout that works on Bacterium may leave Helminth unable to turn the firing lane.
A large slot-heavy layout may work well on Fungal Spore but require more movement support before Heart.
Nanobot converts 50% of Health pickups into Armor, changing how I evaluate recovery rooms.
Save the Most Difficult Control Scheme for Later
Diatom is presented as the co-op Pathogen in the selection interface.
I do not make that my second Heart attempt.
I first finish several solo Pathogens, unlock more progression, and confirm the control setup before committing to a full co-op route.
Antibiotics Achievements
There are five difficulty-related achievements:
- Antibiotics Low — Defeat the Heart on Low.
- Antibiotics Mid — Defeat the Heart on Mid.
- Antibiotics High — Defeat the Heart on High.
- Antibiotics Max — Defeat the Heart on Max.
- Overachiever — Defeat the Brain on Max.
The first four can be combined with unfinished Pathogen Heart achievements.
Overachiever cannot be completed by another Heart victory. It specifically requires the Brain on Max.
When I Increase the Antibiotics Level
I move up when the previous Heart clear was stable, not merely successful.
A stable clear means:
- I entered Heart with recovery remaining;
- the Build had movement beyond its starting value;
- at least one limb could be removed quickly;
- adds did not overwhelm the rear lane;
- phase two did not reduce me to one hit immediately.
If the previous clear survived only because of one lucky pickup, I repeat or strengthen the account before increasing the difficulty.
Which Pathogen I Use for Max
I choose the Pathogen with:
- the most developed loadout;
- the easiest movement for me;
- a familiar Heart Build;
- enough defensive Plasmid nodes;
- a route that does not depend on one rare Organelle.
Max is not where I test a newly unlocked Pathogen.
All 15 Experiment Achievements
The Experiment achievements are:
- Photosynthesis
- Phagocytosis
- Recombination
- Fulminant
- Mutagenesis
- Asymmetry
- Excitation
- God Mode
- Hyperplasia
- Lysis
- Metamorphosis
- Necrosis
- Nyctalopia
- Plutomania
- Tachycardia
Each achievement requires completing the Experiment with the matching name.

Read the Entire Experiment Card Before Starting
The Experiment screen can change more than enemy strength.
I saw modifiers involving:
- at least 15 additional rooms;
- two item rooms;
- Lights Out;
- Weapons Only;
- randomized starting conditions.
That changes what I buy.
A normal Build plan can become useless when the Experiment restricts the available weapon or changes the map length.
My Experiment Preparation Order
Before starting, I check:
- Does the rule restrict weapons or slots?
- Does the map become longer?
- Are extra item rooms guaranteed?
- Is visibility reduced?
- Does the run begin with a random layout?
- Does the challenge require a particular Pathogen?
- What counts as completing the Experiment?
I then choose a Pathogen whose starting trait helps with the restriction.
When I Buy During a Longer Experiment
A longer map increases the value of:
- sustainable Health;
- Armor generation;
- shop discounts;
- effects triggered after clearing rooms;
- scalable damage;
- movement that prevents repeated chip damage.
I do not spend all Cores in the first shop when the map has 15 additional rooms.
A slightly weaker early Build with Cores remaining is safer than a fully spent Build that cannot fix a later movement or recovery problem.
When I Buy During a Restricted Experiment
When the rule limits available weapons, I stop rerolling for effects the challenge cannot use.
I buy:
- Health;
- Stamina;
- movement;
- compatible support effects;
- upgrades to the attacks already allowed.
I do not waste several rerolls trying to force a normal Build into a rule set designed to prevent it.
All Seven Loadout Achievements
The loadout achievements are:
- Bacterium Loadout
- Helminth Loadout
- Fungal Spore Loadout
- Amoeba Loadout
- Nanobot Loadout
- lil collector Loadout
- Diatom Loadout
Each requires fully unlocking that Pathogen’s loadout.

Loadouts Are Not Unlocked by Experience Alone
The locked nodes can ask for specific actions.
The visible requirements included examples involving:
- holding 75 Cores;
- rerolling;
- taking or reacting to pickups;
- getting hit;
- defeating the Heart.
I write down the remaining conditions for the current Pathogen before entering the body.
Otherwise, it is easy to finish a long run and discover that the missing node required a decision I stopped making several organs earlier.
When I Stop Spending Cores
When the target says to hold a specific Core amount, the objective temporarily becomes more important than another optional shop upgrade.
For a 75-Core target, I stop spending once the current Build can already survive ordinary rooms.
I still spend when:
- Health is critical;
- the Build cannot reach the next boss;
- movement is fundamentally broken;
- the purchase is necessary to keep the run alive.
I do not die with 70 Cores merely to avoid buying Health.
The condition matters only if the run continues.
When I Reroll
I reroll when the locked loadout condition specifically asks for it or when the current shop cannot fix the Build.
I do not combine a reroll objective with a fragile boss entry unless I can test the new setup in an ordinary room first.
The Genetic Reshuffle failure before the Stomach showed how quickly an unfamiliar layout can ruin a good run.
When I Backtrack
I backtrack for a loadout condition when I know the target is available:
- a Core pickup;
- Armor;
- Health;
- a shop;
- a previously revealed reward room.
I do not search every empty branch for a requirement that may not appear.
Before the one-way Heart route, I make the final check because anything left in the Lungs becomes inaccessible.
The Four Hidden Achievements
Pathogenic has four hidden Steam achievements in the current list:
lil collector
Defeat the Heart boss with lil collector.
This belongs to the seven-Pathogen Heart route.
Brain
Defeat the Brain boss.
A normal Heart victory did not immediately open this route for me.
lil collector Loadout
Fully unlock the loadout for lil collector.
This belongs to the seven loadout achievements.
Overachiever
Defeat the Brain boss on Antibiotics Max.
This is the final objective in my route because it combines the least common boss with the highest listed difficulty.
Steam Achievements and In-Run Unlocks Are Different
Pathogenic frequently displays an UNLOCKED notification during a run.
That does not automatically mean Steam awarded an achievement.
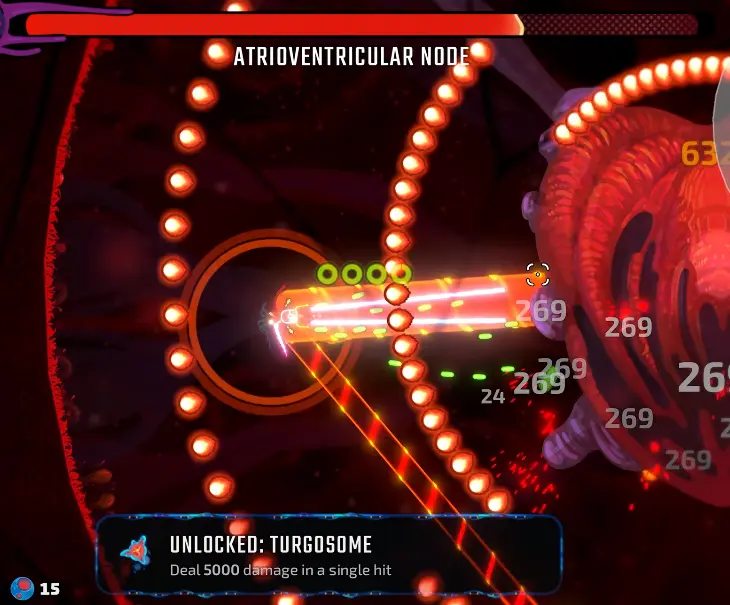
Examples of separate in-game unlocks include:
- Organelles;
- mutations;
- Pathogens;
- loadout nodes;
- modes;
- Plasmid progression.
The Turgosome popup required:
Deal 5,000 damage in a single hit
That is useful progression, but it is not listed among the 41 Steam achievements.
I check the Steam list after a run instead of assuming every unlock popup completed part of the 100% route.
How I Combine Objectives Without Ruining the Run
I combine objectives only when they do not pull the Build in opposite directions.
Good combinations include:
- Heart + current Pathogen + Antibiotics level;
- Experiment + unfinished Pathogen loadout;
- Nanobot eight-Armor unlock + normal progression toward Heart;
- holding Cores + a Build that is already stable;
- Heart clear + boss-related loadout node.
Bad combinations include:
- Max Antibiotics + an unfamiliar Pathogen;
- restrictive Experiment + a complicated Core-hoarding objective;
- Heart attempt + testing a new Genetic Reshuffle;
- low-Health run + refusing to spend because of a Core target;
- Brain Max + an unfinished loadout with weak starting options.
The fastest route is not the route with the most objectives selected.
It is the route with the most compatible objectives.
My Cleanup Checklist
Before starting another run, I check which category still needs progress.
Normal Progression
- Skin
- Intestine
- Stomach
- Liver
- Lung
- Heart
- Brain
Pathogen Heart Clears
- Bacterium
- Helminth
- Fungal Spore
- Amoeba
- Nanobot
- lil collector
- Diatom
Antibiotics
- Low Heart
- Mid Heart
- High Heart
- Max Heart
- Max Brain
Experiments
- Photosynthesis
- Phagocytosis
- Recombination
- Fulminant
- Mutagenesis
- Asymmetry
- Excitation
- God Mode
- Hyperplasia
- Lysis
- Metamorphosis
- Necrosis
- Nyctalopia
- Plutomania
- Tachycardia
Loadouts
- Bacterium
- Helminth
- Fungal Spore
- Amoeba
- Nanobot
- lil collector
- Diatom
I choose the next run from the shortest unfinished category that can also progress a longer one.
What to Read Next
Use the Nanobot Unlock Guide for the eight-Armor requirement.
Use the Pathogenic Best Builds Guide when a Pathogen or Experiment needs a safer damage and movement template.
Use the Stomach Guide for the first major progression wall.
Use the Heart Boss Guide for limb priority, adds, the second form, and the one-way route.
Return to the Pathogenic Guide Hub for the complete reading and progression order.
FAQ
Does every UNLOCKED notification count as a Steam achievement? +
No. I unlocked Turgosome by dealing 5,000 damage in one hit, but Turgosome is not one of the 41 Steam achievements. Organelle, mutation, pathogen, and loadout unlocks can use similar notifications without awarding an achievement.
Can one Heart victory complete several achievements? +
A qualifying clear can satisfy the general Heart achievement, the achievement for the Pathogen being used, and an Antibiotics difficulty achievement. I check Steam after the run before planning another identical clear.
Can I fully unlock every loadout before defeating the Heart? +
Not necessarily. Individual loadout nodes can require conditions such as holding a Core total, taking pickups, rerolling, or defeating the Heart, so I inspect every locked node before deciding what the next run should target.