Echoes of Aincrad Prologue & Early Boss Guide
Beat Echoes of Aincrad early bosses including Sentry Golem, Illfang, Snowcap Boar, Glenspore Grizzly, Dire Strife Wolf, Wrathful Shrewman, and Raging Boar.
Updated:
Quick Answer
For Sentry Golem, play short punish windows around block, Reversal, and Parry Slash. For Illfang, break the shield with Crush Attacks and reduce its HP to zero three times. For Snowcap Boar, break blue-glowing body parts or the boss can heal and repeat the phase. For Glenspore Grizzly, dodge glowing-claw lunges and respect the later fire version. For Dire Strife Wolf, watch electric Discharge and Lunge attacks that build Paralysis. For Wrathful Shrewman, leave blind clouds and handle reinforcements after the roar. For Raging Boar, break all three body parts before greedily chasing damage.
Early Boss Route
This page covers the early boss route, not every boss in the full game.
The table below gives the route order, main mechanic, and what each fight unlocks or teaches. Treat the route point as a planning label, not a promise that every player will arrive at the exact same level.
| Boss | Quest / route | Area / boss room | Route point | Main mechanic | Completion result |
|---|---|---|---|---|---|
| Sentry Golem | Prologue | Early ruins route | Opening route | Boss-class damage, block timing, Reversal / Parry Slash | Teaches boss-class combat before Illfang |
| Illfang the Kobold Lord | Prologue | Kobold Lord boss arena | Prologue boss | Shield breaking, kobold adds, three HP breaks | Prologue progression and Sacred Tree’s Memory |
| Snowcap Boar | Iori’s Request | Megalith Forest South route | Early forest route | Freeze pressure, breakable blue body parts, healing loop | Completes Iori’s Request and opens later forest progression |
| Glenspore Grizzly | Within the Shadows | End of the thief / forest chase route | Early forest boss | Glowing-claw lunge, grab pressure, strong-attack stun windows | Resolves the stolen-item route |
| Dire Strife Wolf | The Violet Fencer I | Thieves’ Gutter / path toward Teardrop Cave | Teardrop Cave entry route | Electric Discharge, Lunge, Paralysis buildup | Opens the path toward Teardrop Cave and its Terminal |
| Glenspore Grizzly | The Violet Fencer II | Teardrop Cave progression | Cave route | Smaller bear, fire breath, Burn pressure | Clears the cave route pressure |
| Wrathful Shrewman | The Violet Fencer II | Teardrop Cave bottom chamber | Cave boss route | Blind clouds, reinforcements, large jump and slash attacks | Clears the deeper cave boss step |
| Raging Boar | Beaten to the Punch | Early post-cave / forest route | Next early-route tier | Three body-part breaks and heavy damage pressure | Advances the stronger part-break route |
Boss Prep Checklist
Prepare before the boss starts.
Boss fights punish weak prep more than normal routes do. Before entering a barrier, cave room, forest boss path, or marked boss space, stop and check these six things.
| Prep check | Why it matters | Better habit |
|---|---|---|
| HP and healing ready | Boss-class hits leave fewer safe mistakes | Rest at a Safe Area or Terminal before pushing deeper |
| Weapon already tested | Bosses punish unfamiliar range and recovery | Do not test a brand-new weapon inside the boss room |
| Sword Skills equipped | Bad skill timing wastes SP and recovery windows | Equip skills you can safely use after real openings |
| SP and stamina ready | Blocking, Crush Attacks, skills, and movement all demand resources | Do not spend everything before the fight begins |
| Iori / partner plan ready | Partner pressure creates safer entries and Combination windows | Use partner flow for bosses, not only normal enemies |
| Smithy and build checked | Weak panels or poor stat support make fights longer | Upgrade or compare your main weapon before retrying |
Sentry Golem Boss Guide
Sentry Golem is the first boss-class enemy that tells you normal mob habits are not enough.
The main lesson is resource discipline. Do not spend all your stamina and SP before the boss answers. Block when needed, use Reversal and Parry Slash openings, and let Iori help create cleaner damage windows.
| Attack / situation | Telegraph | Response | Punish window |
|---|---|---|---|
| Basic frontal pressure | The Golem turns toward you and starts a committed attack | Block or step out instead of trading | Use a short punish after the attack finishes |
| Heavy boss-class hit | Slow wind-up with obvious commitment | Save stamina for guard or dodge | Punish once, then reset before the next swing |
| Reversal / Parry Slash opening | Clean defensive timing creates the opening | Take the prompt instead of backing away too early | Add one safe skill or partner follow-up |
| Overextension after damage | Your stamina is low and the Golem is recovering | Stop attacking and reset | Wait for the next commitment |
| Iori pressure is available | Partner window or Combination flow is ready | Use it to create safer damage instead of solo trading | Follow with a short weapon punish |
The fight becomes much easier when you stop trading. Treat every punish as a short window, not permission to empty your whole stamina bar.
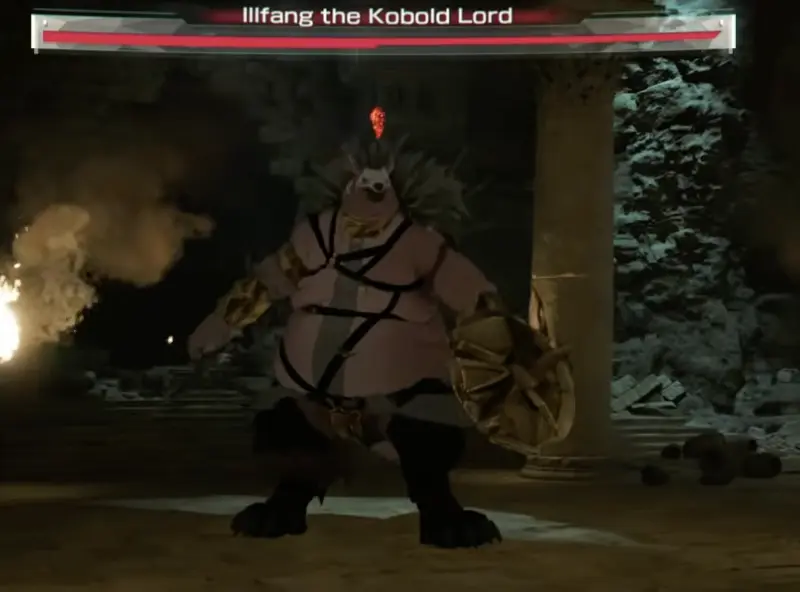
Illfang the Kobold Lord Boss Guide
Illfang is the first major early boss because it combines shield pressure, adds, and three HP breaks.
Do not judge this fight by the first HP bar. Illfang’s shield changes how quickly you can deal real damage, kobolds can interrupt your movement, and the boss must be brought to zero three times before the fight fully ends.
| Illfang phase | What matters | Better answer |
|---|---|---|
| First HP break | Learn the shield, basic boss spacing, and arena flow | Use Crush Attacks to break the shield before spending major damage |
| Second HP break | Kobold pressure can interrupt movement and punish greed | Clear only the nearby kobolds that threaten your space |
| Third HP break | You need clean stamina and SP management to finish calmly | Save resources for real openings and avoid panic after earlier breaks |
| Attack / mechanic | Telegraph | Response | Punish window |
|---|---|---|---|
| Shield guard | Illfang blocks or reduces normal pressure | Use Crush Attacks before committing SP | Punish after the shield is opened |
| Kobold adds | Smaller kobolds join or pressure the arena | Clear only the ones blocking movement or interrupting skills | Return to Illfang once your space is safe |
| Boss swing / pressure | Illfang commits to a melee attack | Guard, dodge, or reposition instead of trading | Use short damage after recovery |
| HP reaches zero | The boss does not end after the first break | Reset your position and continue | Start the next break with stamina available |
| SP into bad angles | You use Sword Skills while the shield or adds are still active | Hold SP until shield break, Iori pressure, or recovery | Spend skills only when the target is vulnerable |
Snowcap Boar Boss Guide
Snowcap Boar is a shorter fight, but it teaches status pressure and part-breaking.
The biggest trap is ignoring the blue-glowing body part. When the part appears, this is not a normal damage window. It is a mechanic check. If you fail to break the glowing part with a heavy attack, the boss can recover HP and repeat the phase.
| Phase / mechanic | What happens | Response | Punish window |
|---|---|---|---|
| Normal pressure | The boar uses freeze pressure, ice tornado-style area control, or charge pressure | Keep stamina, avoid blind chasing, and wait for commitment | Punish after the charge or ice pressure ends |
| Blue body part appears | A breakable part becomes the priority | Use a heavy attack / Crush-style break instead of normal pokes | After the break succeeds, focus damage during the recovery |
| Break failed | The boss can recover HP and loop the phase | Stop chasing raw damage and prioritize the glowing part next time | The next blue-part window becomes the real objective |
| Break succeeds | The boss is opened for damage | Spend safe skills or focused attacks | Reset before stamina becomes unsafe |
When a body part glows blue, stop using random pressure and break it with a heavy attack. If you ignore the part, the boss can recover HP and drag the fight into another loop.
Glenspore Grizzly Boss Guide
Glenspore Grizzly appears in more than one early route context, and the second version should not be treated as the same fight.
The first Grizzly is mainly a claw-lunge and grab check. The later Teardrop Cave Grizzly adds more room pressure through a smaller bear and fire mechanics.
First Glenspore Grizzly
| Attack / mechanic | Telegraph | Response | Punish window |
|---|---|---|---|
| Glowing claws | The claws light up before a lunge or grab | Dodge the grab instead of trading | Punish after the lunge misses |
| Heavy HP pressure | The boss stays close and punishes greedy chains | Use shorter attacks and reset | Use strong attacks only when the boss is exposed |
| Stun opportunity | The boss is recovering after a missed lunge or heavy action | Use strong attacks to build the opening | Focus party damage during the stun |
| You start low on HP | The fight can punish one or two mistakes quickly | Heal before entering the boss step | Do not start the fight already behind |
Teardrop Cave Glenspore Grizzly
| Attack / mechanic | Telegraph | Response | Punish window |
|---|---|---|---|
| Smaller bear joins | A smaller bear pressures the arena with the larger Grizzly | Clear the smaller bear first if it interrupts movement | Return to the larger Grizzly once the room is controlled |
| Fire breath | The Grizzly prepares a forward fire attack | Move close to the side or around behind instead of backing straight away | Punish after the breath finishes |
| Fire aura / Burn risk | The boss becomes dangerous to stay near for too long | Do not greed a full combo while burning pressure is active | Re-enter after the aura or attack window ends |
| Familiarity trap | You treat this like the first Grizzly | Slow down and respect the added mechanics | Prepare again before committing |
The first Grizzly teaches claw timing. The Teardrop Cave version asks for add control and fire positioning, so do not use the exact same autopilot for both.
Dire Strife Wolf Boss Guide
Dire Strife Wolf is a speed and status check.
The fight can make you chase, and chasing is the trap. If you burn stamina following every movement, you will have less resource left when the wolf commits. Its electric attacks can build Paralysis, so the status meter matters as much as the HP bar.
| Attack / mechanic | Telegraph | Response | Punish window |
|---|---|---|---|
| Electrical Discharge | The wolf pauses or charges electricity before the area pressure | Stay at mid range and wait for the discharge to end | Punish after the electric pressure finishes |
| Lunging Attack | The wolf lines up and commits forward | Dodge sideways instead of retreating in a straight line | Punish after the lunge misses |
| Paralysis buildup | Electric hits raise the status threat | Watch the status meter and disengage before it becomes fatal | Re-enter after the meter is under control |
| Chase bait | The wolf moves away or repositions quickly | Hold a safer line instead of sprinting after every movement | Let the wolf return or commit first |
| Slow weapon mistiming | Your heavy attack starts before the wolf commits | Cancel the greed and wait | Use slow attacks only after commitment |
Do not turn the fight into a race. The safer pattern is to hold a readable mid range, let the wolf commit, then punish while watching Paralysis buildup.
Wrathful Shrewman Boss Guide
Wrathful Shrewman tests status awareness, add control, and arena discipline.
Its dark purple clouds can apply Blinded, and its roar can bring reinforcements. It also has larger movement and area attacks that punish players who keep attacking after losing visual control.
| Attack / mechanic | Telegraph | Response | Punish window |
|---|---|---|---|
| Purple cloud | Dark purple cloud appears in the arena | Leave the area immediately | Re-enter after the cloud is no longer controlling your space |
| Blind status | Vision control becomes unreliable | Keep moving, use partner position as reference, and avoid committing blind | Attack only after you regain control |
| Roar | Wrathful Shrewman roars and the room pressure changes | Reset position and prepare for reinforcements | Clear nearby adds before boss damage |
| Reinforcements | Smaller enemies reappear or pressure the fight | Kill only the closest threats first | Return to the boss when movement is safe |
| Large jump | The boss winds up for a big leap | Dodge sideways instead of running straight back | Punish after landing recovery |
| Wide slash | Large area swing threatens the front and side | Leave the attack space and wait | Re-enter after recovery, not during the swing |
Raging Boar Boss Guide
Raging Boar is a stronger part-break check.
The main mistake is treating it like a bigger Snowcap Boar and only chasing the HP bar. The safer plan is to break its three body parts, use Iori support to survive the heavy pressure, and avoid spending all stamina before the part-break windows.
| Attack / mechanic | Telegraph | Response | Punish window |
|---|---|---|---|
| Body part break check | A body part becomes the priority target | Break all three parts instead of only chasing HP | Focus damage after each successful break |
| Heavy charge pressure | The boar commits forward with strong damage potential | Dodge or guard with stamina saved | Punish after the charge ends |
| Iori support window | Iori creates pressure or healing support value | Let partner support stabilize the fight | Use the opening for a part break or safe damage |
| Greedy full combo | You keep attacking while parts are still active | Stop and reposition before the boar answers | Wait for the next part-break window |
Treat Raging Boar as a part-break fight first and an HP race second. Breaking all three body parts makes the fight much safer.
Early Boss Rewards and Unlocks
This table only lists route results that are useful for planning. It does not guess fixed boss drops.
| Boss | Confirmed route value | Why it matters |
|---|---|---|
| Illfang the Kobold Lord | Prologue progression and Sacred Tree’s Memory | This is the first major route-clear boss and the point where the early story opens up |
| Snowcap Boar | Iori’s Request completion | Clears an early partner route and teaches body-part breaking before later bosses reuse the idea |
| Glenspore Grizzly | Resolves the thief / stolen-item route | The fight is tied to recovering the route objective, so it is not just an optional bear fight |
| Dire Strife Wolf | Opens the path toward Teardrop Cave and its Terminal | This is the important route gate for the next cave section |
| Wrathful Shrewman | Clears the deeper Teardrop Cave boss step | This is the main add-control and Blind-status check in the early cave route |
Safer Boss Builds
You do not need the highest listed weapon to beat early bosses. Match your build to the mechanic that is killing you.
| Boss mechanic | Safer response | Use this when… |
|---|---|---|
| Shield / guard pressure | Use Mace or a shield build with reliable Crush Attack access | Illfang’s shield or guarded enemies are slowing the fight down |
| Fast movement / Paralysis | Use Sword with shield or Rapier | Dire Strife Wolf makes you chase, panic dodge, or lose stamina |
| Adds / Blind / messy arena pressure | Use a shield-compatible build and let Iori help control space | Wrathful Shrewman or Illfang adds interrupt your punish windows |
| Part-break checks | Save stamina for Heavy / Crush Attack windows | Snowcap Boar or Raging Boar forces you to break glowing body parts |
| Heavy lunge / grab pressure | Use a safer weapon and punish only after the whiff | Glenspore Grizzly catches you during greedy frontal attacks |
| Harder mode / Death Game safety | Prioritize VIT, END, defensive EX-Mods, and one upgraded main weapon | Mistakes are too expensive for weapon testing or glass-cannon play |
Very Hard and Death Game Adjustments
Harder settings and Death Game planning make consistency more important than style.
Do not use this section as a speed-clear route. Use it as a safety checklist before attempting early bosses when mistakes are more expensive.
| Adjustment | Why it matters |
|---|---|
| Use a familiar weapon | Harder fights punish weapon testing more quickly |
| Prioritize VIT and END earlier | Survival and stamina give you more time to learn mechanics |
| Bring status recovery when available | Freeze, Paralysis, Blind, and Burn can turn one mistake into a death |
| Do not spend all SP or stamina at once | Bosses often punish empty recovery windows |
| Return to the Smithy before retrying | Upgrade level, EX-Mods, and ACV can matter more than another rushed attempt |
| Prefer shield-compatible builds first | Sword, Rapier, and Mace give safer recovery than no-shield routes |
| Clear dangerous adds close to you | Ignoring nearby adds is riskier when one mistake hurts more |
| Skip greedy heavy swings | Two-handed weapons need real punish windows, not panic trades |
Fast Failure Fixes
Use this after a failed attempt. Find the symptom, then fix that one thing next run.
| You failed because… | Fix it next attempt | If it still happens |
|---|---|---|
| Sentry Golem kept interrupting you | Stop trading; use block, Reversal, Parry Slash, and short punish windows | Add END or use a safer shield build |
| Illfang shield blocked your damage | Use Crush Attacks before spending major damage | Try Mace or a build with stronger control |
| Illfang kept going after HP hit zero | Keep fighting until the third HP break | Do not spend all resources after the first break |
| Kobolds ruined Illfang | Clear only nearby kobolds that block movement | Stop chasing every add across the arena |
| Snowcap Boar healed | Break the blue-glowing body part with heavy attacks | Save stamina for the break window instead of chasing HP |
| Glenspore Grizzly grabbed you | Watch glowing claws and dodge the lunge | Heal before entering and punish only after the whiff |
| Second Grizzly overwhelmed you | Clear the smaller bear first and respect fire pressure | Do not fight it like the first Grizzly |
| Dire Strife Wolf paralyzed you | Watch Discharge, Lunge, and the status meter | Hold mid range and stop chasing |
| Wrathful Shrewman blinded you | Leave purple clouds immediately | Reset after roar and clear reinforcements |
| Raging Boar hit too hard | Focus part breaks and use Iori support | Add VIT / END and stop treating it as an HP race |
| Your damage was too low | Check Smithy upgrades, ACV, Unique MODs, and EX-Mods | Read the Weapon Upgrade guide |
| You died too quickly | Add VIT / END and use a shield-safe build | Read the Best Builds guide |
What to Read Next
Use the rest of the Echoes of Aincrad cluster based on your current blocker.
- Read the Beginner Guide if you still need help with stamina, Sword Skills, Iori, safe areas, Healing Crystals, or early route prep.
- Read the Weapon Types Guide if you want the full comparison of Sword, Rapier, Dagger, Mace, Two-Handed Sword, and Two-Handed Axe.
- Read the Best Weapons Guide if you want named weapon candidates such as Bronze Sword, Wind Fleuret, Iron Tooth, Iron Hatchet, Mithril Saber, and Quakemaker.
- Read the Best Builds Guide if you want Growth Points, ACV, Sword Skill slots, Iori flow, EX-Mod priorities, and Death Game safety planning.
- Read the Weapon Upgrade Guide if you need Smithy enhancement, synthesis, Unique MODs, EX-Mods, Col, materials, and donor weapons.
- Return to the Echoes of Aincrad Guide Hub if you want the full guide route.
FAQ
Is this an Echoes of Aincrad all bosses guide? +
No. This page focuses on the prologue and early story bosses: Sentry Golem, Illfang the Kobold Lord, Snowcap Boar, Glenspore Grizzly, Dire Strife Wolf, Wrathful Shrewman, and Raging Boar.
How do you beat Sentry Golem? +
Block when needed, use Reversal and Parry Slash openings, keep stamina for defense, and punish in short windows instead of trading blindly.
How do you beat Illfang the Kobold Lord? +
Use Crush Attacks to break Illfang's shield, clear only the kobolds that threaten your space, and keep fighting until Illfang's HP has been reduced to zero three times.
Why does Illfang not die after the first HP bar? +
Illfang is a three-break boss. The first HP break is not the end of the fight, so reset your position and continue through the next break instead of spending all stamina or SP too early.
How do you beat Snowcap Boar? +
Watch for freeze or slow pressure, keep stamina for dodging, and use heavy attacks on blue-glowing body parts. If you fail to break the part, Snowcap Boar can recover HP and repeat the phase.
How do you beat Glenspore Grizzly? +
For the first Grizzly, watch the glowing claws, dodge the lunge or grab, then punish with strong attacks. For the Teardrop Cave version, clear the smaller bear first and reposition around fire breath or Burn pressure.
How do you beat Dire Strife Wolf? +
Watch for electric Discharge and Lunge attacks that can build Paralysis. Stay at a range where you can see the wind-up, let the wolf commit, then punish after the attack ends.
How do you beat Wrathful Shrewman? +
Leave dark purple blind clouds immediately, reset after its roar because reinforcements can appear, dodge large jump or slash attacks, and clear nearby adds before returning to the boss.
How do you beat Raging Boar? +
Break all three glowing body parts instead of only chasing HP. Let Iori support the fight, keep stamina for part-breaking windows, and do not greed damage while body parts are still active.