All Collectibles & 100% Cleanup
A practical Blasphemous 2 The Third Sin collectibles guide with Marks, offering materials, servants, prayers, altarpieces, skins, and 100% cleanup order.
Updated:
Quick Answer
For 100% cleanup in Blasphemous 2: The Third Sin, open the castle first, then clean by area. This guide counts The Third Sin-specific collectibles, not older base-game or Mea Culpa pickups. The main DLC set includes 19 Marks of the Embrujo, 12 offering materials — 4 Cracked Ceramic, 4 Rusted Silver, and 4 Old Gold — 3 servants, 4 Third Sin prayers, 9 Altarpieces of Favours, 3 Virtue Fragments, and the updated skin checklist. The safest route is to get Embrujo, clear the purple mist / gas, restore the lift, get Broken Ring of Sealed Eyes, open half-face doors, defeat Crescencia, then finish offerings, servants, prayers, skins, altarpieces, and remaining map rooms.
Collectible Count and Cleanup Table
Use this table first. It gives you the full checklist and tells you when each category becomes realistic to finish.
| Collectible type | Count / scope | Best cleanup timing | What it is for |
|---|---|---|---|
| Marks of the Embrujo | 19 | After getting Embrujo, then area-by-area | Embrujo weapon upgrades |
| Pieces of Cracked Ceramic | 4 | Offering cleanup route | Required for servant / offering completion |
| Pieces of Rusted Silver | 4 | Offering cleanup route | Required for servant / offering completion |
| Old Pieces of Gold | 4 | Offering cleanup route | Required for servant / offering completion |
| Servants | 3 | After offerings | Combat support and servant progression |
| Third Sin prayers | 4 | Side-room cleanup | New DLC prayer tools |
| Altarpieces of Favours | 9 | After major routes open | Build options and damage bonuses |
| Virtue Fragments | 3 | Skin cleanup route | Unlocks Penance of Virtue |
| Skin checklist | 8 skins listed | Late cleanup / trophy cleanup | Omnis Facies Poenitentiae progress |
| Map completion | 100% DLC map | After lift and half-face doors | Final completion check |
Best 100% Cleanup Order
Follow this order if you want fewer wasted trips.
| Stage | Unlock condition | Clean now |
|---|---|---|
| 1. After Embrujo | New whip weapon obtained | Early Marks, bell routes, whip rooms, first offering materials |
| 2. After mist is gone | Mist / gas route solved | Mist-blocked rooms, nearby side exits, missed materials |
| 3. After lift works | Elevator route restored | Lift-connected rooms, vertical shafts, deeper castle branches |
| 4. After Broken Ring | Half-face / lady-face doors open | Sealed door rooms, late side rooms, remaining quest items |
| 5. Before Crescencia | Complete Ring ready | Spend Marks, upgrade Embrujo, equip servant, check useful altarpieces |
| 6. After Crescencia | Boss defeated | Crescencia-related rewards, final skins, remaining materials, 100% map |
All Mark of the Embrujo Locations
There are 19 Mark of the Embrujo pickups. These are both collectibles and Embrujo upgrade currency. Collect and spend them while progressing, not only after the final boss.
For red-boxed map screenshots and exact room images, use the dedicated All Mark of the Embrujo Locations guide.
| Mark | Area | Map position | How to reach / what to look for |
|---|---|---|---|
| #1 | Geometry of Knowledge | Central-lower library block, immediately left of the Prie Dieu near the middle of the area | Start from the nearby Prie Dieu, move left into the adjacent room, and break the trophy in the marked room |
| #2 | Geometry of Knowledge | Southeast side of the brown library section, below the central Prie Dieu corridor | Drop down from the rooms above and use Embrujo movement to reach the lower marked room |
| #3 | Geometry of Knowledge | Southwest side of the brown library block, above the lower blue corridor and lower Prie Dieu | Start from the lower save point, move up into the marked room, and check the left-side room space |
| #4 | Geometry of Knowledge | Central-east library route, right of the main vertical room and near the middle Prie Dieu | Use the library route with bell / Embrujo movement, then climb into the upper bookcase side room |
| #5 | The Vibrating of the Organs | Lower-left edge of the organ area, near the border back toward Geometry of Knowledge | Enter from the lower organ route and check the side room before leaving the area border |
| #6 | The Vibrating of the Organs | Far-right tall vertical shaft, below the right-side save / travel cluster | Use Embrujo chain movement through the tall shaft and reach the marked room on the right-side vertical route |
| #7 | The Vibrating of the Organs | Middle-right corridor close to a Prie Dieu and travel hand | From the nearby save / travel side, enter the connected corridor and grab the short room pickup |
| #8 | The Vibrating of the Organs | Central vertical shaft, slightly below the upper route | Enter the shaft from the right or upper route and check the center of the vertical room |
| #9 | The Vibrating of the Organs | Central-left lower route, just above the brown Geometry of Knowledge section | Move along the lower organ route and check the marked side room before dropping back toward Geometry |
| #10 | The Vibrating of the Organs | Far-west vertical shaft on the outer left side of the organ map | Follow the long left-side traversal route and use Embrujo to reach the room at the far-left shaft edge |
| #11 | The Vibrating of the Organs | Southwest shaft directly above the Geometry of Knowledge border | Recheck the lower-left organ shafts; this one is easy to miss if you only follow the upper organ route |
| #12 | The Vibrating of the Organs | Upper-right room near the travel hand on the right side of the area | Start near the right-side travel hand, move into the connected upper rooms, and check the marked room before leaving |
| #13 | Castle of the Mist | Eastern exterior green section, separated from the central castle layout | Use Embrujo platforming on the eastern exterior route and check the green room at the far side |
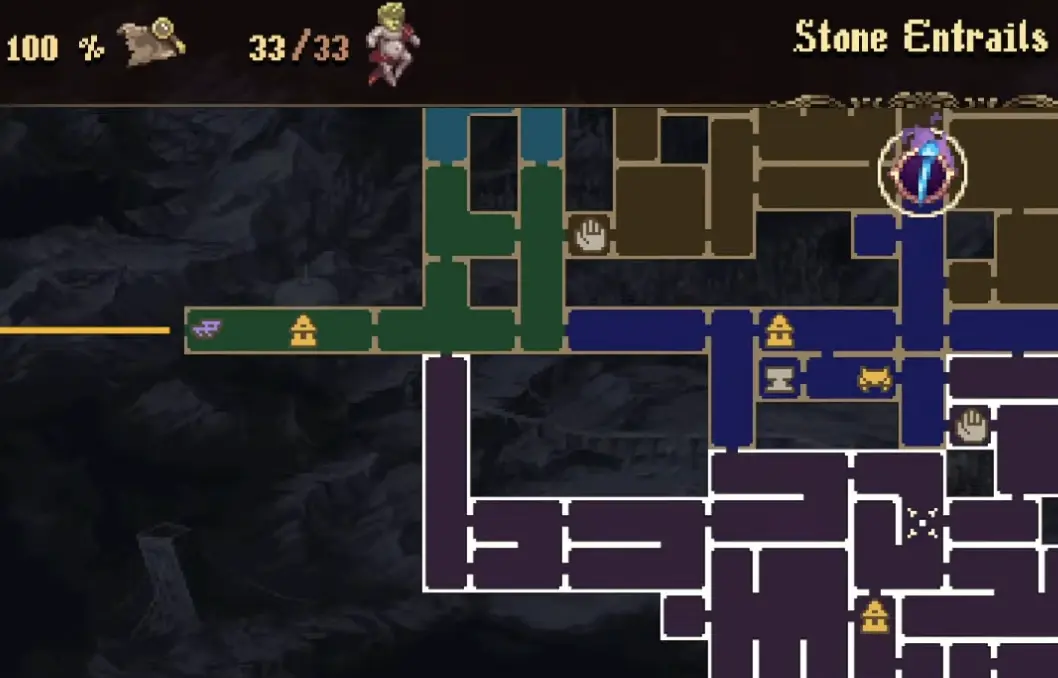
| #14 | Stone Entrails | Central Stone Entrails cluster, below the upper blue corridor and near multiple route markers | Enter the central room, check walls and side access, and look for a hidden or side-room pickup |
| #15 | Stone Entrails | Lower-west Stone Entrails route, close to the area border on the left | Enter the lower-west chamber and check the left-side stone room rather than continuing straight |
| #16 | Stone Entrails | Lower-central Stone Entrails route, below the main corridor and west of the right-side rooms | Use bell / mirror-ring movement depending on entry side, then enter the marked lower-central room |
| #17 | Stone Entrails | Central room directly beside a Prie Dieu | Start from the nearby Prie Dieu, enter the adjacent room, and watch for spikes while reaching the central pickup |
| #18 | Stone Entrails | Lower-right Stone Entrails room near a round map marker | Clear the room sequence near the round marker, then check the lower-right end of the route |
| #19 | Stone Entrails | Far-eastern lower room at the edge of the Stone Entrails layout | Push to the far-eastern lower branch and use Embrujo movement to reach the final side-room trophy |
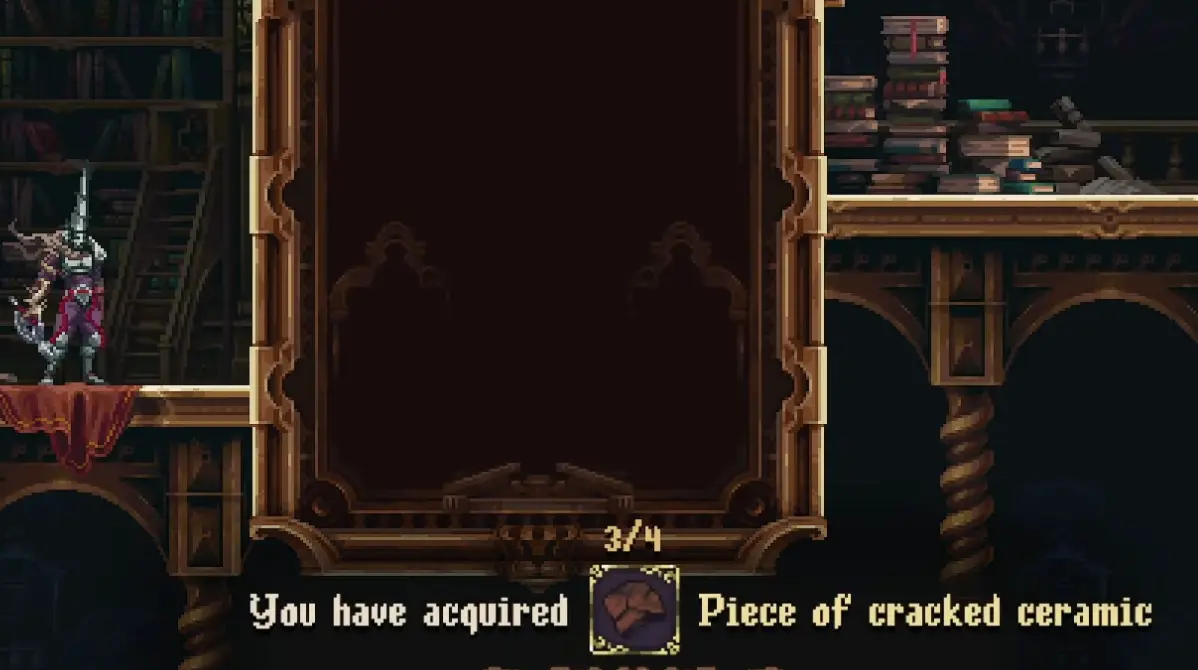
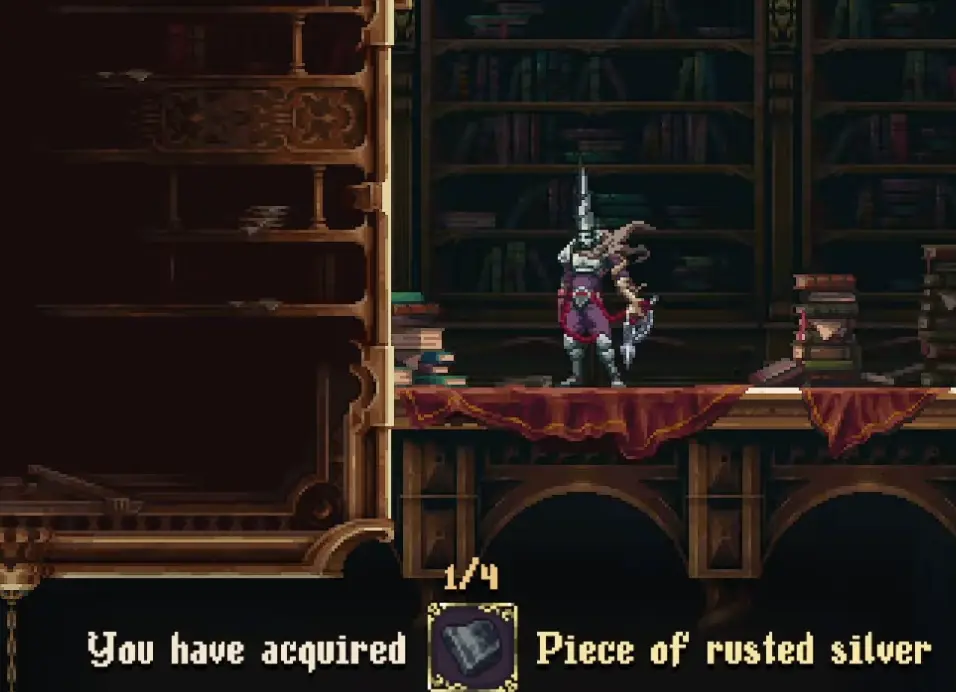
Offering Materials: Cracked Ceramic, Rusted Silver, and Old Gold
The offerings route requires 12 material pickups:
| Offering material | Count | Notes |
|---|---|---|
| Piece of Cracked Ceramic | 4 | Required for the full offerings / servants route |
| Piece of Rusted Silver | 4 | Required for the full offerings / servants route |
| Old Piece of Gold | 4 | Required for the full offerings / servants route |
| Final reward step | 1 | Return to the Altar of Offerings after the material route is complete |
These materials are best cleaned up after you have opened the major route blockers. If you try to hunt all twelve before Embrujo, mist, lift, and half-face door progress, you will keep hitting locked routes.
| Material set | Best time to sweep | Route clues |
|---|---|---|
| Cracked Ceramic #1–#4 | After Embrujo and early Castle routes open | Check early Castle side rooms, room transitions, hidden corners, and short branches that are easy to pass while chasing the main route |
| Rusted Silver #1–#4 | After mist / gas and lift progress | Recheck mist-cleared rooms, lift-connected rooms, and side paths that were unreachable before the castle opened |
| Old Gold #1–#4 | During final offering cleanup | Check offering-related rooms, half-face door rooms, and deeper castle side branches before returning for the reward |
| Reward | After all offering materials are handled | Return to the Altar of Offerings once the material route is complete |

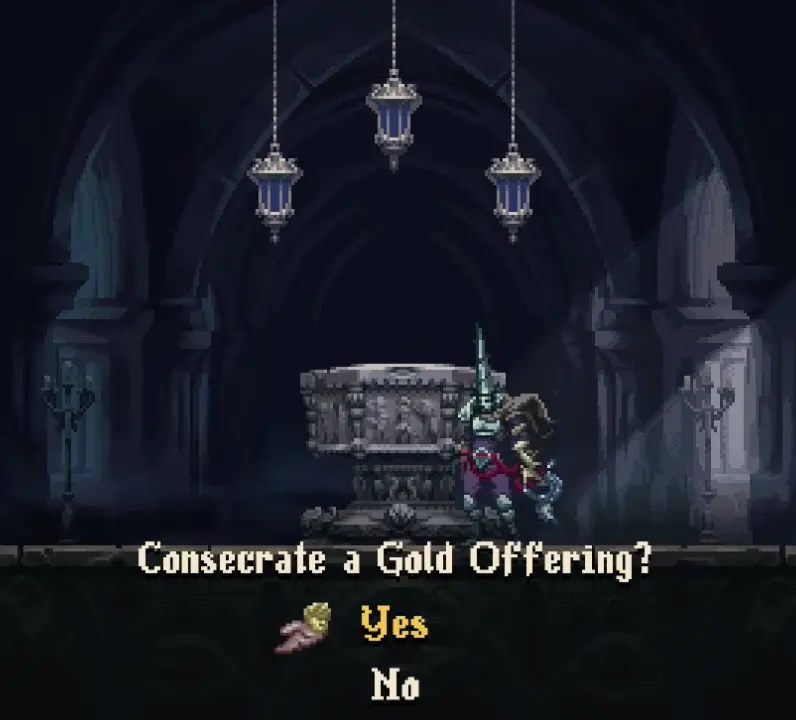
Offerings and Servants
The servant system begins when you find a Consecrated Gold Offering. After collecting the offering materials, return to the Altar of Offerings to complete the servant route. From there, or from a Prie Dieu, you can equip or unequip servants, check their level, and swap between Silver Tears, Moonchild, and Breastplate of Mourning.
All Servants and Effects
There are three servants in The Third Sin:
| Servant | Effect | Best use |
|---|---|---|
| Silver Tears | Periodically launches powerful projectiles at enemies within range | Best general room-clearing servant |
| Moonchild | When taking damage, there is a chance that Moonchild will intervene and cancel the hit | Best defensive servant while learning routes or boss patterns |
| Breastplate of Mourning | Attacks nearby enemies periodically, dealing damage with each hit | Best close-range / aggressive exploration servant |

Chorus of the Servants Trophy / Achievement
The offerings route is tied to the Chorus of the Servants trophy / achievement. To finish it, collect the offering materials and complete the servant route.
| Requirement | What to do |
|---|---|
| Cracked Ceramic | Collect all 4 Pieces of Cracked Ceramic |
| Rusted Silver | Collect all 4 Pieces of Rusted Silver |
| Old Gold | Collect all 4 Old Pieces of Gold |
| Servants | Unlock and manage Silver Tears, Moonchild, and Breastplate of Mourning |
| Reward step | Return to the Altar of Offerings after the materials are complete |
Prayers
This guide counts only The Third Sin-specific prayers, not older base-game or Mea Culpa prayers. The Third Sin route adds 4 confirmed DLC prayers:
| Prayer | Effect / use | Cleanup note |
|---|---|---|
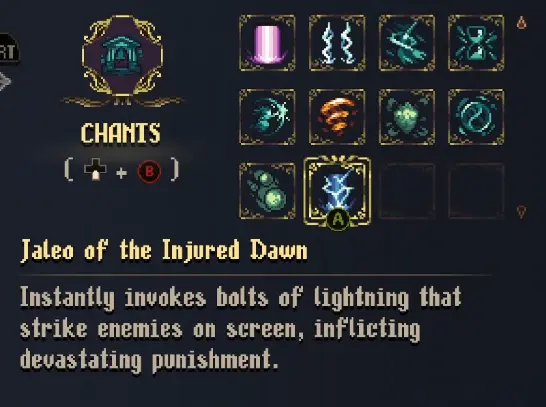
| Jaleo of the Injured Dawn | Instantly invokes bolts of lightning that strike enemies on screen, inflicting heavy punishment | Strong screen-wide damage option; check sky or platform-heavy routes if missing |
| Garrotin of the Forgotten Ones | Confirmed Third Sin prayer pickup | Check it off during prayer cleanup |
| Vidalita of the Blind Eyes | Summons miasma orbs that chase enemies on screen. On impact, they inflict area damage and are consumed | Useful against enemies that stay on screen long enough for the orbs to connect |
| Carcelera of Bitter Blood | Confirmed Third Sin prayer pickup | Check it off during prayer cleanup |
Altarpieces of Favours
The Third Sin has 9 Altarpieces of Favours to collect. Treat this as a late-cleanup category: most figures are easier to finish after Embrujo, mist, lift, and half-face door progress are already open.
| Altarpiece | Why it matters | Cleanup note |
|---|---|---|
| The Perfidy | DLC altarpiece checklist item | Check it off during altarpiece cleanup |
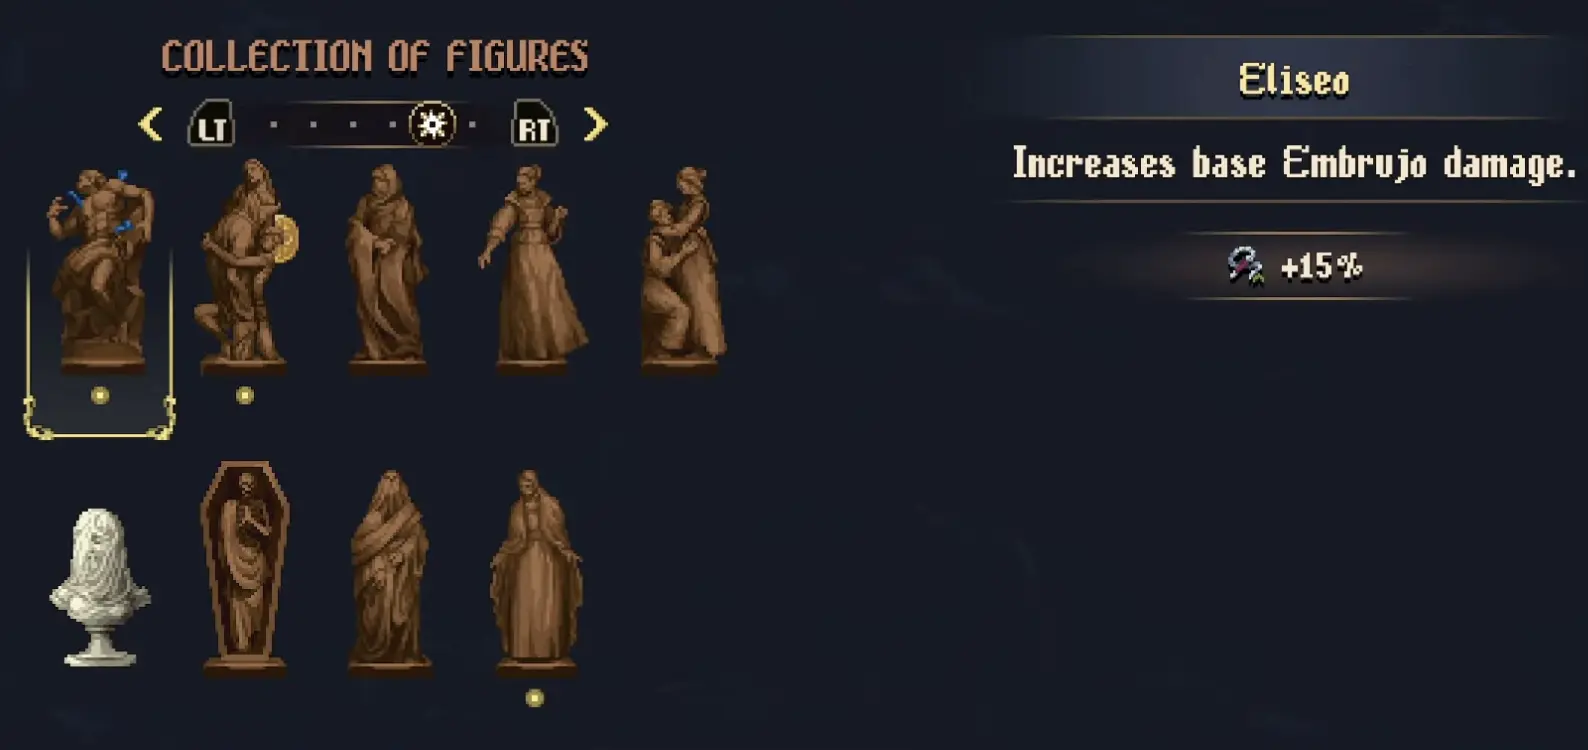
| Eliseo | Increases base Embrujo damage | One of the best figures for Embrujo-focused builds |
| The Grief | DLC altarpiece checklist item | Check it off during altarpiece cleanup |
| The Judicious One | DLC altarpiece checklist item | Check it off during altarpiece cleanup |
| Cartography of the Bones | DLC altarpiece checklist item | Check it off during altarpiece cleanup |
| The Ascension | Passage of Ash releases a damaging shockwave | Useful if you like movement-based damage |
| Lady of the Mist | Defeating enemies gradually increases all weapon damage; bonus is lost if you die, take damage, or rest | Strong for clean exploration, risky if you get hit often |
| Inner Voice | DLC altarpiece checklist item | Check it off during altarpiece cleanup |
| Crescencia | DLC altarpiece checklist item | Check it off during late cleanup |
Skins and Virtue Fragments
The updated skin checklist includes 8 skins for the Omnis Facies Poenitentiae trophy / achievement path. Some are tied to endings or older routes, while Penance of Virtue is tied to the Virtue Fragment cleanup route.
| Skin | How to treat it during cleanup |
|---|---|
| Basic Skin | Starting / default skin entry |
| Second Psalm | Check during full skin cleanup |
| Apostate Blood | Check during full skin cleanup |
| Light and Time | Check during full skin cleanup |
| Perfidy | Check during full skin cleanup |
| Atonement | Check during full skin cleanup |
| The Third Sin | Check during The Third Sin completion route |
| Penance of Virtue | Requires all 3 Virtue Fragments |
The Penance of Virtue skin is tied to three Virtue Fragments:
| Virtue Fragment | Cleanup note |
|---|---|
| Fragment of Breastplate of Virtue | Required for Penance of Virtue |
| Fragment of Leg of Virtue | Required for Penance of Virtue |
| Fragment of Helm of Virtue | Required for Penance of Virtue |
Final Missing Collectible Checklist
Use this when you are nearly done but still missing one item, one skin, one prayer, or one map room.
| Check order | Go back to… | What you are looking for |
|---|---|---|
| 1 | Mist-cleared rooms | Items you skipped when the gas was active |
| 2 | Lift-connected rooms | Vertical shafts, hidden ledges, and side exits |
| 3 | Half-face / lady-face doors | Rooms that only open after Broken Ring of Sealed Eyes |
| 4 | Embrujo grapple rooms | Upper ledges, long air routes, and bell-created paths |
| 5 | The Vibrating of the Organs shafts | Mark pickups and difficult traversal rewards |
| 6 | Stone Entrails lower rooms | Late materials and final Mark cleanup |
| 7 | Offering / servant menu | Servant level or power not finished |
| 8 | Prayer cleanup | Missing Jaleo, Garrotin, Vidalita, or Carcelera |
| 9 | Skin menu | Missing Omnis Facies Poenitentiae progress or Penance of Virtue |
| 10 | Map screen | Any unfilled room or unvisited route |
FAQ
How many Mark of the Embrujo pickups are in The Third Sin? +
There are 19 Mark of the Embrujo pickups. They are spread across Geometry of Knowledge, The Vibrating of the Organs, Castle of the Mist, and Stone Entrails.
How many offering materials are in The Third Sin? +
The offering route uses 4 Pieces of Cracked Ceramic, 4 Pieces of Rusted Silver, and 4 Old Pieces of Gold. Collect them as part of the servant and offering cleanup route.
How many servants are in The Third Sin? +
There are three servants in The Third Sin: Silver Tears, Moonchild, and Breastplate of Mourning. Silver Tears launches projectiles, Moonchild can cancel a hit, and Breastplate of Mourning attacks nearby enemies.
How many new prayers are in The Third Sin? +
There are 4 confirmed Third Sin prayers: Jaleo of the Injured Dawn, Garrotin of the Forgotten Ones, Vidalita of the Blind Eyes, and Carcelera of Bitter Blood.
How many Altarpieces of Favours are in The Third Sin? +
There are 9 Altarpieces of Favours listed for The Third Sin: The Perfidy, Eliseo, The Grief, The Judicious One, Cartography of the Bones, The Ascension, Lady of the Mist, Inner Voice, and Crescencia.
Should you collect everything before Crescencia? +
No. Get Embrujo first, clear the mist, restore the lift, open half-face doors, then clean collectibles by area. Full cleanup is much easier after the castle routes are connected.