Gearbox Fairgrounds: How to Unlock POIs and Blueprints
Find Funfair Blueprints, unlock Gearbox Fairgrounds POIs, improve Blueprint Levels, prepare expedition teams, and reach late-game attractions.
Updated:
Quick Answer
Open the Gearbox Fairgrounds expedition map and inspect the POI’s Overview and Rewards tabs before sending a team. Visit Gearbox Plaza for the Carousel Blueprint, then Roundabout Square for Monobeast Metro. Revisit Blueprint POIs when you need higher-quality designs, and prepare qualified Funfair Experts before entering the advanced areas.
A Gearbox Fairgrounds location can be unlocked on the map but still unavailable for an expedition. Another may accept your team immediately, yet offer Survey progress when you need a higher Blueprint Level. Later destinations can demand two Funfair Experts, additional staff, substantial expedition fees, and qualifications you may not have trained yet.
The quickest way to choose your next expedition is to identify the required reward first. A new ride design, an upgraded Blueprint, a Perk, and a Survey reward are different outcomes. They do not advance the same objectives.
Your first few expeditions introduce the Carousel and custom Roller Coasters. The more expensive trips become worthwhile once you need advanced Funfair designs or must meet a particular Blueprint requirement.
Where to Get Your First Funfair Blueprints
The initial Gearbox locations introduce the attractions needed to establish Riquetti Gardens.
You do not need to discover every item at one destination before moving on. Recover the design required for your next attraction, then return for additional rewards when they become useful.
Gearbox Plaza — Carousel Blueprint
Gearbox Plaza provides the first Carousel design.
Send an available Funfair Expert, complete the expedition, and collect the returned Blueprint.
The Carousel becomes available for construction after you recover its design. This is the first important unlock for the Funfair collection.
The Riquetti Gardens five-star walkthrough covers the opening Carousel objectives and the requirements for earning your first star.
Roundabout Square — Monobeast Metro
Roundabout Square provides the Monobeast Metro design during the opening custom Coaster progression.
Recover the Blueprint before spending money on the attraction. The Coaster must then be constructed at your museum.
Roundabout Square also offers other rewards, including decorative items and a Thrill-related Perk. Those can be useful later, but they do not replace the Monobeast Metro design when that is the attraction you need.
Once the Blueprint is available, follow the Roller Coaster construction instructions to complete the ride.
Trek Tracks and Fast Pass — Later Coaster Designs
Trek Tracks is associated with the Cross-Country Cart, introduced during the family-focused Riquetti Gardens progression.
Fast Pass is another important early expedition destination, associated with the Gearbox Glider.
These attractions serve different requirements. Recovering one design does not automatically make the other available.
Before starting another expedition, open the destination’s Rewards tab and check whether the required Funfair Blueprint has already been discovered.
If the design is still unavailable, inspect the location’s remaining rewards and Blueprint Level rather than building a duplicate of a ride you already own.
Blueprint Level vs Survey Level
Gearbox Fairgrounds uses two different types of location progression.
Blueprint Level measures how well your team understands a Funfair design. Improving it opens access to better versions of the corresponding Blueprint and can reveal additional rewards.
Survey Level tracks exploration progress at a Survey location. It has its own progression and rewards.
A location that uses Survey Level cannot substitute for a Blueprint POI when an objective specifically requires Blueprint Level 2.
How to Raise a POI’s Blueprint Level
Open a Blueprint POI and inspect its Overview tab.
If its Blueprint Level is below the requirement, complete additional expeditions to develop the design.
Higher Blueprint Levels allow you to discover better versions of its Funfair attractions.
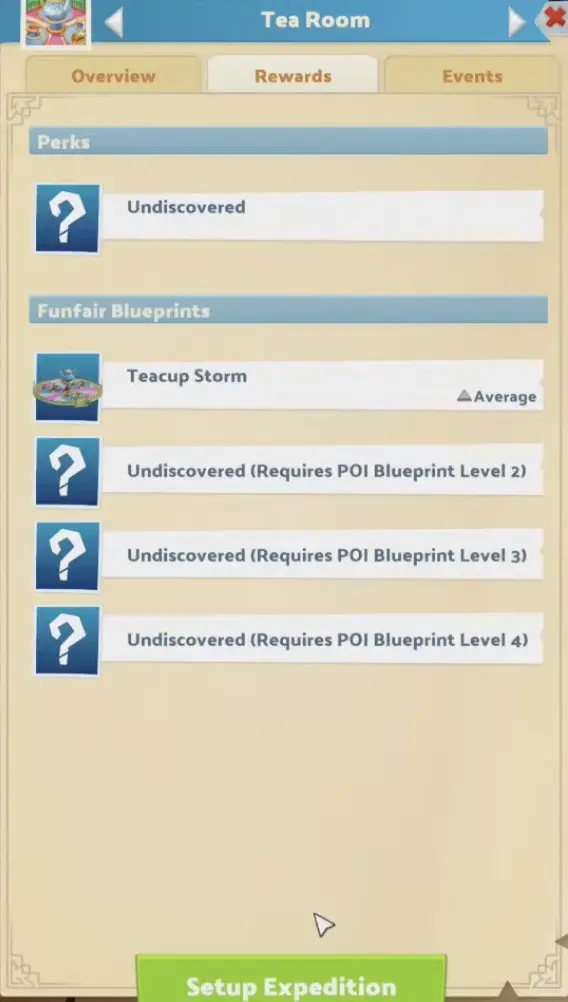
The Tea Room is a useful example. Its Rewards panel shows Teacup Storm at Average quality, with additional Blueprint reward slots requiring POI Blueprint Levels 2, 3, and 4.
Reaching a higher POI level makes the next reward eligible to discover; it does not mean every Blueprint in that location has automatically been collected.
Check both the Overview progress and the Rewards tab before deciding whether another expedition is necessary.
Why You Cannot Skip Straight to a Pristine Blueprint
Blueprint quality upgrades must be discovered in sequence.
For example, a Funfair design progressing through higher qualities needs its intermediate Blueprint rewards before its final Pristine version becomes available.
The important quality sequence includes:
Great → Epic → Pristine
Even when the POI has accumulated enough Blueprint Level progress for the highest reward, an undiscovered Epic Blueprint can prevent you from receiving Pristine immediately.
If the location appears fully developed but the desired quality remains unavailable:
- Open the POI’s Rewards tab.
- Check which quality version is still undiscovered.
- Complete the expedition needed to obtain that version.
- Return for the next quality tier after the earlier reward has been collected.
Repeatedly improving an already sufficient Blueprint Level will not bypass an undiscovered prerequisite reward.
Higher-quality designs can then be applied to existing Funfair attractions through their Upgrade option. You do not need to demolish a working ride merely because you recovered a better Blueprint.
For the upgrade controls and construction decisions, see the Roller Coaster guide.
Five POIs at Blueprint Level 2
Riquetti Gardens requires five Gearbox Fairgrounds POIs at Blueprint Level 2 during its second-star progression.
The objective counts qualifying locations, not the total number of expeditions.
Improving one POI to Level 3 does not count as two POIs at Level 2.
Work through five accessible Blueprint destinations until each meets the requirement. A Survey location does not count simply because its Survey Level has advanced.
Later progression increases the scale of the requirement, including 15 POIs at Blueprint Level 2.
For that larger target, count the qualifying locations already completed before sending experts out again. Concentrate on Blueprint POIs still below Level 2.
Gearbox Fairgrounds POI Requirements, Costs, and Rewards
Expedition requirements differ substantially between destinations.
Some POIs need one experienced Funfair Expert. Others need two experts plus another employee, tying up a larger team for several weeks.
The following locations have specific requirements worth checking before launch.
| POI | Type | Staff Required | Time | Cost | Rewards / Progress |
|---|---|---|---|---|---|
| Tea Room | Blueprint | 2 Funfair Experts + Assistant | 30 days | $18,500 | Teacup Storm; further Blueprint rewards at Levels 2–4 |
| Science Fields | Blueprint | 2 Funfair Experts + Janitor | 30 days | $25,000 | 6 discoverable items |
| Test Your Strength | Survey | Level 5 Funfair Expert | 7 days | $18,000 | Survey progression; Great maximum quality displayed |
| Jumbo Arcade | Survey | Funfair Expert + Assistant | 20 days | $19,000 | 2 discoverable items |
| Tomorrow Town | Location | 2 Funfair Experts + Assistant | 34 days | $37,000 | 5 discoverable items; advanced map progression |
Times and prices are the displayed base expedition values. Your final expedition setup can change them.
The practical difference is not just the entry fee. Sending two Funfair Experts away for 30 days removes them from construction and maintenance work at your museum.
A shorter expedition with a specialized qualification can also be harder to launch than a longer trip with ordinary employees.
Tea Room — Two Experts for Better Blueprints
Tea Room becomes more valuable when you want to develop Teacup Storm and the additional designs available at higher Blueprint Levels.
It needs two Funfair Experts and one Assistant.
If those are your only available Funfair Experts, complete any urgent Funfair construction or restoration first. You will not be able to use the same employees in the museum while the expedition is underway.
When the next Blueprint reward is important, commit the team and return for the additional quality versions as they become available.
Science Fields — Check the $25,000 Cost
Science Fields requires two Funfair Experts and a Janitor.
Its 30-day, $25,000 expedition is a significant commitment, particularly while your museum is expanding.
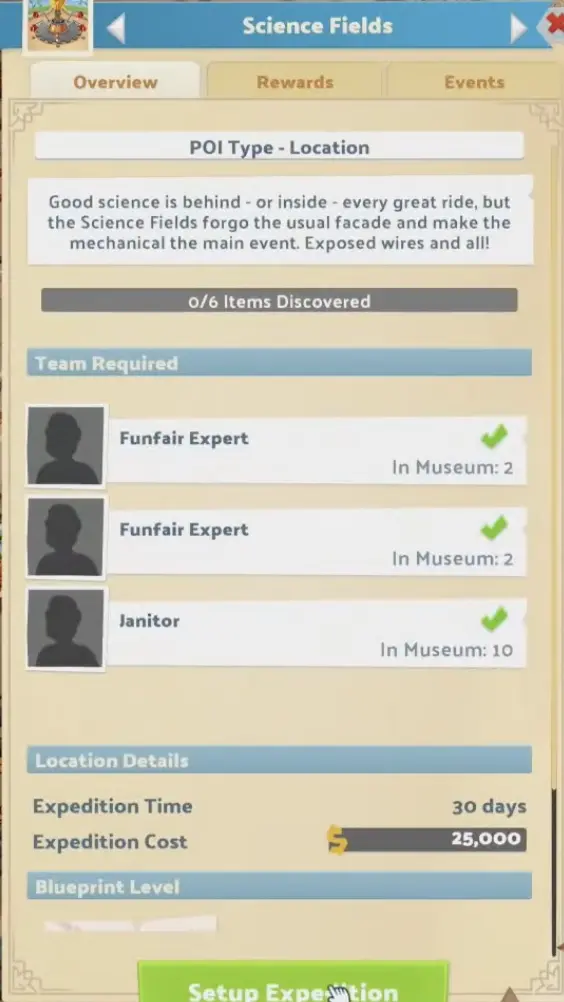
The 0/6 Items Discovered counter indicates the number of items available to discover at that POI. It does not guarantee that six expeditions will recover all six.
Check the Rewards tab and any remaining Blueprint Level conditions before planning multiple trips.
If the current objective can be completed with less expensive Blueprint locations, you can postpone Science Fields until its rewards or progression become relevant.
Test Your Strength — Level 5 Funfair Expert Required
Test Your Strength is a Survey POI with a specific employee-level requirement.
It needs a Level 5 Funfair Expert, takes 7 days, and costs $18,000 at its displayed base settings.
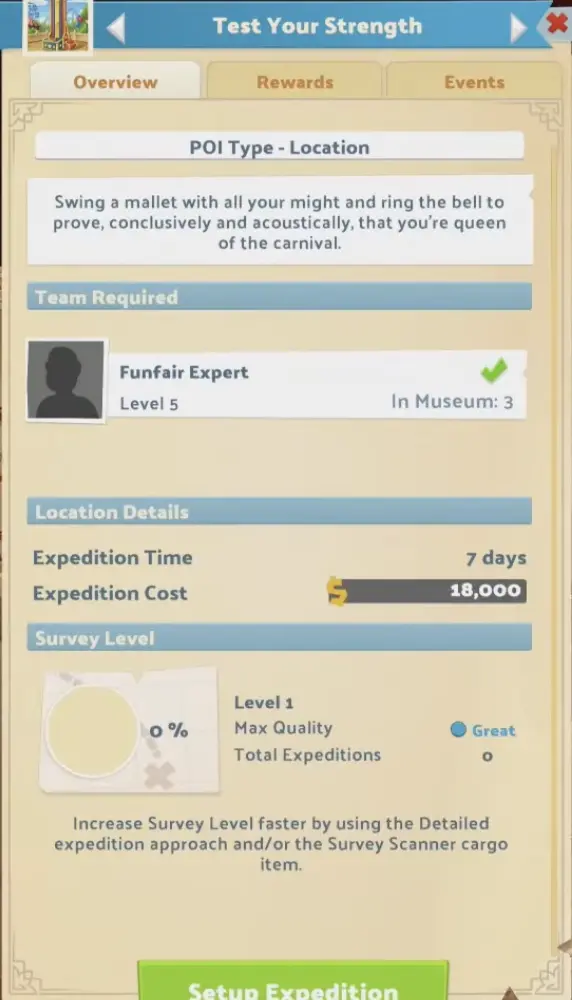
Several lower-level Funfair Experts do not replace the required Level 5 employee.
If you have enough money but cannot launch the expedition, check the expert’s level before doing anything else.
Because this is a Survey location, completing it will not increase your count of Blueprint POIs at Level 2.
Jumbo Arcade — Survey Rewards
Jumbo Arcade requires one Funfair Expert and one Assistant.
Its displayed base expedition lasts 20 days and costs $19,000.
The location has two discoverable items and uses Survey progression.
Visit it when you need its remaining rewards or want to develop its Survey Level.
During a Blueprint-specific objective, prioritize the appropriate Blueprint locations instead.
Speedy, Safe, or Detailed: Which Expedition Should You Choose?
The expedition approach affects travel time, progression, and risk.
For ordinary Survey expeditions, the approaches differ as follows:
- Speedy: Halves the base expedition time, provides no standard Survey Level increase, and introduces helicopter-damage risk.
- Safe: Uses the normal expedition duration and provides 5% Survey Level progress.
- Detailed: Doubles the standard expedition duration and provides 15% Survey Level progress, with an additional exhibit-quality benefit.
The percentages describe the normal Survey progression values before applicable modifiers.
Use Detailed When Survey Progress Matters
A Detailed expedition provides more Survey progress per visit.
For a location whose base duration is 20 days, that means committing the team for a longer period in exchange for more progress from one trip.
This can save repeated expedition setups, but it also keeps your helicopter and required employees unavailable for longer.
Check whether the additional Survey progress is worth that commitment before selecting it.
Use Speedy When the Return Time Matters More
Speedy reduces travel time but sacrifices normal Survey progression.
It is useful when you value a faster return more than developing the destination’s Survey Level.
However, the helicopter-damage risk means it is not automatically the lowest-cost choice.
A faster trip that returns with a damaged helicopter may create additional problems before the next expedition can depart.
Blueprint Expeditions Need a Separate Check
Do not assume the standard Survey percentages determine every Blueprint upgrade.
For Blueprint POIs, inspect the expedition setup and the destination’s current Blueprint progress.
Your assigned Funfair Experts and their relevant qualifications can affect how efficiently designs are developed. Check the displayed team and expedition effects rather than treating every employee combination as equivalent.
Also confirm whether the next reward requires a particular Blueprint Level or a previously undiscovered quality tier.
These are separate reasons why a desired Blueprint may remain locked.
Staff Qualifications: Why an Unlocked POI Can Still Be Unavailable
Having a POI visible on the map does not guarantee your current team can enter it.
A destination may require:
- A particular number of Funfair Experts.
- An Assistant, Janitor, or another supporting employee.
- A minimum Funfair Expert level.
- A specific qualification or qualification level.
- A campaign unlock or another expedition requirement.
The destination’s Overview panel shows what is missing.
If the employee requirement has a red or incomplete indicator, train or hire someone who meets it before trying again.
Complex Construction Level 3
Some advanced Gearbox destinations require Complex Construction Level 3.
This is a qualification requirement, not a Blueprint Level.
Improving a POI’s design progress cannot substitute for training an employee.
When the required expert is unavailable, develop a Funfair Expert with the listed qualification, then return to the expedition map.
Keep that employee available if the next advanced location also needs the same qualification.
Before assigning an experienced expert to an optional expedition, inspect the destinations you still need to unlock. A specialist can be more valuable for opening the next required POI than for recovering another ordinary reward.
Don’t Confuse Staff Rank With Blueprint Level
Test Your Strength requires a Level 5 Funfair Expert.
Other destinations may require a named qualification.
Neither is the same as raising a POI’s Blueprint Level.
If an expedition refuses to launch, inspect the staff requirement first. If it launches normally but the desired Blueprint remains unavailable, check the Blueprint reward progression instead.
That distinction prevents unnecessary training and repeated expeditions to the wrong location.
Gearbox Gate Key — Opening the Advanced Map
The later Gearbox areas are initially inaccessible.
The Gearbox Gate Key becomes available through the Riquetti Gardens campaign after the earlier progression milestones.
Once the Key is obtained, return to Gearbox Fairgrounds and use it to advance through the locked gate route.
Continuing to revisit ordinary early POIs will not replace this requirement.
For the campaign objectives leading to the Gate Key, follow the Riquetti Gardens walkthrough.
Unlock 20 Gearbox POIs
A later objective requires 20 Gearbox Fairgrounds POIs unlocked.
If your available map stops expanding before you reach that number, check the locked area’s requirements.
There are several possible blockers:
- The Gearbox Gate Key or associated campaign progression is incomplete.
- A POI requires a specific staff qualification.
- Another accessible destination has not yet been unlocked.
- The location has an additional requirement displayed in its Overview.
A high Survey Level at one location does not unlock every neighboring POI automatically.
Open the blocked destination and identify the exact unmet condition before deciding which expedition to run next.
Tomorrow Town — Staff, Cost, and Unlock Progression
Tomorrow Town is one of the advanced Gearbox destinations.
Its Overview panel shows:
- 2 Funfair Experts
- 1 Assistant
- 34-day expedition
- $37,000 expedition cost
- 5 discoverable items
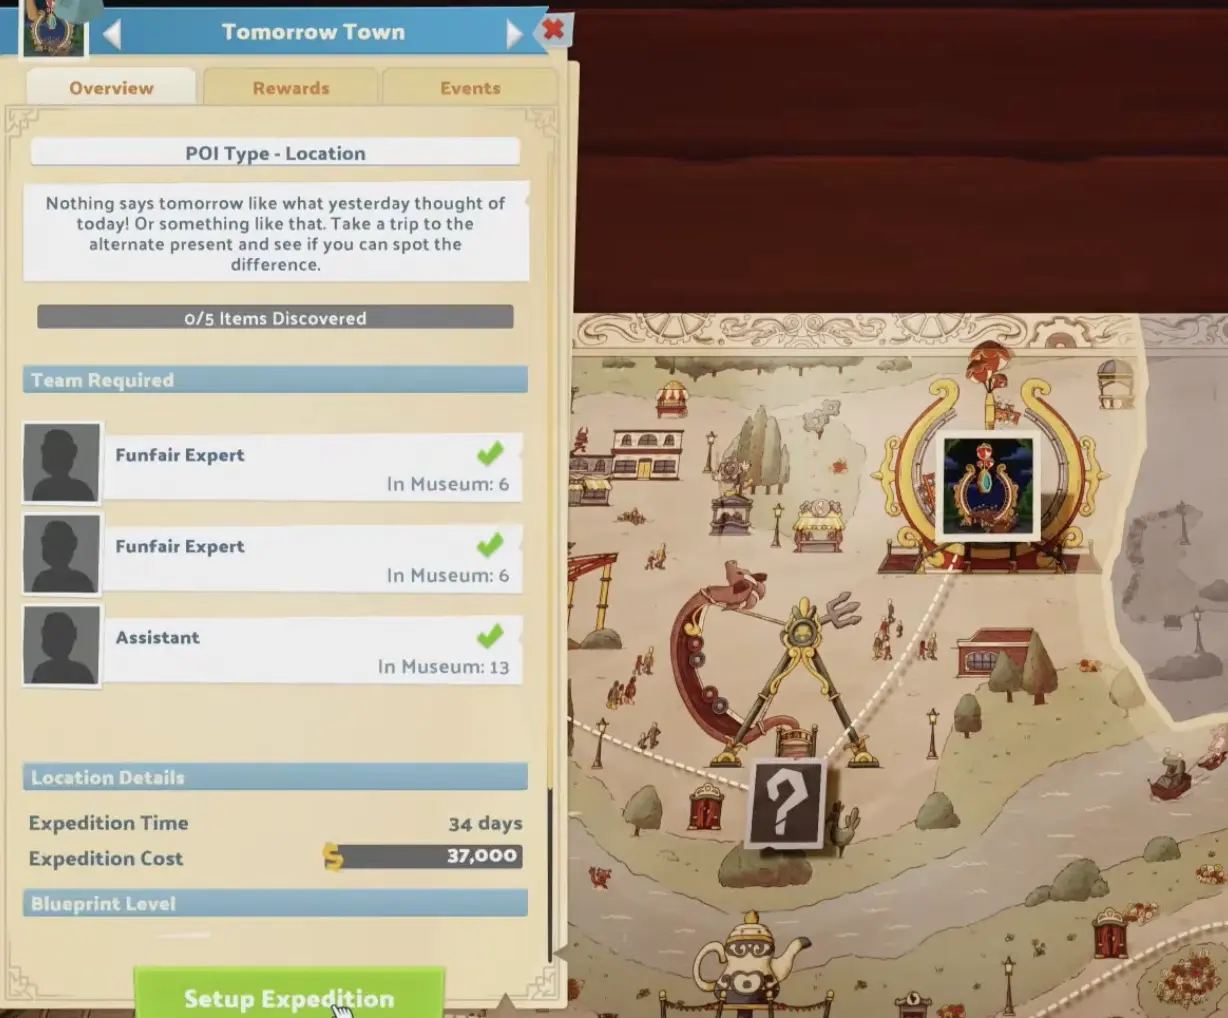
Tomorrow Town is more expensive than the earlier locations listed above, and it commits three employees for over a month at the displayed base duration.
Prepare the museum before launching.
If your only two Funfair Experts are needed to complete a major attraction or perform restoration, finish that work first. Otherwise, you may recover a useful reward only to find that the museum’s construction has stopped while the team is away.
The five-item count also should not be mistaken for five guaranteed ride Blueprints. Inspect the Rewards panel to see which items remain available and what conditions govern them.
Tomorrow Town and the Later Inventions
The advanced Gearbox progression opens access to additional designs, including Cyber Cyclone and the route toward Reason’s Edge.
The designs are separate rewards. Reaching Tomorrow Town does not mean that every late-game attraction has already been recovered.
After completing an expedition, review the newly available destinations and reward slots before committing to the next trip.
A large cash reserve is helpful, but recovering the required design and having a qualified expedition team are still necessary.
Reason’s Edge and the Invention Centre
The final stages of the Gearbox expedition map are associated with Angus Gearbox’s advanced inventions.
Reason’s Edge is a major late-game Funfair attraction. Its Blueprint must be recovered through the advanced expedition progression before it can be constructed at Riquetti Gardens.
The Invention Centre is another important destination. Its storyline involves finding Angus Gearbox, who must then be displayed at the museum.
These are distinct rewards and objectives.
If you’ve recovered a late-game ride design but the Angus Gearbox objective remains incomplete, check the Invention Centre expedition rather than constructing another copy of the same attraction.
If Reason’s Edge is still unavailable in the construction menu, inspect the remaining advanced Gearbox rewards and their unlock requirements.
Once the necessary items have been recovered, the Riquetti Gardens five-star walkthrough covers the corresponding construction and museum completion objectives.
When to Return for More Blueprints and Perks
Not every remaining Gearbox reward is equally useful to your current museum.
Before spending money on a repeat expedition, inspect the available rewards and decide whether the next visit will provide something you need now.
Three situations are worth distinguishing:
- You need a new attraction: Prioritize the POI associated with its missing Blueprint.
- You need a better version of an existing design: Develop the relevant POI’s Blueprint Level and collect the required quality versions in sequence.
- You want a particular Perk: Check whether the location still has that reward available before assigning another team.
A POI can offer multiple Perks or Blueprint rewards. Completing one expedition does not guarantee that the specific item you want will be returned immediately.
The reward decision also affects whether a trip should happen now or later.
If your museum currently lacks the required Blueprint for its next objective, recovering that design takes priority over an optional decoration. If your rides are already operating and your museum is financially stable, returning for useful Perks becomes more attractive.
Perks installed on an attraction can be lost if you sell or delete that ride, so recover and install expensive improvements on attractions you intend to keep.
The Roller Coaster walkthrough covers Perk installation, ride upgrades, and their effect on operating attractions.