Star Wars Galactic Racer Trophy Guide: 50 Trophies & Roadmap
Earn all 50 PS5 trophies or 49 PC achievements with a clear route through Champion Act 3, Galactic Gauntlet wins, and 50 Arcade Gold times.
Updated:
Quick Answer
Finish the Campaign once, but win a Galactic Gauntlet with Clandestine Aid equipped during Act 2 before moving on. It cannot be equipped in Act 3, so missing that win means returning to Act 2 later.
For the Platinum or PC 100%, clear Act 3 on Champion, earn 50 Arcade Gold times, and finish the Gauntlet wins required for each Favor, Racer Style, and speeder type.
Platinum Trophy Overview
PS5 has 50 trophies: 1 Platinum, 1 Gold, 10 Silver, and 38 Bronze. PC has 49 achievements with the same non-Platinum requirements. The tracker below covers these 49 shared goals; on PS5, earning the other trophies also unlocks Galactic Champion (Platinum).
The longest parts of the completion are typically Arcade Gold, Gauntlet combinations, and Rival / collection progress. You can return for the Act 2 Clandestine Aid victory if you missed it, but that means another Campaign run rather than an instant cleanup.
Best Order for the Platinum or 100%
1. Finish the Campaign and Secure the Act 2 Favor Win
Play through the three Campaign acts and make natural progress on Sidebets, Rivals, Backer ratings, Pre-Race Checks, and vehicle unlocks. You do not need to buy every Part or complete every Racer Style challenge on your first Tour.
When Clandestine Aid becomes available in Act 2, equip it and win that act’s Galactic Gauntlet before moving on. This avoids repeating earlier Campaign progression just for United by a Beautiful Dream.
For the Stadium Showdown, League Tokens, and final Championship route, follow the Campaign Guide.
2. Return to Act 3 on Champion
After the first Campaign clear, select Act 3 on Champion and defeat Kestar Bool in the Galactic League Championship for Racer of Legend. A full second playthrough of Acts 1 and 2 is not necessary.
Prioritize keeping the Tour alive over optional first-place finishes. The detailed Champion advice below covers crash limits and safer route choices.
3. Use Replays for Gauntlet Wins and Collections
Before each Gauntlet, check which Favor, Racer Style, and speeder type still needs a victory. A well-chosen combination can move several achievements forward in one Tour. Use other runs for Rival Head-to-Heads, Excellent Backer ratings, Abilities, and the expensive garage requirements.
If keeping a competitive vehicle alive is the obstacle, see the Best Builds and Upgrades Guide.
4. Finish Arcade Gold and Individual Challenges
Big Mystery Racer requires Gold in all 50 base-game Arcade time trials. Clean up the specialized Racer Style, Part, boost, and Scenario requirements after you have enough unlocks to attempt them deliberately.
For the 12 Tales of Podracing events, follow the Tales of Podracing Guide rather than mixing that separate sequence into Arcade or Campaign runs.
All 49 Achievements and 50 PS5 Trophies
Star Wars Galactic Racer Achievement Tracker
Check off finished trophies. Open a category to view the ones still missing.
No achievements match your filters.
Campaign & Rivals 18 remaining 0 / 18
Vehicle & Parts 23 remaining 0 / 23
Arcade & Gauntlet 8 remaining 0 / 8
Progress saves in this browser on this device. Use Completed to undo a checked item.
How to Beat Act 3 on Champion (Racer of Legend)
Disqualified! comes from the earlier Stadium Showdown, while Shade! Shade! Shade! comes from the standard Galactic League Championship. Racer of Legend requires winning the latter Championship on Champion difficulty.
Champion difficulty unlocks after the first complete Campaign clear. Start Act 3 on Champion and build around finishing the Tour consistently rather than maximizing speed immediately. The biggest change is crash pressure: mistakes now carry forward between events until a new planet restores the available crashes.
That makes a few choices especially useful:
- favor safer event types when the map offers them;
- avoid unnecessary contact when a podium result is already sufficient;
- use extra-crash effects when available;
- do not enter another event with a damaged setup simply because the route is shorter;
- keep enough pace in reserve for Kestar rather than risking the entire Tour on optional events.
The final requirement is still the same race: defeat Kestar Bool in the Galactic League Championship.
Do Clandestine Aid’s Gauntlet Win in Act 2
United by a Beautiful Dream asks for a Galactic Gauntlet victory with every Favor.
Clandestine Aid creates the one timing problem in that set because it can be equipped in Act 2 but not Act 3.
Once the Favor is unlocked:
- equip Clandestine Aid during Act 2;
- continue until the Galactic Gauntlet;
- win the Gauntlet with it equipped;
- only then move on to the remaining Campaign progression.
The other Favor wins can be distributed across later Act 2 and Act 3 runs.
This one decision prevents an otherwise unnecessary return through the earlier Campaign acts.
Clean Sweep Is Easiest on a Controlled Act 1 Tour
Clean Sweep requires every relevant event result in one Campaign Tour to succeed.
For Standard and Eliminator races, stay in 1st, 2nd, or 3rd. Field Tests also need to be completed successfully.
Act 1 is the shortest place to make the serious attempt. Routes with Mystery Encounters and Scrap Dealer stops reduce the number of competitive events that have to be cleared, while familiar tracks make conservative podium finishes easier.
There is no benefit in risking first place once second or third already preserves the trophy attempt.
Six Eliminators Depends on the Tour Map
That’s How You Win Championships requires top-three finishes in 6 Eliminator Races within one Campaign Tour.
The six results cannot be accumulated across several Tours, so first inspect the route and make sure enough Eliminators are available.
If the current map does not provide six viable Eliminators, do not force the attempt. Campaign events change between runs, and later Tours provide more opportunities.
A Kestar Mystery Encounter can also alter the Tour by converting Standard Races into Eliminators, which can turn an otherwise unsuitable map into a workable six-race attempt.
Sidebets Lead Into Rival Progress
Sidebets begin from Act 2 and contribute directly to three achievements:
- Beginner’s Luck — win a Sidebet against the current Rival;
- Gathii vs. Bool — win one against Kestar Bool;
- I’ll Take That Bet — win 10 Sidebets.
They also help feed the Rival system. Repeatedly betting against the same racer during a planet can contribute toward that racer becoming a Rival, eventually opening a Rivalry Head-to-Head.
Because Best of the Best requires defeating every Racer in those Head-to-Head events, spreading bets randomly can slow the longer completion goal. Once a racer is already moving toward Rival status, it is usually more useful to work toward someone still missing.
Track Which Backers Already Gave an Excellent Rating
A Poor or Excellent rating once is enough for Poodoo Racer and Star Racer. Pride of Gathleon is different: you need an Excellent Tour rating from each Backer.
Keep a separate record of the Backers you have already completed so later Campaign runs use someone still missing, rather than repeating a finished rating.
Three Favors and Four Abilities Are Loadout Checks
A Few Good Folks only requires 3 Favors equipped simultaneously.
Four Arms Would Be Useful requires 4 active Abilities equipped simultaneously.
The Crash Ability does not replace one of the four active Ability slots for that requirement.
Once enough Abilities are available, choose new Ability unlocks before repeatedly upgrading the same one if Four Arms Would Be Useful is still missing.
The longer collection requirements are:
- Maybe We Can All Be Friends Someday! — gain every Favor;
- Many Special Treasures — use every Ability;
- Skill, Strategy, and the Will to Rise — unlock every Racer Style.
Those naturally finish later because one missing unlock blocks completion.
The Three Racer Style Challenges Need Different Races
Three achievements pair one Racer Style with a specific action.
Raging Rancor
Use Brawler and score 5 takedowns in one Standard or Eliminator race.
A tightly packed field is more useful than an easy race where the lead immediately stretches out. Stay near enough to create repeated contact opportunities without sacrificing an important Campaign result.
Speed and Violence
Use Tech Expert and hit 5 racers with Ion Bolt in one Standard or Eliminator race.
The limiting factor is access to targets. A race where opponents remain nearby is better than one where Shade pulls far into first and spends the rest of the event with nobody in range.
One Hell of a Thrill
Use Redliner and remain above 550 km/h for 5 seconds in one Standard or Eliminator race.
Use a long, predictable high-speed section rather than trying to hold the threshold through several tight corners.
If heat management is preventing the five-second stretch, the Best Builds and Upgrades Guide covers Ramjet Redline and the effects that change how long the vehicle can stay at speed.
Hunk of Junk: Win With Four Faulty Parts
Hunk of Junk combines two requirements:
- at least 4 Faulty Parts must be installed;
- the event must be won in 1st place.
The Faults can attack exactly the systems needed to win.
One setup gained Thermal Loop and Defective Alarm at the same time. Thermal Loop made the Ramjet generate 100% more heat, while Defective Alarm shortened the Redline window.
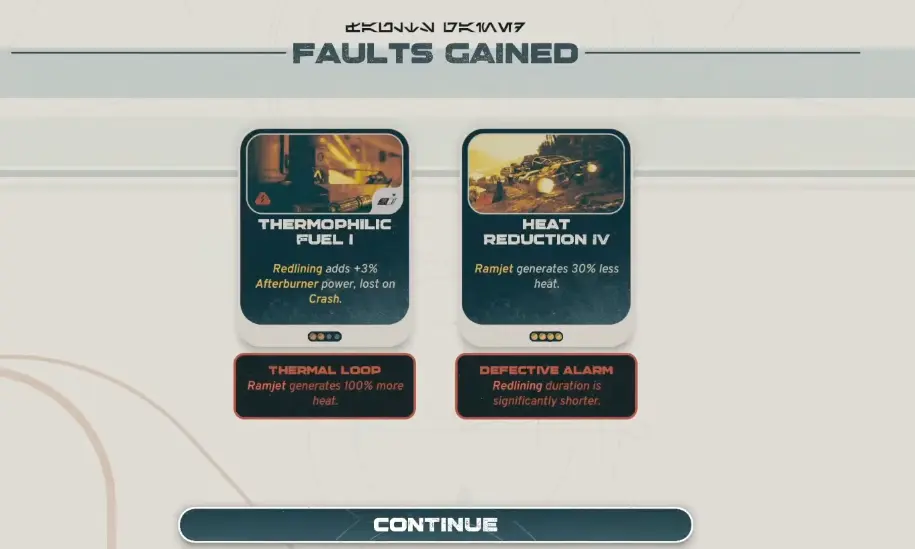
Collect four Faults first, then choose a track where the braking points, shortcuts, hazards, and boost sections are already familiar.
Faulty Parts may remain attached until repaired, so do not build the attempt around the assumption that an inconvenient Fault can always be removed immediately.
Continuous Ramjet, Afterburner, Surge, and Overcharged Challenges
Four achievements require one sustained vehicle state:
- Punch it, Shade! — Ramjet for 60 seconds;
- Very Fast, Very Dangerous — Afterburner for 60 seconds;
- The Most Dangerous Racing in the Galaxy — Overcharged for 40 seconds;
- Speed is Dangerous, Embrace it Anyway — Surge for 60 seconds.
Several short activations are not a substitute for one uninterrupted stretch.
Choose a course and build that can maintain the required state without constant braking, crashes, or forced deactivation.
The two Ramjet achievements want opposite results:
- Punch it, Shade! requires keeping Ramjet active for 60 seconds;
- Risk, No Reward requires overheating until the vehicle explodes.
Treat those as separate attempts.
Save the Expensive Garage Requirements Until Credits Build Up
Several garage achievements are easier once repeated Tours have produced a larger inventory and Credit reserve.
The Fastest Ever Built requires 4 Legendary Parts installed simultaneously.
The Real Soul of Racing requires 2 Upgrades at maximum level during one Tour.
Record-Setting Pit Droid Team requires one Ability at maximum level.
Abilities can be upgraded to level 3, so obtaining two upgrades for one already unlocked Ability completes that requirement.
The two shop buyouts are:
- Might as Well Buy a New Speeder — buy every available Part at Hibi’s Shop in one visit;
- Treasures, Treasures! — buy every available Part at the Scrap Dealer in one visit.
Enter those shops with enough Credits to clear the full available selection rather than buying most of it and leaving one expensive Part behind.
Arcade Has One Easy Trophy and One of the Longest Challenges
Friendly Exhibition Race requires only one Arcade Gold time.
Start with a track and vehicle already understood. One clean Gold is enough.
Big Mystery Racer is very different: it requires 50 Gold times. The base game contains 50 Arcade time trials, so this becomes a full Gold-clear challenge rather than a partial medal collection.
When a Gold attempt misses by only a few seconds, fix the route before rebuilding the vehicle:
- use the shortcut consistently;
- remove crashes;
- improve landings;
- avoid unnecessary braking;
- manage Ramjet heat before the fastest section;
- change one setup variable at a time.
A single collision can cost more time than a minor performance increase can recover.
Racing Glory Only Needs One Scenario
Racing Glory requires one successful Scenario.
There is no requirement to clear every Scenario for this achievement.
Galactic Gauntlet Is the Main Campaign Cleanup Grind
Three Silver trophies require repeated Galactic Gauntlet wins:
I Can Fly Anything
- win with each speeder type.
Racing Master
- win with each Racer Style.
United by a Beautiful Dream
- win with each Favor.
Use a different unfinished Racer Style and Favor combination whenever possible so one Gauntlet victory advances more than one set.
Act 2 and Act 3 both contain a Galactic Gauntlet shortly before their final event. For repeated cleanup, Act 2 can be useful because the Gauntlet can be cleared and the final Kestar race deliberately lost, sending the run back without requiring another complete Campaign restart.
If you already handled Clandestine Aid in Act 2, focus these repeat runs on combinations you have not won with yet.