Build a working ship in Isles of Abyss, improve speed and handling, fix sails and anchors, manage onboard facilities, and position cannons for naval combat.
Unlock Gear Tiers, choose between Tech Point spending and research, and solve missing blueprints, Weapon Bodies, and crafting requirements in Isles of Abyss.
Start in Fragrant Cape, accept any useful V’s Commissions, and follow the main quest until your first warship is ready. Prepare for Sunken Oath before sailing into Reefshadow Bay, and check the regional weather indicator before gathering resources in a Haywire Zone.
In Isles of Abyss, choosing the next destination matters as much as the equipment you bring. Fragrant Cape supplies the materials needed for the opening ship objectives, while Sunken Oath leads into Reefshadow Bay and its mist-covered investigation. Farther out, the Haywire regions change both the dangers you face and the resources worth collecting, so a successful voyage begins with checking the current quest and weather conditions.
Where Should You Go First in Isles of Abyss?
Your first objective is to establish a working ship and advance the main story through Sunken Oath.
Fragrant Cape is the starting area. Its beaches, ruins, and abandoned vessels provide opportunities to gather basic construction materials and supplies without first dealing with one of the four regional Haywire weather conditions.
Build a functional vessel before spending heavily on its appearance. A steering wheel, working propulsion, anchor, and accessible deck equipment matter more than extra rooms during the first voyage. Once the ship moves and turns reliably, prepare its cannon and ammunition for the initial tower challenge.
If your vessel remains stationary, check the anchor, sail, and propulsion setup in the Ship Building instructions before adding more structures.
Once your warship is ready, complete Sunken Oath and collect the reward at the tower’s base. This opens Tier II Gear Crafting and allows the investigation to continue toward Reefshadow Bay.
For the tentacle attacks, exposed weak points, and reward collection, follow the Calamity Tower guide.
Afterward, follow the main quest toward Deepwind Shipping Company, where Malla and Ran become central to the next investigation. The story continues through Mist of Deceit preparation, the Voyager’s Journal, Gray Rock Mine Ruins, and a second tower called Long Lament.
The main quest walkthrough follows those tasks in order, including the points where defeating an enemy is not enough to advance without collecting or delivering the required item.
Why Does a Level 50 Character Still Have Locked Equipment?
Starting at Level 50 does not unlock every equipment tier. Check the requirement displayed by your locked item before spending resources; the Tech Progression guide explains Gear Tier restrictions, research unlocks, and missing crafting components.
How Do You Know When Haywire Weather Is Active?
A Haywire Zone does not remain equally dangerous or equally productive throughout every visit.
Check the current zone’s weather indicator at the top of the screen before gathering special resources.
A teacup icon on the corresponding weather indicator means the abnormal weather is dormant. When Mist of Deceit becomes active, the game announces that visibility has decreased and the temperature has dropped. Check the active event’s countdown to plan your exploration.
Mist of Deceit has started. Check the weather indicator and countdown before entering the affected area.
This changes how you should plan a resource trip.
When you need ordinary supplies, a dormant period is often easier to explore because you can avoid some of the environmental pressure. When you need resources produced by active Haywire weather, arriving during the dormant period may leave you searching for items that are not currently appearing.
Check the gauge before leaving your ship, particularly when traveling to a region specifically for its weather-related materials.
Do not spend your entire stock of protective consumables during calm weather just because the area is normally associated with a particular hazard. Save them for the conditions in which they are needed.
What Should You Bring to Each Haywire Zone?
Four major regions have different survival conditions, protective items, and gathering opportunities. The equipment that works well in one can be inadequate in another.
Reefshadow Bay — Mist of Deceit
Active Mist of Deceit reduces visibility and lowers the surrounding temperature. Your field of view also becomes smaller as HP decreases, making it harder to navigate or escape enemies when injured.
Bring a Blaze Core Lantern or other appropriate mist protection. During active weather, Mist Core Grass provides Mist of Deceit Wicks, which become useful for later cannonball preparation.
The main quest walkthrough follows the Lantern preparation, Wicks gathering opportunity, and investigation with Malla and Ran.
Misty Marsh — Black Tide
After Long Lament, the story points toward Misty Marsh.
Black Tide increases Stardust contamination and creates additional pressure on Sanity. The more time you spend gathering in contaminated areas, the more important it becomes to monitor your remaining protection and Sanity.
A Black Tide Protective Mask helps slow Sanity loss while its effect is active. It consumes durability, so it is not a permanent solution to the region’s hazards.
One important resource here is Black Tide Clots.
These can be collected from contaminated black water near Sporocysts, but gathering them consumes Sanity. The amount obtained also depends on your condition: higher remaining Sanity allows you to collect more Clots.
That creates a real gathering decision. Entering with depleted Sanity means accepting the resource cost while receiving less from the same opportunity. Restore Sanity and prepare your protection before starting a concentrated gathering trip.
Black Tide Clots are used for diving equipment and water-related facilities. The area also introduces Stardust Ore and contaminated plants, so it can be useful for more than the next story objective.
Spring Valley — Time Rain
Time Rain changes both survival consumption and production.
During the event, Energy and Hydration deplete faster, while items and equipment in your backpack continuously lose durability. Carrying extra equipment does not protect it from that effect.
The available countermeasures have different trade-offs:
Time-Reverse Cookies protect your body from the accelerated Energy and Hydration consumption for a limited period.
Time-Reverse Raincoat protects against Time Rain effects, but slightly reduces Movement Speed and consumes durability.
For a short expedition, the Cookies may be sufficient when your main concern is the immediate consumption penalty. On a longer gathering trip, the Raincoat can provide broader protection, although you must account for its movement and durability costs.
Time Rain also has a useful side effect: it accelerates crop and animal growth.
Defeating enemies or harvesting crops during the rain can produce Bottled Raindrops, which are used in water production, farming, and breeding facilities.
A trip to Spring Valley can therefore serve two purposes. Go prepared to withstand the accelerated consumption, then take advantage of the active weather when you specifically need Bottled Raindrops or faster production.
Falling Ember — Skyfire
Falling Ember is affected by Skyfire, a weather event that brings extreme heat and falling meteors.
Meteor impacts can damage nearby players and structures while increasing the temperature around the impact site. The hazard is particularly serious when your ship or other buildings are nearby.
Bring heat protection and pay attention to incoming impacts rather than relying on armor alone. A Cooling Patch can help manage overheating, while food that improves heat resistance can reduce environmental pressure.
The resource worth targeting is Skyfire Gold.
After a meteor falls, approach the impact site when it is safe and mine the meteor for Skyfire Gold and other rare minerals. Larger meteors are harder to mine and can spawn Deviant enemies guarding them.
Skyfire Gold has uses in advanced ship structures and automated gathering equipment.
There is also a practical benefit to removing an impact deposit: the surrounding temperature returns to normal once the meteor has been mined.
A meteor strike is therefore both a hazard and a possible resource opportunity. Clear dangerous enemies, avoid further impacts, and collect the material when you can finish mining without exhausting your supplies.
How Can You Find Resources Without Searching Every Island?
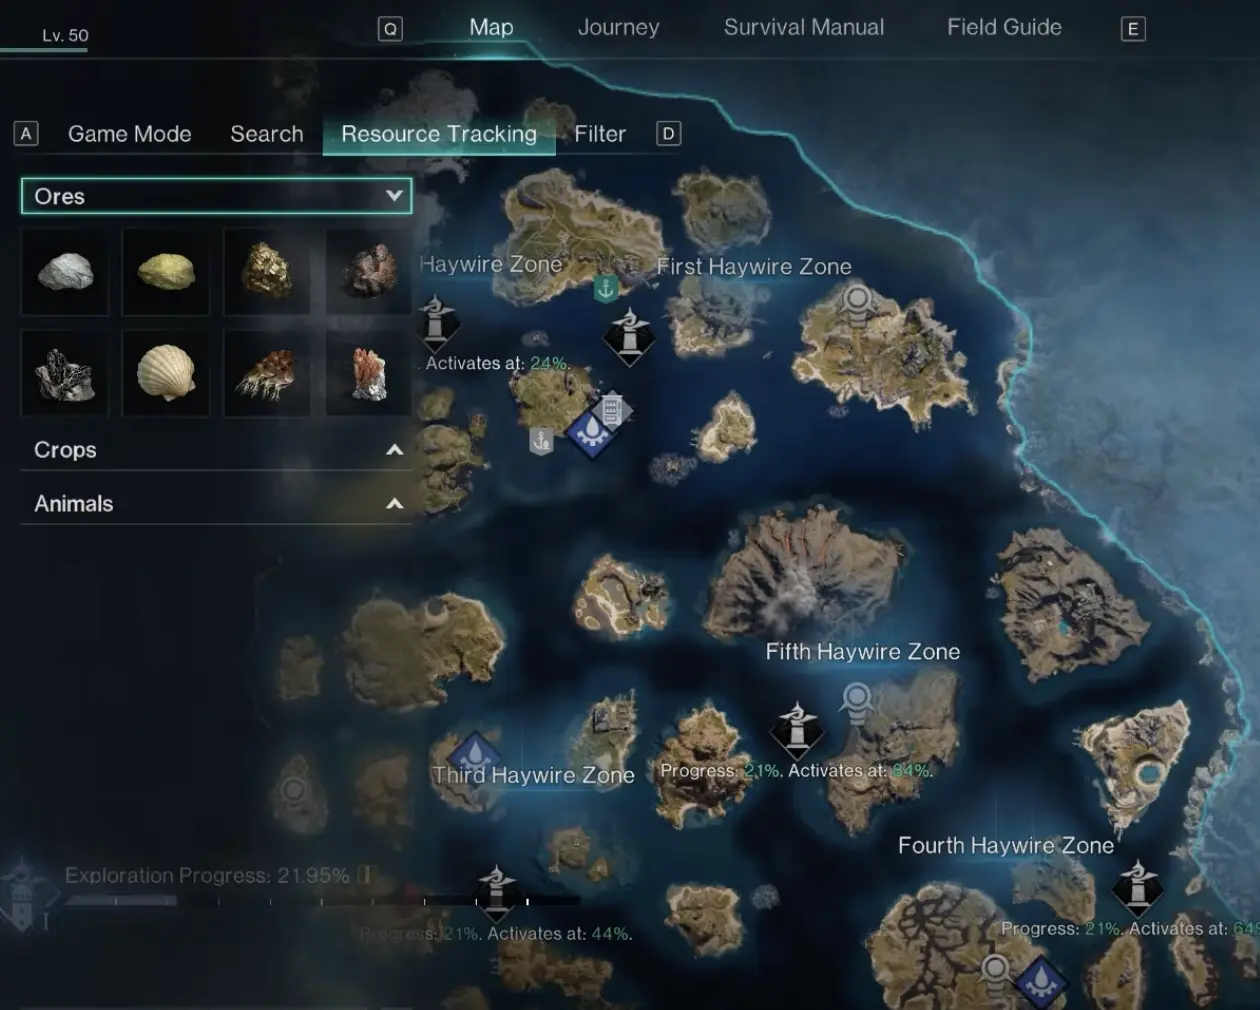
Use the world map’s resource filters before choosing your destination.
The Isles of Abyss map can help locate different categories of resources, including ores, plants, and animals. This becomes increasingly useful once an equipment recipe requires something that is not available in your current region.
For example, Coral Ore is associated with ocean-related crafting, but sailing randomly between islands is an inefficient way to look for it.
Open the map and check the relevant resource information. Narrow the search to the material category you need, then choose a nearby area that fits your current equipment and weather protection.
Open Resource Tracking on the world map to find resource categories before choosing an island to explore.
The map can also help identify locations containing recoverable facilities and equipment.
That is useful when you are considering spending Tech Points to unlock a facility. Some finished products can be found through exploration and reverse-engineered instead of being purchased directly through the Tech Tree.
Before sailing to a distant location for one resource, check whether it also contains materials or equipment you need for your next upgrade. Combining objectives can save repeated crossings, particularly while your ship is still slow.
What Should You Pick Up Along the Coast?
Ordinary-looking beaches can contain useful gathering opportunities that are easy to pass while concentrating on larger settlements.
Look for three types of signs:
Small holes in the sand, where tidal creatures or buried supplies may be found.
Bubbling spots in shallow water, indicating something worth investigating below the surface.
Glowing crevices between rocks or reefs, which can conceal collectible materials.
Approach and interact with these points rather than assuming they are only environmental decoration.
Some tidal creatures retreat or escape when disturbed, and gathering can occasionally cause minor injuries. Deal with the interaction promptly instead of leaving the creature to escape while you search your inventory.
Tide Elves and other coastal gathering spots can yield useful supplies. Check the actual rewards before relying on any single beachcombing activity for a particular crafting material.
Why Should You Keep Drift Bottles?
Drift bottles are especially worth checking while beachcombing.
They may contain treasure maps, ship blueprints, letters, or other discoveries. A treasure map can direct you toward underwater ruins or shipwrecks that would otherwise be difficult to locate.
Opening a bottle does not mean you should immediately dive for its treasure. Check the destination and available equipment first. A shallow wreck near your current position is a more manageable target than a deep-water location when you have little oxygen support.
Other coastal items can also have uses that are not obvious from their appearance:
Ocean Trash can be processed into plastic.
Fossils gathered from bones can be used to extract Acid.
Sulfur Water from hot springs can be refined into Sulfur.
Oysters have a chance to yield Pearls and other materials.
Pirate Coins and Ambergris can be used for trading at the beachcombing shop.
Before discarding unfamiliar ocean materials to make room for ordinary building supplies, inspect what they can produce or whether a merchant accepts them.
How Do You Explore Underwater Wrecks Safely?
Underwater exploration can provide equipment, treasure, and resources unavailable from ordinary island gathering. The risk increases with depth and distance from the surface.
Start with accessible shallow-water wrecks before committing to deeper ruins.
A Basic Diving Suit provides some protection against ocean contamination. Better diving equipment becomes useful when the route involves more contaminated water or longer periods away from the surface.
Check your oxygen supply before descending. An Oxygen Tank can replenish oxygen when it runs out, while an Inflatable Float provides a way to ascend quickly when the situation becomes dangerous.
There is also a useful natural oxygen opportunity: Bubble Fish produce bubbles that can replenish your oxygen while diving.
That makes them worth noticing during a longer search, but they should not replace a planned return route.
How Do You Recognize an Underwater Laboratory?
Watch the sea surface for glowing floating algae. These can indicate an underwater laboratory or another submerged location worth investigating.
Before descending, identify where you expect to return to the surface and whether you have enough oxygen to search the area.
Deeper sites can have higher contamination and more dangerous creatures. Avoid entering a long corridor or submerged structure simply because you have found an entrance; make sure the return trip remains manageable.
Jellyfish can also discharge electricity when approached, so swimming directly through a group may turn an ordinary search into an emergency.
If you are looking for equipment or special treasure, prioritize a location that matches your current protection. Clearing a nearby shallow wreck and returning with its materials is better than losing your supplies while searching a deeper site you cannot yet handle.
What Is Heart of the Ocean Used For?
Heart of the Ocean is a valuable resource obtained through activities such as scenario challenges, exploration rewards, and naval encounters.
It has several competing uses:
Opening certain challenge rewards, including rewards associated with Calamity activities.
Exchanging for valuable items at participating NPC shops.
Trading with other players for equipment or resources they are willing to sell.
Possible shop rewards include Legendary Weapon Calibrations, Armor Mod Crates, and Mod Dust.
The important decision is whether you need the currency for an immediate challenge reward or would gain more from exchanging it for equipment that improves your next encounter.
A player who spends every Heart of the Ocean immediately may have to gather more when another desirable reward becomes available.
Check the reward choices and shop stock before committing a large amount. The exchange value depends on which item you need, not simply on which reward looks rare.
Should You Complete V’s Commissions Before Exploring?
Yes, especially when their objectives overlap with activities you are already planning to do.
Isles of Abyss starts at Level 50, so ordinary character leveling is not the main reason to accept V’s Commissions. Their additional rewards, particularly Energy Links, remain useful.
Check the available commissions before setting out for a settlement, resource trip, or main quest objective. You may already be planning to gather materials, explore a location, or complete an activity that contributes toward a commission.
Accepting the relevant task in advance lets you make progress during the journey rather than having to repeat the same activity afterward.
This does not mean changing your entire route to finish every commission immediately. Prioritize objectives that naturally match your current destination and equipment.
The same principle applies to optional island exploration. A short stop that provides resources, a commission reward, and a useful facility can justify the detour. A distant objective offering only a small reward may be better left until your next trip through that region.
When Should You Challenge a Calamity Nest?
Check the Nest’s Combat Level, Recommended Gear, and Partial Reward Preview on the world map before attempting it.
A Nest is worth challenging when your equipment is suitable for its difficulty and its available rewards justify the ammunition and healing supplies you expect to use. Completing an early encounter can be useful, but there is no reason to force a more difficult Nest while your equipment is still holding you back.
The Calamity Nest guide covers the protection objectives, Calamity Owl fight, and the conditions needed to finish an encounter.