Lost Castle 2 Boss Guide
A practical Lost Castle 2 boss guide covering boss order, Ghost of the Knight, Goblin Champion, Forest Guardian, Wandering Knight, Demon Lord, cursed areas, Nightmare bosses, builds, and alchemy.
Updated:

Quick Answer
To beat Lost Castle 2 bosses, learn the attack window first, then check the build. Early bosses like Goblin Champion, Forest Guardian, and Wandering Knight punish bad dodges and greedy combos. Later gates like Steward the Demon Sealer, Demon Lord, Nightmare bosses, and Mage Tower bosses punish unfocused builds, weak boss damage, no defense, and wasted alchemy.
Boss Types in Lost Castle 2
Not every hard fight should be treated the same way.
Lost Castle 2 has normal area bosses, hidden bosses, elite fights, cursed-area bosses, route-gate bosses, and late-game Nightmare or Mage Tower bosses. The mistake is using one plan for all of them.
| Fight type | What it means | How to approach it |
|---|---|---|
| Elite fight | Harder room enemy or short challenge fight | Spend fewer resources unless the reward is important |
| Cursed-area boss | Higher-risk route with a curse penalty | Take it when the reward can improve the run and you can cleanse afterward |
| Area boss | Main boss for a zone | Learn 1-2 key attack patterns and bring enough boss damage |
| Hidden boss | Boss tied to hidden route or achievement | Track the area and do not assume every run shows the same fight |
| Route-gate boss | Boss that opens major progression | Save alchemy and do not enter with a random build |
| Nightmare / Mage Tower boss | Endgame build check | Prepare the entire run, not only the boss room |
Boss Route and Area Order
Use this as a practical map, not a full bestiary. The goal is to understand where boss pressure begins to increase.
| Route stage | Bosses or boss achievements to watch for | Main pressure |
|---|---|---|
| Opening / early learning | Ghost of the Knight | Basic dodge, short punish windows |
| Black Forest | Mad Gardener, Goblin Champion, Forest Guardian | First real boss pattern checks |
| Ruined / Abandoned Cemetery | Mutated Priest, Last Guardian, Eugene and Bobby | More projectiles, poison, and double-pressure fights |
| Crystal Mountain | Angry Thunder Spirit, Behemoth, Crystal Devourer | Wider attacks, elemental pressure, bigger arenas |
| Castle Bridge | Wandering Knight, Nightmare Maid | Dodge direction and timing checks |
| Black Castle | Steward the Demon Sealer, Demon Lord route | Major progression gate before deeper systems |
| v1.0 branch routes | Frozen Cave, Mudfish Swamp, Saltpeter Desert, Castle Dungeon bosses | More route planning and hidden progression |
| Mage Tower / Nightmare routes | Source of the Nightmare, Lord Alfred, Deceitful Chaos God | Endgame build and route checks |
Quick Boss Checklist
Use this before any serious boss route.
| Check | What it means |
|---|---|
| Do I know the boss’s main dodge direction? | Sideways, vertical, away from range, or around an indicator |
| Can I punish safely? | One short combo is better than losing HP for one extra hit |
| Does my weapon fit the fight? | Slow weapons need clear recovery windows; ranged weapons need space |
| Do I have boss damage? | Low damage turns every fight into a long mistake test |
| Do I have one safety layer? | Shield, recovery, alchemy, defense, or spacing |
| Are my treasures helping the boss fight? | Room-clear effects may not help single-target bosses |
| Is alchemy saved? | Enter with at least one answer for the dangerous phase |
| Is this a progression run or cleanup run? | Do not mix five goals into one boss attempt |
| Can I skip this route? | Elite or cursed routes are optional if the run is already weak |
Ghost of the Knight: Learn the Basic Rhythm
The opening boss check is useful because it teaches the core boss habit: dodge first, punish after.
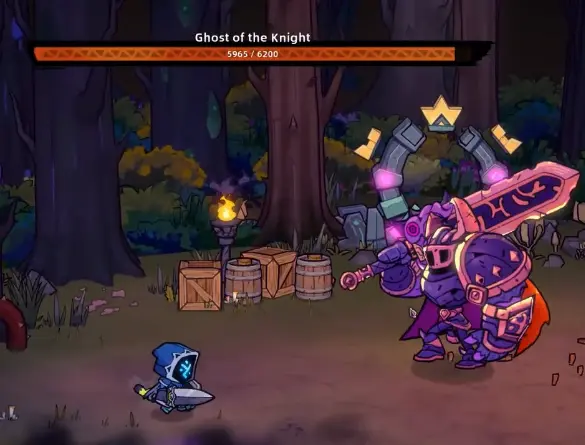
| Pattern | What to do |
|---|---|
| Large weapon swing | Dodge first, punish only after the swing finishes |
| Close-range pressure | Do not stand in front after your first hit |
| Short recovery window | Use one short combo or one weapon skill, then reset |
| Low health greed | Do not throw the run away for the last few hits |
Goblin Champion: Dodge the Stomp and Jump Pressure
Goblin Champion is one of the first hidden boss checks in the Black Forest route.
He punishes players who stand where they were a second ago. Do not try to tank the stomp pattern just because he looks slow.
| Goblin Champion pattern | Response |
|---|---|
| Double stomp toward your last position | Roll sideways or run outside the attack range before the second hit |
| Jump attack | Move early, do not wait until he lands on you |
| Slow recovery after heavy movement | Take a short punish window, then leave |
| Close-range body pressure | Do not stay under him after attacking |
| Summon or ranged build | Let summons or projectiles work while you keep the arena readable |
Forest Guardian: Watch the Jump and Ground Indicators
Forest Guardian is not only a damage check. It tests whether you can read warning movement and ground pressure at the same time.
The key is not to backpedal in a straight line forever. Move based on the attack.
| Forest Guardian pattern | Response |
|---|---|
| Jump warning | Roll sideways instead of straight backward |
| Root or ground indicator | Move vertically out of the threatened lane |
| Arena control | Keep enough space to see the next indicator |
| After big attacks | Punish briefly, then reset before the next root or jump |
| Poison or survival pressure | Bring defensive treasures or recovery if your route is already fragile |
Wandering Knight: Dodge Up or Down, Not Through Him
Wandering Knight is a major Castle Bridge check because his size makes bad dodges expensive.
Trying to roll through him can get you trapped inside the boss body or clipped by follow-up pressure. The safer answer is often to dodge up or down away from his path.

| Wandering Knight pattern | Response |
|---|---|
| Huge forward pressure | Do not roll through his body; dodge up or down |
| Wide heavy swings | Wait for the swing to finish before attacking |
| Long boss body | Keep diagonal escape space instead of standing at his centerline |
| Short damage window | Hit once or twice, then leave |
| Ranged or summon build | Stay off the centerline and let damage continue while you reposition |
Cursed-Area Bosses: Risk, Reward, and Cleansing
Cursed areas are not beginner traps by default. They are risk-reward routes.
The reward can be strong enough to justify the curse, but only if your build can beat the area boss without losing the run. If the route gives you a cleansing or healing fountain afterward, use it before continuing.
| Situation | Should you take the cursed area? |
|---|---|
| Build is strong and healthy | Usually worth considering |
| Reward can fix your run | Worth the risk if the boss is manageable |
| You have no healing left | Usually skip unless the run is already desperate |
| Boss damage is too low | Skip; the curse can make the fight drag |
| You can cleanse after the boss | Take the reward, then remove the downside before the next route |
| You are chasing a serious Nightmare clear | Only take it if the reward directly helps that clear |
v1.0 Branch Bosses: Frozen Cave, Mudfish Swamp, Desert, and Dungeon
After v1.0, several branch-area bosses become important for achievements and hidden progression. You do not need a full boss encyclopedia before fighting them, but you should know what kind of pressure each route is likely to test.
| Area | Boss / achievement | Rate | What to prepare for |
|---|---|---|---|
| Mudfish Swamp | Frenzy Fishiod Shaman / Party’s Over | 7.6% | Bring room control and do not tunnel on the boss if adds or swamp pressure start filling the arena |
| Mudfish Swamp | Giant Hunterspider Queen / Friendly Neighborhood Spider | 7.5% | Keep movement space and avoid standing in one lane for too long |
| Frozen Cave | Phantom of the Lost Swordsman / Bushido Duel | 7.3% | Treat it like a fast melee duel: short punish windows, no greedy follow-up |
| Frozen Cave | Frost Colossus / Vigil Ends | 7.3% | Expect slower but heavier pressure; bring defense or recovery if your build is fragile |
| Saltpeter Desert | Treasure Anglerfish / Diet Control | 6.4% | Do not chase damage blindly; keep spacing and avoid getting pulled into bad positions |
| Saltpeter Desert | Captain / Boat on Dry Land | 6.3% | Prepare for a direct fight with strong melee pressure and save alchemy for the dangerous phase |
| Castle Dungeon | A Mysterious Shadow / Dungeon Phantom | 6.1% | Expect sudden pressure; keep one safety tool ready instead of spending everything early |
| Castle Dungeon | Warden / Saw Madness | 6.0% | Prioritize positioning and survival. Dungeon bosses punish players who arrive with no healing left |
Steward the Demon Sealer and Demon Lord
The Demon Lord route is not one normal boss with a bigger health bar. It is a two-step progression gate: first Steward the Demon Sealer, then The Demon Lord of Destruction.
The Steward phase tests patience because he can shield, speed up, and punish players who keep attacking into bad windows. The Demon Lord phase changes the fight into a target-selection check, where you need to hit exposed hands or the head instead of blindly attacking the center.

| Steward pattern | What to do |
|---|---|
| Shield pressure | Stop dumping burst into him when the shield is active |
| Long waiting stance | Do not panic attack; watch for the next real opening |
| Tired / recovery moment | Use this window for burst, weapon skill, or safe melee hits |
| Speed-up phase | Stop greed attacks and focus on clean dodges |
| Low HP panic | Save at least one alchemy answer before the second stage |
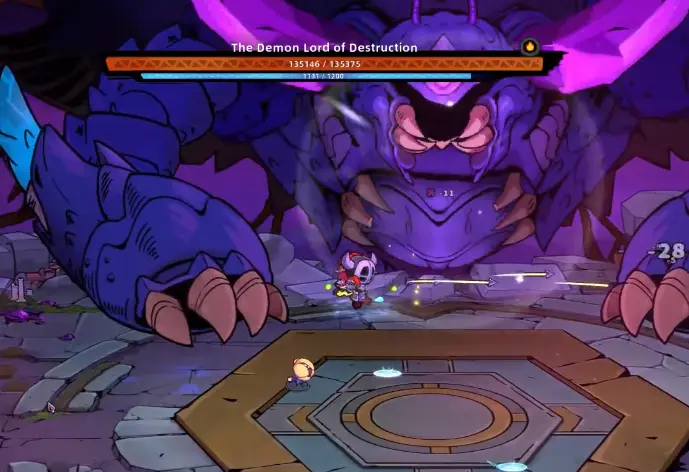
| Demon Lord phase problem | What to do |
|---|---|
| Huge body fills the arena | Do not stand still at the centerline; keep escape space |
| Hands become targetable | Move close enough to hit the hand, then leave before the next hit |
| Head window appears | Use burst or weapon skill only if you can safely reach the window |
| Ranged aim feels awkward | Reposition instead of firing into bad angles |
| You are almost out of health | Use alchemy before the next pattern, not after panic starts |
| Boss is nearly dead | Do not get greedy; this is where many runs throw the clear |
What Unlocks After Demon Lord
After the Demon Lord route, you receive the Fragment of the Demon Lord, and Ethereal Nightmare opens as the next major progression layer.
| After Demon Lord | Next step |
|---|---|
| Ethereal Nightmare unlocks | Talk to Nia and learn Nightmare effects |
| Bosses become build checks | Stop relying on random weapon drops |
| Nightmare depth matters | Pick effects your build can actually answer |
| Memory Shards come later | Track them once the hidden route begins |
| Achievements become route-based | Nightmare, Mage Tower, and hidden achievements need planning |
For the next route, use the Ethereal Nightmare Guide.
Weapon-Specific Boss Plans
Different weapons solve boss fights in different ways. Use this table to match the boss problem to your weapon style.
| Weapon style | Best against | Boss plan |
|---|---|---|
| Single-handed weapon | Pattern-learning bosses | Block or play safer, take short punish windows, and survive mistakes |
| Dual-Blades / Katana | Bosses with short openings | Use fast hits, then leave before the counterattack |
| Two-handed Weapons | Bosses with clear recovery | Wait longer, punish harder, and avoid panic swings |
| Bow / Musket | Large bosses and centerline threats | Keep distance, avoid being cornered, and attack during movement recovery |
| Staff / skill builds | Bosses with predictable windows | Save MP and skills for real openings |
| Phantom Lantern / summon builds | Bosses that chase the player | Let summons keep damage going while you reposition |
| Turbo Lance | Bosses with long recovery windows | Use commitment attacks only after the dangerous move ends |
For build templates, use the Lost Castle 2 Builds Guide.
Alchemy Timing for Bosses
Use alchemy before the run collapses, not after panic starts.
Do not waste your strongest mixture on a room you can clear with spacing. But do not enter Demon Lord, Nightmare bosses, or Mage Tower bosses and forget that your best tools exist.
| Use alchemy when… | Do not use it when… |
|---|---|
| A boss phase can end the run | The room is safe and only feels slow |
| You need burst to shorten a dangerous phase | You are only impatient |
| You need healing during a real recovery window | The boss is already mid-attack |
| A cursed-area reward is worth protecting | The route is already not worth saving |
Nightmare Bosses: Why They Feel Harder
Nightmare bosses are not only harder because the boss hits harder. They feel harder because the entire run reaches the boss in worse condition.
You may have fewer heals, worse modifiers, more cursed pressure, more room damage, or a build that looked good in normal rooms but has weak boss damage.
| Nightmare boss problem | What it usually means |
|---|---|
| You reach the boss with low HP | Room-clear consistency is the issue |
| The boss takes forever | Damage, upgrades, or treasure fit is too weak |
| One mistake deletes you | Defense or recovery is missing |
| Adds or arena pressure overwhelm you | The build has no control or safety |
| The boss feels unfair after modifiers | Your Nightmare effects do not match your build |
| You die with tools unused | Alchemy timing is too passive |
Boss Achievements to Track
Boss achievements are easier when you know which route they belong to. Do not chase every boss achievement on your first clear.
| Achievement | Boss / area | Route note |
|---|---|---|
| Brother, Hold On | Goblin Champion in the Black Forest | Early hidden boss |
| Wrath of the Black Forest | Forest Guardian in the Black Forest | Early hidden boss |
| Death Duel on the Bridge | Wandering Knight at the Castle Bridge | Dodge-direction check |
| Dreadful Mutation | Mutated Priest in the Ruined Cemetery | Poison / pressure route |
| Dragon’s Lair | Crystal Devourer in the Crystal Mountain | Bigger boss-pressure route |
| Demon Shadow | Steward the Demon Sealer in the Black Castle | Major progression gate |
| Diet Control | Treasure Anglerfish in the Saltpeter Desert | v1.0 branch boss |
| Sweet Dreams | Source of the Nightmare in the Mage Tower | Hidden late-game boss |
| Mastermind | Lord Alfred in the Mage Tower | Mage Tower boss |
| United Blades Against Chaos | Deceitful Chaos God in the Mage Tower | Final hidden route |
For route-based achievement cleanup, use the Lost Castle 2 Achievements Guide.
What To Read Next
| Next goal | Guide |
|---|---|
| Fix weak boss damage | Lost Castle 2 Builds Guide |
| Prepare for Nightmare bosses | Ethereal Nightmare Guide |
| Track hidden late-game route | Hidden Mage Tower and Memory Shards Guide |
| Plan boss-related achievements | Lost Castle 2 Achievements Guide |
| Still learning basics | Lost Castle 2 Beginner Guide |
FAQ
How do I beat bosses in Lost Castle 2? +
Learn the boss's safe windows, then check whether your build has enough damage, defense, rune support, treasure synergy, and saved alchemy. Boss fights are pattern checks and build checks at the same time.
How do you beat Goblin Champion? +
Watch the stomp and jump patterns, roll sideways or out of range instead of standing where you were, then punish after the recovery window. Do not stay directly in front after the first hit.
How do you beat Forest Guardian? +
Watch for the jump warning and root-style ground indicators. Move sideways for jump pressure, move vertically when the floor indicator threatens your lane, then punish after the attack finishes.
How do you beat Wandering Knight? +
Do not try to roll through his body. He is large enough to trap bad dodges, so dodge up or down away from his path, wait for the heavy attack to finish, then take a short punish window.
How do you beat Demon Lord? +
Treat the Demon Lord route as a multi-stage gate. Save alchemy, do not waste damage into shielded moments, attack exposed hands or head when the second phase opens, and avoid getting greedy when the fight is almost over.
Are cursed areas worth taking? +
Cursed areas can be worth taking if your build is stable and the reward improves the run. If the route gives you a cleansing or healing fountain after the cursed-area boss, use it before continuing.
Are Nightmare bosses different? +
Nightmare bosses are harder because you usually reach them under more pressure: worse modifiers, fewer resources, stronger rooms, and less room for mistakes. Prepare the whole run, not only the boss room.