Lost Castle 2 Beginner Guide
A practical Lost Castle 2 beginner guide for v1.0, covering first camp steps, quests, Serena, weapon preferences, camp upgrades, jump attacks, side rooms, runes, treasures, alchemy, and starter builds.
Updated:
Quick Answer
For a clean Lost Castle 2 v1.0 start, follow the Quest prompts, talk to camp NPCs, unlock or check Serena’s weapon setup when available, and narrow your weapon pool instead of leaving every weapon type open. Upgrade Blacksmith first, Alchemist Hut second, and save deeper systems like the Ethereal Statue for later. For solo beginners, start with a safer build such as single-handed weapon + green/red rune support before chasing flashy weapons.
First Camp Route: What To Do After the Opening
The first mistake many new players make is treating camp like a menu they can skim.
Camp is where Lost Castle 2 starts giving you long-term control. After your first return, do this in order:
| Order | What to do | Why it matters |
|---|---|---|
| 1 | Check the Quest system | v1.0 quests point you toward important unlocks and stop you from wandering blindly |
| 2 | Talk to every available camp NPC | New NPCs often unlock systems, upgrades, weapon control, or progression hints |
| 3 | Find Serena / weapon setup when available | This is where weapon pool control starts to matter |
| 4 | Enable only a few weapon categories | A smaller pool makes every run easier to build around |
| 5 | Spend early upgrades on Blacksmith first | Weapon and gear strength help every run |
| 6 | Upgrade Alchemist Hut second | Alchemy and charms become major run-saving tools |
| 7 | Save Ethereal Statue focus for later | Deeper soul and Nightmare systems matter more after the basics are stable |
| 8 | Start the next run with one clear goal | Weapon clear, quest progress, camp resources, or boss practice |
Follow the Quest System
The v1.0 Quest system is one of the most important beginner tools because it tells you what the game expects next.
Do not ignore it.
Quests help you move through camp systems, new areas, weapon control, progression tasks, and later unlocks. When something feels unclear, check quests before running the same route again.
| Quest habit | Why it helps |
|---|---|
| Check quests after returning to camp | New tasks can appear after boss kills or system unlocks |
| Read the next unlock requirement | Prevents wasting runs in the wrong area |
| Use quests to choose your run goal | Gives every run a purpose |
| Finish system quests early | Opens camp features that make later runs easier |
| Do not chase rare goals before quests stabilize | Early progression matters more than cleanup |
Narrow Your Weapon Pool With Serena
Leaving every weapon type open sounds flexible, but it makes early runs noisy. You get more drops, but fewer of them support the same plan.
When Serena or the weapon preference setup becomes available, narrow your weapon pool.
A safe beginner setup is:
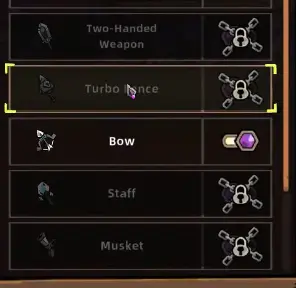
| Weapon category | Beginner value | Notes |
|---|---|---|
| Single-handed weapon | Safest solo starter | Best first pick for learning bosses; works well with green/red rune support |
| Bow | Safe ranged learning tool | Good for reading enemy patterns from distance, especially with multishot or projectile support |
| Staff | Skill-based starter | Strong once you understand MP, weapon skill timing, and Rune Bullet-style play |
| Musket | Ranged burst option | Good damage, but spacing and reload rhythm matter more than Bow |
| Phantom Lantern | Summon-style pressure | Strong with summon treasures, but less direct as a first weapon |
| Two-handed Weapons | High damage windows | Good later; new players often swing too early and get punished |
| Dual-Blades / Katana | Fast melee pressure | Strong with attack speed and crit, but close-range mistakes are expensive |
| Turbo Lance | Commitment weapon | Learn charge windows before forcing a clear |
Best Beginner Build: Single-Handed + Green/Red Runes
A safe beginner build should help you survive while still dealing enough damage.
That is why single-handed weapon + green/red rune support is a strong starting point for solo players.
| Build piece | What to look for |
|---|---|
| Weapon | Single-handed weapon or shield-style melee |
| Main color direction | Green for survival, red for damage |
| Treasure priority | Shield, recovery, damage, crit, and short-cooldown effects |
| Upgrade priority | Upgrade when the weapon fits the run, not just because the station is available |
| Alchemy role | Healing or emergency safety for boss mistakes |
| Boss plan | Learn patterns safely, punish short windows, avoid greedy combos |
For more build templates, use the Lost Castle 2 Builds Guide.
Camp Upgrade Priority
New players usually ask where to spend early resources. The simple priority is:
- Blacksmith
- Alchemist Hut
- Ethereal Statue
| Upgrade | Priority | Why it matters |
|---|---|---|
| Blacksmith | First | Improves weapon and gear strength, which helps every run immediately |
| Alchemist Hut | Second | Unlocks stronger alchemy value, charms, and survival tools |
| Emergency Mechanism | Get early inside Alchemist Hut | Gives you a safety net when one mistake would normally end the run |
| Ethereal Statue | Later | More important once Nightmare, Soulstones, Soul Seals, and deeper systems matter |
| Other camp upgrades | As quests require | Follow the Quest system when a specific unlock blocks progress |
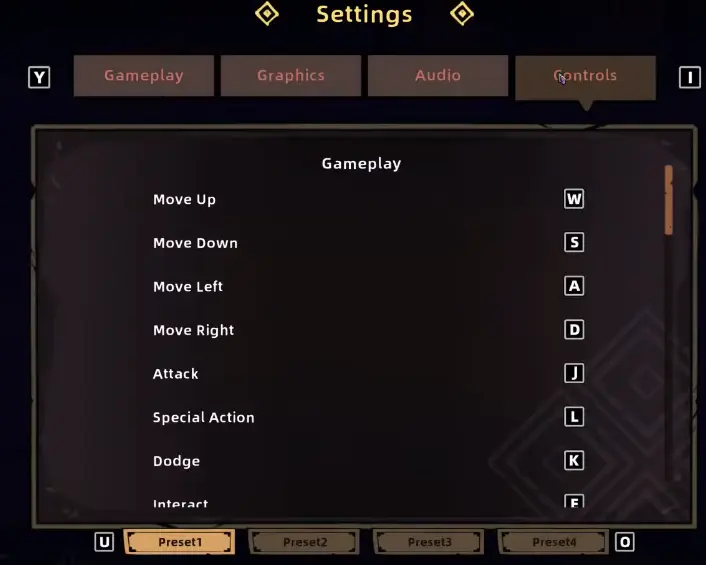
Fix Controls Before Serious Runs
Controls are not the main strategy, but bad controls make every strategy feel worse.
Lost Castle 2 asks you to dodge, attack, use weapon skills, drink elixirs, interact, and use hunter gear quickly. Move important actions to buttons you can press under pressure.
| Action | Why it should be easy |
|---|---|
| Attack | Main combat input |
| Weapon skill / block | Needed for many weapons and Rune Bullet-style setups |
| Dodge | Main survival input |
| Elixir | Needs to be reachable without looking down |
| Interact | Used constantly in camp, shops, and pickups |
| Hunter gear | Useful during messy rooms and boss pressure |
Use Jump Attacks
Jump attacks are easy to overlook, but they help a lot in early combat.
They give you a way to attack while repositioning, approach from safer angles, and avoid standing still during crowded rooms. Against some enemies, a jump attack is safer than walking in and committing to a full ground combo.
| Jump attack use | Why it helps |
|---|---|
| Quick approach | Lets you hit without slowly walking into danger |
| Side angle attack | Helps you avoid attacking directly into the enemy’s front |
| Short punish window | Good when a full combo is too greedy |
| Room movement | Keeps you moving while still dealing damage |
| Boss learning | Lets you take one hit window and reset |
Check Side Rooms Before Rushing the Goal
Do not sprint straight to the objective every run.
Side rooms often contain extra weapons, armor, treasures, resources, or route value. Skipping them can leave you underpowered before a boss. Taking every dangerous room while low on HP is also a mistake.
| Side room situation | Better choice |
|---|---|
| Healthy with elixir left | Check side rooms for upgrades and treasure value |
| Low HP and no tools | Skip risky rooms and preserve the run |
| Build needs a weapon upgrade | Side rooms can be worth the risk |
| Boss is close | Only take side rooms that help the boss plan |
| Quest asks for a route item | Follow the quest route first |
| Memory Shard / hidden route later | Track special rooms more carefully once that route begins |
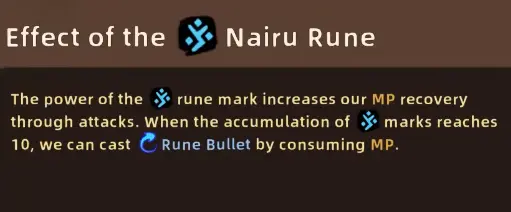
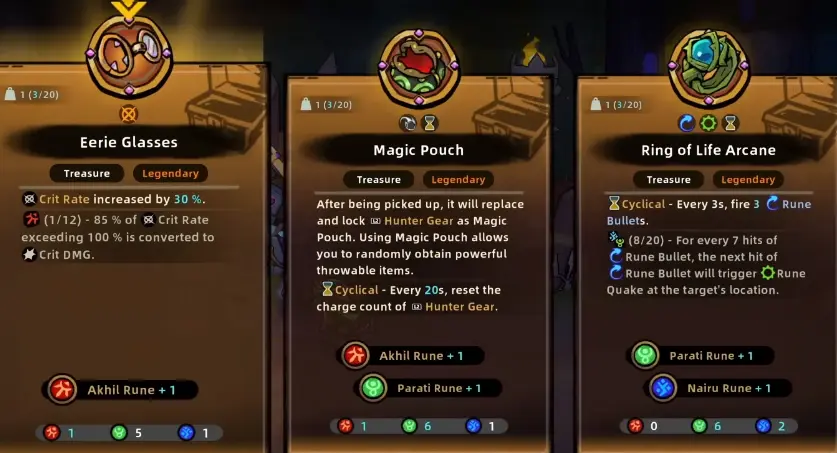
Learn Runes With Nairu Rune and Rune Bullet
Runes are not just passive stats. They can change how your weapon skill works and how you spend MP.
Nairu Rune is the best early example because it leads into Rune Bullet.
Use this simple flow:
| Step | What to do |
|---|---|
| 1 | Pick up Nairu Rune support or rune armor that gives Nairu power |
| 2 | Watch your Nairu marks build toward 10 |
| 3 | Keep enough MP instead of spending every skill immediately |
| 4 | Wait for enemies to group or for a boss to finish an attack |
| 5 | Use weapon skill during a safe window |
| 6 | Let Rune Bullet add tracking damage instead of firing it into a bad moment |
| 7 | Rebuild MP and repeat when the next safe window appears |
Pick Treasures With Specific Builds in Mind
A treasure can be rare and still be wrong for your run.
Instead of asking whether the treasure is strong in general, ask what kind of build it supports.
| Your build | Treasure effects to prioritize | Avoid |
|---|---|---|
| Single-handed green/red | Shield, recovery, defense, direct damage, crit, short-cooldown effects | Pure skill effects with no MP plan |
| Dual-Blades / Katana | Attack speed, crit, hit triggers, on-hit damage, mobility safety | Slow effects that do not trigger often |
| Bow / Musket | Projectile support, multishot, ranged damage, crit, attack speed | Close-range effects you cannot safely use |
| Staff / Nairu | MP recovery, skill triggers, cooldown value, Rune Bullet support | Basic-attack-only effects with no skill value |
| Phantom Lantern / summon | Summon attack, summon attack speed, survival while summons work | Summon bonuses when you have no summons |
| Two-handed | Burst damage, defense, boss-window value, direct damage | Tiny frequent-hit effects that do not match the weapon |
Do Not Chase v1.0 Boss Weapons Too Early
v1.0 adds later weapons and boss-linked unlocks such as Chaos Destroyer, Chaos & Deceit, and Chaos Reaper.
They are worth knowing about, but they should not be your first beginner goal. Learn the basic weapon categories, camp upgrades, quests, and boss patterns first. Later, those weapons become part of deeper build and collection routes.
Upgrade Weapons Only When They Fit the Run
Do not upgrade the first decent weapon just because the station is available.
Before spending resources, check whether the weapon matches your current plan.
| Upgrade check | Upgrade? |
|---|---|
| Weapon is in your preferred category | Good sign |
| Weapon works with your rune colors | Good sign |
| Treasures already support it | Good sign |
| It has a boss plan | Good sign |
| It only feels okay for one room | Wait |
| You are upgrading because you are nervous | Wait |
| A better fit may still drop soon | Be careful |
Use Alchemy as a Planned Answer
Alchemy is strongest when you save it for the part of the run that usually kills you.
| Situation | Alchemy use |
|---|---|
| Boss phase gets dangerous | Use healing, burst, or safety tools |
| Elite room can end the run | Use a planned answer before panic starts |
| Ranged build gets rushed | Use emergency space or healing |
| Single-handed build is stable | Save alchemy for boss mistakes |
| Nightmare route later | Treat mixtures as part of the build |
Beginner Mistakes To Avoid
| Mistake | Why it hurts | Better move |
|---|---|---|
| Ignoring quests | You miss the game’s intended unlock path | Check quests after each major camp return |
| Leaving every weapon type open | The run becomes noisy and unfocused | Start with a small weapon pool |
| Skipping Serena / weapon setup | Chests keep giving random directions | Use weapon preference when available |
| Spending camp resources randomly | Important systems unlock slower | Blacksmith first, Alchemist Hut second |
| Not using jump attacks | You stand still too much | Use jump attacks for quick angles and resets |
| Rushing main path only | You miss side-room value | Check side rooms when your build can handle them |
| Picking treasures by rarity | Rare does not always mean useful | Pick treasures that fit your weapon |
| Upgrading too early | Resources go into the wrong weapon | Upgrade when the weapon has a future |
| Rushing Nightmare | Harder routes expose weak builds | Stabilize normal clears first |
| Chasing achievements first | You slow down progression | Let early achievements happen naturally |
FAQ
What should I do first after returning to camp in Lost Castle 2? +
Check the Quest system, talk to camp NPCs, unlock or review Serena's weapon preference setup when available, narrow your weapon pool, then spend upgrades on Blacksmith first, Alchemist Hut second, and Ethereal Statue later.
Should I only enable a few weapon types? +
Yes. For a new solo route, start with only a few comfortable categories instead of leaving every weapon type open. Single-handed weapon, Bow, and Staff are safer beginner choices, while Musket, Phantom Lantern, Turbo Lance, Katana, and heavy weapons are better after you understand their rhythm.
What is the best beginner build in Lost Castle 2? +
A safe solo start is a single-handed weapon with green and red rune support. Green helps survival, red helps damage, and the shield-style rhythm gives you more room to learn boss patterns.
Are quests important in Lost Castle 2 v1.0? +
Yes. The v1.0 Quest system guides you toward important unlocks and systems. Check quests after every major return to camp so you do not miss progression tasks.
Which camp upgrades should I prioritize? +
Prioritize Blacksmith first for weapon and gear strength, Alchemist Hut second for charm and alchemy value, and Ethereal Statue later once deeper systems and Soul-related progression matter more.
Should I use jump attacks? +
Yes. Jump attacks help you reposition, hit from safer angles, and avoid standing still too long. They are especially useful when you need a quick hit without committing to a full ground combo.
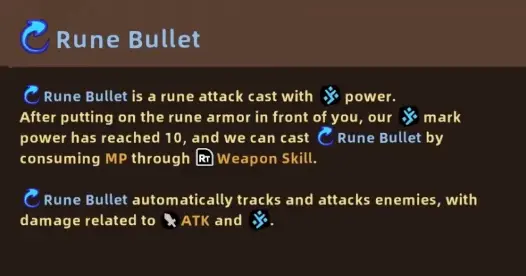
How does Rune Bullet work? +
Rune Bullet appears through Nairu Rune support. Build Nairu marks to 10, keep enough MP, then use your weapon skill during a safe window so Rune Bullet can add tracking damage instead of being wasted.