A practical Lost Castle 2 guide hub for v1.0 players who need the clean route through beginner systems, builds, runes, inscriptions, Ethereal Nightmare, Memory Shards, Hidden Mage Tower, bosses, and achievements.
A practical Lost Castle 2 beginner guide for v1.0, covering first camp steps, quests, Serena, weapon preferences, camp upgrades, jump attacks, side rooms, runes, treasures, alchemy, and starter builds.
A practical Lost Castle 2 Memory Shards and Hidden Mage Tower guide explaining all 11 shards, Nightmare 3 routing, boss sources, camp shard checks, Frozen Cavern, Nia, and the final unlock trigger.
A practical Lost Castle 2 boss guide covering boss order, Ghost of the Knight, Goblin Champion, Forest Guardian, Wandering Knight, Demon Lord, cursed areas, Nightmare bosses, builds, and alchemy.
Start Lost Castle 2 v1.0 by learning the camp loop, fixing your controls, and narrowing your weapon direction before chasing upgrades. Once your runs are stable, build around Akhil, Parati, and Nairu runes, inscriptions, resonance, treasures, and alchemy, then move into Ethereal Nightmare, Soulstones, Memory Shards, Hidden Mage Tower, bosses, and achievements.
What This Lost Castle 2 Guide Hub Covers
Lost Castle 2 looks simple in the first few rooms: attack, dodge, pick up loot, and survive one more fight.
The deeper you go, the more the game becomes a planning problem. A run can fall apart because you upgraded the wrong weapon, left every weapon type open, mixed rune directions, ignored inscriptions, picked treasures that do not fit your weapon, or entered Nightmare without a real build.
This hub is the route map. Use it to jump to the guide that matches your current blocker.
Runes, armor, weapon skills, and build direction start mattering early. Do not wait until Nightmare before learning how your run is supposed to win.
If you are trying to…
Start here
Learn the first-hour route and avoid early mistakes
Your first goal is not to memorize every weapon or force a perfect build. Your first goal is to understand the loop.
You leave camp, clear rooms, collect weapons and treasures, fight bosses, bring progress back, upgrade camp systems, and start again with more control than before.
Phase
What to do
Why it matters
Character setup
Create your character and choose a comfortable control layout
Bad controls make dodging, blocking, healing, and weapon skills feel worse than they are
Tutorial route
Learn basic attacks, weapon skills, defense, dodging, elixirs, and early rune armor
These systems become the foundation for later builds
First camp return
Check camp NPCs, quests, weapons, upgrades, and multiplayer options
Camp progression gives every failed run a purpose
Weapon direction
Use weapon preferences once available instead of leaving every weapon type open
A smaller weapon pool makes your run easier to shape
Build identity
Pick runes, treasures, inscriptions, and alchemy that support one plan
Random good items are weaker than connected effects
Nightmare preparation
Add enough damage, survival, and boss consistency before harder modes
Harder content exposes unfocused builds quickly
Weapon Preferences and Build Direction
One of the biggest early mistakes is treating every run like a weapon lottery.
If you leave every weapon type open, the game can hand you weapons that do not match your rhythm, rune direction, inscriptions, or treasure plan. That feels flexible, but it often turns into clutter.
Weapon planning mistake
Why it hurts
Better move
Leaving every weapon open
Your drops may not match your build direction
Narrow your weapon pool once preferences are available
Upgrading the first decent weapon
A better weapon can appear after your resources are gone
Wait until the weapon fits the run
Changing weapons too often
Your run loses identity
Build around one weapon rhythm
Picking treasures by excitement
Strong-looking effects may not connect
Ask whether the treasure helps this run
Ignoring inscriptions
Gear bonuses stay scattered
Build toward resonance and connected effects
A good run starts before the first room. Choose the weapon types you actually want to see, then read every rune, treasure, and inscription through that plan.
Runes, Inscriptions, and Resonance
Runes are not just background stats. They tell you what kind of run you are building.
The three core rune directions are Akhil, Parati, and Nairu.
Grabbing disconnected bonuses because they look good
Inscriptions and resonance are the next layer. A random strong item can help one room, but a connected weapon, armor, treasure, rune, and inscription plan can carry a full route.
Treasures are not automatically good just because the effect looks exciting.
Fast weapons want different support than slow weapons. Skill-heavy builds want different treasures than basic-attack builds. Survival builds need recovery or defense that matches how they actually take damage.
The better question is not “Is this treasure strong?”
The better question is:
Is this treasure strong for this run?
System
Good habit
Treasures
Pick effects that support your weapon and rune direction
Alchemy
Save mixtures for fights that can actually end the run
Healing
Do not waste it because you panic after one mistake
Burst tools
Use them when a boss or elite room needs to end quickly
Utility effects
Carry them when they solve a real problem, not just because they exist
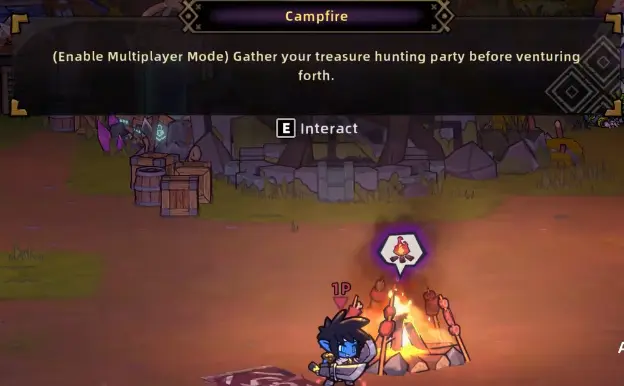
Co-op and Multiplayer
Lost Castle 2 works as a solo game, but co-op changes the rhythm. Rooms get messier, revives matter, loot decisions become shared pressure, and a chaotic run can still feel good with friends.
Co-op uses room setup and room codes. If a friend cannot join, check the room code carefully and make sure the same multiplayer setup is active.
Co-op topic
What to know
Room code
Use it when joining a friend’s room
Private room
Better if you only want friends
Quick match
Useful if you want random players
Local multiplayer
Check the campfire and room setup options
Loot feel
Players may see their own drops and decisions
Revives
Co-op can save bad moments, but it also makes rooms busier
Build planning
Try not to fight over the same role if your group has different weapons
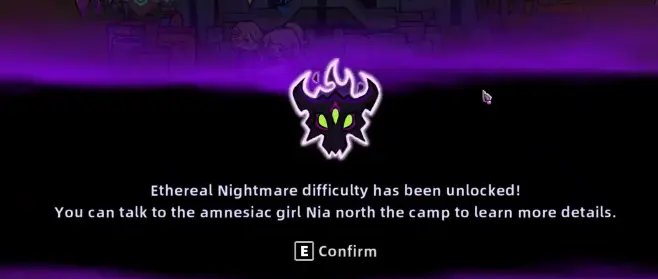
Ethereal Nightmare
Ethereal Nightmare is where the game starts asking whether your build actually works.
It is not just a harder setting. It connects to Nia, Nightmare effects, Soulstones, Soul Flowers, Champion Relics, Soul Inscription, deeper Nightmare clears, Memory Shards, Hidden Mage Tower, and late-game achievements.
Ethereal Nightmare is a major progression step. Treat it as a build and reward system, not just a harder version of the same route.
Nightmare question
What it really tests
Can you clear rooms fast enough?
Damage, weapon support, and treasure fit
Can you survive boss mistakes?
Defense, recovery, spacing, and alchemy timing
Do your inscriptions connect?
Resonance and build identity
Do your rune colors make sense?
Akhil, Parati, Nairu, or a planned mix
Are rewards moving your account forward?
Soulstones, Soul Flowers, Champion Relics, and Soul Inscription
Can you adapt to effects?
Reading Nightmare effects instead of copying one setup forever
For the full unlock route, rewards, Nightmare 1-5, effect selection, Soulstone systems, and Nia progression, use the Ethereal Nightmare Guide.
Memory Shards and Hidden Mage Tower
Memory Shards are not random lore pickups. They connect to Seek the Truth, the Hidden Mage Tower route, and late-game hidden progression.
Do not worry about them during your first runs. Once you are pushing Nightmare routes and Nia-related progression, start tracking them carefully.
Many Lost Castle 2 walls are not solved by more farming. They are solved by understanding what a boss is testing.
Some bosses test spacing. Some punish greedy melee. Some expose low damage. Some are late-game route gates tied to Nightmare, Demon Lord progression, Memory Shards, or Mage Tower.
If this is blocking you…
What to check
Early bosses
Are you attacking too long after safe windows?
Goblin Champion or Wandering Knight
Do you have enough room control and safe punish timing?
Steward the Demon Sealer
Are you wasting burst into shield windows?
Demon Lord
Are you saving enough tools for the second phase?
Branch bosses
Are you entering optional routes with a weak build?
Mage Tower bosses
Is your build actually ready for hidden-route pressure?
Lost Castle 2 has a lot of achievements, but a full checklist is not the best way to start.
Many early achievements unlock naturally while you play. The achievements that need planning are usually tied to hidden routes, Nightmare progression, Memory Shards, weapon collection, co-op, Soulstones, Soul Seals, and late-game clears.
Achievement type
How to approach it
Story and boss achievements
Let most of these unlock naturally as you progress
Nightmare achievements
Plan these around Ethereal Nightmare progression
Memory Shard achievements
Track them once you begin the Hidden Mage Tower route
Weapon and collection achievements
Clean them up after your camp and weapon options improve
Co-op achievements
Handle them once your multiplayer setup is stable
Soulstone and Soul Seal achievements
Save them for late-game Nia and build-system cleanup
Hard late-game achievements
Save them until builds and boss routes are consistent
For the guide focused on hard, hidden, Nightmare, co-op, Soulstone, and late-game unlocks, use the Lost Castle 2 Achievements Guide.
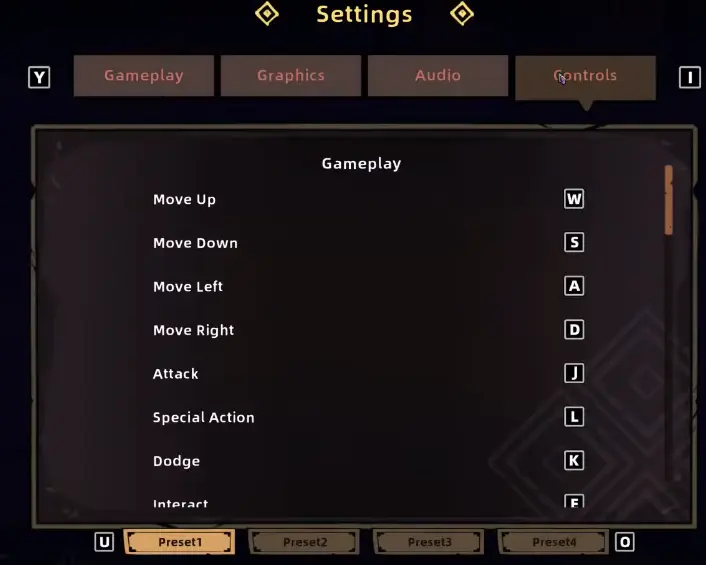
First-Run Control Check
Before you push serious routes, make sure the controls feel comfortable. Lost Castle 2 asks you to attack, dodge, block, use weapon skills, drink elixirs, and trigger Hunter Gear under pressure, so a bad layout can make the combat feel harder than it is.
Fix awkward controls early. A comfortable attack, dodge, weapon skill, and elixir layout makes every later route easier.
Action
Practical setup idea
Attack
Put it on left click if you prefer mouse combat
Weapon skill / block
Put it on right click or another easy button
Dodge
Use a key or mouse side button you can press under pressure
Elixir
Keep it reachable without moving your hand too far
Hunter Gear
Put it near your main combat buttons
Emotes / extras
Move them away if they take useful keys
Common Early Blockers
Use this table when you know something feels wrong, but you are not sure which system is responsible.
Problem
Likely fix
Combat feels awkward
Adjust controls before doing more runs
Runs feel random
Use weapon preferences and build around fewer weapon types
Damage falls off
Check whether your runes, treasures, and inscriptions support your weapon
Boss fights take forever
Add damage or burst tools; tanky is not safe if the fight never ends
You die to one mistake
Add enough defense, recovery, or safer alchemy timing
Treasures feel strong but the run still fails
Stop collecting disconnected effects
Alchemy feels useless
Save mixtures for rooms and bosses that actually need them
Nightmare feels impossible
Treat it as a build check and fix your run identity first
Memory Shards are confusing
Follow the Hidden Mage Tower route once you are ready for late-game progression
Achievements feel overwhelming
Focus on progression categories, not all achievement names at once
Recommended Reading Order
For a clean first pass through the Lost Castle 2 cluster, read in this order:
Clean up hard, hidden, Nightmare, Soulstone, and co-op unlocks
The House Always Wins FAQ
What should I do first in Lost Castle 2?+
Create your character, fix controls if the default layout feels awkward, clear the tutorial route, then use camp upgrades and weapon preferences to shape your next runs instead of accepting every random weapon drop.
Are weapon preferences important in Lost Castle 2?+
Yes. Weapon preferences help narrow the drop pool before a run starts. That makes it easier to build around one weapon rhythm, rune direction, inscription plan, and treasure setup.
What are the main rune types in Lost Castle 2?+
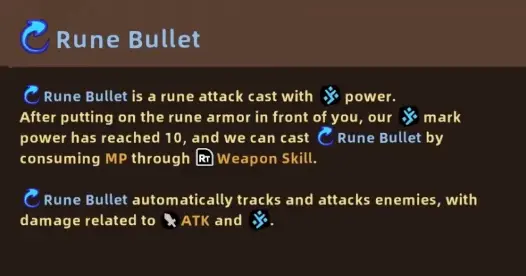
The three core rune directions are Akhil, Parati, and Nairu. Akhil supports red damage pressure, Parati supports green survival, and Nairu supports blue skill, MP, and Rune Bullet setups.
How do inscriptions and resonance work in Lost Castle 2?+
Inscriptions and resonance turn gear bonuses into a focused build. Random bonuses are much weaker than weapon, armor, treasure, rune, and inscription effects that support the same plan.
How do you unlock Ethereal Nightmare in Lost Castle 2?+
Ethereal Nightmare unlocks after the required late-game progression and Demon Lord route. Once it unlocks, talk to Nia in camp and treat Nightmare as a build and reward system, not just a harder difficulty toggle.
There are 11 Memory Shards for the Hidden Mage Tower route: Obsession, Fallen, Fearless, Despair, Luminous, Dark Icy, Malice, Warmth, Conviction, Fortitude, and Fragrant.
Should I make an achievements checklist first?+
No. Most early achievements unlock naturally. Focus first on progression, builds, Nightmare, Memory Shards, weapon clears, hidden routes, and bosses, then clean up hard achievements later.
Is Lost Castle 2 better solo or co-op?+
Both work. Solo is cleaner for learning enemy patterns and build planning, while co-op adds chaos, revives, shared pressure, and room-code setup.