How to Repair the Van in Funnel Runners
Diagnose the Van, prepare the right tools, replace the Battery and Tires, install Fuses, fill every fluid, and confirm the escape.
Updated:
Quick Answer
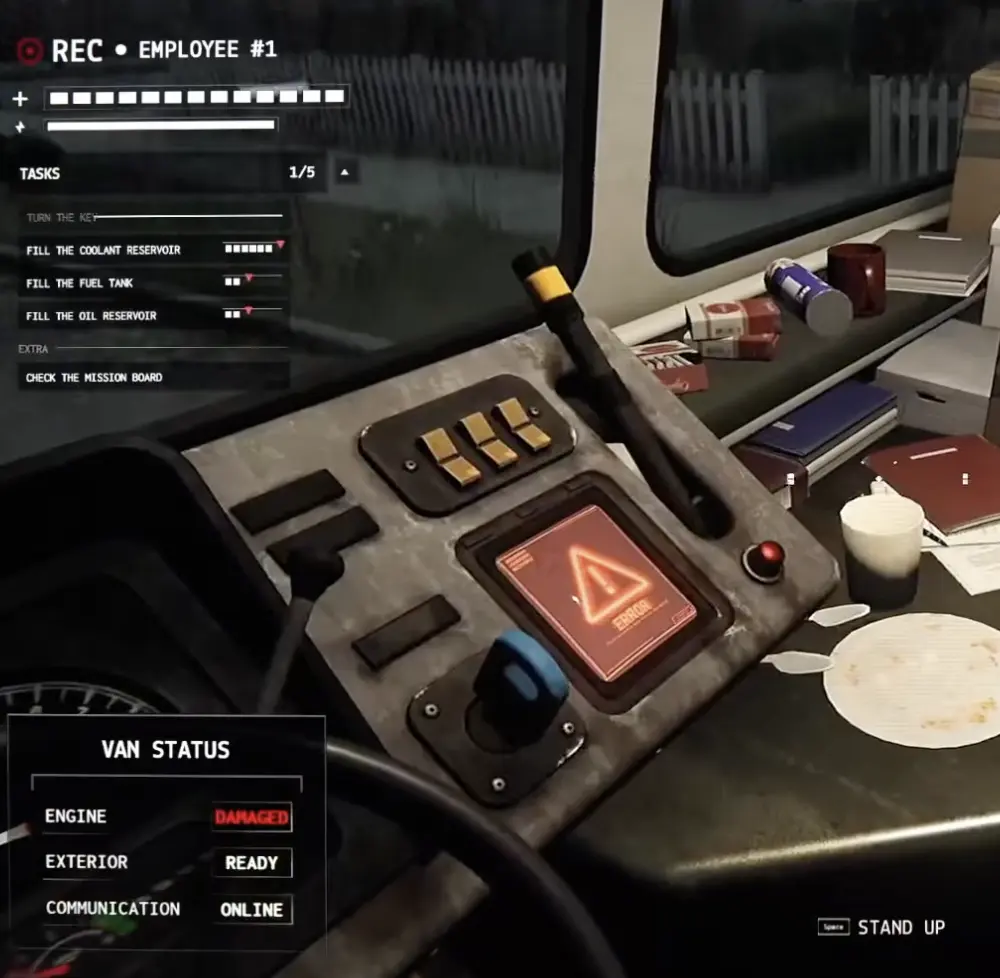
Turn the Van key before searching. The automatic diagnostic tells me whether the run needs a Battery, Tire, Fuses, Fuel, Motor Oil, or Coolant, and the fluid bars show how much is still missing. A Battery needs a Toolbox. A Tire needs the replacement Tire, a Scissor Jack, and a Toolbox. Returning the item does not complete the repair automatically: I still interact with the damaged component, finish the repair minigame, and confirm that the task disappears. When every task clears, I return to the driver’s seat and use Leave City.
Diagnose the Van Before Searching
The first useful action is sitting in the driver’s seat and attempting to start the Van.
This runs the automatic diagnostic and creates the repair list for the current mission.
I read three things before leaving:
- Which systems are damaged.
- How many replacement parts are required.
- How much progress each fluid task needs.
I do not inspect every component and guess what looks broken. The diagnostic already tells me what can advance the current run.
For example, when the list contains only:
- Fuses;
- Fuel.
I do not prioritize:
- a Battery;
- Motor Oil;
- Coolant;
- Tire;
- Scissor Jack.
Those items may be useful in another mission, but they do not move this Van closer to escape.
Prepare Broken Components Before the Search
When the Van already contains the required equipment, I prepare the repair point before leaving.
Depending on the diagnostic, I can:
- remove the blown Fuses;
- disconnect and remove the dead Battery;
- place the Scissor Jack beside a damaged Tire;
- remove the flat Tire with the Toolbox.
This turns the return into a shorter sequence.
Instead of coming back during the final weather window and still needing to locate the Toolbox, place the Jack, and remove the old part, I can install the replacement immediately.
Tools, Gadgets, Collectables, and Consumables
The official item framework divides loose items into four broad groups:
- Tools directly support Van repairs, including items such as Tires, Fuses, Batteries, and Scissor Jacks.
- Gadgets help the team survive or access routes, such as Umbrellas, Crowbars, and Defibrillators.
- Collectables contribute to optional objectives and rewards.
- Consumables restore health, stamina, or other short-term resources.
This guide focuses on the repair-critical side of that system.
A useful Gadget does not replace a missing Tool. An Umbrella may protect the return trip, but it cannot clear a Battery task. A Crowbar may open a barred room, but it does not install Fuses.
When inventory becomes tight, I prioritize the item that directly advances the diagnostic.
Use the Solo Guide for Gadget and Consumable purchase decisions, and the Tornado and Weather Survival Guide for weather-specific equipment.
Van Repair Requirements
| Repair | Location on the Van | Bring back | Required preparation | Completion check |
|---|---|---|---|---|
| Battery | Under the hood | Replacement Battery | Use the Toolbox to disconnect the terminals and remove the dead Battery | Install the replacement, finish the interaction, and confirm Battery clears |
| Tire | Damaged exterior wheel | Replacement Tire | Place the Scissor Jack, then use the Toolbox to remove the flat Tire | Install the Tire and confirm the remaining Tire count decreases |
| Fuses | Fuse area under the hood | Replacement Fuses | Remove the blown Fuses | Install the new set, complete the minigame, and confirm Fuses clears |
| Fuel | Fuel cap on the side of the Van | One or more Fuel Cans | Open the Fuel tank interaction | Fill the required amount, finish the close prompt, and confirm Fuel clears |
| Motor Oil | Oil reservoir under the hood | One or more Motor Oil containers | Open the correct reservoir | Add Oil, finish the interaction, and check the remaining task bar |
| Coolant | Coolant reservoir under the hood | One or more Coolant containers | Open the correct reservoir | Add Coolant, finish the interaction, and check the remaining task bar |
The diagnostic is the final completion check.
A replacement item lying beside the Van, a removed flat Tire, or a partially filled fluid bar is still an unfinished repair.
How the Repair Minigame Works
Bringing the correct item back does not install it automatically.
When I interact with the damaged component, the game can start a timing-based repair minigame. I follow the on-screen prompt and remain on the interaction until the game confirms success.
When I miss the timing:
- the repair remains active;
- I interact with the component again;
- I repeat the minigame;
- I check the diagnostic after succeeding.
This is especially easy to misunderstand in co-op.
A player may say:
“Fuel is done.”
when they actually mean:
“I found Fuel.”
I use three separate callouts:
- “Fuel found.”
- “Fuel delivered.”
- “Fuel cleared.”
Only the last callout tells the search team that Fuel is no longer required.
In the launch achievement snapshot, 75.7% of players had failed at least one repair minigame, while 89.3% had completed one successfully. Missing an early timing prompt is common. The costly mistake is leaving the Van without checking whether the task cleared.
How to Replace the Battery
The Battery is located under the hood.
I need:
- one replacement Battery;
- one Toolbox.
The repair order is:
- Open the hood.
- Find the Battery interaction.
- Use the Toolbox to Disconnect Terminals.
- Use the Toolbox to Remove Dead Battery.
- Equip or position the replacement Battery.
- Install it.
- Complete the repair prompt.
- Check that Battery disappears from the diagnostic.
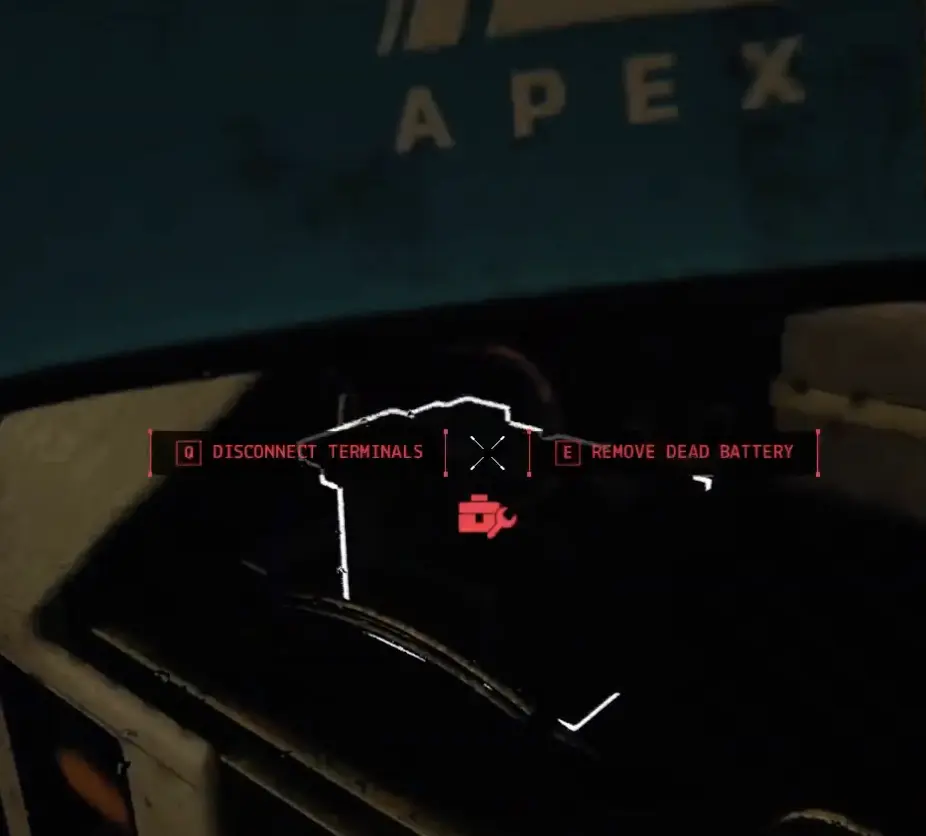
The most common Battery problem is not finding the replacement.
It is returning with one and discovering that the Toolbox is:
- in another house;
- in a teammate’s inventory;
- lying beside the wrong wheel;
- lost after a weather event;
- buried among loose equipment inside the Van.
Once the diagnostic confirms a Battery problem, I keep the Toolbox at the Van.
When the replacement arrives, I install it before beginning an optional rescue or collectible route.
Battery Repair Will Not Complete
I check:
- Did I disconnect the terminals?
- Did I remove the dead Battery?
- Is the Toolbox still available?
- Am I interacting with the Battery slot rather than dropping the replacement nearby?
- Did I complete the repair minigame?
- Does the diagnostic still list Battery?
Placing the replacement under the hood is not the same as installing it.
How to Change a Flat Tire
A Tire repair normally needs three items:
- replacement Tire;
- Scissor Jack;
- Toolbox.
The order matters.
- Identify the damaged wheel.
- Place the Scissor Jack beside that wheel.
- Equip the Toolbox.
- Use Remove Flat Tire.
- Bring the replacement Tire to the prepared wheel.
- Install it.
- Complete the repair interaction.
- Check whether the Tire requirement clears or decreases.
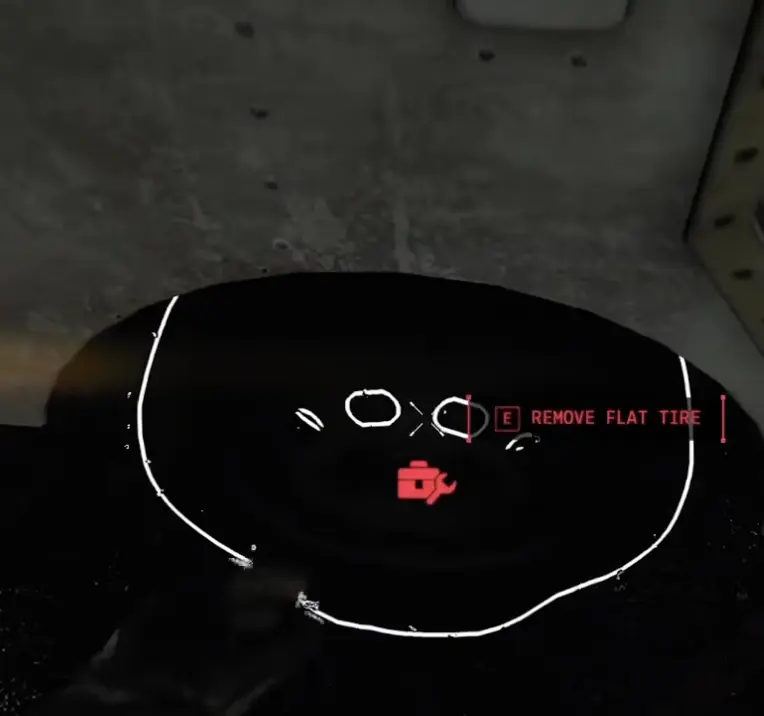
A Tire can consume most or all of a basic inventory loadout. In one run, picking it up filled all three visible slots and forced the player to drop everything else.
Before carrying a required Tire, I clear:
- optional Collectables;
- unrelated Tools;
- spare equipment;
- Consumables I can use immediately.
I do not carry a Tire into another building.
Prepare the Wheel Before Searching
When the Van starts with a Scissor Jack and Toolbox, I place the Jack and remove the flat Tire immediately.
That changes the return sequence from:
find Tire → find Jack → find Toolbox → remove flat → install
to:
find Tire → install
This becomes more important when the diagnostic lists multiple damaged wheels. I prepare and complete each wheel separately, then read the remaining task count.
Tire Repair Will Not Complete
I check:
- Am I at the correct damaged wheel?
- Has the Scissor Jack been placed?
- Was the flat Tire removed with the Toolbox?
- Am I holding the replacement Tire?
- Did the installation interaction finish?
- Does another wheel still need a replacement?
A Tire placed beside the wrong wheel does not advance the task.
How to Replace the Fuses
The Fuse area is under the hood, toward the right side of the engine compartment.
My order is:
- Open the hood.
- Find the Fuse interaction.
- Remove the blown Fuses.
- Bring the replacement Fuses to the Van.
- Install the new set.
- Complete the repair minigame.
- Confirm that Fuses disappears from the diagnostic.
In tested runs, the Fuse repair required removing the blown set and installing the replacement without another specialist tool.
That makes Fuses mechanically simpler than a Battery or Tire, but the small item is easy to mismanage in co-op.
One player may announce that they found Fuses after another player has already installed a set. The Van player should immediately update the team:
“Fuses cleared. Stop carrying extras.”
A spare Fuse pack should not take the inventory position needed for the remaining Oil, Fuel, or Coolant.
How to Fill Fuel, Oil, and Coolant
All three fluid repairs follow the same basic sequence:
- Find the correct fill point.
- Equip the matching container.
- Complete the interaction.
- Check the remaining progress bar.
The required amount can change between missions.
Fuel
The Fuel cap is on the side of the Van.
My order is:
- Go to the side Fuel tank.
- Open the Fuel interaction.
- Equip the Fuel Can.
- Use Fill Fuel Tank.
- Complete the repair prompt.
- Use Close Fuel Tank when prompted.
- Check whether Fuel has cleared.
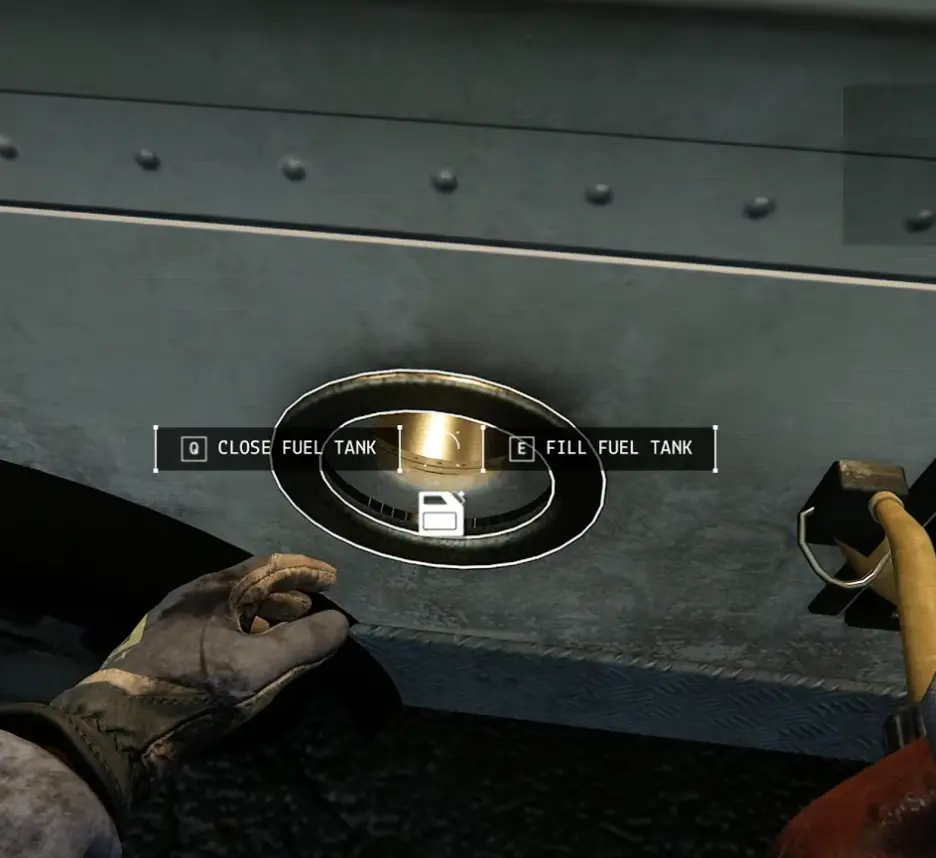
In one tested run, a player failed the Fuel minigame, repeated the interaction, and completed it on the next attempt.
When Fuel remains active afterward, I look at the progress bar before sending someone to search for another Can.
Motor Oil
Motor Oil goes into the Oil reservoir under the hood.
I:
- Open the hood.
- identify the Oil reservoir;
- open its interaction;
- add the Motor Oil;
- complete the prompt;
- close the reservoir when required;
- check whether Oil remains active.
I confirm the item label before filling. Motor Oil and Coolant containers can be difficult to distinguish in dark conditions.
When the Oil task remains visible, I know the Van needs another delivery rather than another interaction with the empty container.
Coolant
Coolant uses its own reservoir under the hood.
My sequence is:
- Open the Coolant reservoir.
- Equip the Coolant container.
- Add it.
- Complete the repair prompt.
- Close the reservoir when required.
- read the remaining Coolant bar.
A run with a long Coolant bar can require several deliveries. I do not redirect the search team until the diagnostic confirms the requirement is gone.
Best Repair Order When Several Systems Are Broken
There is no universal repair order because the available parts change in every mission.
I use this practical sequence:
- Diagnose every active system.
- Complete any repair whose replacement is already at the Van.
- Remove broken Fuses, the dead Battery, and flat Tires when the necessary tools are available.
- Keep the Toolbox and Scissor Jack near their repair points.
- Install every returned replacement immediately.
- Check the diagnostic.
- Send the next search only for what remains.
I do not wait until every missing item is collected before repairing anything.
When the Battery arrives, I install it.
When Fuses arrive, I install them.
When one Tire arrives, I complete that wheel while another player continues searching for the next requirement.
This leaves fewer unfinished interactions for the final weather window.
Co-op Repair Handoffs
Co-op repairs become confusing when the team knows an item exists but not what stage it has reached.
I use short, specific updates:
- “Battery found, returning.”
- “Dead Battery removed; Toolbox at the front.”
- “Rear-right Tire prepared; Jack and Toolbox are there.”
- “Fuel delivered; the bar is still active.”
- “Fuses cleared.”
- “All repairs complete; return to the Van.”
The Van player should manage:
- the current task list;
- tool placement;
- completed repair confirmation;
- the next missing item.
Without one person confirming the diagnostic, multiple players can continue searching for a task that has already cleared while nobody looks for the actual final part.
Fuses or Fluids Still Will Not Clear
Battery and Tire problems are covered in their dedicated sections above.
For Fuses, Fuel, Motor Oil, and Coolant, I use this shorter checklist.
Fuses
I check:
- Were the blown Fuses removed first?
- Am I installing the replacement set rather than dropping it nearby?
- Did the minigame finish successfully?
- Does the diagnostic still list Fuses?
Fuel
I check:
- Am I at the side Fuel cap?
- Am I using a Fuel Can?
- Did I complete the fill and close prompts?
- Is the Fuel bar only partially complete?
Motor Oil
I check:
- Am I using the Oil reservoir rather than the Coolant reservoir?
- Does the item label say Motor Oil?
- Did the interaction complete?
- Does the task bar show that another container is needed?
Coolant
I check:
- Am I using the Coolant reservoir?
- Does the carried container say Coolant?
- Did I complete the fill interaction?
- Does the longer progress bar still have empty segments?
For these four repairs, the usual problem is one of three things:
- wrong interaction point;
- incomplete minigame;
- more quantity still required.
Confirm Success and Leave the City
When every repair entry disappears, I return to the driver’s seat.
The final sequence is:
- Sit in the driver’s seat.
- Turn the key.
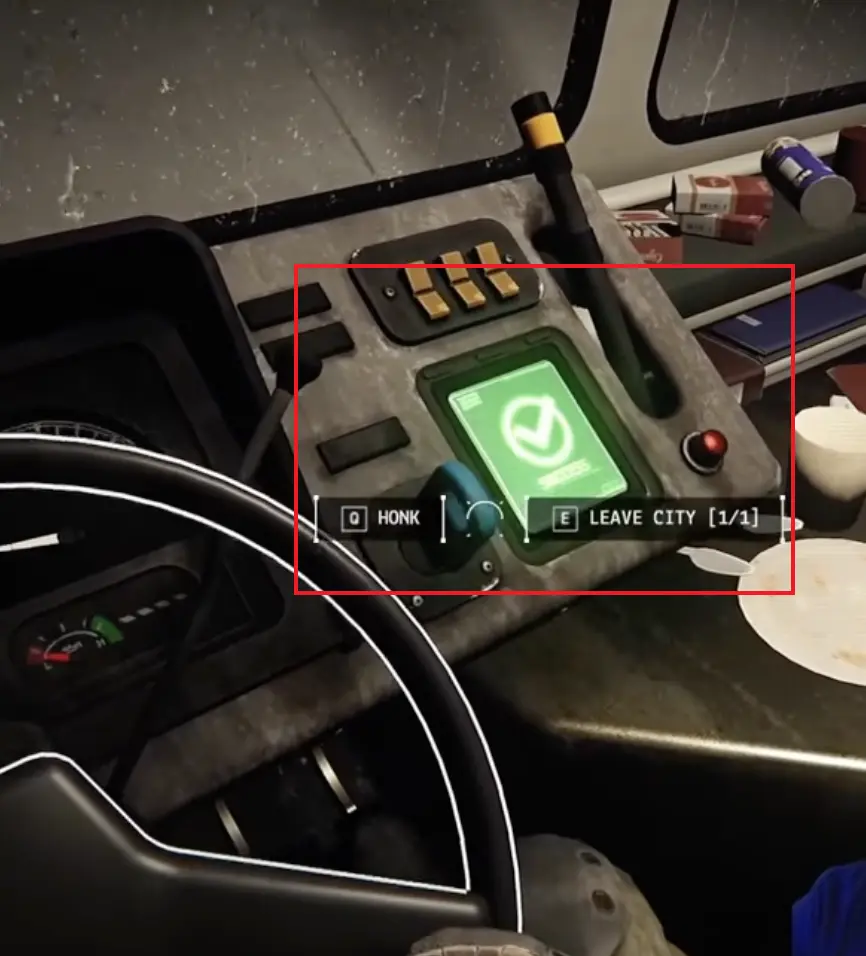
- Confirm the green Success state.
- Check that Leave City [1/1] is available.
- Use Leave City.
These states still do not unlock the escape:
- a replacement Battery lying under the hood;
- a Tire placed beside the Van;
- Fuses sitting in another player’s inventory;
- a nearly full Oil or Coolant bar;
- a completed repair that was never confirmed on the diagnostic.
The green success screen and Leave City prompt are the final confirmation.
What to Read Next
Use the Repair Parts Locations Guide for Motor Oil, Fuel, Coolant, Battery, Tire, Fuses, Toolbox, and Scissor Jack search priorities.
Use the Solo Guide for opening routes, limited inventory, Vitastation purchases, Gadgets, Consumables, and restart decisions.
Use the Tornado and Weather Survival Guide for Doppler reports, F1–EF5 threats, Acid Rain, Hail, Lightning, and damaged return routes.
Return to the Funnel Runners Guide Hub for the complete reading order.
FAQ
Is the Toolbox consumed after repairing the Van? +
No. I reused the same Toolbox for multiple repairs during one run, including Battery and Tire work. After each interaction, I leave it beside the Van rather than letting another player carry it back into the map.
Can one mission require more than one Tire? +
Yes. One tested diagnostic listed two damaged Tires. Each wheel had to be prepared and repaired separately, and completing one replacement only reduced the remaining Tire requirement.
Why is a fluid task still active after one container? +
The required amount changes between runs. In one diagnostic, Coolant displayed five visible progress segments while Fuel and Oil displayed two each, so a single container was not automatically enough.
Does failing a repair minigame consume the replacement part? +
Not in the tested repair attempts. I could interact again and repeat the timing sequence. The achievement list also includes First Day Fail for failing a repair minigame and First Day Star for succeeding.