Fortune Mill Achievements Guide
A practical Fortune Mill achievements guide for all 51 achievements after the New Game+ update, including bullseyes, jackpots, Lucky Spin, Gacha pulls, and NG+ COMPLETED.
Updated:
Quick Answer
Fortune Mill now has 51 achievements. The old 40-achievement route is still useful for the base escape, but 100% now also requires New Game+ COMPLETED and the added late bullseye achievements from Cloud Nine Bullseye to Supernova Bullseye. The safest route is: clear the base rooms, clean up the random achievements before escape, then finish New Game+ as the final 51/51 pass.
Fortune Mill 100% Roadmap After the New Game+ Update
The biggest mistake is treating this like an old all-40 guide. The current achievement list has a base-run layer and a New Game+ layer. I use the base run to finish the random cleanup achievements, then I use NG+ for the final completion achievement and late Darts scaling.
| Stage | What to clear | Main mistake to avoid |
|---|---|---|
| 1. Darts room | Bottle of Hope, Metal Bottle, early bullseyes, Rattling Gunner, Magician Mousey, Verminous | Do not ignore the bottle above the board |
| 2. Lotto / Scratchers | Accountant Toad, Abacus Frog, Big time win, five JACKPOT achievements, Gorgon | Do not farm low-value tickets before automation and value scaling |
| 3. Pachinko / Dice / Poker | Bubba, Red Hot Roller, Ice Cold Roller, Mean Green Roller, Poker Pirate, I Had Trips, Rimmington | Do not stop the whole run just to wait for one poker hand |
| 4. Shadow Realm | Boss Slain | Do not brute-force the boss before your Darts damage is ready |
| 5. Sushi / Poppy | Poppy, Ghost Janitor, Hivemind, Lucky Spin | Do not save all Poppy spins for the final minute |
| 6. Gacha | Rare Pull, Epic Pull, Legendary Pull, Pearlescent Pull, Bin Goosey, Gumball Goose, Executor | Do not chase Pearlescent Pull on a slow machine without animation skip or token scaling |
| 7. New Game+ | Cloud Nine through Supernova Bullseyes, New Game+ COMPLETED | Do not follow an old all-40 route and stop after the first escape |
Fastest 100% Route I Recommend
This is the route I would follow if I wanted to waste the least time while still getting all 51 achievements.
| Step | Route | Why this order works |
|---|---|---|
| 1 | Push Darts until Rattling Gunner, Magician Mousey, early bullseyes, Bottle of Hope, and Metal Bottle are done | It clears the easy hidden achievements before you forget them |
| 2 | Enter Lotto, buy Accountant Toad, Abacus Frog, Auto Scratch, ticket value, and ticket size | It makes jackpots and Big time win happen while you progress instead of as pure cleanup |
| 3 | Move into Pachinko while leaving Lotto automation active | Dice and Poker achievements need attempts over time |
| 4 | Return to Shadow Realm only after Rattling, damage, marks, and duration are strong | Boss Slain is a damage check, not an early puzzle |
| 5 | Start Poppy’s Wheel in the Sushi stage, then keep spinning during Shadow Realm and Gacha cleanup | Lucky Spin is easier when spins happen in parallel with other work |
| 6 | In Gacha, buy animation skip if available, then improve token generation, inventory, pedestals, and machine priority | Legendary Pull and Pearlescent Pull are mostly real-time cleanup walls |
| 7 | Before first escape, check Lucky Spin, Pearlescent Pull, Legendary Pull, all jackpots, I Had Trips, Boss Slain, and bottles | These are the achievements most likely to remain missing |
| 8 | Start NG+ and clear the game again for New Game+ COMPLETED and late bullseyes | NG+ is the final 51/51 layer |
All 51 Achievements Checklist With Unlock Rates
The unlock rates below use Steam Global Achievements as the source and were checked on 2026-06-30. They are useful as difficulty signals, not as exact odds. Steam, Exophase, Steam Hunters, and other trackers can show different percentages because they use different player pools or update schedules, so do not mix sources when comparing rarity.
| Achievement | Requirement | Unlock rate | Best time to get it | Practical note |
|---|---|---|---|---|
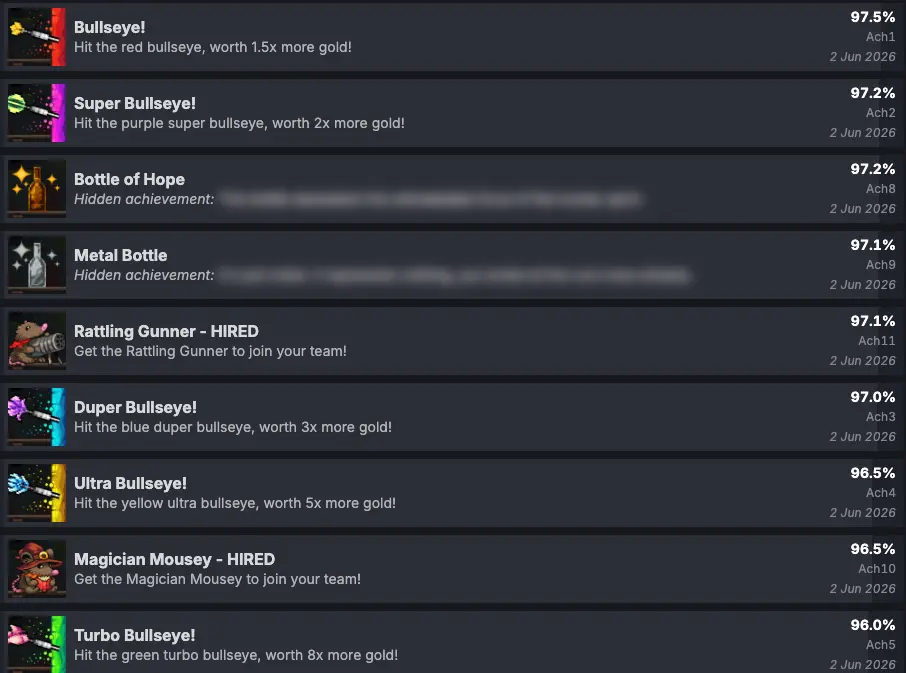
| Bullseye! | Hit the red bullseye, worth 1.5x more gold | 97.3% | Early Room 1 | Natural after you understand dart aiming |
| Super Bullseye! | Hit the purple super bullseye, worth 2x more gold | 96.9% | Early Room 1 | Unlock the zone, then hit it |
| Bottle of Hope | Hidden bottle achievement | 96.9% | Early Room 1 | Throw above the board at the bottle area |
| Metal Bottle | Continue the bottle interaction after the first bottle states | 96.8% | Early Room 1 / cleanup | Keep hitting the bottle area until it triggers |
| Rattling Gunner - HIRED | Get Rattling Gunner to join your team | 96.8% | Room 1 | Buy early for passive darts |
| Duper Bullseye! | Hit the blue duper bullseye, worth 3x more gold | 96.7% | Room 1 | Easier with Bigger Bullseye and Multi-Throw |
| Ultra Bullseye! | Hit the yellow ultra bullseye, worth 5x more gold | 96.3% | Room 1 | Natural while scaling Darts |
| Magician Mousey - HIRED | Get Magician Mousey to join your team | 96.3% | Room 1 | Buy when the study system appears |
| Turbo Bullseye! | Hit the green turbo bullseye, worth 8x more gold | 95.7% | Room 1 | Upgrade bullseye size first |
| Verminous - BRIBED | Pay 1,000,000 gold to Verminous | 95.5% | First room exit | Required progression |
| Royal Bullseye! | Hit the orange royal bullseye, worth 12x more gold | 94.2% | Room 1 return | Rattling can help hit it passively |
| Accountant Toad - HIRED | Get Accountant Toad to join your team | 91.9% | Lotto room | Key best-win passive helper |
| Pinnacle Bullseye! | Hit the pinnacle bullseye, worth 20x more gold | 91.6% | Later Room 1 | Return after stronger bullseye size if needed |
| 1st JACKPOT! | Get the jackpot prize from the orange Lotto Scratcher | 90.4% | Early Lotto | Usually the first jackpot layer |
| Abacus Frog - HIRED | Get Abacus Frog to join your team | 90.2% | Lotto room | Makes ticket play generate EXP |
| Big time win! | Earn 10,000+ dollars from a single scratcher | 90.0% | Lotto after value upgrades | Needs one strong ticket result, not passive money |
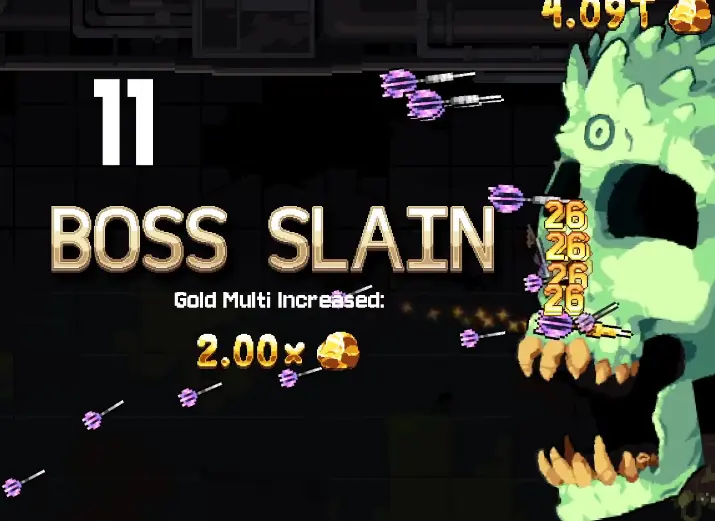
| Boss Slain | Defeat the first Shadow Mode boss | 87.8% | Shadow Realm | Damage check; scale before retrying |
| Gorgon - BRIBED | Pay 1,000,000 money to Gorgon | 87.9% | Lotto exit | Required progression |
| Red Hot Roller | Roll a 6 and play the Red Dice bonus game | 86.4% | Pachinko / Dice | Chance-based, usually natural |
| Bubba - HIRED | Get Bubba to join your team | 85.2% | Pachinko | Helper unlock |
| Ice Cold Roller | Roll an 8 and play the Blue Dice bonus game | 84.2% | Pachinko / Dice | Chance-based, usually natural |
| 2nd JACKPOT! | Get the jackpot prize from the green Lotto Scratcher | 83.6% | Green ticket layer | Easier with lives, size, and value upgrades |
| Cloud Nine Bullseye | Hit the white Cloud Nine bullseye, worth 30x more gold | 83.2% | Late Darts / NG+ | Added in Update #1 |
| Poker Pirate - HIRED | Get Poker Pirate to join your team | 82.5% | Pachinko / Poker | Needed for I Had Trips |
| Starfire Bullseye | Hit the blazing Starfire bullseye, worth 50x more gold | 82.3% | Late Darts / NG+ | Added in Update #1 |
| Violet Bullseye | Hit the Violet bullseye, worth 80x more gold | 81.5% | Late Darts / NG+ | Added in Update #1 |
| Luscious Bullseye | Hit the Luscious bullseye, worth 125x more gold | 80.5% | Late Darts / NG+ | Added in Update #1 |
| Mean Green Roller | Roll a 10 and play the Green Dice bonus game | 80.1% | Pachinko / Dice | Chance-based |
| Rimmington - BRIBED | Pay 1,000,000 tickets to Rimmington | 79.9% | Pachinko exit | Required progression |
| Gilded Bullseye | Hit the Gilded bullseye, worth 200x more gold | 79.5% | Late Darts / NG+ | Added in Update #1 |
| Void Bullseye | Hit the Void bullseye, worth 300x more gold | 78.2% | Late Darts / NG+ | Added in Update #1 |
| Emerald Bullseye | Hit the Emerald bullseye, worth 500x more gold | 76.8% | Late Darts / NG+ | Added in Update #1 |
| 3rd JACKPOT! | Get the jackpot prize from the Lotto Scratcher | 75.0% | Intermediate ticket layer | Check this if a middle jackpot is missing |
| Poppy the Kangaroo - HIRED | Get Poppy the Kangaroo Mouse to join your team | 75.1% | Sushi / Poppy | Needed before Lucky Spin attempts |
| Onyx Bullseye | Hit the Onyx bullseye, worth 800x more gold | 74.9% | Late Darts / NG+ | Added in Update #1 |
| 4th JACKPOT! | Get the jackpot prize from the blue Lotto Scratcher | 73.3% | Later Lotto cleanup | Return after stronger ticket scaling |
| Ghost Janitor - HIRED | Get Ghost Janitor to join your team | 72.8% | Sushi stage | Helper unlock |
| Sapphire Bullseye | Hit the Sapphire bullseye, worth 1200x more gold | 72.3% | Late Darts / NG+ | Added in Update #1 |
| Hivemind - BRIBED | Pay 1,000,000 ribbons to the Hivemind | 70.4% | Sushi exit | Required progression |
| 5th JACKPOT! | Get the jackpot prize from the grey Lotto Scratcher | 68.7% | Late Lotto cleanup | Easy to miss if grey scratchers are underplayed |
| Supernova Bullseye | Hit the final Supernova bullseye, worth 2500x more gold | 68.8% | Late Darts / NG+ | Final added bullseye target |
| Rare Pull | Get a blue-rarity item from any Gacha machine | 68.1% | Gacha | Usually natural |
| I Had Trips! | Get a 3 of a Kind or better from Poker Pirate’s cards | 65.0% | Poker Pirate | More hands means more chances |
| Epic Pull | Get a purple-rarity item from any Gacha machine | 63.1% | Gacha | Improve pull volume |
| Bin Goosey - HIRED | Get Bin Goosey to join your team | 62.4% | Gacha | Late helper cleanup |
| Gumball Goose - HIRED | Get Gumball Goose to join your team | 59.9% | Gacha | Late helper cleanup |
| Lucky Spin | Get the top prize from Poppy’s Wheel game | 52.8% | Poppy’s Wheel | Start spinning early; it can take repeated attempts |
| Executor - BRIBED | Pay 1,000,000 stuffing to Executor | 51.5% | Base final escape | Required final base-run blocker |
| Legendary Pull | Get an orange-rarity item from any Gacha machine | 48.5% | Late Gacha | Buy animation skip if available before farming |
| Pearlescent Pull | Get a cyan-rarity item from any Gacha machine | 33.9% | Late Gacha cleanup | Hardest base-run rarity pull |
| New Game+ COMPLETED | Clear NG+ with 10M per room and more expensive upgrades | 23.5% | After base escape | Final 51/51 completion layer |
Room 1 Achievements: Bullseyes, Bottles, and Helpers
Room 1 has the easiest achievements, but it also has two hidden bottle achievements that players can miss because they look like background flavor.
Bottle of Hope and Metal Bottle
For Bottle of Hope and Metal Bottle, use the Darts room. Aim your darts above the main dartboard, toward the bottle sitting over the board area. Keep throwing at that upper bottle area until the first hidden bottle achievement triggers, then keep doing it until Metal Bottle triggers too.
Bullseye Achievements
The bullseye achievements come from unlocking and hitting each special bullseye layer. Early bullseyes are base-run achievements; the added Update #1 bullseyes are best treated as late Darts or NG+ scaling goals.
| Bullseye layer | Achievements | Practical route |
|---|---|---|
| Early base bullseyes | Bullseye, Super, Duper, Ultra, Turbo | Buy Bigger Bullseye, unlock zones, and keep throwing |
| Late base bullseyes | Royal, Pinnacle | Return with better bullseye size, Multi-Throw, and Rattling accuracy |
| Update #1 bullseyes | Cloud Nine, Starfire, Violet, Luscious, Gilded, Void, Emerald, Onyx, Sapphire, Supernova | Push Darts deeper in late game / NG+ instead of forcing them too early |
The most efficient Darts order is:
- Buy value upgrades so every hit matters.
- Buy Bigger Bullseye before serious Trial Mode attempts.
- Add Multi-Throw for more hit chances.
- Hire and upgrade Rattling Gunner.
- Hire Magician Mousey for study upgrades.
- Return later for tiny bullseyes instead of wasting early time.
Rattling Gunner and Magician Mousey
| Achievement | How to get it | Why it matters |
|---|---|---|
| Rattling Gunner - HIRED | Buy Rattling Gunner in Room 1 | Passive darts, bullseye hits, and Shadow Realm help |
| Magician Mousey - HIRED | Buy Magician Mousey in Room 1 | Study-style upgrades for Darts scaling |
Verminous - BRIBED unlocks when you pay 1,000,000 gold. It is required progression, but I still like buying the important Darts helpers first so the next rooms feel less slow.
Lotto and Scratcher Achievements
The Lotto room is where the achievement list starts to depend on repeated attempts. Your goal is to build ticket value and automation, not to scratch weak tickets forever.
Best Lotto Order for Achievements
| Priority | Buy / unlock | Why it helps achievements |
|---|---|---|
| 1 | Ticket value upgrades | Makes Big time win and best-win scaling easier |
| 2 | Ticket size upgrades | More spaces means more chances at good payouts and jackpots |
| 3 | Accountant Toad | Turns best wins into passive income |
| 4 | Abacus Frog | Makes repeated ticket play generate EXP and permanent boosts |
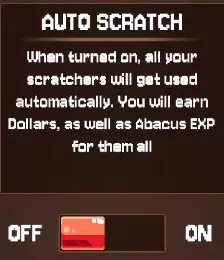
| 5 | Auto Scratch | Removes the worst manual clicking and keeps Lotto moving |
| 6 | Jackpot chance / jackpot symbols | Best after tickets are already worth something |
How to Get Big time win!
Big time win! requires 10,000+ dollars from a single scratcher. Passive helper money does not count as the ticket result.
Good ways to trigger it:
- hit a jackpot after ticket value upgrades;
- use a stronger ticket color instead of the starter ticket;
- expand rows, columns, and lives before trying serious runs;
- return later if your single-ticket ceiling is still too low.
How to Get All Five JACKPOT Achievements
| Achievement | Target | Cleanup advice |
|---|---|---|
| 1st JACKPOT! | Orange Lotto Scratcher jackpot | Usually happens first |
| 2nd JACKPOT! | Green Lotto Scratcher jackpot | Improve green ticket size and lives |
| 3rd JACKPOT! | Intermediate Lotto Scratcher jackpot | Check this if one middle jackpot is missing |
| 4th JACKPOT! | Blue Lotto Scratcher jackpot | Come back after stronger value scaling |
| 5th JACKPOT! | Grey Lotto Scratcher jackpot | Easy to forget during final cleanup |
If one jackpot layer feels awful, stop farming it for a while. Better ticket value, larger layouts, Abacus EXP, and Auto Scratch make jackpot cleanup much easier later.
Gorgon - BRIBED is required progression. Pay 1,000,000 money once Lotto is strong enough to carry you into Pachinko.
Pachinko, Dice, and Poker Achievements
Pachinko achievements are mostly about keeping the system active long enough for dice and poker events to happen.
| Achievement | How to get it | Cleanup note |
|---|---|---|
| Bubba - HIRED | Hire Bubba | Buy when available |
| Red Hot Roller | Roll a 6 and play the Red Dice bonus game | Chance-based |
| Ice Cold Roller | Roll an 8 and play the Blue Dice bonus game | Chance-based |
| Mean Green Roller | Roll a 10 and play the Green Dice bonus game | Chance-based |
| Poker Pirate - HIRED | Hire Poker Pirate | Needed for I Had Trips |
| I Had Trips! | Get a 3 of a Kind or better from Poker Pirate’s cards | More hands means more chances |
| Rimmington - BRIBED | Pay 1,000,000 tickets to Rimmington | Required progression |
I Had Trips!
I Had Trips! is chance-based. The goal is not to solve a fixed card puzzle; the goal is to see enough Poker Pirate hands while you keep progressing.
If it is missing near the end, return after your Pachinko flow is stronger. Do not stop your whole run early just to stare at one poker trigger.
Shadow Realm Achievement: Boss Slain
Boss Slain requires defeating the first Shadow Mode boss. Treat it as a damage check.
Before serious attempts, improve:
- Rattling Gunner speed and accuracy;
- extra darts and throw speed;
- special dart effects;
- Shadow Realm duration;
- mark or damage upgrades;
- cross-room multipliers that help you buy Darts upgrades faster.
Sushi, Poppy’s Wheel, and Lucky Spin
The Sushi stage leads into Poppy the Kangaroo - HIRED, Ghost Janitor - HIRED, Hivemind - BRIBED, and Lucky Spin.
Hivemind - BRIBED is required progression: pay 1,000,000 ribbons after your fuel, Sushi tiers, ribbon gain, and cross-room bonuses are strong enough.
How to Get Lucky Spin
Lucky Spin unlocks when you get the top prize from Poppy’s Wheel.
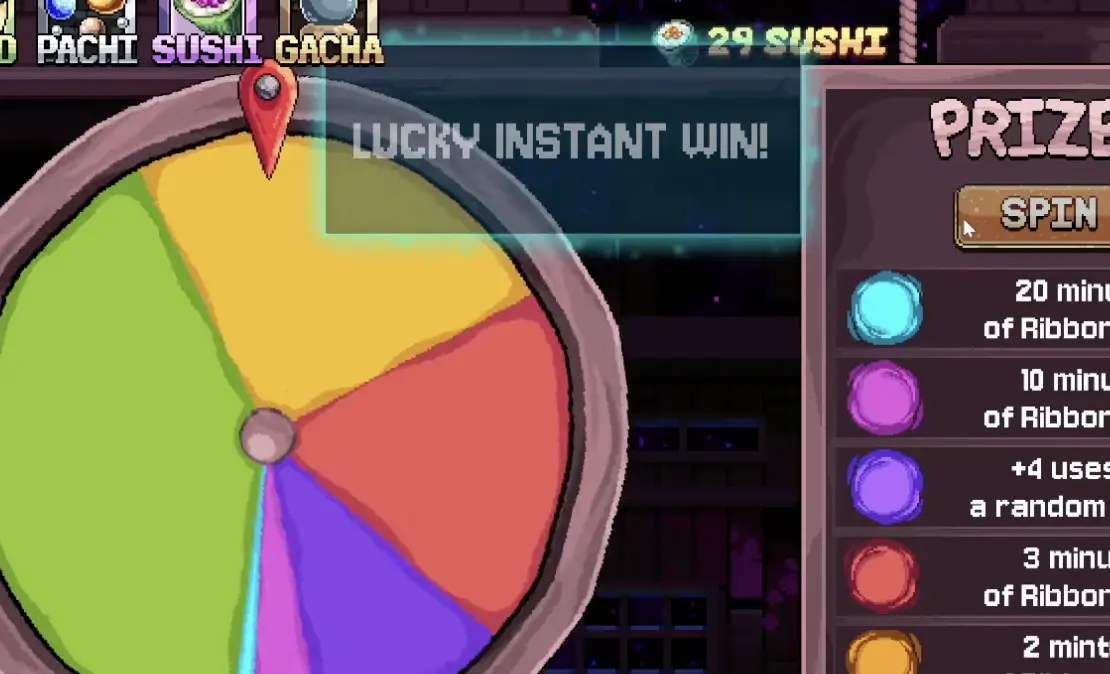
There is no official odds display on the wheel, so I would not publish a fake percentage. The best practical anchor is the current community report that a recent update makes the top prize effectively guaranteed after about 40 spins. Treat that as a cleanup checkpoint, not as a visible in-game promise: some players get Lucky Spin earlier, older reports include multi-hour dry streaks, and patch state matters. Start Poppy’s Wheel in the Sushi stage, spend spins while you are still doing Shadow Realm or Gacha cleanup, and only hard-focus it if it is one of your last missing achievements.
| If Lucky Spin is missing… | What to do |
|---|---|
| You just unlocked Poppy | Keep progressing; do not stop everything yet |
| You are still building Sushi / Hivemind | Spin whenever available while pushing ribbons |
| You are also missing Gacha pulls | Run Poppy in parallel with Gacha cleanup |
| It is your last base-run achievement | Keep spinning until roughly the 40-spin community checkpoint before assuming something is wrong |
Gacha Achievements: Legendary Pull and Pearlescent Pull
Gacha is the biggest base-run cleanup wall. Rare Pull and Epic Pull usually happen naturally, but Legendary Pull and especially Pearlescent Pull need better machine priority and real-time efficiency.

Gacha Machine Priority
| Priority | What to do | Why it matters |
|---|---|---|
| 1 | Buy Gacha animation skip if the shop offers it | It does not improve odds, but it saves the most real time during Legendary/Pearlescent farming |
| 2 | Improve Gacha token generation | More pulls per minute means more chances |
| 3 | Add inventory slots and pedestal support | Prevents useful items from getting wasted or ignored |
| 4 | Keep strong passive items | Passive bonuses help without using a pedestal slot |
| 5 | Prioritize Goldfish Gacha if your tooltip shows a 1.5x rare-rate bonus | This is the best cleanup angle for Legendary Pull and Pearlescent Pull if available in your build |
| 6 | Use higher-cost machines only when your token income can support them | Expensive pulls are not automatically better if they slow your attempt rate too much |
| 7 | Trash duplicates for stuffing once the item is no longer useful | Stuffing leads toward Executor - BRIBED |
Animation Skip Is a Real Achievement Upgrade
For Gacha cleanup, animation skip is not just comfort. It changes how fast you can roll for Legendary Pull and Pearlescent Pull in real time. If the shop offers a Gacha animation skip or faster pull option, I would buy it before serious rarity farming, even if another upgrade looks stronger on paper.
Legendary Pull and Pearlescent Pull
| Achievement | Requirement | Best cleanup plan |
|---|---|---|
| Rare Pull | Blue-rarity Gacha item | Usually natural |
| Epic Pull | Purple-rarity Gacha item | Keep pulling while building the system |
| Legendary Pull | Orange-rarity Gacha item | Use animation skip, token generation, and better machines |
| Pearlescent Pull | Cyan-rarity Gacha item | Prioritize rare-rate bonuses such as Goldfish Gacha if available |
Bin Goosey - HIRED and Gumball Goose - HIRED are late Gacha helper achievements. If they are missing, keep progressing Gacha unlocks and helper systems rather than assuming you missed an earlier room.
Executor - BRIBED
Executor - BRIBED requires 1,000,000 stuffing. It is the final base-run bribe, but it is not one of the hardest achievements. The hard part is making sure you do not escape while rare cleanup is still unfinished.
Final Base-Run Cleanup Checklist
Use this once before confirming the first escape.
| Category | Confirm this | Why it matters |
|---|---|---|
| Hidden Room 1 | Bottle of Hope and Metal Bottle | Easy to forget after leaving Darts |
| Bullseyes | Bullseye through Pinnacle | Return with better bullseye size if needed |
| Lotto | Big time win and all five JACKPOT achievements | Some jackpot layers are easy to underplay |
| Poker | I Had Trips | Chance-based; needs enough hands |
| Shadow Realm | Boss Slain | Damage check |
| Sushi / Poppy | Poppy, Ghost Janitor, Hivemind, Lucky Spin | Lucky Spin can take many wheel attempts |
| Gacha helpers | Bin Goosey and Gumball Goose | Late helper cleanup |
| Gacha rarity | Rare, Epic, Legendary, Pearlescent Pull | Pearlescent Pull is the main base-run wall |
| Base escape | Executor - BRIBED | Finish after the rare checks |
New Game+ Achievements
The New Game+ update added 11 achievements: ten late bullseyes and New Game+ COMPLETED.
| Achievement | Requirement | Route note |
|---|---|---|
| Cloud Nine Bullseye | Hit the white Cloud Nine bullseye, worth 30x more gold | Push Darts deeper after the base route |
| Starfire Bullseye | Hit the blazing Starfire bullseye, worth 50x more gold | Keep scaling bullseye size and Rattling |
| Violet Bullseye | Hit the Violet bullseye, worth 80x more gold | Late Darts target |
| Luscious Bullseye | Hit the Luscious bullseye, worth 125x more gold | Late Darts target |
| Gilded Bullseye | Hit the Gilded bullseye, worth 200x more gold | Late Darts target |
| Void Bullseye | Hit the Void bullseye, worth 300x more gold | Late Darts target |
| Emerald Bullseye | Hit the Emerald bullseye, worth 500x more gold | Late Darts target |
| Onyx Bullseye | Hit the Onyx bullseye, worth 800x more gold | Late Darts target |
| Sapphire Bullseye | Hit the Sapphire bullseye, worth 1200x more gold | Late Darts target |
| Supernova Bullseye | Hit the final Supernova bullseye, worth 2500x more gold | Final bullseye target |
| New Game+ COMPLETED | Clear NG+ with 10,000,000 per room and more expensive upgrades | Final 51/51 achievement |
How Much More Expensive Is New Game+?
New Game+ is the one part of the current 51-achievement route that old all-40 guides do not cover well. The verified hard number is the room blocker change: each normal 1,000,000 bribe becomes 10,000,000 per room in NG+. Upgrade prices also scale much harder, but the increase is not one clean universal multiplier across every shop.
That means NG+ is not just “the same run, only 10x longer.” Some early upgrades can feel much more punishing than the bribe number suggests, so rebuild the run in this order: Darts income first, then Rattling Gunner and Magician Mousey, then Lotto automation, then later-room scaling. Do not brute-force the later rooms before your early automation is back online.
What Changes in New Game+
The verified hard number is the room blocker change: the normal 1,000,000 requirement becomes 10,000,000 per room in NG+. Upgrade prices also scale much harder, but I would not describe every shop with one fixed multiplier because the pain is not uniform across rooms or later NG cycles. Community reports show some early upgrades can jump far beyond a simple 10x increase, such as a second dart upgrade going from a cheap base-run buy to roughly the 100K range in NG+.
So the NG+ plan is not “do the same thing, only 10x longer.” The plan is to use the new NG+ shop, automation, cost reduction, and high-impact Darts scaling earlier than you did in the base run.
When you start NG+, check these things immediately:
| NG+ check | Why it matters |
|---|---|
| Darts starting power | Rebuild value, bullseye size, and extra darts before rushing the 10M bribe |
| Rattling and Mousey timing | Automation and study upgrades are still the backbone of a smooth restart |
| Bullseye zone progress | The added bullseye achievements are natural Darts scaling checkpoints |
| Trial / secret shop value | Cost reduction and permanent multipliers matter more because upgrade prices scale harder than the bribe target suggests |
| Lotto automation timing | Auto Scratch and Abacus-style scaling reduce repeated manual work |
| Gacha cleanup status | Do not rely on NG+ to fix base-run Pearlescent or Lucky Spin if you could finish them before escape |
My NG+ priority is:
- Rebuild Darts first: value, bullseye size, extra darts, Rattling, Mousey, and NG+ shop upgrades.
- Buy automation and cost reduction earlier than you did in the base run, because upgrade prices scale aggressively.
- Use the new bullseyes as Darts progress checks instead of trying to force Supernova immediately.
- Move through Lotto, Pachinko, Sushi, and Gacha with the same room order, but do not pay each 10M blocker until that room has its main automation running.
- Finish New Game+ COMPLETED only after you are sure no base-run rare achievements are still missing.
FAQ
How many achievements are in Fortune Mill? +
Fortune Mill has 51 achievements after the New Game+ update. The original base list had 40 achievements, then Update #1 added 10 more bullseye achievements and New Game+ COMPLETED.
Can you get all Fortune Mill achievements in one run? +
You can clear almost every base-run achievement before the first escape, but 51/51 requires New Game+ COMPLETED. Treat the first escape as base-run cleanup, then finish NG+ as the final pass.
What are the hardest Fortune Mill achievements? +
The hardest cleanup achievements are usually Pearlescent Pull, New Game+ COMPLETED, Legendary Pull, Lucky Spin, I Had Trips, and any missing late bullseyes. Executor - BRIBED is a final progression gate, not a true difficulty achievement.
How do you get Bottle of Hope and Metal Bottle? +
In the Darts room, aim your darts above the main dartboard toward the bottle area. Keep hitting that top bottle area until Bottle of Hope triggers, then continue until Metal Bottle unlocks.
How do you get all jackpot achievements? +
Unlock jackpot symbols, upgrade ticket value and ticket size, then hit the jackpot prize from each required Lotto Scratcher layer. Do not farm weak tickets forever; return after Auto Scratch, Abacus Frog, and stronger ticket upgrades.
How do you get Lucky Spin? +
Lucky Spin unlocks from the top prize on Poppy's Wheel. Start spinning after Poppy becomes available in the Sushi stage. Current community reporting points to a post-update safety around 40 spins, but because the game does not show official odds, use that as a practical anchor rather than a guaranteed tooltip rule.
How much more expensive is New Game+ in Fortune Mill? +
New Game+ raises the main room bribe target from 1,000,000 to 10,000,000 per room, and several upgrades become much more expensive. It is not a clean universal 2x or 10x multiplier across every upgrade: some early upgrades jump far harder than others, so the safest NG+ route is to rebuild Darts income first, buy Rattling Gunner and Magician Mousey again when available, then unlock Lotto automation before trying to brute-force later rooms.
How do you get Legendary Pull and Pearlescent Pull? +
Buy animation skip if available, improve token generation, add inventory and pedestal support, then prioritize stronger machines. If your build shows Goldfish Gacha with a 1.5x rare-rate bonus, use it for Legendary Pull and Pearlescent Pull cleanup.
How do you get New Game+ COMPLETED? +
After the first escape, clear New Game+ with 10,000,000 required per room. The verified bribe change is 1M to 10M; upgrade costs also scale much harder, but they should not be described as one fixed multiplier across every shop.