Crashout Crew Safety Violations Guide
A practical Crashout Crew Safety Violations guide with a modifier overview table, best picks, Faulty Wiring and Lights Out tips, Defective HVAC counters, Hardhat Area meteors, Ordinance Delivery explosives, modifier combos, solo and co-op advice, and upgrade counters.
Updated:
Quick Answer
Safety Violations are worth picking only when your team can name the problem and counter it. If the modifier adds darkness, heat, stress, slippery floors, goo, bees, meteors, fire, or explosives, buy and play around that problem first. Do not choose the highest payout just because it pays more; choose the violation your route, upgrades, and team roles can survive.
Safety Violations Overview
Use this table when you are on the selection screen and need to decide quickly. The safest pick is not always the lowest payout. The safest pick is the one your team can counter with routing, upgrades, and roles.
| Safety Violation | Reward | Difficulty | Main problem | Duration planning | Pick early? | Best counters | Solo vs co-op note |
|---|---|---|---|---|---|---|---|
| Faulty Wiring / Lights Out | +$300 | High | Periodic global blackouts, near-zero visibility outside the forklift headlight cone, missed cargo, side collisions, bad routing | Check the card header. If duration is not visible, plan around multiple orders. | Avoid early unless the route is simple. | Standard Shelf, Cup Holder, Aromatherapy, clear callouts, one button owner | Co-op is harder because players collide in the dark. Solo is slower but cleaner. |
| Defective HVAC | +$200 | Medium-High | Heat or fire-style warehouse hazards, unsafe routes, stress pressure, possible fire risk | Next 2 Shifts shown on captured card. | Pick for Hot to Trot or when the route is already safe. | Safer routing, Cup Holder, Aromatherapy, Fire Extinguisher or Water Balloon Pump if fire/heat hazards appear | Solo can route carefully; co-op needs lane discipline so players do not push each other into danger zones. |
| Hardhat Area | +$200 | High | Falling hazards / meteor-style impacts from above | Next 2 Shifts shown on captured card. | Avoid while learning. | Covered routes when possible, safer staging, Cup Holder, clear crossings | Co-op can split recovery jobs; solo should avoid exposed paths. |
| Ordinance Delivery | +$400 | High | Explosive extras can appear in orders, creating blast risk and panic handling | Check the card header. Treat as high risk even if short. | Avoid early unless you have a plan for explosives. | Blast Shields, Fire Extinguisher, The Grippers, safer staging | Co-op needs strict handoff rules; solo should move explosive cargo slowly. |
| Allergies / Foreign Particulate | +$600 shown in card example | Medium-High | Stress pressure and allergy-style chaos | Card example shows a limited shift window; check the header before picking. | Only if you have stress control. | Cup Holder, Aromatherapy, safer roles | Co-op needs role discipline; solo needs more tolerance because no one can recover for you. |
| Goo / Oil / Spills | Varies | Medium | Main lanes become messy, slippery, or slow | Treat as a route problem until cleaned or countered. | Good first pick if cleanup is available. | Scrubbie, Super Scrubber, Water Balloon Pump, Leaf Blower | Co-op can assign a cleaner; solo should avoid spending the whole shift cleaning. |
| Slippery Floors / Ice | Varies | Medium-High | Turns, braking, and truck approaches become unreliable | If the floor affects the whole route, treat it as a full-shift risk. | Pick only if you can drive carefully. | Tire Chains, slower routes, fixed staging | Solo can learn the drift; co-op traffic makes it more dangerous. |
| Bees / Honey / awkward cargo pressure | Varies | Medium-High | Special cargo gets dropped, players panic, routes get crowded | Risk grows if the cargo appears repeatedly. | Good only with cargo control. | The Grippers, Standard Shelf, Cup Holder | Co-op needs one special-cargo owner; solo needs safer staging. |
| Fire / Fuses | Varies | Medium-High | Fire blocks routes or threatens dangerous cargo | Duration matters less than whether fire hits the main lane. | Pick only with a counter. | Fire Extinguisher, Small Fire Sprinkler, Water Balloon Pump | Co-op can assign fire control; solo should buy a direct counter first. |
Quick comparison of common Safety Violations and how to handle them.
Duration: Check the Card Header First
Duration changes the whole decision. A modifier that lasts one short shift is very different from a modifier that affects the next two shifts or multiple orders.
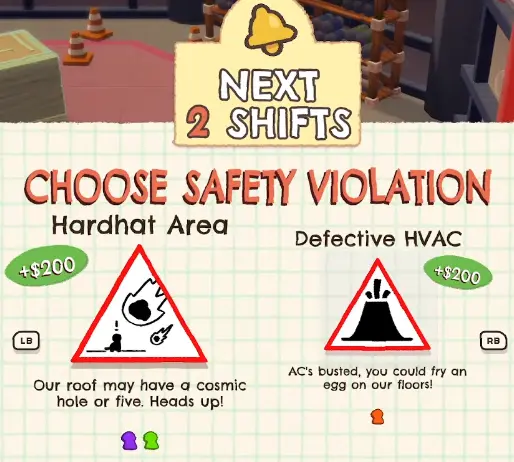
Some captured Safety Violation cards show Next 2 Shifts at the top. When the card clearly shows that, plan around both shifts. When the header is not visible or the duration is unclear, treat the modifier as something that can affect multiple orders and avoid picking anything your crew cannot handle repeatedly.
| Duration situation | How to think about it |
|---|---|
| Clearly one shift | You can take a harder modifier if the current layout is simple and your team has a counter. |
| Next 2 Shifts | Pick safer modifiers and avoid anything that breaks the core route twice in a row. |
| Duration unclear | Assume it can affect multiple orders until proven otherwise. |
| Modifier affects the main lane | Treat it as high impact even if the duration is short. |
| Modifier affects rare side areas | Safer if you can route around it. |
| Modifier is unfamiliar | Skip it until you understand the base contract. |
How duration changes Safety Violation decisions.
Faulty Wiring / Lights Out Tips
Faulty Wiring is the in-game Safety Violation that creates the Lights Out problem. The card says: “The lights are acting up again. We’ll fix that (eventually)!” In practice, it causes periodic global blackouts across the warehouse.
During the blackout, most of the warehouse outside the forklift headlight cone becomes nearly impossible to read. The headlight helps with what is directly in front of you, but it does not protect you from side traffic, hidden hazards, or teammates crossing from another lane.

| Problem during Faulty Wiring | Better habit |
|---|---|
| Players crash into each other from the side. | Use short lane callouts: “middle,” “coming down,” “truck lane clear,” or “do not cross.” |
| Hazards are hard to see during blackout windows. | Slow down before turns and let one player call dangerous lanes. |
| Cargo gets lost in the dark. | Stage boxes on shelves or in one clear pickup zone. |
| The team wastes too much time moving slowly. | Keep one safe main route instead of improvising every delivery. |
| Stress rises from repeated mistakes. | Buy Cup Holder or Aromatherapy before pure speed upgrades. |
| Special cargo gets dropped. | Prioritize The Grippers and fixed staging. |
| The button gets pressed early. | Assign one shipper and require a final call before sending. |
Use this plan when Faulty Wiring makes the warehouse hard to navigate.
Defective HVAC
Defective HVAC is a heat and fire-style Safety Violation. The card says: “AC’s busted, you could fry an egg on our floors!” In the captured card example, it gives +$200 and lasts for the next 2 shifts.
This modifier can add heat or fire-style hazards to the warehouse while your crew is trying to finish orders. It also matters for achievement hunters: completing a contract with Defective HVAC enabled is tied to the Hot to Trot achievement.
Treat Defective HVAC as a floor-safety and stress-control modifier. The main risk is that normal routes become unsafe, especially if players keep crossing dangerous floor areas while carrying cargo or rushing toward the truck.
| Problem during Defective HVAC | Better response |
|---|---|
| The main route crosses heat or fire hazards. | Reroute before trying to drive faster. |
| Players take repeated stress from environmental danger. | Buy Cup Holder or Aromatherapy and give stressed players safer jobs. |
| Fire or heat appears near cargo. | Move important cargo away before final loading. |
| Co-op players push each other into danger. | Split lanes and stop crowding the same route. |
| The hazard affects a truck approach. | Build a staging point before the danger zone and send cargo in controlled trips. |
| You are going for Hot to Trot. | Play safer than usual. Finishing the contract matters more than taking a fast but messy route. |
How to handle Defective HVAC.
Defective HVAC Counter Notes
Defective HVAC clearly points to heat or fire-style danger, but the exact counter depends on what appears in the shift. Use the safest response first: route around danger, stage away from hot areas, and buy direct fire or stress tools when the problem is visible.
| Situation | Best current response |
|---|---|
| Fire or fuses appear. | Fire Extinguisher is the strongest direct counter. |
| Heat appears with spills or wider floor danger. | Water Balloon Pump may help if the hazard behaves like fire or spill pressure. |
| Movement feels unstable near the hazard. | Use Tire Chains only if traction is part of the problem. |
| Explosives or special cargo are active. | Keep them away from heat or fire zones and use safer staging. |
| Danger zones are fixed. | Route around them and keep cargo staging away from the area. |
| Danger zones shift or appear dynamically. | Slow down, watch one order cycle, then commit to a safer route. |
How to think about Defective HVAC counters.
Hardhat Area
Hardhat Area is the falling-hazard Safety Violation. The card says: “Our roof may have a cosmic hole or five. Heads up!” In the captured card example, it gives +$200 and lasts for the next 2 shifts.
Treat Hardhat Area like a meteor or falling-impact modifier. The danger is not only the hit itself; it is the panic movement after players try to dodge, drop cargo, or swerve into teammates.
| Hardhat Area problem | Better response |
|---|---|
| Falling hazards hit the main route. | Delay the crossing or reroute through safer space. |
| Cargo gets scattered after impact. | Stage important cargo away from exposed danger zones. |
| Players panic and collide. | Slow the callouts down and assign route ownership. |
| Special cargo is active. | Move it carefully and avoid exposed crossings. |
| You need speed to beat the timer. | Add speed only after the safe route is known. |
How to play around Hardhat Area.
Ordinance Delivery
Ordinance Delivery is an explosive-cargo Safety Violation. The card says: “Some explosive extras MAY have slipped into our orders…” It gives +$400 in the captured card example, which makes it tempting, but the risk is high.
Treat this as a contract where cargo handling matters more than raw speed. One explosive mistake can turn a good order into a full shift collapse.
| Ordinance Delivery problem | Better response |
|---|---|
| Explosive cargo appears in an order. | Move it slowly and keep the route clear. |
| Players crowd the explosive item. | Assign one player to handle it and everyone else to clear traffic. |
| Explosion risk is near the truck. | Stage cargo away from the truck button until the order is ready. |
| Players drop or bump explosive cargo. | Use The Grippers or safer lane rules. |
| Fire or fuse danger appears too. | Fire Extinguisher and Blast Shields become much more valuable. |
How to handle Ordinance Delivery.
Allergies and Stress Pressure
Allergies or Foreign Particulate-style modifiers are dangerous because they punish small mistakes. A team that is already bumping into each other will crash out even faster once stress pressure is added.
The answer is not pure speed. The answer is more tolerance, faster recovery, and safer jobs for stressed players.
| Stress problem | What to do |
|---|---|
| Players crash out too quickly. | Buy Cup Holder before speed. |
| Stress stays high for too long. | Buy Aromatherapy after or alongside Cup Holder. |
| One player keeps taking risky jobs. | Move them to safer staging or cleanup until stress drops. |
| Co-op collisions keep triggering stress. | Split lanes and stop crowding the truck. |
| Wrong orders cause panic. | Assign a reader and one shipper. |
How to play stress-heavy Safety Violations.
Goo, Oil, Spills, and Floor Mess
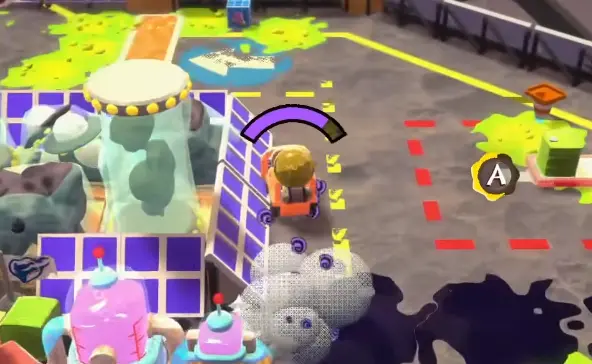
Floor mess is manageable when it is local. It becomes dangerous when it sits on the main route and every delivery has to cross it.
If your team drives through the same spill five times, the modifier is no longer “small.” It is now the center of the run.
| Floor mess problem | Better response |
|---|---|
| Mess is on the main lane. | Clean that lane first or reroute all traffic. |
| Players keep slipping through it. | Call the lane blocked and stop using it. |
| Cargo lands inside the mess. | Stage cargo somewhere safer before loading. |
| Everyone half-cleans and no one ships. | Assign one cleaner or floater. |
| The mess keeps returning. | Buy Scrubbie, Super Scrubber, Water Balloon Pump, or Leaf Blower. |
How to handle floor mess during a shift.
Slippery Floors and Ice
Slippery floors change how the forklift stops, turns, and lines up with the truck. The danger is not only movement; it is button accuracy, cargo placement, and teammate traffic.
Tire Chains are the cleanest counter when slippery or hazard-covered lanes are the main problem. If you do not have them, slow down before corners and stage cargo away from tight truck approaches.
| Slippery floor problem | Better response |
|---|---|
| You overshoot turns. | Brake earlier and avoid sharp last-second turns. |
| Players slide into each other. | Use one-way lanes or split the warehouse by zone. |
| Truck approach is slippery. | Stage cargo before the final loading area. |
| Cargo keeps drifting into traffic. | Use shelves or safer staging zones. |
| The same lane is always dangerous. | Buy Tire Chains or route around it. |
How to survive slippery floors or ice-style movement.
Bees, Honey, and Awkward Cargo
Bees and honey-style problems create stress because cargo becomes awkward and players panic around it. The worst mistake is letting everyone chase the special item at once.
Use one owner for risky cargo. Everyone else should keep the route, truck area, and staging zone clean.
| Special cargo problem | Better response |
|---|---|
| Cargo is easy to drop. | Buy The Grippers and avoid crowded crossings. |
| Everyone chases the special item. | Assign one special-cargo player. |
| Honey or awkward cargo blocks staging. | Use a dedicated shelf or safe drop zone. |
| Stress rises around the cargo. | Buy Cup Holder or Aromatherapy. |
| The route is long. | Add Teleporter or runner tools only after handling is stable. |
How to handle bees, honey, or awkward cargo pressure.
Fire, Fuses, and Explosions
Fire and explosions are not normal route problems. They are failure multipliers. If they reach the wrong cargo or the truck area, one mistake can collapse the whole shift.
Buy direct counters when fire or explosive pressure is active. Do not treat these modifiers as something you can always drive around.
| Hazard | Best response |
|---|---|
| Small fire only | Small Fire Sprinkler can be enough if the route is simple. |
| Fires and fuses | Fire Extinguisher is the stronger direct counter. |
| Fires plus spills | Water Balloon Pump covers both problems. |
| Explosive cargo | Use Blast Shields if explosions are active and route carefully. |
| Fire near truck area | Clear the danger before final loading and sending. |
How to counter fire, fuses, and explosions.
Dangerous Modifier Combinations
Most bad Safety Violation choices come from stacking two problems that attack the same part of the run. One slippery modifier is manageable. Slippery floors plus goo can turn every lane into a crash-out trap.
| Modifier combo | Why it is dangerous | Safer plan |
|---|---|---|
| Faulty Wiring + Meteors / Hardhat Area | Periodic global blackouts hide routes and hazards, while falling impacts punish exposed crossings. | Keep one safe route, call crossings early, and avoid panic driving during blackout windows. |
| Faulty Wiring + Bees / Honey | Low visibility makes players collide more often, while awkward cargo punishes every bump. | Standard Shelf → The Grippers → Cup Holder → Aromatherapy. |
| Defective HVAC + Fire / Explosions | Heat or fire-style hazards can turn unsafe cargo handling into a full shift collapse. | Fire Extinguisher, Blast Shields, safer staging, and slower controlled routes before speed. |
| Goo / Spills + Slippery Floors | The floor becomes both messy and hard to control, making every trip unreliable. | Scrubbie or cleanup first, then Tire Chains if the same lane stays dangerous. |
| Allergies + Hardhat Area | Stress pressure plus sudden falling hazards gives players little room to recover. | Cup Holder first, then safer staging and slower exposed crossings. |
| Ordinance Delivery + Fire / Fuses | Explosives plus fire pressure can turn one bad handoff into a failed order. | Assign one explosive handler and buy Fire Extinguisher or Blast Shields if available. |
| Bees / Honey + Long Routes | Awkward cargo becomes worse when every mistake requires a long recovery trip. | The Grippers, staging shelf, then Teleporter only after handling is stable. |
| High stress + crowded co-op lanes | The modifier exposes poor team routing immediately. | Split lanes, assign one shipper, and move stressed players to safer tasks. |
Modifier combinations that are harder than they look.
Solo vs Co-op Safety Violation Choices
Solo and co-op handle modifiers differently. Solo has fewer collisions, but every job is yours. Co-op has more hands, but more traffic.
| Modifier type | Solo risk | Co-op risk | Better approach |
|---|---|---|---|
| Faulty Wiring / Lights Out | Slower navigation and more missed cargo. | Teammate collisions in low visibility. | Solo: fixed staging. Co-op: short callouts and zone control. |
| Stress pressure | One crash out can ruin the whole shift. | Chain crash outs if players crowd each other. | Buy Cup Holder or Aromatherapy early. |
| Floor mess | Cleanup steals your delivery time. | Cleaner role can handle it, but only if assigned. | Solo favors Scrubbie; co-op assigns a floater. |
| Defective HVAC | Unsafe routes cost time and stress. | Players can push each other into hot or unsafe zones. | Stage away from the hazard and avoid crowded lanes. |
| Hardhat Area / Meteors | Harder to recover alone after disruption. | More players can recover, but more can panic. | Keep staging away from danger zones. |
| Ordinance Delivery / explosives | One explosive mistake can ruin the order. | Multiple players may crowd the explosive item. | Assign one handler and keep the route clear. |
| Special cargo | One dropped item costs a lot of time. | Multiple players may crowd the risky cargo. | Use The Grippers and one cargo owner. |
How Safety Violation difficulty changes by player count.
Upgrades and Rank During Safety Violations
For full upgrade details, use the Best Upgrades Guide. During Safety Violations, the upgrade rule is simple: buy the counter before buying speed.
For S Rank attempts, learn the base route first. Add Safety Violations only after you can complete the contract cleanly without them. Extra money is useful only if the modifier does not create wrong orders, crash outs, or repeated route failures.
| Violation problem | Upgrade direction |
|---|---|
| Stress / crash outs | Cup Holder, Aromatherapy |
| Dropped awkward cargo | The Grippers |
| Messy floor | Scrubbie, Super Scrubber, Water Balloon Pump, Leaf Blower |
| Slippery or hazardous lanes | Tire Chains |
| Fire or fuses | Fire Extinguisher, Small Fire Sprinkler |
| Explosions | Blast Shields |
| Long routes after the modifier is controlled | Teleporter, Nitro Canisters, Boost Pad |
Fast upgrade mapping for Safety Violation problems.
In-Shift Emergency Plan
If you already picked a Safety Violation and the shift is falling apart, do not try to solve everything at once. Stabilize the route first.
| Emergency problem | First move |
|---|---|
| Everyone is lost or crashing. | Stop crossing the middle and call one safe lane. |
| Wrong orders are happening. | Assign one reader and one shipper immediately. |
| Main lane is blocked. | Clean or abandon that lane before sending another truck. |
| Stress is high. | Give stressed players safer jobs until the meter drops. |
| Special cargo is loose. | Stage it safely before trying to finish the order. |
| Hazard keeps repeating. | Change the route instead of driving through it again. |
Use this when a Safety Violation is already active and the run is going badly.
FAQ
What are Safety Violations in Crashout Crew? +
Safety Violations are optional shift modifiers that add extra risk for extra reward. They can create darkness, stress pressure, floor hazards, slippery routes, bees, meteors, fires, explosions, or other warehouse problems.
Which Safety Violation should I pick first? +
Pick the modifier your team can clearly counter. Localized floor hazards, mild mess, or predictable route problems are usually safer than Faulty Wiring, Meteors, explosives, or stacked unknown modifiers.
How do you survive Faulty Wiring or Lights Out in Crashout Crew? +
During Faulty Wiring, the warehouse goes through periodic global blackouts. Use fixed staging points, short lane callouts, slower turns, one button owner, and clear routes. Do not buy pure speed first.
What does Defective HVAC do in Crashout Crew? +
Defective HVAC is a heat or fire-style Safety Violation. The card says the AC is busted and the floor is hot enough to fry an egg. Treat it as a floor-safety and stress-control modifier, and route around heat or fire hazards before trying to go faster.
How long do Safety Violations last? +
Always check the card header. Some captured Safety Violation cards show Next 2 Shifts. If duration is not visible, plan as if the modifier can affect multiple orders and avoid anything your team cannot handle repeatedly.
Should I stack multiple Safety Violations? +
Only stack modifiers when they affect different problems and you have counters ready. Avoid combinations like Faulty Wiring plus Meteors, Goo plus Slippery Floors, or Defective HVAC plus explosives until your team can handle the base route cleanly.
What upgrades counter Safety Violations? +
Cup Holder and Aromatherapy help stress pressure, Scrubbie and Super Scrubber help mess, Tire Chains help slippery or hazard-covered routes, Fire Extinguisher handles fires and fuses, Blast Shields help explosions, and The Grippers help awkward cargo.
Are Safety Violations worth it for S Rank? +
Safety Violations can help you buy better upgrades, but they are risky during S Rank attempts. Learn the base route first, then add one manageable modifier only if it does not cause wrong orders, crash outs, or route chaos.