How I Win Sea Events Without Losing a Ship
My battle routine for matching ships and Captains, managing Supplies, reading incoming damage, and escaping before a failed roll destroys the Crew.
Updated:
Quick Answer
Before I enter a sea event, I compare its numerical requirements with the ship’s final stats after Crew and Captain bonuses. During the event, I read the enemy action first, protect Crew when replaceable Hull or Treasure can absorb the cost, and preserve Supplies for later stages. I escape before one bad roll can remove the remaining safety margin, not after the ship is already beyond recovery.
My first avoidable naval failure was not caused by weak weapons.
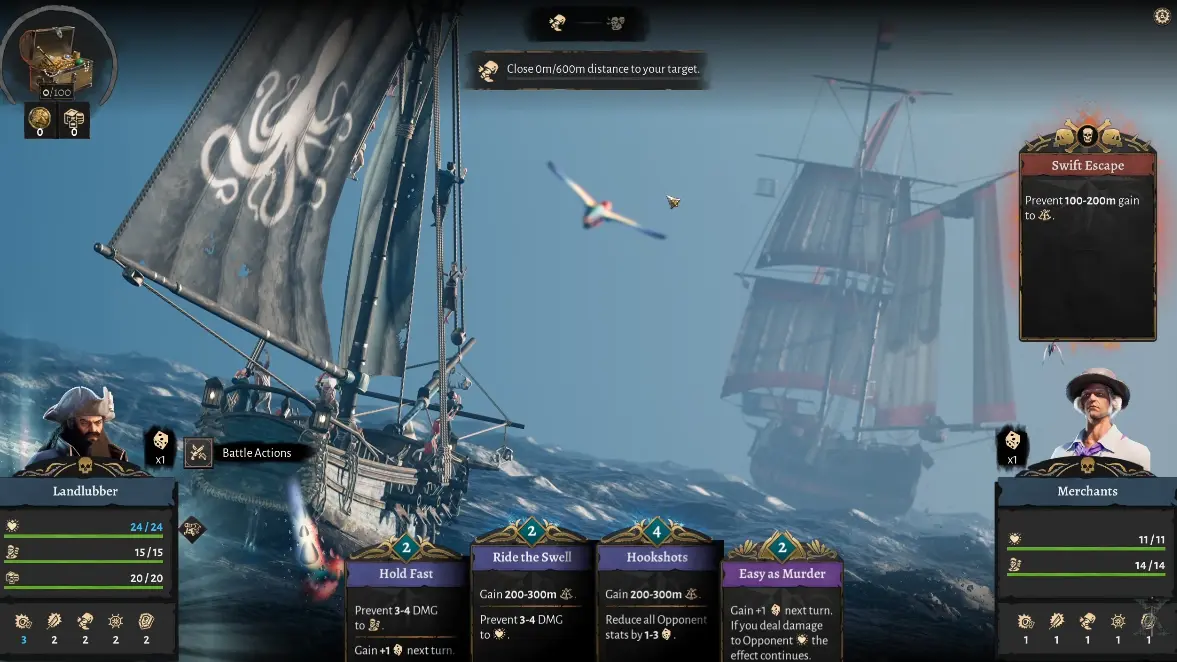
I sent a direct-combat Captain after a Merchant Ship whose first objective was a chase. The ship had only 2 Speed.
Gun Damage became useful later, but it did nothing while the target was still pulling away. Repeated distance actions consumed Supplies before the real fight began.
I finished the event only after using a Support Action and accepting damage that a better ship and Captain pairing could have avoided.
Since then, I ask five questions before departure:
- What is the first objective?
- Which later objective is most likely to end the run?
- Which stat controls the actions I will need?
- What can I afford to sacrifice if Supplies reach zero?
- Is the reward worth Crew losses or a possible rebuild?
I Use the Numerical Requirement as the Entry Check
The recommended ship class is useful, but the actual numbers decide whether my current setup is ready.
Feasting with Legends required:
- 39 Maneuverability or higher
- 6 Armour or higher
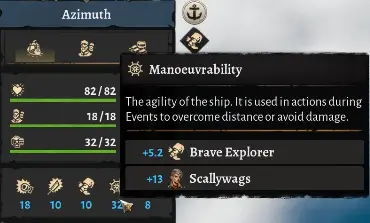
My Azimuth showed 32 Maneuverability after its current bonuses.
That total included:
- 13 from Scallywags
- 5.2 from Brave Explorer
The ship was still seven points short.
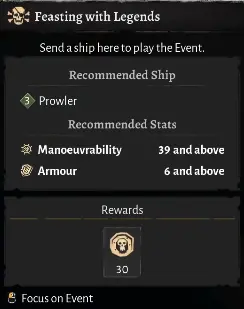
A Shrine or temporary bonus could narrow the gap, but it would not automatically make the attempt safe.
The ship would still enter a stronger event with less margin whenever the dice rolled poorly.
I attempt an under-requirement event only when:
- the stat gap is small;
- an active buff improves the same stat;
- the Captain supports the same objective;
- Hull and Crew are close to full;
- Supplies are healthy;
- another ship can continue exploration or defend the Haven after a loss.
I turn away when several of those conditions are missing.
A visible reward is not enough reason to risk the vessel.
I Match the Ship to the Hardest Stage
Sea events frequently contain more than one objective.
One Empire route required me to:
- reduce enemy Health;
- cover distance;
- defend for three turns.
A fast ship might complete the distance phase but fail the defensive turns.
A Destroyer might survive the combat but spend too many Supplies closing the distance.
I choose the ship around the stage most likely to end the run, not necessarily the first stage shown.
I Use Speed for Chases
Speed controls actions such as Ride the Swell.
One early Merchant Ship objective required covering 600 distance.
With only 2 Speed, the available action ranges were weak enough that repeated attempts consumed most of the Supplies before combat began.
For a chase route, I prefer:
- a Speed-focused ship;
- a Captain who improves Speed or distance actions;
- enough Supplies to survive a poor first roll;
- a plan for the combat phase that follows.
I do not send my strongest Gun Damage setup simply because the event eventually contains a fight.
I Use Maneuverability for Navigation and Avoidance
Maneuverability supports navigation, chase, avoidance, and mixed defensive objectives.
Azimuth is useful because it provides strong Maneuverability without losing all combat ability.
I use it when:
- the next region is blocked by navigation checks;
- several objectives require avoidance or positioning;
- I need an exploration ship that can survive an unexpected fight;
- another vessel is available for direct Haven defence.
I still compare its final stat with the exact requirement before sailing.
I Use Gun Damage and Defence for Direct Combat
For a route built around enemy Health and defensive turns, Steel Edge and Teach worked much better together.
Teach added 5.2 Gun Damage in that setup.
The ship also had enough Armour and Defence to reduce incoming damage during the survival phase.
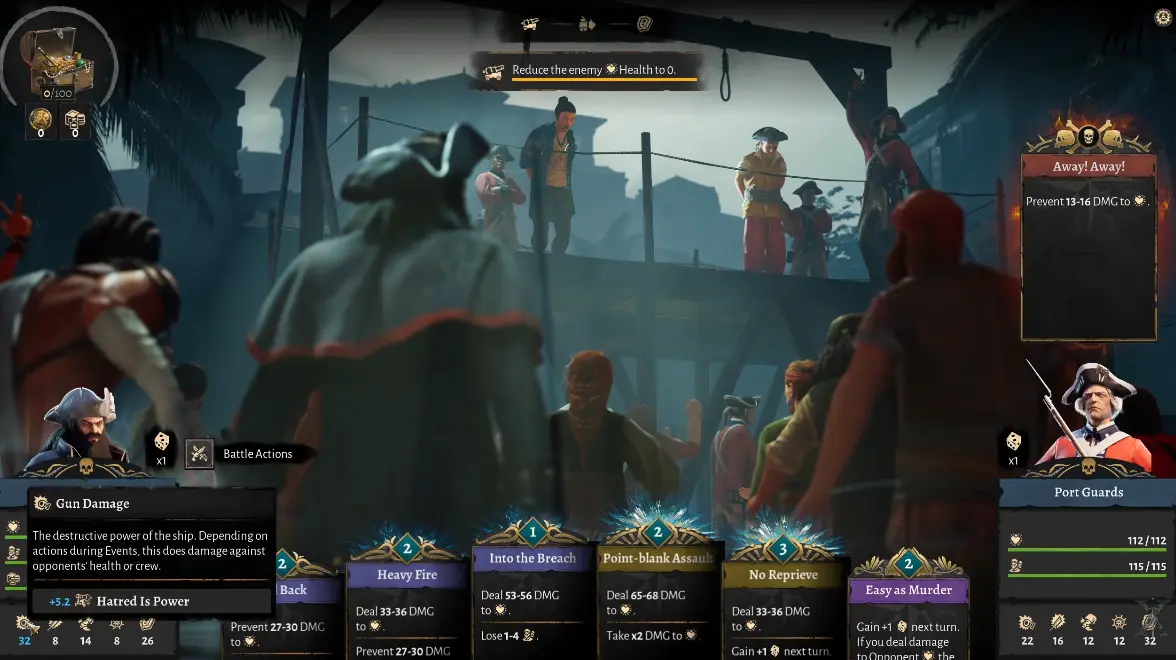
I use a combat setup for:
- Crown interceptions;
- direct Hull-damage objectives;
- events with several defensive turns;
- routes where survival matters more than travel speed.
I Use Boarding for Crew-Focused Events
Treasure Caves and some raids require Boarding or ask me to reduce enemy Crew.
I do not send a Gun-focused ship simply because it is the highest tier available.
When the event clearly asks for Boarding and the current setup is far below the requirement, I leave it marked for a more suitable ship and Captain.
A population reward is not useful when the expedition loses most of the Crew needed to bring it home.
I Match the Captain Before Leaving Port
I do not treat a Captain assignment as permanent.
At port, I choose around the next route:
- Speed for a chase;
- Maneuverability for exploration;
- Gun Damage and Health for direct combat;
- Boarding for Crew-focused raids;
- loot bonuses only after the safety requirements are already covered.
The wrong Captain can turn a suitable ship into a poor event choice.
A Gun Damage bonus adds little during a pure distance objective.
A loot-focused Captain can increase the reward while leaving the ship short of the stat required to reach it safely.
I Read the Enemy Action Before Choosing Mine
Both sides resolve actions during the turn.
Before selecting my card, I inspect whether the enemy will:
- damage Hull;
- damage Crew;
- remove Supplies;
- prevent distance gain;
- protect Hull;
- protect Crew;
- improve a later action.
Then I choose the response.
I Usually Protect Crew Before Hull
Crew losses are often more expensive than Hull damage.
Hull can be repaired with construction materials.
Replacing Crew may require:
- free Drifters;
- Housing;
- the correct Upkeep chain;
- a return trip;
- a Friendly Port payment;
- time before a Captain or ship becomes usable again.
When I can prevent meaningful Crew damage, I usually do it.
I accept limited Hull damage when the action:
- completes the current objective;
- preserves Crew;
- leaves enough Hull for the remaining stages;
- avoids spending the final Supplies on a weak block.
I Compare Incoming Damage With My Maximum Prevention
I do not choose Defence merely because the card exists.
I compare the ranges.
Taking three Hull damage to finish an objective can be reasonable.
Facing up to 22 damage while preventing only six is not a safe exchange unless that same turn ends the event.
When even the maximum defensive roll leaves lethal damage, I treat the turn as an escape decision rather than another combat turn.
I Attack the Unprotected Target
When the enemy protects Hull, I look for a Crew-damage action.
When the enemy protects Crew, I attack Hull.
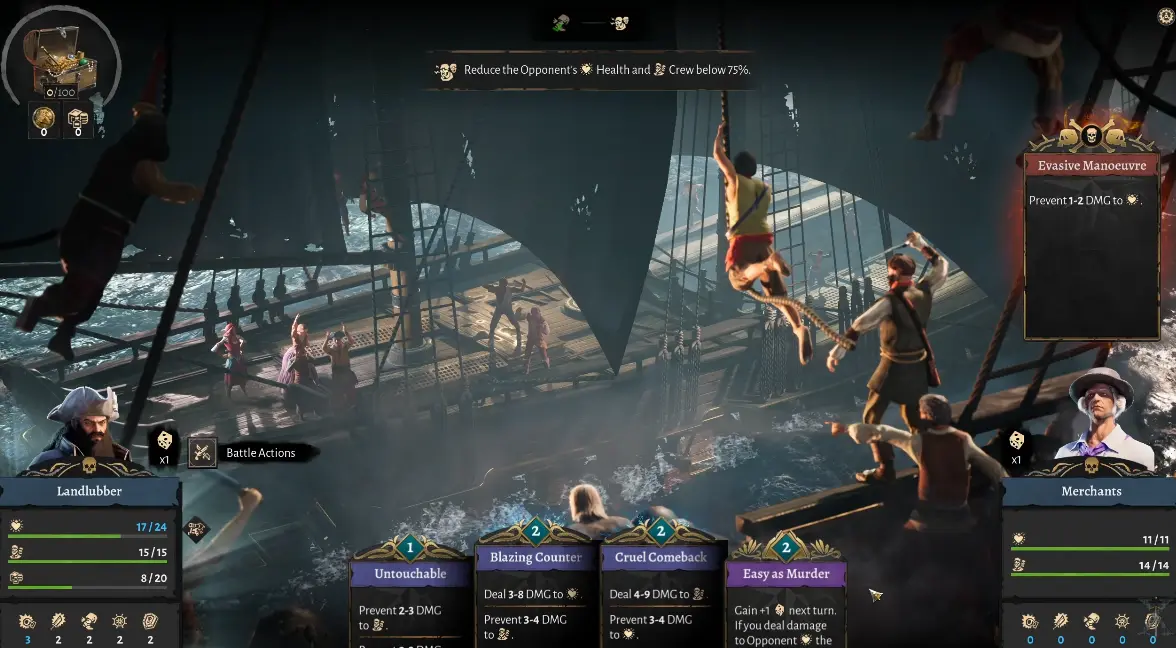
This matters most when Supplies are low.
Spending another costly action into active protection may leave no resources for the next objective.
Supplies Are the Real Event Timer
Normal Battle Actions consume Supplies.
When Supplies reach zero, the regular options disappear and I must use a Support Action that exchanges something valuable for another Supply reserve.
A large action is not automatically the best action.
If it consumes the final Supplies without completing the objective, its real cost also includes the Hull, Crew, or Treasure sacrificed on the next turn.
How I Choose a Support Action
The Support Action panel in this run offered three ways to recover 14 Supplies:
- Extra Shares: spend 20 Treasure
- Stripped for Parts: take 28 Hull Damage
- Fewer Mouths: take 3 Crew Damage
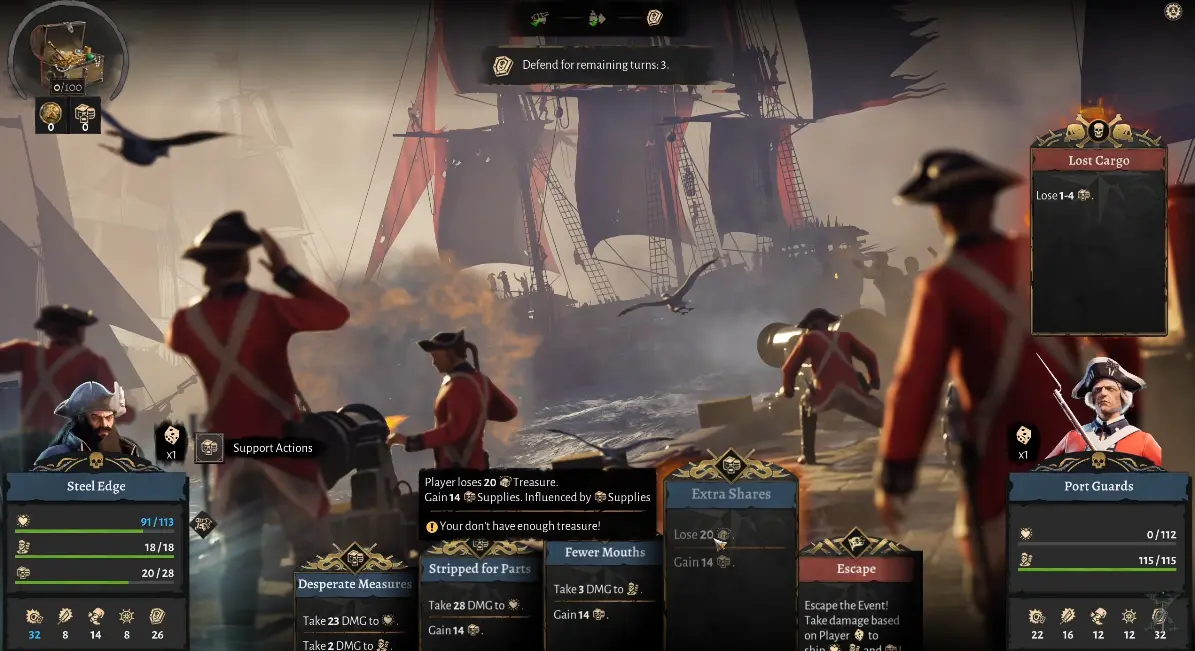
I choose the resource that is easiest to replace in the current run.
I spend Treasure when the vessel is at risk
I prefer Extra Shares when:
- the remaining Treasure is optional;
- Hull or Crew is already damaged;
- the new Supplies can finish the event safely;
- returning with less loot is better than losing the ship.
Optional Treasure is usually easier to replace than a high-tier Crew.
I sacrifice Hull when repair materials are abundant
I use Stripped for Parts when:
- Hull can absorb the full damage;
- Planks and repair capacity are ready;
- Crew is scarce;
- the action will create enough Supplies to finish or escape.
I do not choose it when 28 Hull Damage would leave the ship one weak roll from sinking.
I sacrifice Crew only as a last resort
I use Fewer Mouths when:
- the event will end immediately afterward;
- the ship has enough Crew to survive;
- replacement pirates are available;
- Hull cannot absorb the alternative;
- the reward solves a larger progression block.
I do not lose Crew merely to preserve optional Treasure.
I Save Supplies for Later Objectives
The first objective is rarely the entire event.
The Merchant Ship route began with a 600-distance chase, then required both enemy Hull and Crew to fall below 75%.
Spending every Supply point on the chase left no normal actions for the fight.
My current routine is:
- determine whether the selected action can finish the stage;
- use the lowest-cost reliable option;
- avoid paying for optional Treasure while Supplies are tight;
- preserve one defensive response for the next enemy action;
- assume another phase remains unless the interface clearly shows the final objective.
A high roll can save Supplies.
It is not a substitute for planning.
I Use Dice Bonuses When Several Turns Remain
A lasting extra die can be valuable early in a long event because it improves several later actions.
The same setup card is wasteful when one normal action can finish the current phase.
I invest in a dice bonus when:
- several objectives remain;
- Supplies are healthy;
- the enemy’s current action is manageable;
- the bonus persists across useful future actions.
I skip it when:
- the next direct action can finish;
- incoming damage must be blocked immediately;
- Supplies are already low;
- the bonus ends with the current objective.
I Treat Under-Tier Success as an Exception
I attempted one Tier 3 event with a strengthened Tier 2 ship.
The route required covering 11,700 metres while the ship remained under attack.
At one point:
- incoming damage ranged from 2–12;
- my prevention ranged from 2–8.
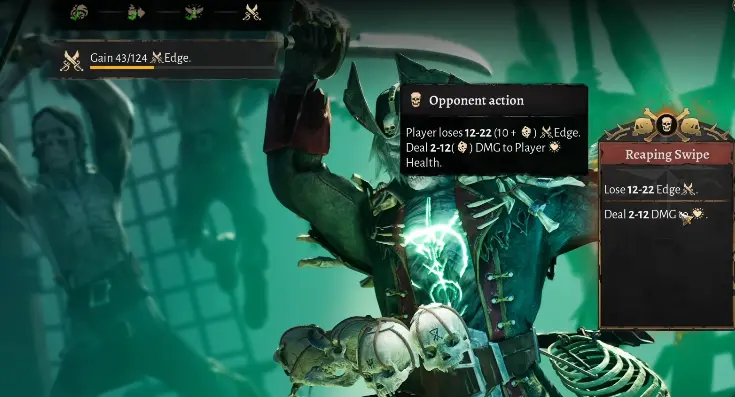
The attempt succeeded, but the result did not prove that the route was safe.
I treat it as a high-risk exception because:
- the worst incoming roll exceeded my best prevention;
- another enemy action could have targeted Crew;
- Supplies were consumed across a long objective;
- replacing the ship would have delayed exploration and defence.
I do not repeatedly send the same Tier 2 setup into similar Tier 3 events based on one favourable result.
When I Escape
I escape when the next turn can remove the remaining safety margin.
My warning signs are:
- incoming Crew damage can remove the remaining Crew;
- maximum prevention is far below incoming damage;
- Supplies are empty and every Support Action is dangerous;
- the ship lacks the stat used by the current objective;
- several stages remain;
- a poor roll has already removed the buffer;
- the reward is replaceable.
I do not wait until Hull or Crew reaches one.
Escape can also impose losses, so I make the decision while the ship can still survive the result.
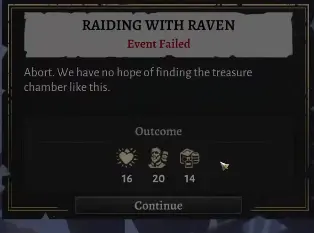
In one failed attempt, I continued because the event appeared close to completion. By the time I abandoned it, the outcome cost 20 Pirates, and the vessel could not be recovered.
When I Return Home After a Victory
After an event, I inspect the ship before selecting another nearby marker.
I return when:
- Crew has taken meaningful losses;
- Hull needs repair;
- the next event uses a stat this ship lacks;
- Crew Upkeep is unstable;
- the Haven needs the Captain or Drifters;
- another detour is much longer than the route home.
A second reward is not automatically worth delaying repairs.
Another event also consumes the Supplies, Crew, and Hull margin needed to bring the first reward home safely.
My Port Recovery Order
After one early victory, repairing the Hull cost 11 Planks in that specific case.
I repaired before selecting another event.
My order at port is:
- repair Hull;
- restore Crew;
- check Housing;
- confirm Crew Upkeep is positive;
- choose the Captain for the next route;
- inspect the next event requirements;
- leave only after the Haven can support the expedition.
Starting another event while already damaged makes every later Supply shortage more dangerous.
I Use Friendly Ports to Extend the Right Route
A Friendly Port can help continue an expedition without returning to the Haven.
The recruitment panel I used offered Crew restoration in groups of 8. Each option cost:
- 80 Coin
- 24 of the listed Crew Upkeep resource
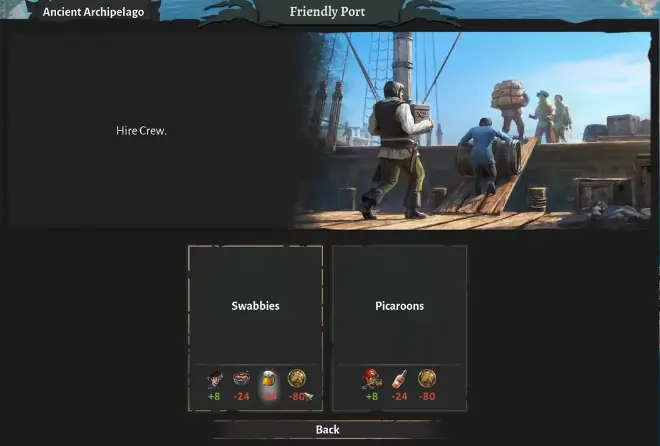
I use a Friendly Port when:
- the repaired ship matches the next event;
- the Haven can support the replacement Crew;
- the required Captain is already aboard;
- continuing is shorter than returning home;
- the next reward justifies the expense.
I still return when:
- the wrong ship class is on the route;
- the required Captain is elsewhere;
- Upkeep cannot support the new Crew;
- the island needs workforce;
- the next event exceeds the ship’s practical stats.
A repair or recruitment purchase does not turn the wrong vessel into the right vessel.
What I Prepare After Losing a Ship
Losing a ship costs more than the hull.
Rebuilding the Tempest shown in this run required:
- 40 Planks
- 40 Rope
The ship also required a large Crew commitment.
The larger loss included:
- the Crew;
- Crew Upkeep;
- time without the vessel;
- the Captain’s temporary unavailability;
- delayed exploration;
- weaker Haven defence.
Once higher-tier events begin, I keep a reserve of Planks and Rope.
More importantly, I avoid assigning every free Drifter to several fully crewed ships when one failed event would leave nobody available for replacements.
My Pre-Event Check
Before pressing Enter, I confirm:
- the ship meets the important numerical requirements;
- the Captain strengthens the actual objectives;
- Hull and Crew have a safe margin;
- Crew Upkeep is stable;
- the Haven can operate without this ship and Captain;
- I know which Support Action I will use if Supplies reach zero;
- I am willing to abandon the reward before the ship becomes unrecoverable.
During the event, I read the enemy action first, preserve Supplies for later stages, and protect Crew when replaceable Hull or Treasure can absorb the cost.
The safest event is not simply the one attempted with the highest-tier ship.
It is the one where the ship, Captain, Crew, Supplies, and escape plan all solve the same route.
FAQ
Can I change the Captain while a ship is already at sea? +
I make Captain changes while the ship is in port. Before departure, I inspect the next route's Speed, Maneuverability, Gun Damage, Defence, and Boarding requirements rather than hoping the current Captain fits every event.
Does recruiting Crew at a Friendly Port remove their Upkeep? +
No. Friendly Port recruitment restores missing Crew, but the new pirates still use their normal Upkeep. I make sure the island has Housing and a stable Galley or Tavern supply before recruiting a large replacement group.