How I Reach Tier 2 Without Wasting Compass Progress
My practical Deed route for choosing the right first ship, combining useful objectives, and stopping before a new hull or Camp destabilizes the Haven.
Updated:
Quick Answer
I reach Tier 2 faster by concentrating on a small group of Deeds that overlap with expansion I already need. I combine Pirate Camps with useful deposits, Warehouses with real production districts, and a second ship with an actual exploration or defense role. Once the third useful point unlocks the ship I need, I stop chasing Compass progress and prepare its materials, Crew, Housing, and Upkeep before it leaves the Pier.
The first time I opened the Compass, I spread progress across several paths.
That looked balanced, but it did not solve anything. I still had the same starting ship, the same blocked events, and several half-finished expansion projects competing for workers.
The better approach was to choose one immediate objective:
- survive Crown attacks;
- catch faster ships;
- reach Maneuverability-heavy events;
- expand Housing;
- improve vertical transport;
- create a reliable source of Coin.
I then completed enough overlapping Deeds to unlock the ship or building that solved that objective.
The Compass became much easier once I stopped asking, “Which path is best?” and started asking:
What is preventing my next useful ship, event, or production chain from working?
How Compass Progress Works in Practice
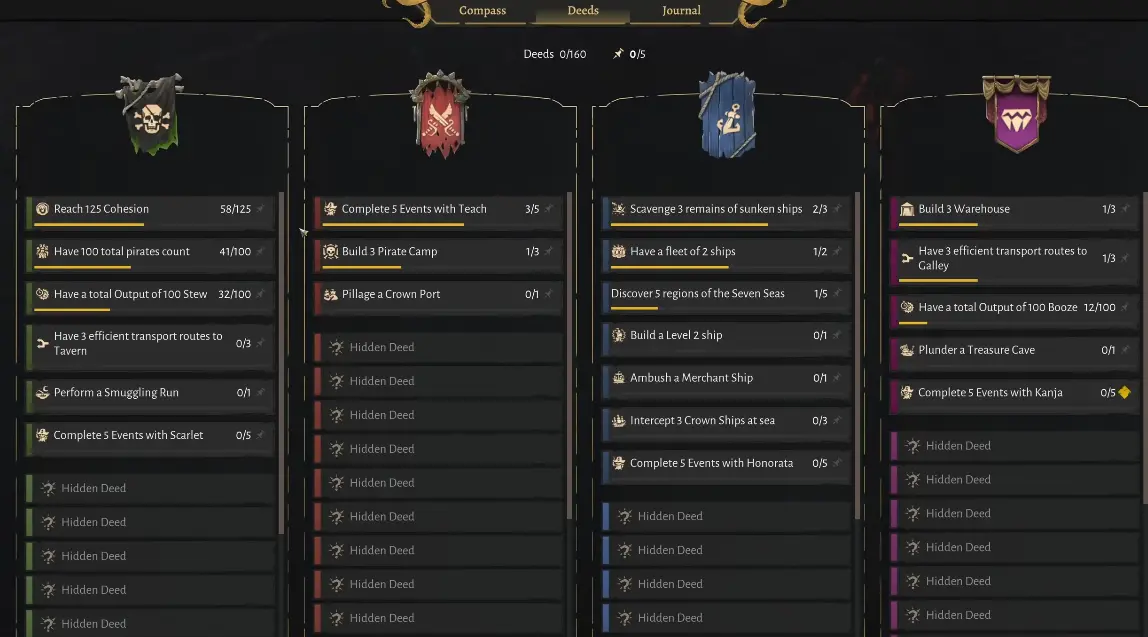
The Compass is divided into four directions:
- Notoriety
- Empire
- Seafaring
- Wealth
Deeds provide the progress used to unlock nodes in those directions.
The early objectives cover several kinds of play:
- total pirate population;
- Cohesion and production output;
- Pirate Camps and Warehouses;
- efficient Tavern or Galley routes;
- ships and discovered regions;
- Crown interceptions;
- Captain events;
- Treasure Caves and merchant encounters.
I do not treat those as four completely separate checklists.
One expansion can advance multiple columns.
For example, a new Pirate Camp can:
- move an Empire Camp-count Deed forward;
- claim a Shallow Pier for another ship;
- support the Seafaring fleet Deed;
- include a Warehouse for Wealth progress;
- claim Salt, Guano, Lead, Lime, or another missing resource;
- create routes that later count toward efficiency objectives.
That is why placement matters more than simply completing the counter.
I Choose the First Tier 2 Ship Around the Next Blocker
There is no first Tier 2 ship that is automatically correct for every run.
I inspect the events currently blocking useful rewards and choose a ship around the stat those events demand.
I Choose Iron Fist When Direct Combat Is the Problem
Iron Fist is my preferred early option when Crown defense and direct naval combat are becoming the main risks.
It gives me a combat-focused ship that can remain near the Haven, intercept incoming Crown vessels, and handle objectives where Gun Damage and Defence matter more than Speed or exploration.
I prioritize it when:
- Crown attacks are becoming frequent;
- the first tower cannot cover every vulnerable coast;
- my exploration ship is poorly suited to interception;
- several useful events require direct Hull damage;
- I need a defensive vessel that can remain close to home.
I do not choose Iron Fist merely because it looks like the strongest ship.
When the next important objective is a chase or Maneuverability check, its combat strengths may not solve the actual block.
I Choose Steel Edge When Speed and Mixed Combat Matter
Steel Edge is more useful when the route ahead combines pursuit and fighting.
An event that begins with closing distance can drain Supplies before the combat phase even starts. More Gun Damage does not help when the target remains out of range.
I consider Steel Edge when:
- merchant events repeatedly begin with distance objectives;
- I need better Speed without giving up all combat ability;
- the event contains both pursuit and Hull-damage phases;
- the reward is important enough to justify building a dedicated chase ship.
I still check the full event sequence before construction.
A ship that solves the first distance objective may still need enough Armour, Crew, or Supplies to survive the later stages.
I Choose Azimuth When Exploration Is the Blocker
Azimuth is my preferred early exploration choice when Maneuverability appears across the next group of useful events.
I value it because it is not limited to one narrow role. It provides an exploration-focused base while retaining enough combat potential to remain useful when an event develops into a fight.
I choose it when:
- navigation and avoidance objectives block regional progress;
- the next Captain or quest sits behind exploration events;
- I want a ship that can scout without being helpless in combat;
- I already have another ship covering direct Haven defense.
My rule is:
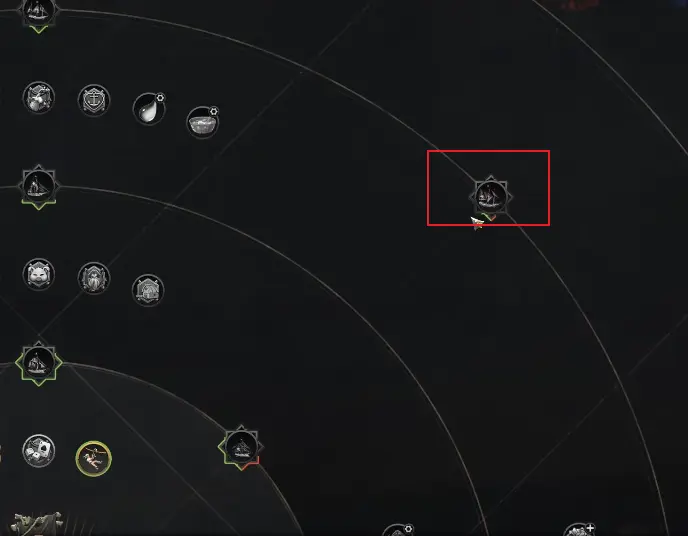
Unlock the ship that solves the next blocked group of events, not the ship I might need several hours later.
My Fast Early Deed Route
I do not begin by forcing every visible Deed.
I first let the opening settlement complete the work it already needs:
- stable Housing;
- Stew and Booze production;
- Plank storage;
- the first ship;
- safe early exploration;
- enough Drifters to support another project.
While those systems operate, I inspect the Deed screen and look for objectives that can share the same buildings.
Step 1: Pair Pirate Camps With Warehouses
Two of the cleanest early objectives are:
- build Pirate Camps;
- build Warehouses.
I combine them.
Whenever a new Camp is worth keeping, I normally need local storage anyway. Building the Camp and its Warehouse advances both expansion and Wealth progress without creating a structure that exists only for a counter.
I look for Camp locations that include at least two useful features:
- a Shallow Pier or Pier slot;
- a resource not available in the starting territory;
- several nearby deposits;
- fertile land;
- a useful vertical transport position;
- space for a compact production district.
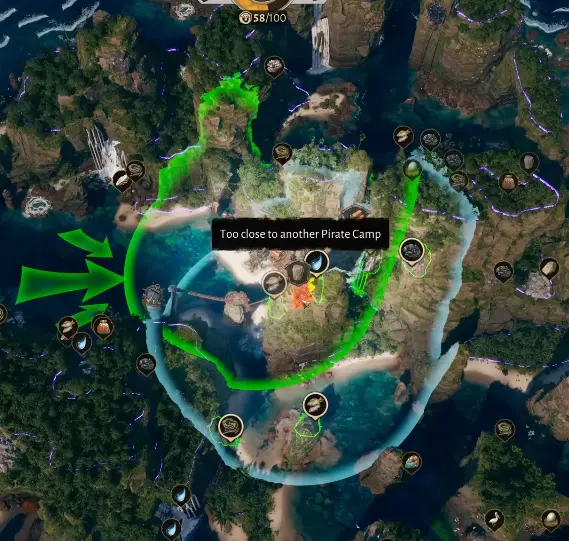
A Camp that claims Salt and a Pier can support:
- the Camp-count Deed;
- Bread production;
- a second ship;
- the fleet-size Deed;
- exploration from another part of the island.
That is a much better use of the construction cost than placing a Camp on an empty ledge and deleting it immediately.
Step 2: Use Temporary Camps Only When the Point Is Urgent
Sometimes I need one more Camp to finish a Deed and unlock an important ship.
In that case, I keep the temporary setup minimal:
- place the Pirate Camp;
- connect the construction route;
- allow the building to finish;
- confirm the Deed completion;
- inspect the claimed territory one more time;
- remove the Camp if it provides no lasting value.
I do not add Housing, food, a Warehouse, and several industries around a Camp I already expect to remove.
The moment I begin supporting it as a permanent settlement, the supposed cheap Deed can consume:
- builders;
- Fetchers;
- local Housing;
- Stew production;
- construction materials;
- defensive coverage.
Step 3: Build the Second Ship Because I Need Two Roles
The fleet-of-two Deed is valuable because a second ship already solves a real strategic problem.
I use two ships for different jobs:
- one remains available for Crown defense or nearby combat;
- the other explores, rescues pirates, collects resources, or completes Captain events.
This is more useful than sending one vessel across the map and leaving the Haven with no interception option.
Before constructing the second ship, I check:
- an available Pier;
- Planks and Rope;
- enough Drifters for Crew;
- Housing for the new pirates;
- the Crew’s required Upkeep;
- replacement capacity after Crew losses;
- whether the ship has a real route or role.
I do not build an empty hull solely to satisfy the Deed when the island cannot support its Crew.
Once the second ship is operational, it can contribute to several Seafaring objectives:
- have a fleet of two ships;
- build a Level 2 ship;
- discover additional regions;
- ambush a Merchant Ship;
- intercept Crown ships;
- complete Captain events.
The ship becomes both an unlock reward and a tool for earning the next points.
Step 4: Let Production Deeds Complete Through Useful Output
Notoriety and Wealth include output and route objectives.
I do not create temporary production solely to make the number rise. I use chains the Haven already needs.
Useful examples include:
- raising Stew output before population growth;
- raising Booze output before expanding Crew;
- creating efficient routes to the Tavern;
- creating efficient routes to a Galley;
- building Warehouses around active production districts.
The important word is efficient.
Adding another provider does not help when:
- its route is too long;
- it consumes another Fetcher;
- the producer does not make enough input;
- the destination belongs to another Pirate Camp;
- the Warehouse is full or incorrectly configured.
I complete route Deeds with production I intend to keep, not temporary lines that will be removed as soon as the objective registers.
Step 5: Use Natural Event Progress Instead of Grinding One Captain
Several Deeds ask me to complete events with a specific Captain.
I do not force the same Captain into events that do not suit their strengths.
Instead, I assign each Captain to routes where their bonuses are already useful:
- combat Captains to Crown or direct-damage events;
- Speed-focused Captains to pursuit;
- exploration Captains to navigation and regional events;
- reward-focused Captains only when the ship already meets the safety requirements.
This allows the Captain-event counter to progress while the ship still performs a useful job.
I stop when the next event demands a different ship role. A Captain Deed is not worth risking the ship in an objective it is poorly equipped to complete.
I Spend the Third Useful Point, Then Stop
The most dangerous part of the Compass is not earning the first point.
It is continuing to build for points after the needed unlock is already available.
Once Iron Fist became available through the Empire route, my next task was no longer another Empire Deed.
The new priorities were:
- build the ship;
- prepare its Crew;
- provide Housing;
- stabilize Crew Upkeep;
- keep enough workforce on the island;
- make the ship useful in actual combat.
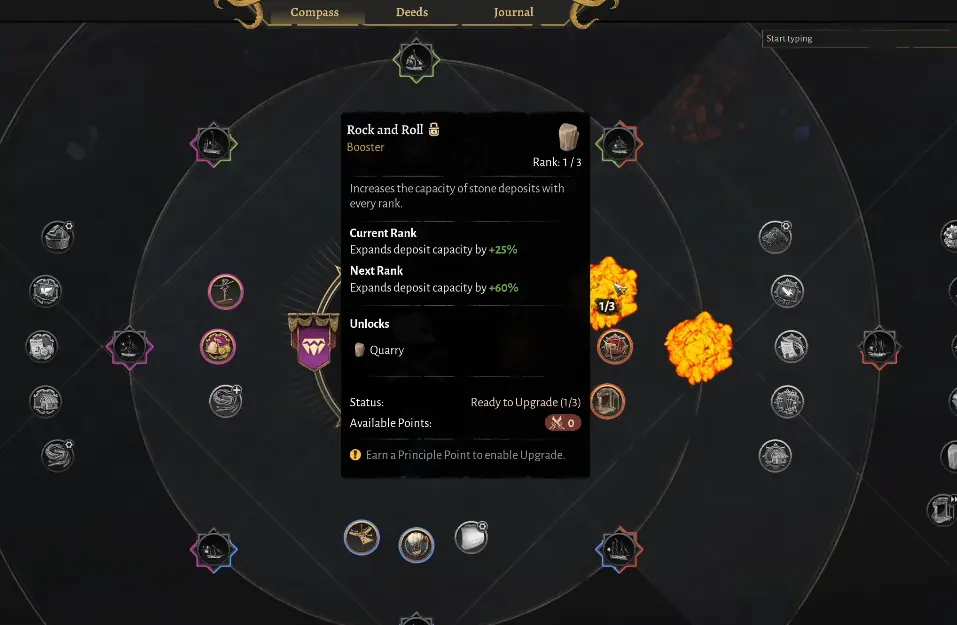
I continue in the same direction only when the next node solves another active problem.
Otherwise, I stabilize the Haven or begin working toward a complementary unlock.
Unlocking a Building Does Not Mean I Buy It Immediately
The Compass can make several attractive buildings available before the economy is ready to use them.
I separate available from worth buying now.
I Delay the Gambling Den When Coin Is Tight
The Gambling Den cost 120 Coin in my run.
That was a major early purchase while Coin was also competing with:
- transportation upgrades;
- ship infrastructure;
- permanent production;
- emergency construction;
- other Compass buildings.
I delay it until I have a specific use for its production effect and enough Coin that the purchase will not block the next ship or required connection.
I do not buy it simply because the icon is unlocked.
I Build the Trading Post After I Have Renewable Surplus
The Trading Post is useful when I have goods that can be replaced continuously.
I am comfortable selling surplus:
- Planks;
- Stew;
- Booze;
- renewable processed goods;
- excess output from a stable chain.
I avoid selling limited deposit resources merely to create early Coin.
If Salt, Guano, Lead, or another fixed material is already limiting a future chain, selling the stock creates a more expensive problem later.
I Delay the Salvage Dock Until Ships Create Regular Costs
The Salvage Dock becomes more useful after I am repeatedly:
- constructing ships;
- repairing damaged hulls;
- replacing lost vessels;
- supporting several Piers.
With only one basic ship, its benefit has little time to repay the construction cost.
Once I operate several Tier 2 ships, reducing repeated ship costs becomes much more valuable.
I Take Housing or Transport When They Solve the Real Bottleneck
A utility unlock can be more valuable than another ship.
I choose compact Housing when tents are consuming:
- fertile land;
- production space;
- path access;
- useful cliff edges.
I choose transport when an important route stays slow even after provider and production problems are fixed.
I do not buy an expensive transport building for one low-volume resource. I use the cheapest option that removes the active bottleneck.
The Compass path may reflect my intended victory route, but each early purchase still needs to improve the current Haven.
I Prepare Rope Before Starting the Tier 2 Hull
Unlocking the design exposed the next practical problem: shipbuilding materials.
The Rope Maker in this setup used:
- 4 Fiber
- to produce 6 Rope
It required 2 Greenhands and cost 25 Planks to construct.
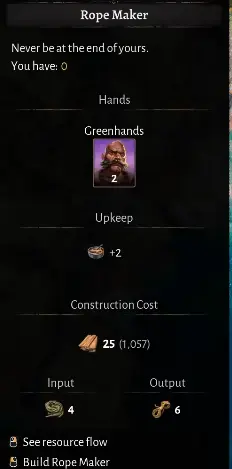
I place the Rope Maker close to its Fiber source and keep shipbuilding storage near the Pier.
The Warehouse serving the Pier prioritizes:
- Planks;
- Rope;
- other current hull materials.
I do not fill it with unrelated food or trade goods. The purpose of this Warehouse is to make the construction route short and visible.
Before starting the hull, I check:
- Fiber production is active;
- the Rope Maker has workers;
- Rope output is positive;
- the Warehouse accepts Rope;
- the Pier has a valid provider;
- enough Planks remain for emergency construction.
Unlocking the ship early is useful. Starting construction before its material chain exists only creates a Pier that waits indefinitely.
I Prepare Crew Upkeep Before Assigning Crew
A completed hull can remain safely at the Pier.
A fully assigned Crew with no functioning Upkeep chain creates an immediate island problem.
When Scallywags became available, Cassava Bread became part of the preparation.
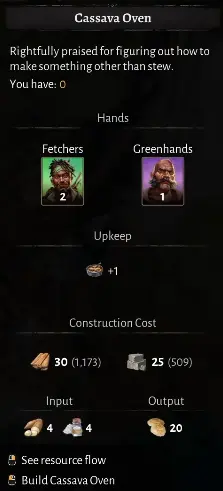
The Cassava Oven used:
- 4 Cassava
- 4 Salt
- to produce 20 Cassava Bread
It required:
- 2 Fetchers
- 1 Greenhand
Its construction cost in this setup was:
- 30 Planks
- 25 Stone
My preparation order is:
- claim or connect a Salt source;
- establish Cassava production on fertile ground;
- build the Cassava Oven;
- connect Bread to the correct Galley;
- confirm output is positive;
- prepare the required Housing;
- check the free Drifter reserve;
- assign the ship Crew.
I do not max the Crew slider while Bread remains at zero.
The new ship does not need to depart the moment construction finishes. Delaying the departure is cheaper than recovering from falling Satisfaction and Outrage across an entire Camp.
When I Stop Chasing Compass Points
I stop working on Deeds when progression begins making the existing Haven less stable.
My stop signs are:
- the new ship has no working Upkeep;
- Housing is already negative;
- the next Pirate Camp opens an undefended coast;
- the free Drifter reserve is almost empty;
- a shipbuilding material still depends on an unreliable route;
- the Pier is waiting on Rope or another unfinished chain;
- I am constructing buildings only because a counter exists;
- Coin purchases would block a required ship or transport upgrade.
When one of these appears, I pause Compass progression.
I return to:
- Housing;
- workforce;
- construction materials;
- local Upkeep;
- transport;
- defense.
A fourth point is not useful when the third-point unlock still cannot operate.
My Tier 2 Readiness Check
Before sending the new ship away from the Haven, I confirm:
- the ship solves an event type I currently need;
- the Pier can receive every required construction material;
- the hull is complete;
- the Captain matches the ship’s role;
- the Crew has Housing;
- the Crew Upkeep chain is producing more than it drains;
- enough Drifters remain for the island;
- another ship or tower can protect the Haven;
- I have repair materials available after the first event.
The fastest Compass route is not the one that fills the most nodes.
It is the route that unlocks one useful ship while creating the fewest buildings, Camps, and Upkeep chains that I later need to remove or repair.
FAQ
Why is my unlocked Tier 2 ship still not ready to sail? +
Unlocking the design does not provide the Pier, construction materials, Crew, Housing, or Crew Upkeep. I leave the hull at the Pier until the support chain is stable rather than assigning pirates to a ship the Haven cannot sustain.
Can I remove Pirate Camps after completing a Camp-count Deed? +
In my run, the Deed completed when the required Camp finished construction, and removing an unnecessary Camp afterward did not reverse that completion. I still keep any Camp that claims a useful Pier, deposit, or permanent production area.