My safest Corsair Cove start is to stabilize the island before treating the
first ship as permission to explore everything. I prepare Housing and Stew,
run one Wood Cutter into two Sawmills, store spare Planks, and establish Booze
before assigning Crew. After launching the Landlubber, I take only the rewards
the Haven can absorb and return before Housing, workforce, Upkeep, or defense
starts falling behind.
Corsair Cove became much easier once I stopped treating island building and sea
exploration as separate systems.
Almost every reward I bring home creates another requirement.
Rescued pirates need Housing. A larger Crew increases Upkeep. A damaged ship
needs repair materials and replacement sailors. A newly claimed deposit may
solve one production problem while creating another Pirate Camp, another route,
and another coastline to defend.
My first-hour objective is therefore not to unlock everything as quickly as
possible.
I want to reach the first ship with enough spare workforce, production,
storage, and defensive capacity to handle whatever that ship brings home.
Before the first ship leaves, I want Housing, Stew, Booze, Planks, storage, and the Pier route working at the same time.
Start With the Problem You Have
I use this guide for the opening route. Once one system becomes the main
blocker, I switch to the focused guide rather than trying to solve every problem
inside one long walkthrough.
Current problem
Use this guide
What it solves
I have pirates but no free builders, workers, Fetchers, or Crew
Early Black Powder, Gun Tower supply, permanent production, attack-point coverage, stronger waves, and interception
My First-Hour Build Order
I use the following order because it prevents three common opening spirals:
insufficient Housing causes Satisfaction to fall;
too many active jobs consume the entire Drifter reserve;
early exploration creates rewards and threats the Haven cannot yet support.
1. I Build a Housing Buffer Before Expanding Industry
For my conservative Uncharted opening, I queue eight tents before starting
the larger production chains.
That is not a universal minimum for every mode. Story Mode can introduce the
settlement more gradually. Eight tents are simply the buffer I use when I want
to avoid stopping construction later because several pirates suddenly have
nowhere to live.
I place the first Housing along simple paths, but I protect the locations that
will matter later:
fertile ground for Wood or food production;
fixed resource deposits;
the approach to a Shallow Pier;
compact areas where several processors can share one Warehouse;
high cliff edges that may become useful Zip Line anchors.
I do not fill every available ledge.
I build enough capacity for the starting population and a small number of new
arrivals, then preserve the remaining space until I know which production chain
needs it.
2. I Stabilize Stew Before Assigning More Workers
My first food chain is:
Campfire → Galley → pirates inside the Pirate Camp
The Campfire produces Stew. The Galley distributes it.
A finished Galley does not help if it has no working connection to a Stew
provider, so I open the building and confirm where its Fetcher is collecting
from.
I use two Campfires in my conservative opening.
One may be enough during the earlier guided sequence, but two give me room to
add working hands and the first Crew without immediately pushing Stew below
current demand.
I keep the Campfires and Galley in one food district. The route from the
producers to the Galley matters more than placing every building as close as
possible to the central Pirate Camp.
I also avoid boosting both Campfires immediately.
A temporary production increase is not useful when the additional staffing
requirement removes the pirates I still need for the Wood chain, Tavern,
Warehouse, or Pier.
3. I Match One Wood Cutter With Two Sawmills
My first construction chain is:
fertile ground → Wood Cutter → two Sawmills → Warehouse
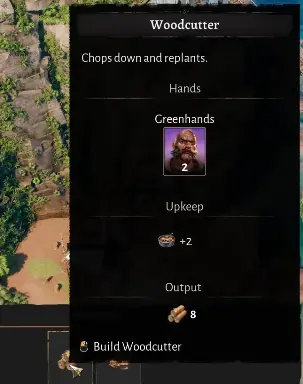
The Wood Cutter in this opening produced 8 Wood per minute.
Each Sawmill consumed 4 Wood per minute, so two Sawmills matched the input
without leaving raw Wood unused or starving either processor:
Wood Cutter output: 8 per minute
Sawmill 1 input: 4 per minute
Sawmill 2 input: 4 per minute
One Wood Cutter producing 8 Wood per minute supports two Sawmills consuming 4 Wood per minute each.
I place the Wood Cutter on fertile ground and keep the Sawmills close enough
that the Fetchers do not spend the opening minutes walking around a cliff.
I let the basic chain operate before using production boosts.
When the base output already covers current construction, I prefer keeping spare
Drifters available instead of creating a larger Plank surplus that I cannot yet
use.
4. I Store Planks but Keep the Warehouse Flexible
Planks support most of the opening build order, the first Pier, later expansion,
and ship repairs.
I connect both Sawmills to one early Warehouse and create a meaningful Plank
buffer before beginning the Pier.
I do not allow Planks to occupy every available storage position.
The same district may soon need to handle Rope, Stone Blocks, ship materials,
or a resource being moved toward another Pirate Camp. Filling the Warehouse
with one product makes the next connection harder to organize.
I also salvage the opening shipwreck after the basic chains are stable. That
returns useful construction materials and shortens the wait for the first ship.
I do not demolish a stocked Warehouse while redesigning the district.
Before moving one, I build the replacement, transfer the important goods, and
confirm the old storage is empty.
5. I Establish Booze Before Hiring Crew
My opening drinking chain is:
Moonshine Still → Tavern → Crew
I use two Moonshine Stills and one Tavern for the first Crew setup.
The Tavern distributes Booze but does not produce it. Before assigning sailors,
I check that:
at least one Moonshine Still is operating;
the Tavern has a valid provider;
a Fetcher is assigned;
Booze has started arriving;
the island still has spare Drifters after the Crew assignment.
This order prevents a common early trap.
It is possible to finish the ship, fill its Crew slots, and then discover that
nobody is left to construct or operate the Booze chain needed to support those
same sailors.
I want Booze trending upward before the first pirates board.
6. I Connect the Shallow Pier Before Spending My Reserve
Shallow Piers use predefined construction locations.
I inspect both the dock position and its actual entrance before confirming the
building. The visible Pier can sit beneath a cliff while its route connection
must approach from another level.
In one opening, the Shallow Pier cost 30 Planks. I had 55 Planks stored,
so construction left a reserve rather than consuming everything.
That reserve matters if I need to:
finish the access path;
repair an interrupted production building;
add emergency Housing;
repair the ship after its first event.
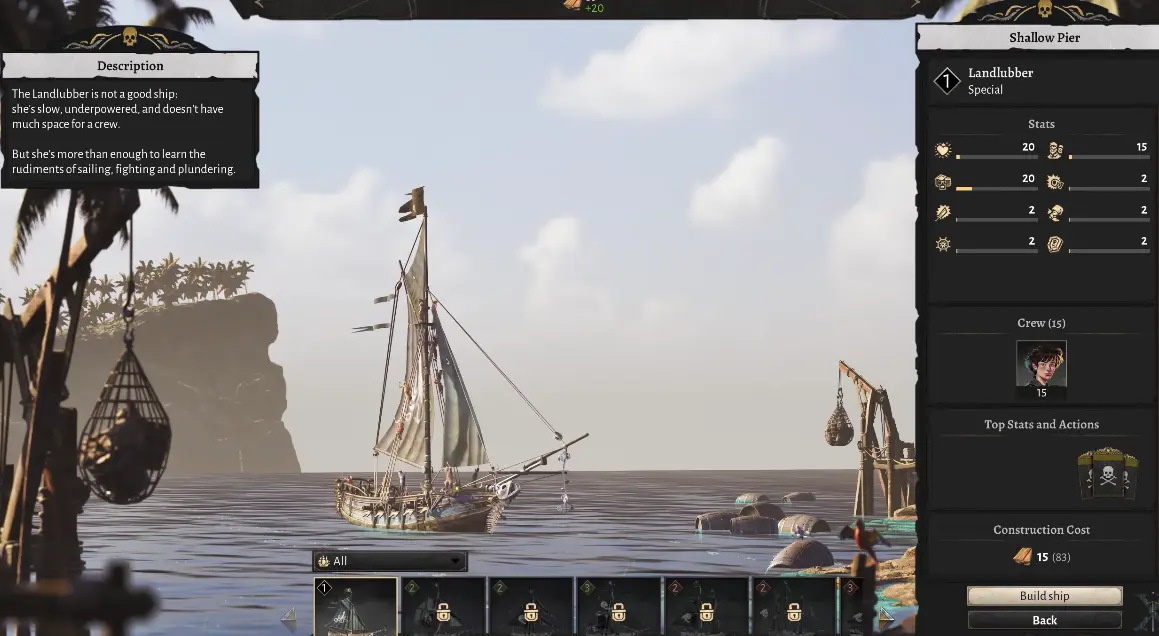
Once the Pier is connected, I build the starting Landlubber.
The Landlubber opens the wider game, but I use it for safe early objectives rather than forcing it into every visible event.
The first ship opens the broader progression systems in Uncharted Mode, but it
does not make every nearby event safe.
I still compare the objective with the ship I actually have.
7. I Take the Reward the Island Needs, Then Turn Home
My first sea route is short and practical.
I prioritize:
a safe source of new Drifters when workforce is the blocker;
early Black Powder when the Haven lacks defense;
low-tier events whose requirements match the Landlubber;
a direct route home.
I do not keep adding events simply because their markers are nearby.
Before starting another encounter, I ask:
Is the current Crew still healthy?
Does the next event require a stat this ship lacks?
Is the island already short of workers or Housing?
Am I carrying the resource needed for the next critical building?
Will the detour delay defense or Upkeep recovery?
When the ship is carrying the reward that solves the current problem, I usually
return.
A second optional event is not worth arriving home after Housing, food, or
defense has already failed.
8. I Prepare the Haven Before New Pirates Arrive
A successful rescue does not finish the workforce problem. It transfers the
problem back to the island.
Before a ship carrying recruits docks, I prepare:
empty Housing capacity;
positive Stew production;
enough Booze or other Crew Upkeep;
room for required construction materials;
several pirates who can remain unassigned.
After the ship arrives, my order is:
replace essential Crew losses;
complete Housing;
stabilize Stew and other Upkeep;
restore one missing Fetcher or working hand;
keep a workforce reserve;
start the next industry last.
I do not immediately assign every new pirate.
A population reward stops being useful when the entire group is absorbed into
new jobs and the Haven returns to zero free Drifters.
9. I Stabilize the Island Before Choosing the Next Compass Unlock
The Compass contains four progression directions:
Notoriety;
Empire;
Seafaring;
Wealth.
I test the early objectives, but I do not spread points evenly merely because
all four paths are available.
My first meaningful unlock should solve the next real obstacle:
direct combat;
ship Speed;
Maneuverability;
exploration;
trade and Coin;
compact Housing;
faster transportation.
I also check the cost of using the unlock.
A newly available ship may still require:
another Pier;
Planks, Rope, or other construction materials;
a different Crew tier;
more Housing;
a new Upkeep chain;
enough replacement pirates to survive Crew losses.
I let an unlocked hull wait at the Pier when the support economy is not ready.
The unlock has not solved the problem until the ship can leave without
destabilizing the island.
How I Read Satisfaction, Outrage, and Cohesion
I treat Satisfaction as the local warning and Cohesion as the wider danger.
Housing and Upkeep problems first appear inside the affected Pirate Camp. If I
continue expanding while Satisfaction is falling, the local shortage can
develop into Outrage and begin damaging the broader run.
When a Camp starts declining, I stop and check:
Housing;
Stew;
the Upkeep required by the current pirate tier;
whether the distributor has a provider;
whether a Fetcher is assigned;
whether production is keeping up with demand.
I fix the local shortage before accepting another expensive event choice or
opening another territory.
A high Cohesion total gives me more room to make difficult decisions. It does
not make an unstable food or Housing chain safe.
When I Build Another Pirate Camp
I do not establish another Camp simply because a Deed asks for one or the map
has space.
Before confirming the location, I check:
which unique deposits enter the territory;
whether it includes a useful Pier slot;
how construction materials will reach it;
whether it has room for local Housing and Upkeep;
how many workers and Fetchers its industries will require;
whether it creates another vulnerable coastline.
I prefer a Camp that solves at least two lasting problems.
A location containing Guano and a useful Pier may justify its own Warehouse,
Housing, food, and defense.
A location that only adds another ordinary Wood or Stone source usually does
not justify the same support cost.
I produce continuous Upkeep locally
For a distant settlement, I normally create local Stew production.
Food is consumed continuously. Importing the only supply across several cliffs
creates a serious risk whenever one Fetcher, Warehouse, or route slows down.
I transport construction materials
I am more willing to move Planks, Rope, and Stone Blocks between Camps.
Construction demand arrives in bursts, so duplicating every building-material
chain in every territory wastes workforce and space.
I move fixed resources through visible stages
Salt, Guano, Lead, Lime, and other fixed deposits may need a cross-Camp route.
I divide those routes into clear stages rather than assigning one Fetcher to
cross the entire island:
Each stage creates a checkpoint. When the chain stops, I can see whether the
failure occurred at extraction, the middle route, or the final delivery.
The Stop Signs That Make Me Pause Expansion
The free Drifter count is almost empty
I pause production boosts and duplicate buildings before adding another
industry.
Recovering pirates I have already assigned is faster than waiting for another
population event.
Satisfaction is falling in one Camp
I repair Housing and Upkeep before building in a different territory.
Expanding elsewhere does not solve the local shortage.
The island owns a resource but the destination is empty
I do not assume that more production is required.
The problem may be the provider, Pirate Camp boundary, Fetcher assignment,
Warehouse, or route rather than the amount shown in the top bar.
The next event exceeds the ship’s actual strengths
I compare the event requirement with the ship after its Captain and Crew bonuses.
A matching ship class or tier does not guarantee that the final stats are high
enough.
The coast is exposed but the defense is not supplied
I stop optional construction until the vulnerable area has either a working
tower or a suitable interception ship.
A completed defensive building is not useful when its supply route is still
empty.
Five Distinctions That Prevent Expensive Mistakes
Total population is not free workforce
A large Haven can still have no pirates available for the next building or ship.
Island stock is not guaranteed local access
A resource may exist in another territory without a valid route to the building
that needs it.
A completed hull is not a ready ship
The ship still needs a Captain, Crew, Housing, Upkeep, and a workforce reserve
at home.
Black Powder is not a loaded defense
The resource must reach the defensive building and be converted before the
coast is protected.
A higher ship tier is not automatic event readiness
Speed, Maneuverability, Boarding, Gun Damage, Armour, Hull, Crew, Supplies, and
Captain bonuses still determine whether the attempt is safe.
Version and Testing Notes
The exact opening can differ between Story Mode and Uncharted Mode, and map
layouts can change the best building locations and resource routes.
My route deliberately keeps extra capacity:
enough early Housing to avoid an immediate shortage;
two Campfires instead of relying on the smallest possible Stew output;
spare Planks after constructing the Pier;
unassigned Drifters instead of filling every job;
a short first expedition rather than a chain of optional events;
a stable defense before the next major expansion.
I separate exact interface values from strategic decisions.
Production rates and construction costs describe the setup in which I observed
them. Building order, return timing, purchase timing, and expansion choices are
the practical rules I use to keep the Haven stable.
My first-hour rule is simple:
I do not open the next system until the current island can support what that
system will bring home.
The House Always Wins FAQ
Should I start Corsair Cove in Story Mode or Uncharted Mode?+
Story Mode gives me a more guided introduction. I use Uncharted Mode when I want the Journal, Deeds, and Compass to open after the first ship and prefer making my own progression decisions from the beginning.
Do idle Drifters consume Upkeep?+
Unassigned Drifters need Housing but do not consume Upkeep resources. Stew, Booze, Bread, and other demands increase after I assign pirates to working roles or ship Crew.
Should I fully crew the first ship immediately?+
I do not automatically fill every Crew slot. I keep enough pirates on the island for construction, production, Fetchers, and emergency Upkeep, then assign only the Crew needed for the next safe event.
Can I complete all four Compass paths in one run?+
The game allows progress in all four paths, but completing every route creates much more production and expansion work. I test the early quests, then concentrate on the path that solves my current progression block.