How I Run and Win Hippodrome Chariot Races
I use the first Trial before committing to a race, prepare only the goods I can afford, manage Sprint and Stamina, and avoid bad Rival Challenge bets.
Updated:
Quick Answer
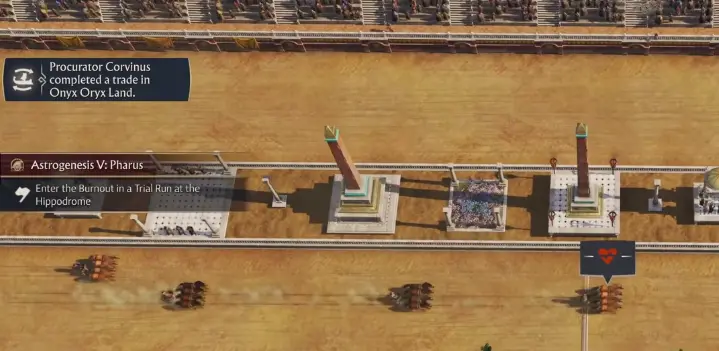
After the Hippodrome is finished, I use the available Trial Run before starting my first main event instead of letting that opportunity disappear unused.
My normal progression is:
Trial Run → Amateur Race → more training → Classic Quadriga → Imperial Race
For the first Amateur event, my race screen showed 20 minutes of preparation, 30 Patrician workforce and 40,000 Denarii. A Classic Quadriga stepped that up to 30 minutes, 75 Patrician workforce and 75,000 Denarii, before counting the preparation goods I still had to supply.
I only add optional goods when the city can spare them. During the race, I save Sprint for a moment where the boost can actually gain position, and I become much stricter about Stamina as the races get longer.
After a main event there is roughly a 45-minute cooldown, which I use for Trials and normal city work.
I am much more careful with Rival Challenges. The rule is simple: my charioteer must finish ahead of the rival, and the losing charioteer passes to the winner.
I Use the First Trial Before Starting a Main Event
Once the Hippodrome is built, I do not immediately pay for a proper race.
I use the available Trial Run first.
The Trial screen lets me choose 2, 4 or 8 laps, so for a new charioteer I normally start with two.
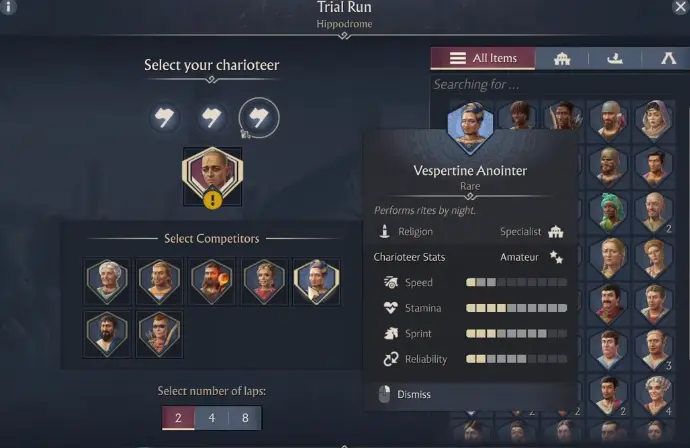
I am not trying to prove the Specialist can survive an eight-lap race on day one.
I want a quick answer to a simpler question:
Does this racer look usable enough to keep working with?
The deeper comparison of hidden stats, potential and which Specialist is actually worth developing is in my best Hippodrome racers guide.
For the racing progression itself, the important thing is that I spend the first Trial before the main event changes the cycle.
The First Amateur Race Is Already a Real Economic Commitment
An Amateur event looks like the obvious beginner race, but it is not free.
On my preparation screen it required:
- 20 minutes of preparation;
- 30 Patrician workforce;
- 40,000 Denarii;
- several preparation goods;
- plus an optional good that could increase the potential Splendour reward.
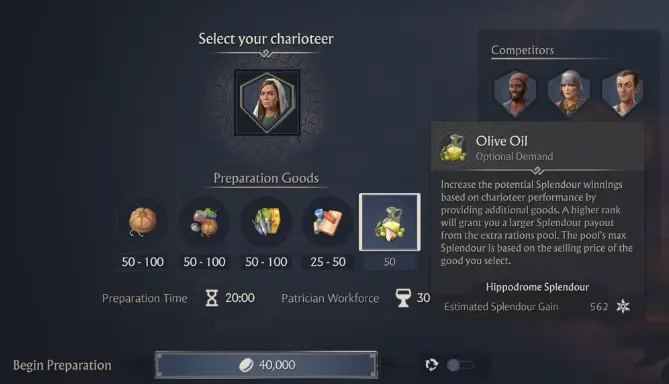
That is why I check the city before pressing Begin Preparation.
On one early race I was already short on Bread.
Starting another event while basic supply was falling would have solved the wrong problem.
I check the required goods first, then look at optional items.
If an optional good is sitting comfortably above demand, I use it.
If the island is already struggling to supply it, I keep the stock.
Optional goods can improve the Splendour outcome, but the full Splendour economy has its own trade-offs. I handle that in my Splendour and Honoured Guests guide.
For the race itself, my rule is simpler:
required goods are the cost of entering; optional goods are a luxury I spend from surplus.
I Use the Preparation Time Instead of Watching the Timer
A main event does not begin immediately after I pay for it.
That delay is useful.
For an Amateur event, I had 20 minutes of preparation time. Classic Quadriga later increased that to 30 minutes.
I use that window to fix whatever the race is exposing in the rest of the city.
If Bread is dropping, I check Bread.
If the optional item I want is on another island, I move it.
If another Specialist still needs a Trial, I deal with that while the event is preparing.
That keeps the Hippodrome from turning into a building I stare at while the rest of the empire waits.
Sprint Works Best When I Have Space to Use It
Sprint is the one race control I actively time, and it is easy to waste.
My first instinct was to press the boost as soon as it became ready.
I stopped doing that.
Now I wait for a moment where the burst can actually convert into track position.
Good situations for me are:
- I am close enough to another chariot to make an overtake;
- the track ahead is clear;
- I am coming into a section where the higher speed will not immediately run into traffic;
- or I need one final push late in the race.
I have had Sprint work well just before a turn, and I have also had better results saving it for a clear straight.
So I do not use a fixed:
always Sprint before the corner
rule.
The track position matters more.
If another chariot is blocking the line, spending the boost can simply make me reach the same blockage faster.
In one Amateur event I was still fighting late in the race, saved the useful Sprint until it could recover ground, and turned that opportunity into the win.
Weak Stamina Gets Harder to Hide as the Race Goes On
Sprint can rescue a moment.
It cannot repair a racer whose Stamina is collapsing every lap.
I have watched a charioteer stay competitive early, begin losing pace, recover with Sprint and then fall backward again once the burst ended.
That is when I stop blaming my timing.
The underlying racer is not ready for the event.
The game itself makes the relationship clear: Stamina becomes more important as the number of laps increases.
That is one reason I use shorter Trials first and become stricter before moving into longer main events.
If a racer is only barely surviving the Amateur field, I do not promote them just because Classic Quadriga has become available.
Unlocking the event and being ready to win it are two different things.
The 45-Minute Cooldown Is Part of the Race Loop
After a main event, the next one is not immediately available.
The normal cooldown is roughly 45 minutes.
I do not treat that as wasted time.
That is when I return to Trials, deal with another candidate and work on the city while the next main event recovers.
My basic rhythm becomes:
main event
→ cooldown
→ Trials and city work
→ next main event
Research can make those Trials much more productive. I use the upgrades in my Hippodrome research order to increase how much development I can get between proper races.
The 45-minute wait stops feeling long once I stop standing beside the track waiting for it to end.
Classic Quadriga Is Where I Expect the City and Racer to Be Ready
Classic Quadriga is a noticeable jump from the first Amateur event.
On my preparation screen it showed:
- 30 minutes preparation time;
- 75 Patrician workforce;
- 75,000 Denarii;
- larger preparation-good requirements.
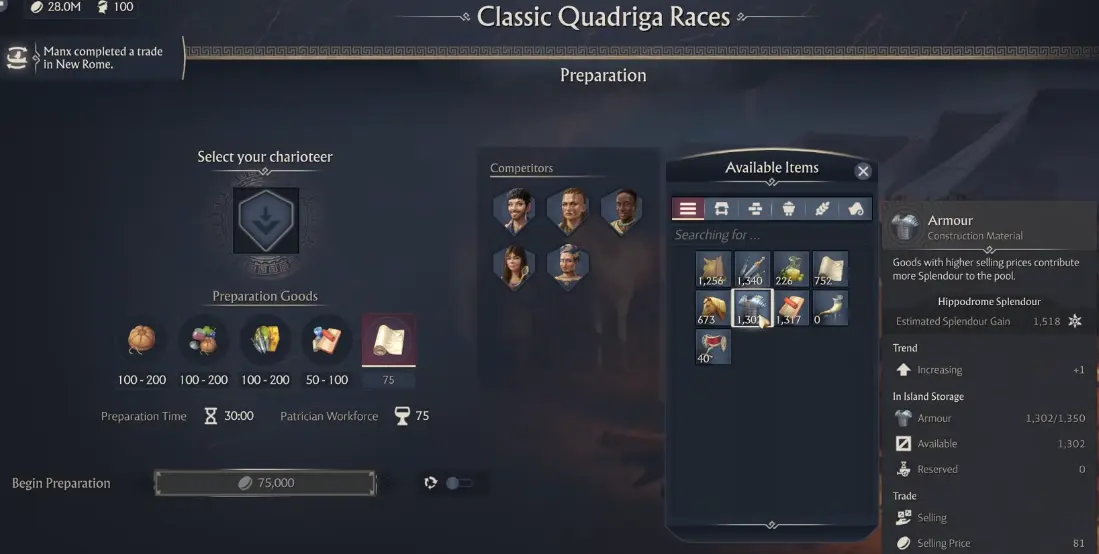
That is enough of a jump that I do not use it as another test run.
Before paying for Classic Quadriga, I want:
a racer that has already performed reliably
and
an economy that can supply the preparation without creating a shortage elsewhere.
I had a candidate with enough raw speed to look promising, but weak Stamina kept pulling him backward once the race stretched out.
I would rather discover and fix that in the cheaper tier.
If my immediate goal is still training, I stay with the event I can run consistently rather than burning higher-value goods just because another race tier is unlocked.
I Reach Imperial Races After the Racer Has Already Proven Themself
The Imperial Race is one of the important Hippodrome progression goals.
I do not use it to answer:
Is this Specialist actually good?
That question should be settled earlier.
My progression is:
short Trial
→ Amateur
→ repeat until performance is dependable
→ Classic Quadriga
→ Imperial Race
By the time I push into Imperial competition, I want the charioteer to have already handled weaker fields without depending on a perfect Sprint at the finish.
I also want the city to be comfortable supplying races repeatedly.
The Hippodrome becomes expensive very quickly if every new tier forces me to stop and rebuild another missing supply chain.
I Do Not Risk a Good Specialist in a Rival Challenge Without Checking the Matchup
Rival Challenges are the one event where I change my risk tolerance completely.
The game gives the rule directly:
To win, my charioteer has to rank better than the rival’s challenger.
And the consequence is not just losing the entry cost.
The losing charioteer passes into the possession of the victor.
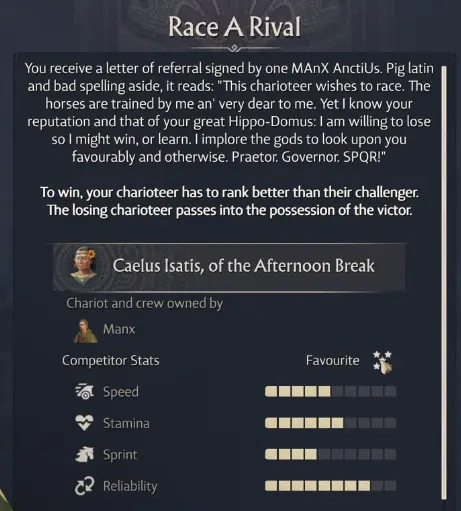
That makes the Rival screen much more important than a normal event-selection screen.
I look at the opposing racer before I agree.
The example I faced showed the rival’s:
- Speed;
- Stamina;
- Sprint;
- Reliability;
before I accepted the challenge.
If their profile looks stronger than the Specialist I am considering, I do not gamble simply because the quest is available.
I learned that lesson by losing a Seamstress in an actual Rival Challenge.
She tired late, failed to finish ahead of the rival and changed ownership.
That result permanently changed how I treat these races.
I Back Out When the Matchup Is Wrong
The most important decision in a Rival Challenge can happen before the race starts.
If I see:
- weak Stamina against a stronger rival;
- a Specialist I cannot replace;
- an untested racer;
- or a matchup that depends on one perfect Sprint;
I leave it.
There is no reason to turn a valuable Specialist into a quest payment.
I would rather run another normal event, improve the racer and wait for a matchup I actually like.
That is especially true once I have invested several cycles into developing the character.
The more valuable the racer becomes, the less interested I am in proving something with a bad bet.
I Spend More on a Race Only When the Goal Justifies It
Once the Hippodrome is running smoothly, it is tempting to add every optional preparation good because a bigger Splendour number looks better.
I do not automatically do that.
When I am still testing and training, I prefer the cheaper event that keeps progression moving.
When I have a racer worth backing and the city has a real surplus, I am more willing to increase the event investment.
And when I specifically need the Splendour reward, I check whether the extra goods actually move me toward the next useful milestone before committing them.
The race is only one part of the economy.
I do not let it become the reason the rest of the island stops working.
The Race Loop I Keep Coming Back To
Once the system settled into a routine, I stopped trying to optimize every event separately.
I use the Trial that is available.
I make sure the next main event will not break a core supply.
I save Sprint until the track gives me room to use it.
I watch Stamina as the laps get longer.
I use the 45-minute cooldown instead of waiting beside the Hippodrome.
Then I move up a race tier only after the previous one feels reliable.
Rival Challenges are the exception.
For those, I check the opponent and the Specialist at stake first.
A normal loss costs me resources.
A bad Rival Challenge can cost me the racer I spent all that time developing.