Tower of Babel Progression, Gold, and Altar Guide
A practical Tower of Babel Survivors of Chaos progression guide explaining when to push floors, when to farm, how gold works, what to upgrade first, Altar upgrade costs, Floor 19-21 progression, the Floor 21 final boss, and how to recover when you feel stuck.
Updated:
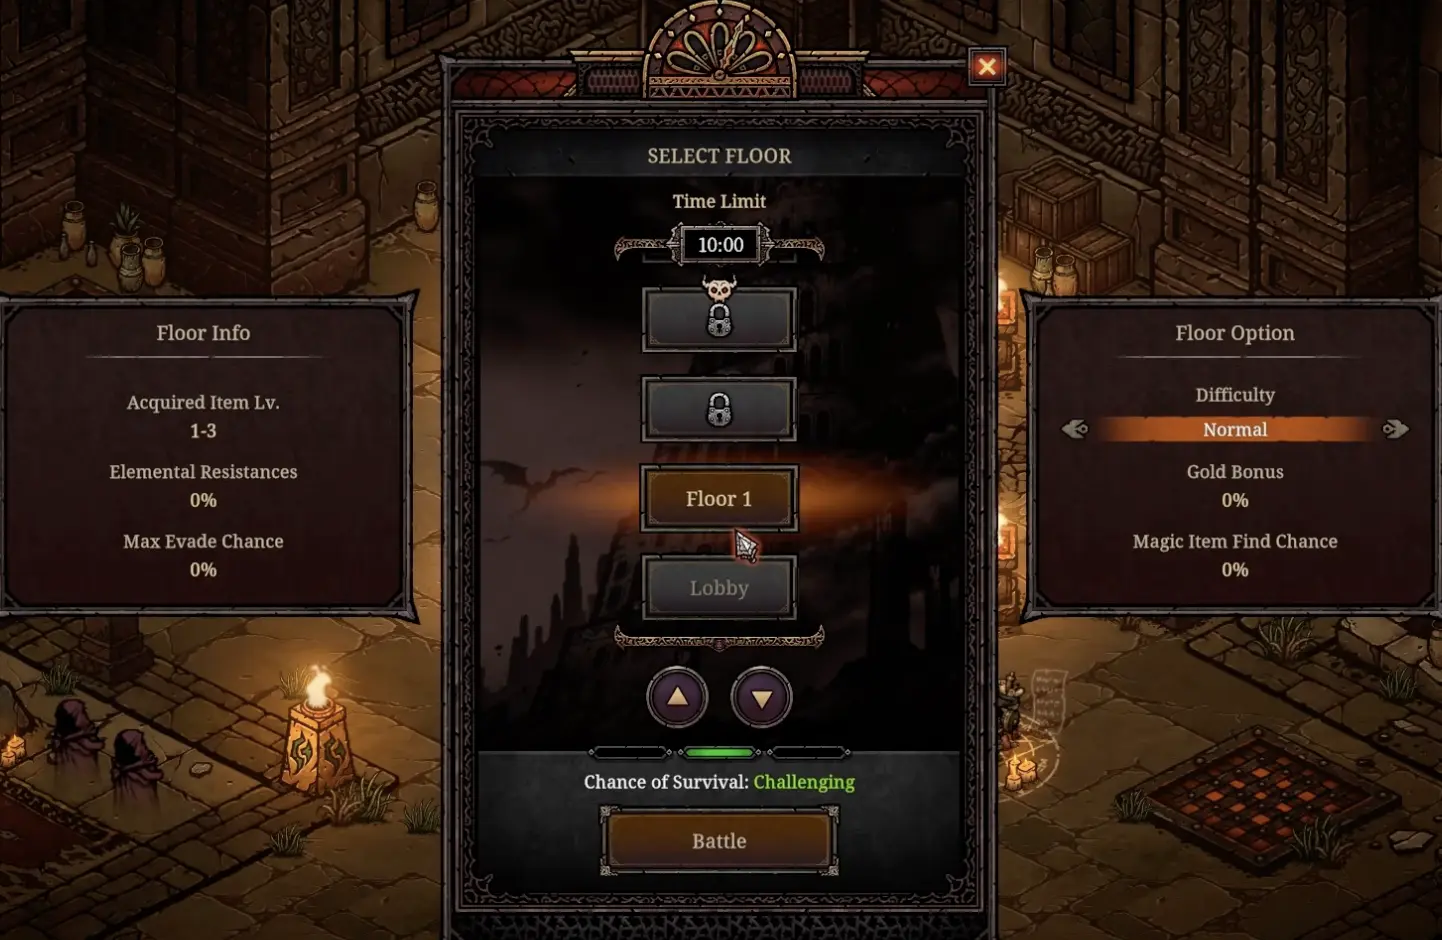
Quick Answer
In Tower of Babel: Survivors of Chaos, progression is a loop: clear a floor, collect gold and gear, identify items, equip upgrades, spend gold on the Altar, then push again. If the next floor kills you quickly, do not keep forcing it. Farm a safer floor, fix your weakest stat, replace outdated gear, and return when your damage and survival feel stable.
Start Here
Tower of Babel progression is not only about clearing the next floor once.
A strong character comes from repeating this loop:
clear floor → collect gold → collect gear → identify items → equip upgrades → spend gold → upgrade Altar → push again
If the next floor suddenly feels unfair, usually one part of that loop is behind. Your build may not have boss damage. Your gear item level may be outdated. Your Altar upgrades may be too weak. Or you may be spending gold on the wrong problem.
Progression Loop
| Step | What to do | Why it matters |
|---|---|---|
| 1. Pick a floor you can survive | Start with a floor where your build reaches the boss reliably. | Completed runs are better than failed greedy pushes. |
| 2. Build around a damage plan | Invest in a few strong skills instead of spreading every level randomly. | Your damage needs to scale before enemy density rises. |
| 3. Collect gold and loot | Break objects, pick up drops, and survive until the run ends. | Gold and gear are the foundation of progression. |
| 4. Read the result screen | Check gold, survival time, damage, and which skills carried. | The result screen tells you what actually worked. |
| 5. Identify items | Reveal your acquired gear in the hub. | Unidentified gear cannot be judged properly. |
| 6. Equip upgrades | Compare item level, stats, class restrictions, and legendary effects. | Gear can change your next run more than one extra skill pick. |
| 7. Upgrade the Altar | Spend gold on the stat that fixes your current weakness. | Altar upgrades make future runs safer. |
| 8. Push again | Move up only when the current floor feels controlled. | Pushing too early wastes time and can risk acquired loot. |
Use this as the basic progression route until your build, gear, and upgrades feel stable.
Push or Farm?
The most common progression mistake is pushing every new floor immediately.
A new floor is worth pushing when you can survive the previous one comfortably. If you barely cleared the last floor, the next floor may expose your weak points fast.
| Situation | Best choice | Why |
|---|---|---|
| You cleared the floor easily. | Push next floor. | Your build is probably ready for stronger rewards. |
| You cleared, but almost died several times. | Farm once or twice. | You need more gear, gold, or survival before pushing. |
| Boss took too long to kill. | Farm and improve damage. | Weak boss damage will get worse on harder floors. |
| Waves reached you too often. | Farm and improve area clear or control. | You need better wave clear, slow, freeze, movement, or damage reduction. |
| You ran out of mana often. | Farm or adjust build. | Mana restoration may matter more than raw damage. |
| Your gear item level is far behind. | Farm for gear. | Better item level can solve a lot of hidden power problems. |
| You are testing a new class. | Farm a safe floor first. | New classes need gear and upgrades before they feel smooth. |
Use this table to decide whether to push the next floor or farm a safer one.
Floor 19-21 Progression Reference
Use this as a current 1.0 reference for the final tower floors. These rows are not a full drop table, but they give useful checkpoints for deciding whether your build and gear are ready.
| Floor | Known current-version signal | What it means |
|---|---|---|
| Floor 19 | Late tower floor before the final push | Treat this as the point where old gear and weak builds start showing problems. |
| Floor 20 Nightmare | Acquired Item Lv. 37-43 and survival shown as Deadly | Use this as a late-tower item level benchmark. If your gear is far below this range, farm before pushing deeper. |
| Floor 21 | Final boss floor; 25-minute floor; boss appears with about 5 minutes remaining | Prepare both wave clear and boss burst. A build that only clears waves may fail at the final check. |
| After Floor 21 | Warped Floor, Dual Boss Arena, and Final Greed unlock | This is where the game shifts from tower progression into endgame systems. |
Current 1.0 late-floor progression samples. Use your own floor select screen as the final source if values change after patches.
How Gold Works
Gold is the main resource that turns completed runs into permanent progress.
You can use gold for Altar upgrades, shop items, gear recovery, hidden convenience unlocks, and other hub systems. Early on, gold should be treated as a progression tool, not just a shopping currency.
| If your problem is… | Spend gold on… |
|---|---|
| Low damage | Damage-related Altar upgrades, better weapon, useful gear |
| Dying too fast | Vitality, armor, damage reduction, life recovery, safer gear |
| Weak boss fights | Basic attack, special attack, attack speed, boss-safe damage |
| Mana problems | Mana restoration or gear that supports special attack uptime |
| Outdated gear | A clear weapon or armor upgrade, not a tiny sidegrade |
| New class feels weak | Character-specific upgrades and basic class-compatible gear |
| Runs feel inconsistent | Shared upgrades and survival tools before greedy farming |
| Lobby movement feels slow | Beggar 10000 gold unlock, but only after core spending is stable |
Use gold to remove the problem blocking your next clear.
Confirmed Gold and Cost Reference
Players usually do not need vague advice like “spend gold carefully.” They need reference points.
Use this table as a starting point. It is not a full cost database, but it gives you real numbers to compare against.
| Situation | Gold or cost signal | How to use it |
|---|---|---|
| Basic Altar stat, level 0 to 1 | 100 gold | Early Strength, Dexterity, Intelligence, and Vitality upgrades can start here. |
| Four level 0 to 1 basic stat upgrades | 400 gold total | Useful early benchmark if you want one point in each basic stat. |
| Early shop legendary example | 1,080 gold | A shop legendary can cost far more than several early Altar upgrades. Buy only if the effect matters. |
| Beggar hidden unlock | 10,000 gold | Grants faster lobby movement. This is a convenience unlock, not a combat upgrade, so do it after your core progression spending is stable. |
| Player-reported level 4 blessing example | Around 7,000 gold for 10 upgrades | Costs rise quickly. This is why midgame gold can feel tight. |
| Later Altar cost sample | 6,000 gold | Shows that Altar costs can rise into the thousands after the early game. |
| Higher Altar cost sample | 12,800 gold | Use as a warning that late upgrades can become expensive enough to shape your farming plan. |
| Stable late-game gold farm reference | Floor 15 Nightmare has been reported at 200k+ gold in strong runs | Treat this as a community farming reference, not a guaranteed current-version result. |
These are confirmed or player-reported reference points. Treat sample values as checkpoints, not a complete cost table.
What Floor Should You Farm?
Farm the highest floor you can clear quickly, safely, and repeatedly.
A good farming floor is not always the hardest floor you have unlocked. The best farm is the floor that gives useful rewards without wasting time on failed runs.
| Progress stage | Best farming target | Why |
|---|---|---|
| Very early game | Highest normal floor you can finish safely | You need basic gold, gear, and Altar upgrades before chasing big rewards. |
| Early gear catch-up | A floor where the item level range beats your current gear | Better item level can fix progression faster than small Altar upgrades. |
| When next floor kills you | One floor below your wall | Stable clears beat repeated failed pushes. |
| Mid-game gold pressure | A safe floor with fast clears and enough gold to upgrade Altar | Your goal is gold per minute, not pride. |
| Late tower progression | Floor 19-21 only when your build is stable | These floors are progression checks, not automatically the best farming route. |
| Floor 20 gear benchmark | Use Acquired Item Lv. 37-43 as a late-tower reference | If your gear is much lower, farm upgrades before pushing Floor 20 or Floor 21. |
| Post-Floor 21 endgame | Warped Floor, Dual Boss Arena, Final Greed, and Chaos Dungeon systems | Use these for endgame testing only after current-version reward data is reliable. |
| Too-hard content | Do not farm it yet | If you fail often, your real gold per minute is bad. |
Use this as a practical floor farming guide. Current-version late-game farming numbers should be verified with your own result screens.
Altar of Blessings Explained
The Altar of Blessings is one of the most important long-term progression systems.
It lets you spend gold on upgrades that make future runs stronger. This matters because every failed run usually points back to one of four problems:
- not enough damage
- not enough survival
- not enough mana or uptime
- not enough gear scaling
| Upgrade type | Best for | Prioritize when… |
|---|---|---|
| Strength / Attack Power | Physical damage and basic attack pressure | Your class or build relies on weapon damage or melee attacks. |
| Dexterity / Critical Hit / Evasion | Crit scaling and avoidance | You already have enough basic damage and want more scaling or safety. |
| Intelligence / Mana Restoration / Resistance | Spell builds and mana-heavy classes | You play Wizard or rely heavily on special attacks. |
| Vitality / Maximum Life | Survival and mistake recovery | You die before the boss or get burst down by dense waves. |
| Shared upgrades | Account-wide comfort | You play multiple classes and want progress to carry over. |
| Class-specific upgrades | Main class power | You are committed to one class for pushing. |
Use this as a beginner-friendly Altar priority table.
Altar Upgrade Cost Reference
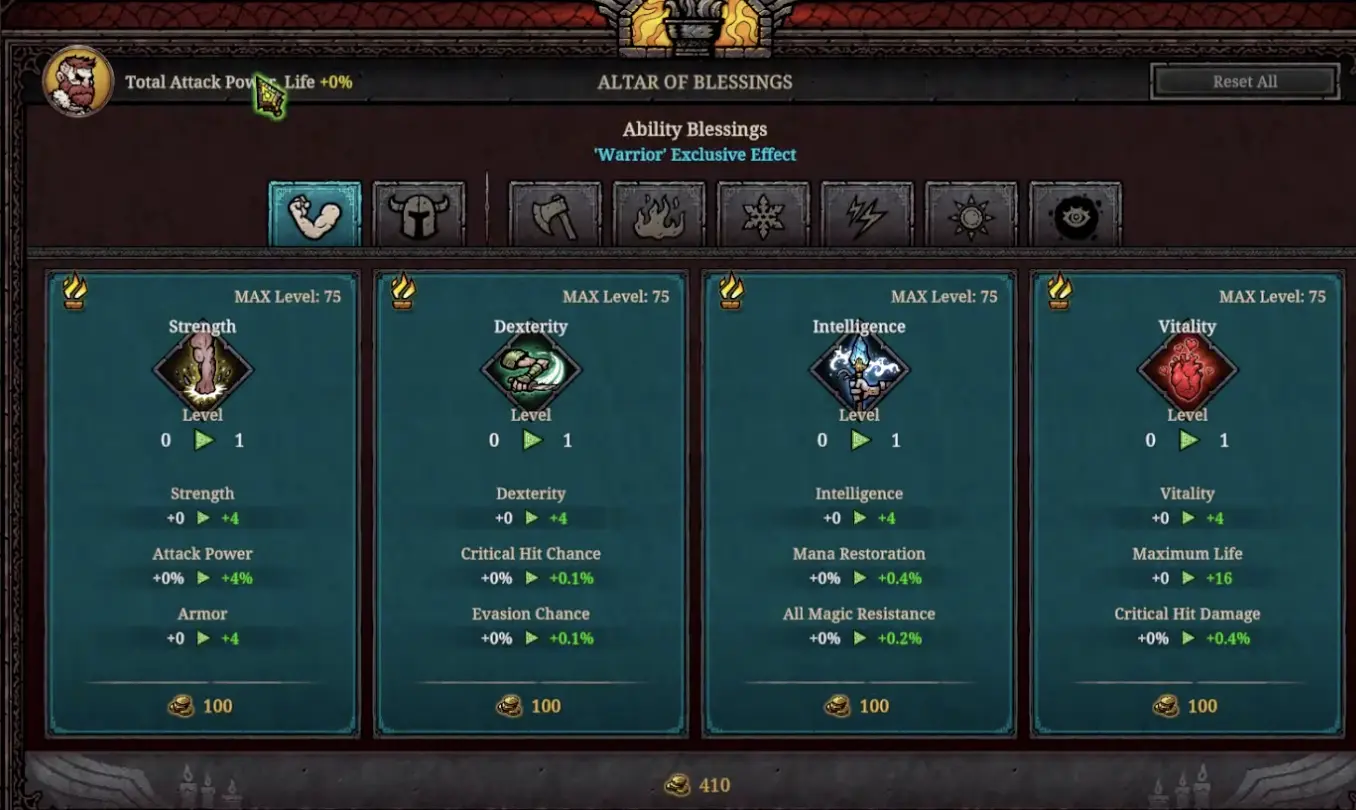
The first basic stat upgrade shown on the Altar costs 100 gold. Each card also shows exactly what that first point gives.
| Altar upgrade | Confirmed early cost | First upgrade shown |
|---|---|---|
| Strength 0 → 1 | 100 gold | Strength +4, Attack Power +4%, Armor +4 |
| Dexterity 0 → 1 | 100 gold | Dexterity +4, Critical Hit Chance +0.1%, Evasion Chance +0.1% |
| Intelligence 0 → 1 | 100 gold | Intelligence +4, Mana Restoration +0.4%, All Magic Resistance +0.2% |
| Vitality 0 → 1 | 100 gold | Vitality +4, Maximum Life +16, Critical Hit Damage +0.4% |
| Level 4 blessing upgrade example | Player-reported around 7,000 gold for 10 upgrades | Use as a warning that costs scale hard after the early game. |
| Later upgrade sample | 6,000 gold | Use as a cost-scaling sample, not a fixed universal upgrade level. |
| Higher upgrade sample | 12,800 gold | Shows why late Altar planning can become a major farming goal. |
Use this as the confirmed early Altar cost reference. Later costs rise and should be recorded separately.
What to Upgrade First
There is no single perfect Altar order for every class, but there is a safe early rule:
Upgrade the stat that fixes your current failure.
If you die too early, buy survival. If you clear waves but bosses take too long, buy damage. If you cannot keep using special attacks, buy mana support.
| Priority | Upgrade focus | Why |
|---|---|---|
| 1 | Basic survivability | Dying early stops every other plan. |
| 2 | Main damage stat | Faster clears reduce pressure and make bosses safer. |
| 3 | Mana or attack uptime | Important for Wizard, Skull Crusher, and special attack builds. |
| 4 | Movement, evasion, or damage reduction | Helps when enemy density increases. |
| 5 | Shared upgrades | Useful if you rotate between classes. |
| 6 | Farming bonuses | Better after you can clear reliably. |
| 7 | Greedy or niche upgrades | Best saved until your build is already stable. |
Use this as a practical early upgrade order. Adjust it based on your class.
Character-Specific vs Shared Upgrades
Some upgrades help a specific class, while other upgrade tables can help across multiple classes.
This matters because trying a new character does not always mean starting completely from zero. You may still benefit from shared progression, but the new class still needs its own gear and stat support.
| Upgrade type | What it means | Best use |
|---|---|---|
| Character-specific stats | Stats tied to the class you are playing | Upgrade when you commit to a main class. |
| Shared tables | Bonuses that carry across classes | Upgrade when you rotate between Warrior, Wizard, Skull Crusher, and others. |
| Class talent choices | Build-defining route for a class | Pick based on your skill plan, not just raw numbers. |
| Gear slots | Some items are class-exclusive | New classes may need fresh weapons, helmets, or armor. |
| Old gear | May be underleveled after new content | Replace if new item level drops are much higher. |
Use this table when switching classes.
How to Use the Result Screen
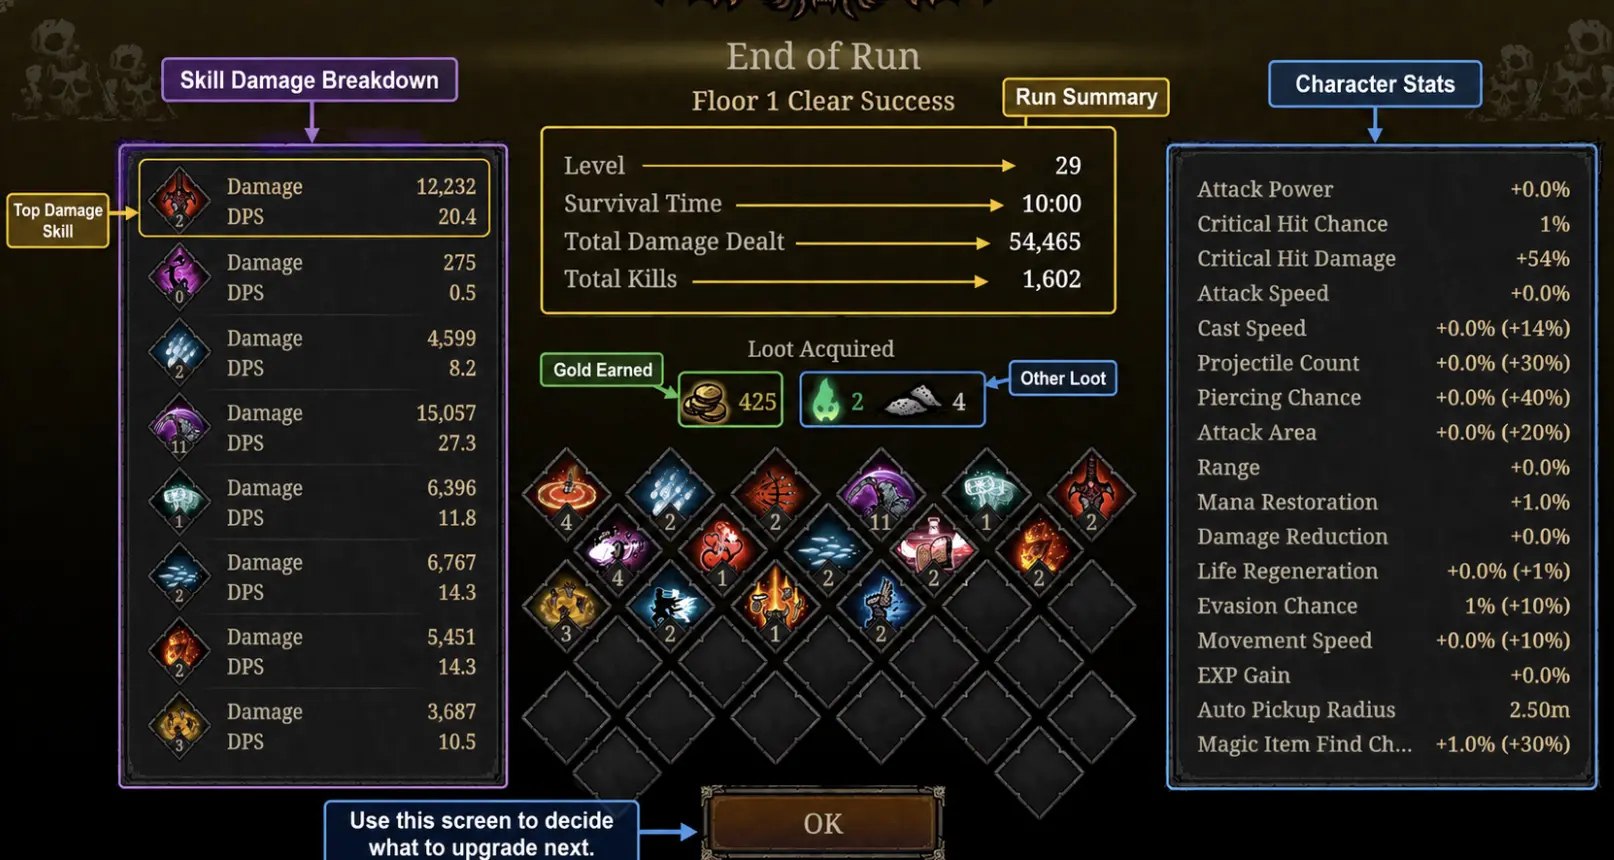
After a run, do not click through the result screen too fast.
The result screen helps you understand what actually carried the run. Sometimes the skill that looked flashy did less than expected. Sometimes your main hand weapon does more work than your active skills.
| Result screen clue | What it tells you |
|---|---|
| Gold reward is low | Farm a more efficient floor or clear faster before chasing expensive upgrades. |
| One skill dealt most damage | Bless or level that skill more often in future runs. |
| Main hand weapon dealt high damage | Basic attack or weapon scaling may be worth investing in. |
| Boss took too long | Add boss damage, attack speed, or special attack scaling. |
| You survived with low health often | Add sustain, movement, damage reduction, or Vitality. |
| A skill underperformed | Consider banning it or avoiding it next run. |
Use the result screen to decide your next upgrade.
Quick Note on Stolen Items
If a run fails, a goblin can steal acquired items. Do not turn this page into a gear recovery checklist: just remember to check the merchant’s Lost tab before starting the next run.
For the full recovery logic, read the Gear and Legendary Items Guide.
What to Do When You Feel Stuck
If you cannot progress, use this recovery plan.
| Step | Action |
|---|---|
| 1 | Stop pushing the floor that keeps killing you. |
| 2 | Farm the highest floor you can clear safely. |
| 3 | Check your result screen for weak damage, low gold, or weak survival. |
| 4 | Identify all gear after the run. |
| 5 | Equip higher item level upgrades that fit your class. |
| 6 | Sell obvious junk gear. |
| 7 | Spend gold on the Altar to fix your main weakness. |
| 8 | Buy shop gear only if it solves a real problem. |
| 9 | Adjust your skill plan before the next run. |
| 10 | Push again only after the farm floor feels controlled. |
Progression Problems This Plan Does Not Fix Automatically
The stuck plan solves most early walls, but a few problems need a different response.
| Problem | What actually happens | Fix |
|---|---|---|
| Switching class with no gear | The new class feels weak even though your account has upgrades. | Farm a safer floor and equip class-compatible gear first. |
| Crafting on temporary gear | You spend gold, gems, jewels, or runes on an item that gets replaced quickly. | Only craft on items with strong item level, stats, or legendary effects. |
| Buying shop gear blindly | You lose gold that could have fixed your Altar or survival problem. | Buy only if the item solves damage, survival, mana, or item level. |
| Taking greed too early | Gold Gain does nothing if you die before the run pays off. | Take greed after the run is already safe. |
After Floor 21: What Progression Becomes
After the Floor 21 final boss, progression shifts away from simply pushing the next normal floor.
Your next goals become:
- improve endgame gear
- test Warped Floor modifiers
- prepare for Dual Boss Arena
- understand Final Greed and Final Enhancement
- collect better result screen data before choosing a permanent farming route
FAQ
How do I progress in Tower of Babel Survivors of Chaos? +
Progression comes from clearing floors, collecting gold and gear, identifying items, upgrading your character, improving Altar bonuses, and then pushing harder floors when your build feels stable.
Should I push the next floor or farm an easier floor? +
Push if you can clear the current floor safely and your boss damage feels good. Farm if the next floor kills you quickly, your gear item level is behind, or your build needs more gold and Altar upgrades.
What should I spend gold on first? +
Spend gold on the upgrade that fixes your current failure. If you die early, buy survival. If bosses take too long, buy damage. If special attacks run dry, buy mana support. Do not spend all your gold on random shop gear before checking Altar upgrades.
How much do Altar upgrades cost? +
Early basic stat upgrades can start at 100 gold for a level 0 to level 1 upgrade. Costs rise as upgrades level up, and later upgrades can become expensive enough that gold farming matters.
What happens around Floor 20 and Floor 21? +
Current 1.0 testing shows Floor 20 Nightmare with Acquired Item Lv. 37-43. Floor 21 is the final boss floor; it lasts 25 minutes, and the boss appears with about 5 minutes remaining.
What does the Beggar do with 10000 gold? +
The Beggar can ask for 10000 gold and rewards faster lobby movement. Treat this as a convenience unlock, not a combat upgrade, so prioritize core progression spending first.
Why do I feel stuck? +
You are usually missing one of four things: damage, survival, item level, or Altar upgrades. Stop pushing the floor that keeps killing you, farm a safer floor, identify gear, spend gold on the weakness that stopped the run, then try again.