Serpent's Gaze Weapons and Aspects Guide
A practical Serpent's Gaze weapons and Aspects guide explaining best beginner picks, attack patterns, stat scaling, Aspect choices, Callings, and unlocks.
Updated:
Quick Answer
The best Serpent’s Gaze weapon is the one that matches your stats, recovery timing, and build plan. Oathbound Rapier is strong for fast Dexterity and bleed-style builds, Aureate Curved Sword is a safer balanced pick, Mace of the Maiden and Gatekeeper’s Warhammer fit heavy Strength play, and Aspect of the Bold wants a weapon that can punish safely while you manage health risk. Your Aspect, weapon, starter relic, and Calling should support the same plan.
How to Choose Weapons and Aspects
Do not choose a Serpent’s Gaze weapon only because it looks cool or has a big number. Your weapon controls your attack speed, range, combo commitment, energy pressure, scaling, and boss punish windows.
Use this quick rule:
| If you want… | Pick this kind of setup | Best first question |
|---|---|---|
| Easy first runs | Balanced weapon + safe Aspect | Can I stop attacking quickly if the boss moves? |
| Fast boss punishes | Rapier or other fast Dexterity weapon | Can I manage stamina while poking often? |
| Big hits | Mace, Warhammer, or heavy Strength weapon | Do I know the enemy’s real openings yet? |
| Fire burst | Trickster-style setup with fire relic support | Can I save relic charges for elites and bosses? |
| Bleed pressure | Fast weapon + bleed Calling / upgrades | Can I hit often enough to build pressure? |
| Rot / Blight damage | Plague-style setup + debuff support | Can I apply status safely and repeatedly? |
| High-risk Bold play | Fast or balanced weapon + recovery support | Can I use health as a resource without panic-healing? |
| Co-op support | Magnolia, support, or summon-friendly setup | Will my teammates stay close enough to benefit? |
What to Check on a Weapon Screen
Every weapon decision should start with the same checklist.
| Check | Why it matters |
|---|---|
| Primary attack | This is your basic damage loop. Learn whether it is a quick poke, balanced combo, or slow heavy swing. |
| Secondary attack | Often gives a charged hit, safer angle, range, or extra pressure. It can change how the weapon handles rooms. |
| Special | Can define the weapon if it gives burst, mobility, projectile pressure, stun, or status setup. |
| Weapon scaling | Tells you which stats actually increase your damage. |
| Class attributes | Starting stats affect early damage and survival before upgrades appear. |
| Starter relic | Some Aspects start with damage, support, fireball, summon, or buff tools. |
| Energy cost | Slow weapons, charged moves, and repeated dodges can drain stamina faster than expected. |
| Unlock source | If the weapon is locked, check whether it comes from a boss, hub reward, NPC request, or run item. |
Best Beginner Weapon
The best beginner weapon is a readable weapon.
That means:
- you understand the attack speed;
- the range is not misleading;
- the scaling stat is obvious;
- the combo does not trap you for too long;
- you can punish bosses without trading every hit;
- the weapon works even before perfect upgrades appear.
For most players, a balanced sword or fast weapon is easier to learn than a very slow heavy weapon.
| Beginner weapon style | Why it helps |
|---|---|
| Balanced sword | Simple range, simple timing, and easier stat planning |
| Fast Dexterity weapon | Quick punish windows and easier status application |
| Fire relic setup | Lets you deal safe burst without standing in melee |
| Support setup | Better for co-op or safer learning |
| Heavy weapon | Strong, but only if you wait for real openings |
Weapon Attack Pattern Quick Table
Use this table to decide which weapon section you should read first. It gives you the short version of each weapon’s role and attack rhythm; the detailed Primary, Secondary, Special, scaling, and unlock notes are covered in the individual weapon sections below.
| Weapon | Role | Primary rhythm | Secondary / Special idea | Best for |
|---|---|---|---|---|
| Aureate Curved Sword | Balanced melee | Readable melee swings with moderate commitment | Good all-purpose melee pressure | Beginners, balanced Aspect testing, first clears |
| Oathbound Rapier | Fast Dexterity | Quick thrusts and short punish windows | Best when paired with bleed, crit, or attack speed | Boss pokes, fast enemies, bleed builds |
| Mace of the Maiden | Heavy melee | Slower hits with more commitment | Better when you wait for a clean punish | Strength builds, patient melee players |
| Gatekeeper’s Warhammer | Heavy Strength | Slow, high-commitment heavy attacks | Big punish style instead of constant pressure | Strength players who know openings |
| Fire / Trickster weapon setup | Relic burst | Weapon fills downtime between relic casts | Fireball-style burst and burn pressure | Elites, bosses, safer ranged damage |
| Support / Magnolia setup | Team utility | Weapon provides baseline damage | Starter relic or Aspect adds ally value | Co-op, safer team runs |
| Bold setup weapon | High-risk damage | Should be safe enough to punish without overtrading | Supports health-risk play with recovery planning | Aspect of the Bold players |
Oathbound Rapier
Oathbound Rapier is one of the strongest fast-weapon directions because it leans into Dexterity and quick punish windows.
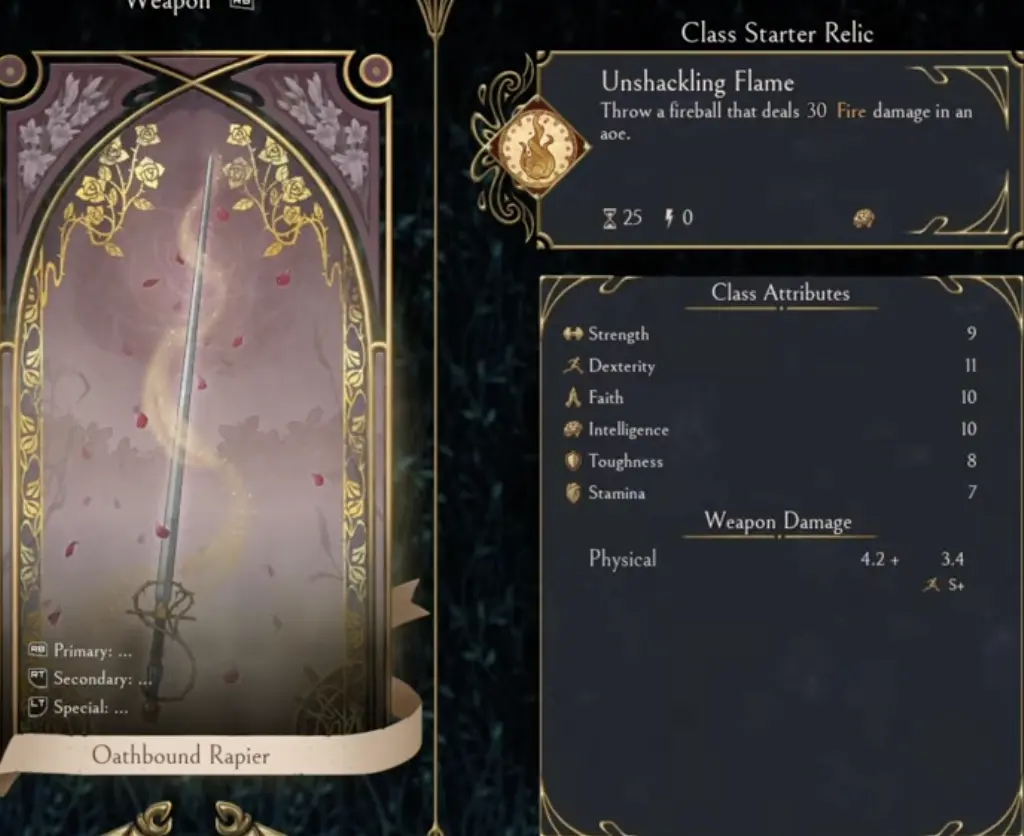
Oathbound Rapier Attack Rhythm
| Part | How to think about it |
|---|---|
| Primary | Fast thrust-style pressure. Use it for short boss punish windows instead of long trades. |
| Secondary | Treat it as a controlled pressure option, not something to spam until stamina is empty. |
| Special | Best when it supports quick burst, mobility, or status pressure. |
| Scaling plan | Build around Dexterity first, then add bleed, crit, attack speed, or survival. |
| Best mistake to avoid | Do not treat it like a heavy weapon. Rapier wins by getting in and out. |
Use Oathbound Rapier if you want:
- fast stabs;
- quick recovery;
- Dexterity scaling;
- bleed support;
- crit or attack speed upgrades;
- short boss punish windows;
- safer melee pressure.
How to Unlock Rapier-Style Progression
Rapier progression is tied to Golden Rose-related progress.
The practical route is:
- Build enough damage and nectar to reach Golden Rose.
- Use safe boss damage instead of greedy melee trades.
- Beat the boss cleanly.
- Return to the hub and check new weapon options.
- Build around Dexterity, bleed, crit, or fast attacks if the rapier fits you.
For boss details, use the Boss Guide.
Mace of the Maiden
Mace of the Maiden is a slower heavy weapon direction. It hits harder than fast weapons, but it asks for cleaner timing.
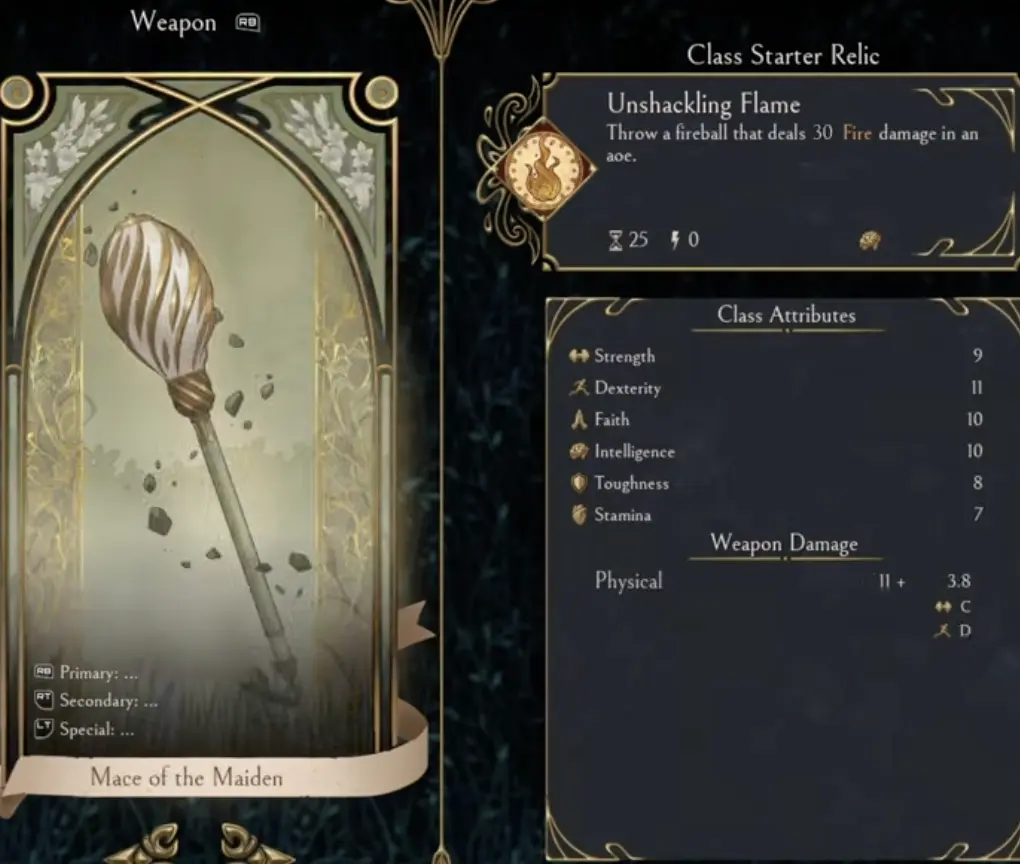
Mace of the Maiden Attack Rhythm
| Part | How to think about it |
|---|---|
| Primary | Slower heavy swings. Use fewer attacks and leave earlier. |
| Secondary | Treat it as a heavier commitment option, useful only when the enemy is actually open. |
| Special | Best when it gives control, burst, or a safe punish window. |
| Scaling plan | Build around Strength-style value, then add Toughness and Stamina if recovery feels rough. |
| Best mistake to avoid | Do not pick it just because heavy hits look strong. Slow recovery is a real cost. |
Use Mace of the Maiden if you want:
- heavier physical hits;
- a simpler Strength-style plan;
- strong punish damage;
- fewer but more meaningful swings;
- a weapon that rewards spacing.
Avoid it if:
- you panic-roll often;
- you like to mash full combos;
- you struggle with fast bosses;
- you do not invest in survival or stamina support.
Aureate Curved Sword
Aureate Curved Sword is a better beginner pick if you want a balanced melee weapon that does not force you into the extremes of rapier speed or mace commitment.
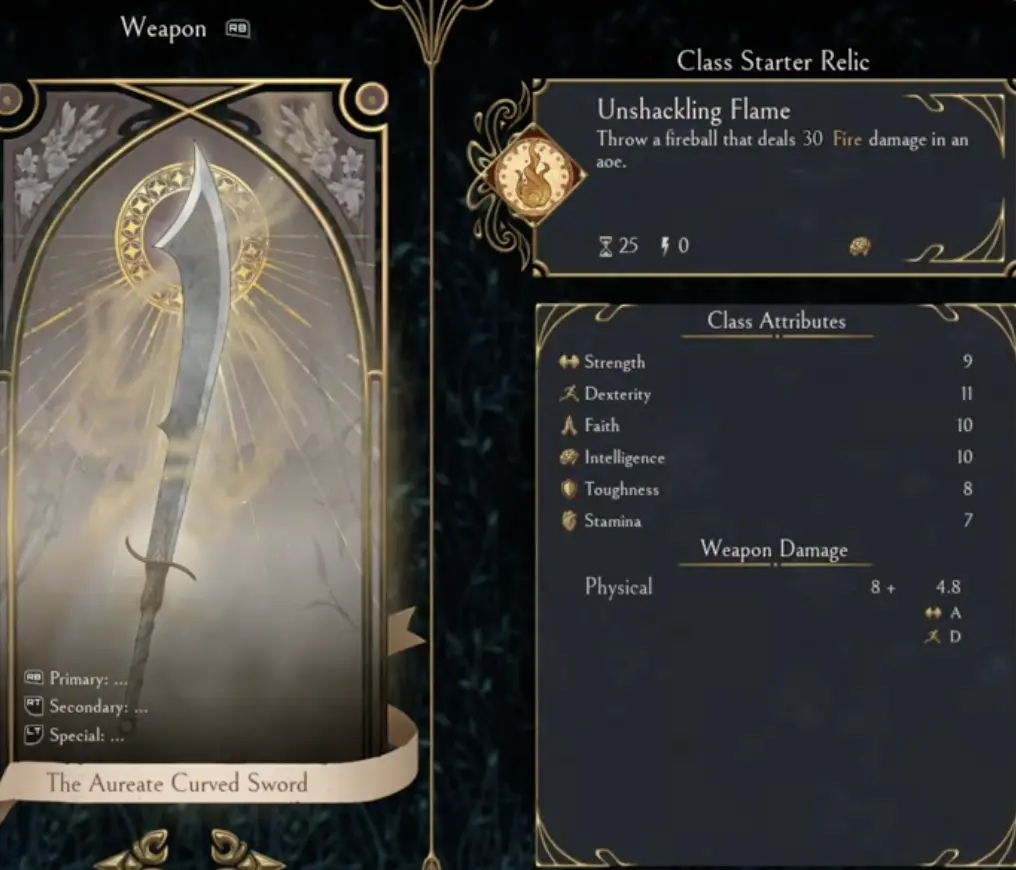
Aureate Curved Sword Attack Rhythm
| Part | How to think about it |
|---|---|
| Primary | Balanced melee attacks with more commitment than rapier but less than heavy weapons. |
| Secondary | Use it when you need a stronger or safer angle than basic swings. |
| Special | Best used as part of a steady melee plan, not as a separate build by itself. |
| Scaling plan | Follow the weapon’s visible scaling, then add survival if you are learning bosses. |
| Best mistake to avoid | Do not abandon it too early just because it is not flashy. Balanced weapons teach the game well. |
Use it if you want:
- a straightforward melee weapon;
- easier learning than very slow weapons;
- enough range to play carefully;
- a setup that works with balanced builds;
- a weapon to test new Aspects without changing everything.
Gatekeeper’s Warhammer
Gatekeeper’s Warhammer is the heavy Strength fantasy. It is for players who want big hits and do not mind slower timing.
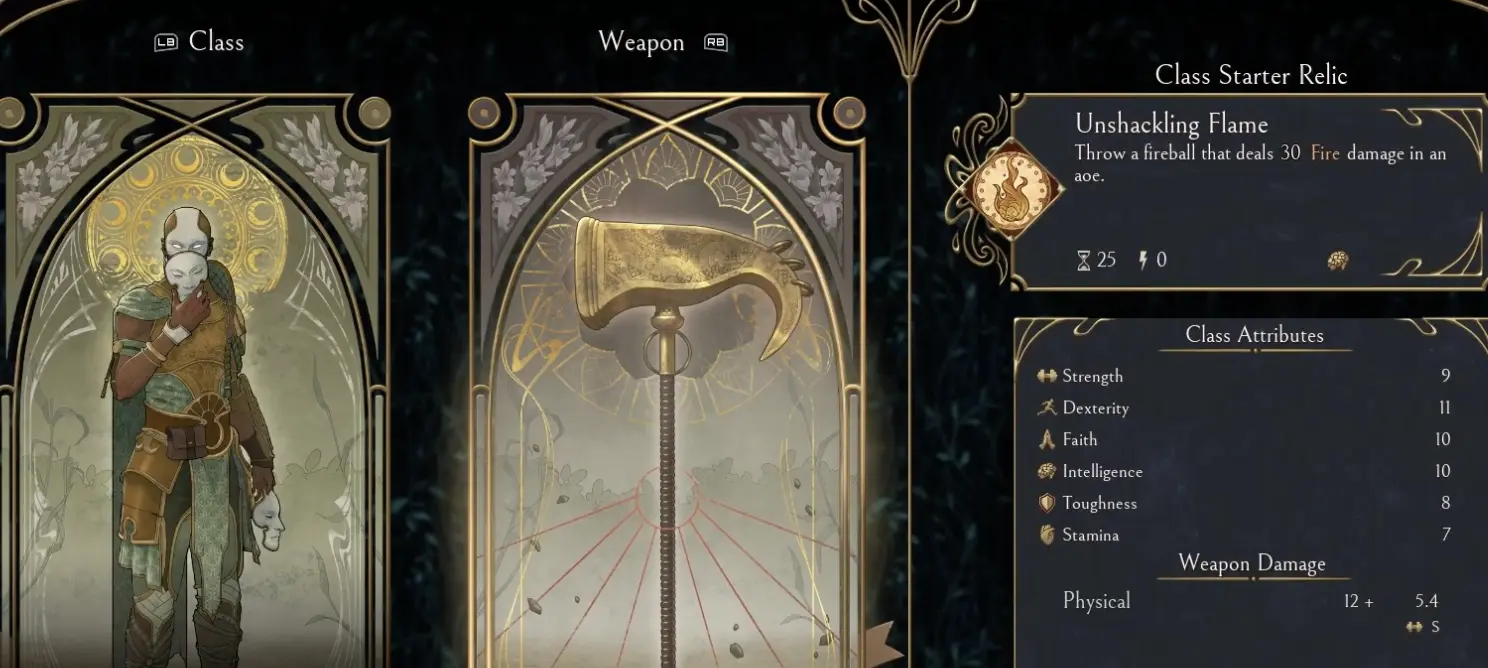
Gatekeeper’s Warhammer Attack Rhythm
| Part | How to think about it |
|---|---|
| Primary | Heavy, committed attacks. You are looking for clear openings, not constant pressure. |
| Secondary | Use only when you are sure the target cannot punish the longer commitment. |
| Special | Best if it gives burst, control, or an opening to safely land heavy damage. |
| Scaling plan | Build around Strength and add enough Toughness / Stamina to survive missed timing. |
| Best mistake to avoid | Do not use it as a beginner panic weapon. It rewards patience, not mashing. |
Use Gatekeeper’s Warhammer if:
- you want strong Strength scaling;
- you like big punish hits;
- you are willing to wait for openings;
- you can handle slower recovery;
- you are comfortable adding Toughness and Stamina.
Best Aspect for Beginners
Your Aspect is not just a name. It affects your starting attributes, starter relic, natural build direction, and how easy the first few rooms feel.
The best beginner Aspect is the one with the lowest learning barrier, not the most complicated scaling.
| Aspect | Role | Beginner barrier | Best for |
|---|---|---|---|
| Aspect of the Magnolia | Balanced / support value | Low: direct value and readable setup | Beginners, co-op, balanced melee, support relic use |
| Aspect of the Oak | Sturdy / resistance value | Low: safer learning, less fragile starts | Players who want a tougher first run |
| Trickster | Fire / burst / relic play | Medium: needs relic timing and charge control | Players who want safe burst instead of long melee trades |
| Dreamer | Debuff / relic / flexible scaling | Medium: needs understanding of debuffs and relic value | Players who like status, relic charges, and mixed effects |
| Plague | Rot / Blight / damage over time | Medium: needs reliable status uptime | Players who like Rot, Blight, and high-health enemy pressure |
| Aspect of the Bold | High-risk damage | High: uses health risk and recovery planning | Players who can manage health as a resource |
| Summoner | Summons / pressure control | Medium: needs upgrade support to shine | Co-op players, boss pressure, safer control builds |
| Support-style Aspect | Team utility | Low / medium: depends on teammates staying close | Co-op teams and safer group play |
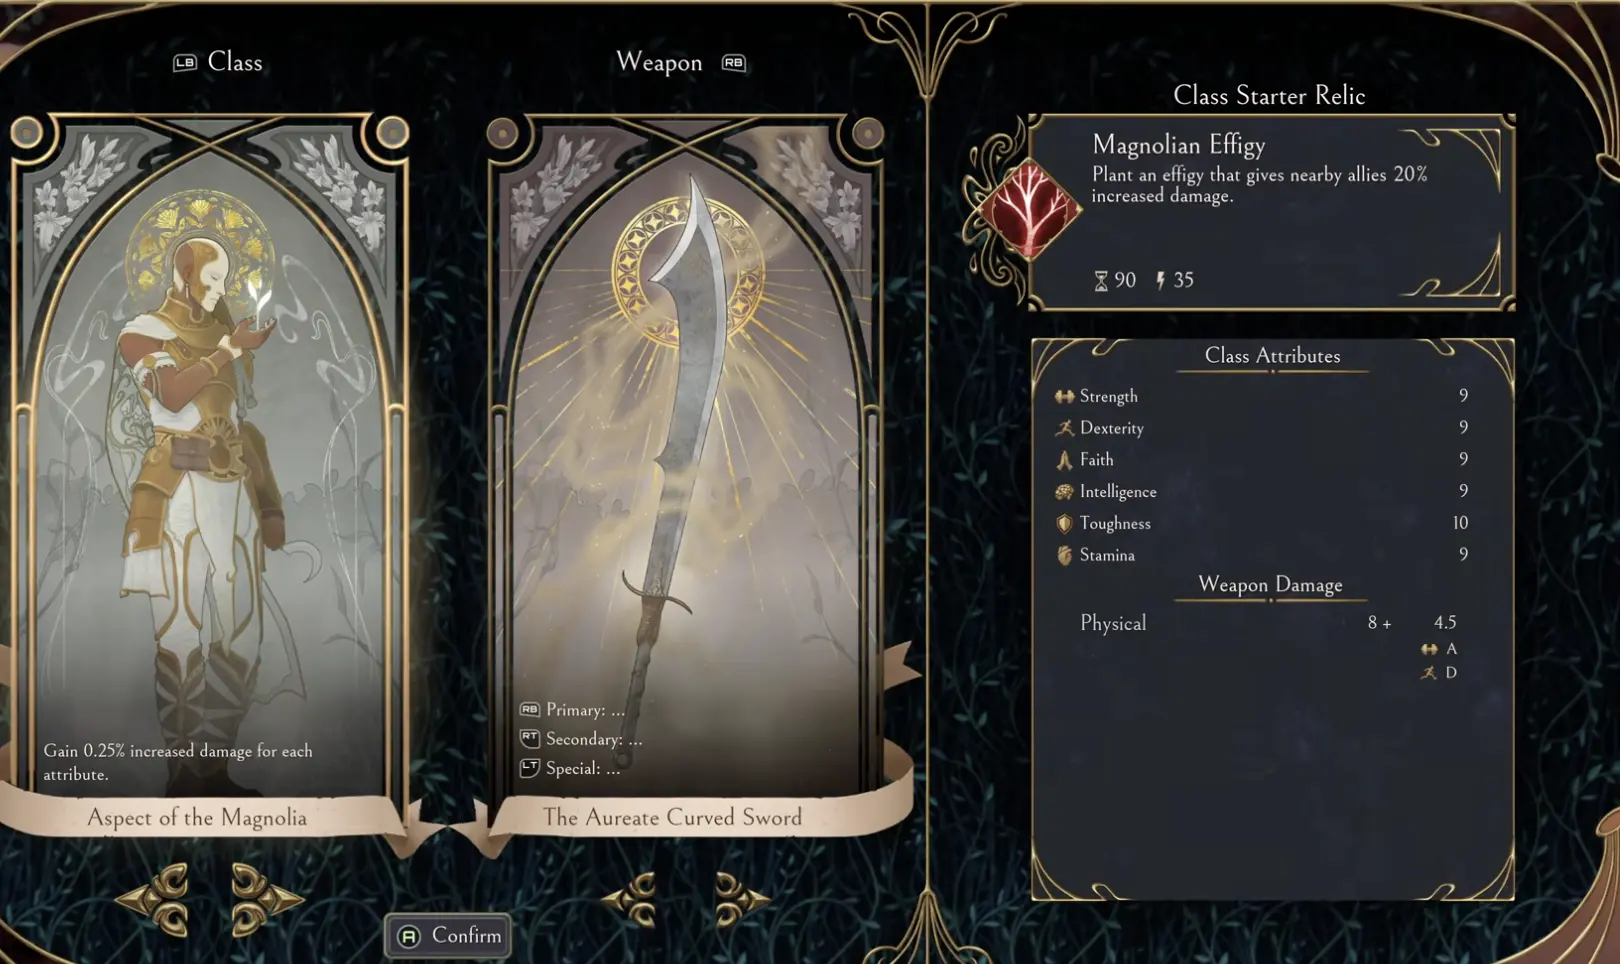
Aspect of the Magnolia
Aspect of the Magnolia is a strong learning Aspect because it gives direct value instead of asking you to understand a complicated engine immediately.
It pairs well with:
- balanced melee weapons;
- beginner builds;
- boss damage choices;
- attribute-based scaling;
- co-op support if your starter relic helps allies.
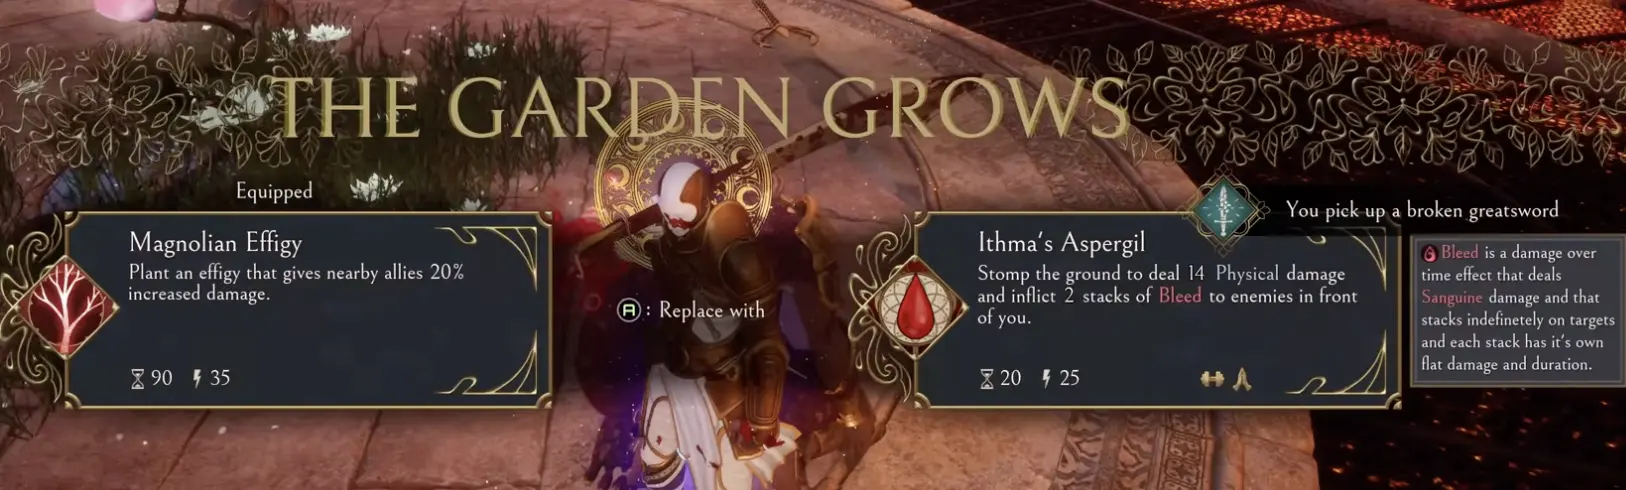
The Magnolia starter relic shown here, Magnolian Effigy, gives nearby allies increased damage, which makes it easy to understand in co-op and still useful when placed carefully.
| Magnolia strength | Why it helps |
|---|---|
| Simple value | Easier to use than complicated status builds |
| Attribute synergy | Rewards clean stat planning |
| Support potential | Can help nearby allies in co-op |
| Good beginner pairing | Works with balanced weapons and safe upgrades |
Aspect of the Oak
Aspect of the Oak is the safer pick for players who want a sturdier start. It is not the flashiest Aspect, but it helps if your early problem is dying before your build comes online.
Use Oak if you want:
- more forgiving first rooms;
- a sturdier baseline;
- resistance-focused value;
- a safer way to learn enemy patterns;
- less pressure to play like a glass cannon.
| Oak strength | Why it helps |
|---|---|
| Safer baseline | Helps newer players survive long enough to learn |
| Resistance value | Makes messy rooms less punishing |
| Good with balanced weapons | Lets you learn without chasing a fragile combo |
| Works in solo | Useful when every enemy targets you |
| Good before high-risk builds | Helps you learn before moving into Bold or glass-cannon setups |
Trickster and Fire Setups
Trickster-style setups are strong because fireball-style damage gives safe burst. This matters when bosses are too dangerous to trade with.
A fire setup wants:
- relic charges;
- fire damage increases;
- burn effects;
- fire resistance reduction;
- enough Stamina to stay mobile;
- a weapon that can handle downtime between relic uses.
| Fire setup piece | Why it matters |
|---|---|
| Fire relic | Gives safe burst and room control |
| Extra relic charges | More casts before downtime becomes a problem |
| Burn support | Adds damage over time |
| Fire conversion | Makes more of your kit support the same plan |
| Fast or balanced weapon | Lets you fight while relics recharge |
Plague, Rot, and Blight Aspects
Plague-style builds are good when you want status damage to keep working while you dodge.
Rot is especially useful because it can deal Blight damage based on the target’s current HP. That makes it better against tougher enemies when you can apply it reliably.
Good Plague / Rot setups want:
- repeated hits;
- debuff duration;
- Blight conversion;
- Rot on hit;
- a weapon that can apply status safely;
- enough survival to wait out damage over time.
| Plague / Rot piece | Why it helps |
|---|---|
| Rot on hit | Keeps pressure active |
| Blight conversion | Supports the damage type Rot uses |
| Debuff duration | Makes status uptime more reliable |
| Fast weapon | Applies status more safely |
| Boss damage | Helps when status alone is too slow |
Aspect of the Bold: Best Weapon Pairings
Aspect of the Bold needs a different weapon mindset. Because Bold rewards health-risk play, you do not want a weapon that forces you into bad trades every time you attack.
The safest Bold weapons are usually:
- fast enough to leave after a punish;
- balanced enough to avoid overcommitting;
- strong enough to benefit from damage bonuses;
- not so slow that every miss becomes a death spiral.
| Weapon style | Bold fit | Why |
|---|---|---|
| Fast Dexterity / rapier-style weapon | Strong | Lets you use damage bonuses without standing still too long |
| Balanced curved sword / sword setup | Strong | Good mix of safety, damage, and recovery |
| Fire relic setup | Strong | Lets you deal burst without always spending health in melee |
| Heavy Strength weapon | Risky | Big damage is tempting, but slow recovery can turn health-risk play into self-punishment |
| Summon / support setup | Situational | Good if the setup gives breathing room, weaker if it lowers your direct control |
Dreamer and Debuff Builds
Dream-style choices are good if you like flexible builds based on relic charges, healing over time, debuffs, or element conversion.

Dreamer-style builds can work with:
- fast weapons;
- relic-heavy setups;
- debuff duration;
- status effects;
- element conversion;
- safer recovery tools.
They are less ideal if you just want a simple first clear, because flexible damage can be harder to evaluate than direct boss damage.
Summoner and Support Setups
Summoner and support builds are strongest when you want extra pressure or co-op utility instead of pure weapon damage.
A support or summon setup can give:
- ally damage buffs;
- mirror images;
- summons;
- extra pressure against bosses;
- distraction against dangerous enemies;
- safer co-op roles.
Use support or summoner if:
- you play co-op often;
- you like safer boss pressure;
- you want to split attention;
- you do not want every build to be pure melee;
- you are comfortable supporting a slower fight.
Callings: Why They Matter
Callings are not weapons, but they can decide which weapons feel good.
If a Calling increases one status and reduces others, treat that as a build direction.
| Calling direction | Best weapon pairing |
|---|---|
| Burn | Trickster, fire relics, fast or balanced weapons |
| Bleed | Oathbound Rapier, fast weapons, crit, attack speed |
| Rot | Plague, Blight support, repeated hits |
| Roll changes | Weapons that do not need constant panic dodging |
| Damage conversion | Weapons and stats that support the converted damage type |
| Relic support | Fireball, summon, Quicksand, or burst relic setups |
Relics Still Matter
Your weapon is not the only thing that changes your run. Relic choices can completely change how your build fights.
When a relic reward appears, ask:
| Question | Why it matters |
|---|---|
| Does this relic match my weapon? | Slow weapons may need safe burst; fast weapons may want status support |
| Does it replace a tool I rely on? | Do not replace your only safe boss damage without a reason |
| Does it need upgrades to work? | Some relics are weak unless you also have charges, cooldown, or damage support |
| Does it help rooms or bosses? | Boss help is usually more important if that is where you die |
| Does it support co-op? | Some relics become stronger when allies benefit |
Weapon and Aspect Unlocks
Serpent’s Gaze unlocks more weapons, Aspects, Callings, and tools as you progress. Some unlocks come from bosses, some from NPC requests, some from mysterious items, and some from run progress.
Use this as a working unlock tracker.
| Weapon / Aspect | Known or likely unlock source | What to do |
|---|---|---|
| Oathbound Rapier | Golden Rose-related progression / rapier reward | Beat Golden Rose and check the hub afterward |
| Aureate Curved Sword | Available or shown through hub weapon selection after progression | Check weapon wall / hub selection |
| Mace of the Maiden | Available or shown through hub weapon selection after progression | Check weapon wall / hub selection |
| Gatekeeper’s Warhammer | Later weapon unlock / heavy Strength progression | Check after major run milestones and weapon wall updates |
| Aspect of the Bold | Aspect unlock shown through progression | Check Aspect selection after unlock text appears |
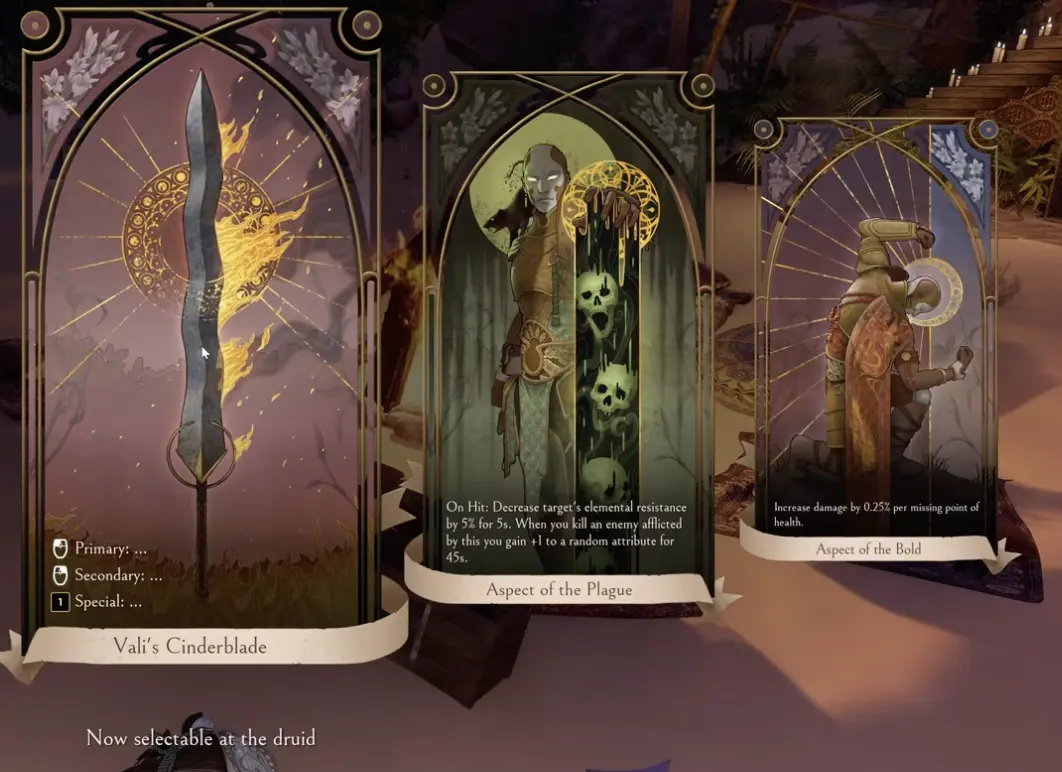
| Aspect of the Plague | Aspect unlock / status build progression | Check Aspect selection after relevant unlocks |
| Aspect of the Oak | Aspect selection / safer starter option | Check current Aspect list in the hub |
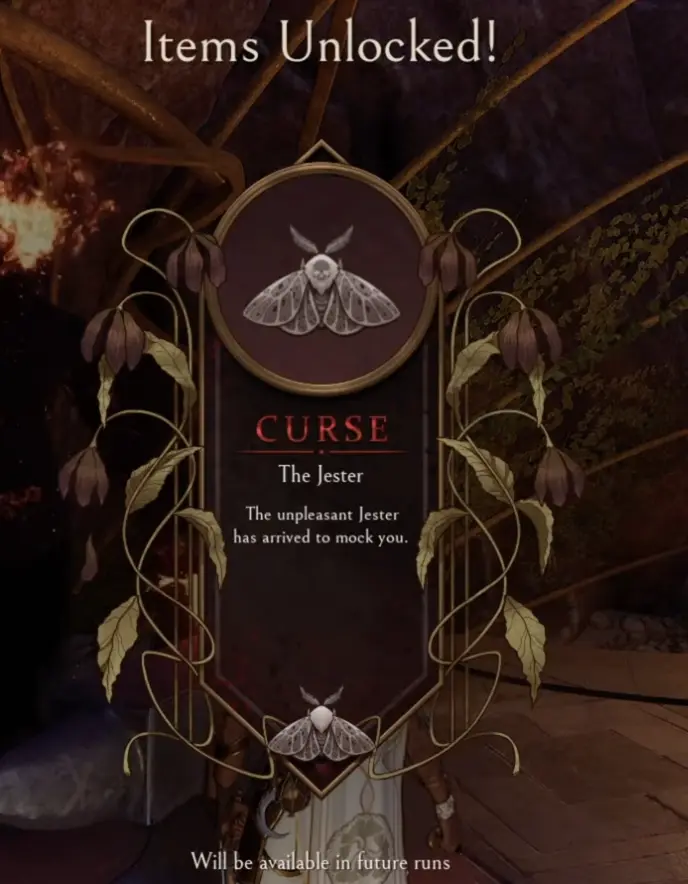
| New Callings | Curse, boss, or run progress unlocks | Check Callings after major progress or new unlock prompts |
Best Weapon by Player Type
Use this instead of a strict tier list.
| Player type | Best weapon direction | Why |
|---|---|---|
| New player | Aureate Curved Sword or balanced weapon | Easy to read and less punishing |
| Fast melee player | Oathbound Rapier | Quick stabs, Dex scaling, good boss windows |
| Heavy weapon player | Mace of the Maiden or Gatekeeper’s Warhammer | Big hits and simple Strength planning |
| Status player | Rapier, fast weapon, Plague setup | Easier burn, bleed, Rot, or Blight application |
| Fire player | Trickster-style weapon + fire relic | Safe burst and room control |
| High-risk / Bold player | Fast or balanced weapon with recovery support | Lets you use health-risk damage without overcommitting |
| Co-op support player | Magnolia / support / summon setup | Buffs, summons, and shared pressure |
| Boss-focused player | Fast weapon or safe burst setup | Punish windows matter more than raw room damage |
Weapon and Aspect Mistakes to Avoid
Mistake 1: Picking a heavy weapon because the number looks bigger
Heavy weapons are strong only if you can wait for real openings. If you are still learning bosses, a faster or balanced weapon may clear more consistently.
Mistake 2: Ignoring the actual attack pattern
A weapon’s Primary, Secondary, and Special matter more than the fantasy. If you hate the attack rhythm, you will not play the build well.
Mistake 3: Pairing Aspect of the Bold with too much commitment
Bold already asks you to manage health risk. Do not add a weapon that makes every punish window unsafe unless you know the boss well.
Mistake 4: Building around relic damage without relic support
A relic can carry a run, but only if you have charges, cooldown help, damage support, or safe timing. Otherwise, your weapon still needs to do real work.
Mistake 5: Treating unlocks as automatic upgrades
A new weapon is not always better than the one you understand. Test the rhythm before moving your whole build around it.
Mistake 6: Using a tier list instead of a role
Serpent’s Gaze weapons solve different problems. Pick the role you need: fast punish, heavy hit, fire burst, status uptime, support, or survival.
FAQ
What is the best beginner weapon in Serpent's Gaze? +
The best beginner weapon is a readable weapon with clear scaling, safe recovery, and attacks you can understand quickly. Aureate Curved Sword and fast Dexterity weapons are easier to learn than slow heavy weapons.
Is Oathbound Rapier good? +
Yes. Oathbound Rapier is a strong Dexterity weapon for fast punish windows, bleed, crit, attack speed, and boss fights where short attacks are safer than long combos.
Is Mace of the Maiden good? +
Yes, if you like slower heavy hits. Mace of the Maiden is better for players who can wait for real openings instead of forcing attacks.
Is Aureate Curved Sword good? +
Aureate Curved Sword is a good balanced weapon direction for learning melee timing, testing Aspects, and playing a safer first-clear style.
What is the best Aspect for beginners? +
Aspect of the Magnolia or Aspect of the Oak are safer beginner choices because they give readable value. Trickster is also good if you prefer safe fire burst.
What is Aspect of the Oak good for? +
Aspect of the Oak is useful for players who want a sturdier start, more resistance-focused value, and a safer learning run instead of a high-risk damage build.
What weapon is best for Aspect of the Bold? +
Aspect of the Bold works best with weapons that can punish safely while you manage health risk. Fast weapons, balanced melee, and controlled burst are safer than very slow weapons for most players.
How do you unlock more weapons? +
Some weapons come from boss rewards, hub unlocks, NPC requests, mysterious items, seeds, and run progress. Confirm each unlock in the hub after major bosses or item rewards.
Should I use a weapon tier list? +
Use weapon roles before tier lists. Pick fast Dexterity, heavy Strength, balanced melee, fire relic, bleed, Rot, support, or summon based on what problem your runs have.