Serpent's Gaze Beginner Guide
A practical Serpent's Gaze beginner guide for first runs, controls, nectar, recovery, blood, upgrades, weapons, Curse, bosses, and early mistakes.
Updated:
Quick Answer
For your first Serpent’s Gaze run, do not chase a perfect build. Learn what the tutorial does not explain: when to use nectar, why blood is both level progress and currency, why there is no reliable permanent power to lean on between runs, how recovery can save a downed run, and why your weapon’s scaling stat matters more than random attribute points.
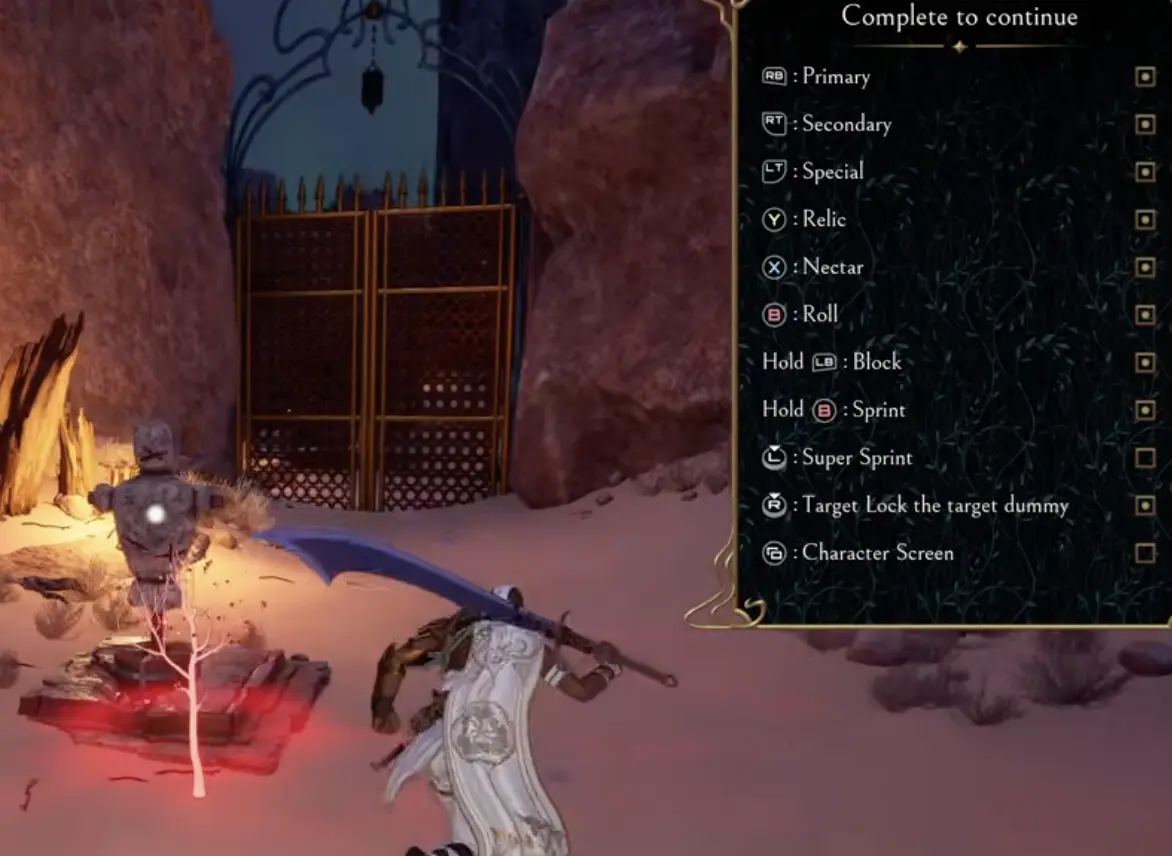
What the Tutorial Does Not Explain
The tutorial shows you the buttons, but it does not fully explain why each mechanic matters in a real run. That is the biggest beginner trap.
Here is the missing context:
| Tutorial mechanic | What the game shows | What you actually need to know |
|---|---|---|
| Primary attack | Your basic combo | Learn how long the combo locks you in before using it on bosses. |
| Secondary attack | An extra attack option | Use it when it gives safer range, burst, or utility; do not spam it without checking energy cost. |
| Special | A class or weapon tool | Save it for elites, boss windows, or room control instead of wasting it on weak enemies. |
| Relic | A special active tool | Some relics define the whole build, so do not replace one blindly. |
| Nectar | Healing / recovery resource | This is your boss safety net. Spending it too early can kill the run later. |
| Roll | Dodge button | Roll after reading the attack, not just because an enemy moved. |
| Block | Defensive option | Blocking can still cost stamina or let damage through, so do not treat it like a perfect shield. |
| Sprint / Super Sprint | Movement | Use it to escape projectile zones, reach ranged enemies, or reposition before a room collapses. |
| Target lock | Focuses an enemy | Good for single targets, but dangerous in crowded rooms if it turns your camera badly. |
| Character screen | Stats and scaling | This tells you which attribute your weapon actually wants. |
Your First Run Goal
Your first goal is not to win immediately. Your first goal is to understand why you died.
A good first run teaches you:
- how much nectar you normally waste before a boss;
- which enemies drain your health;
- whether your weapon feels too slow or too short;
- whether your stat points are actually helping your damage;
- which upgrades are simple enough to trust;
- how far you can push before Curse or room pressure becomes too much.

Use this simple route:
| Step | What to do | Why it matters |
|---|---|---|
| 1 | Pick a readable weapon | You need to understand its speed, range, and recovery. |
| 2 | Check weapon scaling | Early level points should support your weapon. |
| 3 | Take a safe first upgrade | Boss damage, healing, barrier, or simple status damage is easiest to use. |
| 4 | Clear rooms slowly | Pull fewer enemies and kill ranged threats early. |
| 5 | Save nectar for boss prep | A boss attempt with no healing is usually a lost run. |
| 6 | Learn one boss pattern | Do not panic when the fight changes phase. |
| 7 | Check unlocks after the run | New weapons, Aspects, and Callings can change your next attempt. |
Does Serpent’s Gaze Have Meta Progression?
Do not plan your first runs around permanent power upgrades.
Serpent’s Gaze is a run-based game where you should expect to start each run mostly from scratch. You can unlock more options, weapons, Aspects, Callings, and tools, but you should not assume that failed runs will turn into permanent stat power that carries you later.
That changes how beginners should play.
| Wrong assumption | Better beginner mindset |
|---|---|
| I will get permanently stronger if I keep dying | You mostly get better by learning routes, builds, boss windows, and unlock choices. |
| I can waste resources because the next run will be easier | Every run still needs smart nectar, blood, and upgrade decisions. |
| Unlocks are the same as permanent power | Unlocks give options, not automatic wins. |
| I should greed every room for future progression | If the greed kills the run before the boss, it may not be worth it. |
Upgrade System Map
One of the easiest ways to get lost is mixing every upgrade type together. For your first few runs, focus on the upgrades that affect the current run immediately.

Start with these systems first:
| Upgrade source | What it affects right now | Beginner example | How to choose |
|---|---|---|---|
| Patron gifts | Direct run power, boss damage, Rot, Blight, nectar | Primordial Crown, Moldy Stingers, Symbiosis | Best when you want simple value you can feel immediately. |
| God Blessings | Healing, debuffs, relic charges, element conversion, summons | Dream-style upgrades, Qareen-style summon choices | Best when your current weapon or relic can trigger the effect often. |
| Relics | Active tools, burst, support, AoE, replacement choices | Fireball relic, Quicksand, support relics | Replace only if the new relic solves your current problem better. |
| Seeds | Smaller run modifiers and combat bonuses | Barrier, primary combo damage, sprint attack effects | Pick simple effects that match how you already fight. |
Best First Upgrade Choices
For beginners, the safest upgrades are the ones that solve clear problems.

Use this priority list:
| If your problem is… | Look for… | Why |
|---|---|---|
| Bosses take too long | Boss damage, Primordial Crown, safe burst | Shorter boss fights mean fewer mistakes. |
| You die before bosses | Extra nectar, healing over time, barrier, Toughness | Survival comes before fancy scaling. |
| Your damage feels weak | Weapon scaling, primary damage, simple status damage | Random upgrades will not fix bad stat choices. |
| Enemies have too much health | Rot, Blight, bleed, debuff duration | Damage over time helps while you reposition. |
| You use relics often | Relic charges, relic cooldown, relic damage | Strong if your relic is already carrying fights. |
| Rooms feel chaotic | Fire burst, summons, barrier, safer weapons | You need control before greed. |
Why Primordial Crown Is Strong
Primordial Crown is strong because it is easy to understand: more boss damage, then extra levels after boss kills.
That does not mean every run must take it. It means that if you are new and unsure, Primordial Crown is one of the safest choices because bosses are usually where beginner runs collapse.
Dream Thing, Debuffs, and Relic Builds
Dream-style upgrades are useful when your build already uses debuffs, relics, or element conversion.

These are not bad upgrades, but they ask more from the player.
| Dream-style effect | Best when… | Avoid when… |
|---|---|---|
| Healing over time | You take chip damage often | You keep dying to burst damage |
| Relic charges | Your relic is already strong | You barely use your relic |
| Debuff duration | You apply burn, bleed, Rot, or exposed often | Your weapon rarely applies status |
| Element conversion | Your stats and Calling support it | You do not understand your damage type yet |
Nectar, Recovery, and Auto-Revive
Nectar is not just a heal. It is your recovery safety net.
In solo, getting knocked down does not always have to mean the run ends immediately if you still have recovery resources available. That makes nectar management even more important. If you burn every heal in normal rooms, you may also lose the resource that could have kept a boss attempt alive.

Think of nectar in three layers:
| Nectar use | When to use it | Beginner rule |
|---|---|---|
| Normal healing | You are low and have safe space | Heal after creating distance, not during an enemy swing. |
| Boss safety | You are learning a phase or surviving a mistake | Save enough nectar for the part of the fight you do not know yet. |
| Recovery / revive value | You go down but still have recovery resources | Do not waste recovery tools before the run’s hardest moment. |
What Blood Does
Blood has two main uses:
- It helps you level during the run.
- It can be spent during the run, including on nectar restoration.

Use blood like this:
| Situation | Best blood choice |
|---|---|
| Your weapon scaling is clear | Put level points into that main stat. |
| You are low on nectar before a boss | Spend blood on nectar if available. |
| You keep dying before bosses | Add Toughness or Stamina instead of only damage. |
| You already have enough healing | Push damage or weapon scaling. |
| A room looks risky | Do not greed blood if losing nectar makes the boss impossible. |
Which Stats Should Beginners Level?
Serpent’s Gaze has six stats:
- Strength
- Dexterity
- Faith
- Intelligence
- Toughness
- Stamina
The rule is simple: level your weapon’s scaling stat first, then fix survival.
| Stat | Beginner meaning | Level it when… |
|---|---|---|
| Strength | Supports heavy or Strength-scaling weapons | Your weapon has strong Strength scaling. |
| Dexterity | Supports fast or Dexterity-scaling weapons | You use rapier-style, curved sword, or fast weapons. |
| Faith | Supports certain relics, weapons, or build effects | Your class, relic, or weapon clearly wants it. |
| Intelligence | Supports certain conversion, resistance, or magic-style effects | Your build gives a clear reason. |
| Toughness | Gives more room for mistakes | You die before bosses or get burst down. |
| Stamina | Lets you attack, dodge, sprint, and recover better | You run out of energy after one combo or panic roll. |
Which Aspect or Class Is Best for Beginners?
The best beginner Aspect is the one that gives clear value without asking for a perfect build.
Use this comparison:
| Beginner option | Beginner barrier | Why pick it | Why avoid it |
|---|---|---|---|
| Balanced sword / Magnolia-style setup | Low barrier: simple melee timing and readable value | Clear stats, stable melee, good learning baseline | Not as explosive as fire, bleed, or summon builds |
| Fast Dexterity / rapier-style setup | Needs spacing and stamina control | Quick punish windows, safer boss pokes, better status application | Weak if you mash until stamina is empty |
| Fire / Trickster-style setup | Needs relic timing and charge management | Safe burst, room control, strong elite and boss pressure | Can feel weak if you waste fire tools on small enemies |
| Plague / Rot setup | Needs reliable status uptime | Good against high-health enemies when supported | Weak if you only apply Rot once in a while |
| Heavy Strength setup | Slow weapons punish players who do not know openings yet | Big hits, simple Strength planning, strong punish damage | Bad if you panic swing or trade into fast bosses |
| Summoner / support setup | Needs setup time and upgrade support | Strong in co-op, good pressure control, safer boss fights | Less direct if you want pure weapon damage immediately |
Curse and Awareness for Beginners
Curse is not a late-game detail. It can affect beginner runs immediately by adding pressure, modifiers, dangerous enemies, or special threats.
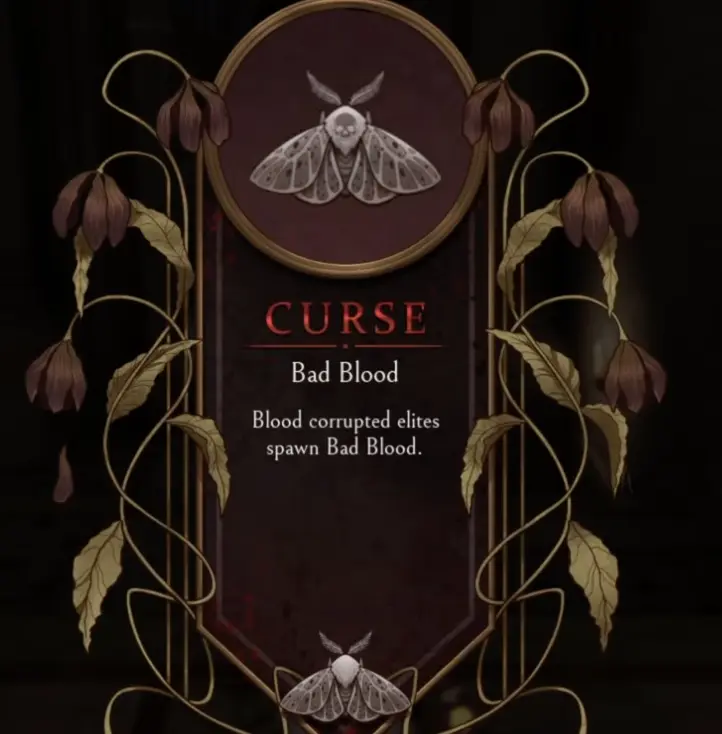
For beginners, the important part is not memorizing every Curse. It is knowing how to react.
| Curse effect | What it means for beginners | Best response |
|---|---|---|
| Invading enemies | A room can become dangerous even if the route looks familiar | Slow down and clear priority targets first |
| Hunting enemies or miniboss pressure | You may be pressured while trying to route normally | Avoid greedy detours and keep space |
| Corrupted elites | Normal rooms can drain healing fast | Save burst tools and do not pull extra enemies |
| Environmental hazards | Movement and route choice become more important | Use sprint carefully and watch the floor |
| Awareness increase | The domain may become more dangerous | Treat the next run like a learning run |
How to Survive Majin Lands
Majin Lands asks whether you understand resource management.
The main threats are:
- ranged enemies;
- big melee enemies;
- spiders or small pressure enemies;
- enemies that punish panic dodges;
- rooms where multiple enemies attack at once.
Use this route logic:
| Room problem | What to do |
|---|---|
| Ranged enemies on high ground | Kill or reach them early before fighting big enemies. |
| Large melee enemy | Fight in open space and avoid wall panic. |
| Crowded room | Pull enemies apart instead of rushing the middle. |
| Low nectar | Stop taking greedy fights before the boss. |
| Curse pressure appears | Slow down and protect recovery resources. |
| You find a nectar shop | Restore before a boss if healing is low. |
Preparing for Great Sister Vali
Great Sister Vali is an early boss check. She teaches the most important boss lesson: do not spend everything before the fight changes.

Before entering the fight, check:
| Boss prep | Good sign |
|---|---|
| Nectar | You have enough healing or recovery for mistakes. |
| Damage stat | Your weapon’s main scaling stat has points invested. |
| Stamina | You can attack and still dodge afterward. |
| Toughness | You do not die to one bad exchange. |
| Relic / special | You know when to use it safely. |
| Build direction | Your upgrades support one clear plan. |
Use these beginner tips:
- Save nectar for the later part of the fight.
- Wait for the full attack string before punishing.
- Use one or two hits, then leave.
- Do not force slow attacks during active pressure.
- Heal only after making space.
- Do not panic if the fight continues after the first down.
Early Access Note: Some Details May Change
Serpent’s Gaze is still in Early Access, so some numbers, bugs, upgrades, weapons, shrine events, Curse modifiers, and boss balance may change after patches. Use this guide for the core beginner decisions: how to spend nectar, how to read weapon scaling, how to choose safe upgrades, and how to avoid wasting a run before the boss.

Beginner Mistakes to Avoid
Mistake 1: Treating the tutorial as enough
The tutorial tells you what buttons exist. It does not fully teach when to heal, when to sprint, when to stop attacking, or why scaling matters.
Mistake 2: Expecting permanent power to save you
Unlocks give more options, but you still need to build each run correctly.
Mistake 3: Spending all nectar before bosses
This can remove both your healing and your recovery safety net.
Mistake 4: Leveling every stat
Pick your weapon’s scaling stat first, then add Toughness or Stamina if survival is the problem.
Mistake 5: Taking upgrades you cannot trigger
Debuff duration, element conversion, and relic upgrades are only strong if your build actually uses them.
Mistake 6: Ignoring Curse pressure
A Curse that drains your nectar before the boss has already beaten your run.
Mistake 7: Picking a slow weapon before learning openings
Heavy weapons are strong, but beginners usually learn faster with balanced or fast weapons.
Later Systems to Learn
Once you understand nectar, blood, stats, and early upgrades, start paying attention to the systems that shape future runs and more specialized builds.
| Later system | What it does | When to care |
|---|---|---|
| Callings | Push future runs toward burn, Rot, bleed, roll changes, or other passive rules | After you unlock a few and start planning builds around status effects |
| Weapon upgrades | Change combo length, attack speed, projectiles, energy cost, or weapon behavior | After you know which weapon you actually enjoy using |
| Unlock paths | Add new weapons, Aspects, Callings, or relic options | After a boss kill, mysterious item, NPC request, or major run milestone |
| Higher Awareness | Changes how dangerous familiar domains feel | After your first clears, when routes stop feeling predictable |
What to Read Next
| If you need… | Read this |
|---|---|
| Stronger first-clear setup | Best Builds |
| Great Sister Vali or Golden Rose help | Boss Guide |
| Curse and Awareness details | Curse System Guide |
| Weapon and Aspect choices | Weapons & Aspects Guide |
| Solo or co-op decisions | Solo & Co-op Guide |
Community and Update Resources
Because Serpent’s Gaze is in Early Access, you should also check community resources when something changes.
Useful places to check:
- Steam Community announcements for patch notes and hotfixes.
- Steam discussions for bug reports, balance complaints, and build questions.
- Official Discord if you want developer feedback and current player discussion.
- YouTube boss runs or full runs if you need to visually learn a boss route before attempting it yourself.
- Reddit or Soulslike communities for early impressions, solo/co-op questions, and build testing.
FAQ
What should I do first in Serpent's Gaze? +
Finish the tutorial, pick a readable weapon, check its scaling stat, take a safe early upgrade, and save enough nectar for the first boss.
Does Serpent's Gaze have permanent meta progression? +
Do not plan around permanent power upgrades between runs. Treat each run as a fresh build attempt where your strength comes from current-run upgrades, unlock choices, and better play.
How does recovery work when you go down? +
If you still have recovery resources, getting knocked down does not always have to end the run immediately. Save nectar and recovery tools for boss phases or dangerous rooms.
What does blood do in Serpent's Gaze? +
Blood gives level progress during a run and can also be spent, including on nectar restoration. Do not spend it blindly before a boss.
Which stats should beginners level? +
Level the stat your weapon scales with first. Add Toughness if you die too fast, and add Stamina if you cannot attack and still dodge.
What is the best beginner upgrade? +
Boss damage, extra healing, barrier, and simple status damage are the safest early choices. Primordial Crown is especially strong if your runs end at bosses.
Which class or Aspect is best for beginners? +
Pick an Aspect with clear value and a weapon you can control. Balanced melee, safe fire tools, and support-style options are easier than high-risk glass-cannon setups.
How does Curse affect beginners? +
Curse can add extra enemies, dangerous modifiers, or special threats that drain nectar before the boss. Slow down and adapt instead of forcing the same route.
Should beginners play solo or co-op? +
Try at least one solo run to learn enemy timing, then use co-op if you want shared pressure, support tools, revives, and role-style builds.