Miami Zero Walkthrough: Days 1–15 and How to Escape
Clear the 15-day Miami campaign with the right inspections, story objectives, tool unlocks, and final escape preparations.
Updated:
Quick Answer
Select Miami Campaign, inspect Dr. Schultz with the Biometric Scanner, record his Tremor, and send him to the yacht.
From Day 2, complete the checkpoint’s new assignments while processing survivors. Once Schultz introduces the Wanted List, send the matching people to the Research Ward and complete their experiments after the shift. Prepare for the final escape on Day 15.
Miami Zero gives you 15 days to manage a quarantine checkpoint while an approaching military deadline threatens everyone still inside the containment zone. Inspecting survivors remains your daily responsibility, but the campaign also sends you away from the checkpoint to solve equipment problems, investigate suspicious medical experiments, and help prepare an escape.
The opening days introduce new inspection tools and establish Dr. Schultz’s research operation. Later, Torres becomes involved in an investigation connected to the Adaptive Recovery Clinic, and the story shifts toward finding a satellite phone and gaining access to Schultz’s computer.
Two objectives run alongside these events: restoring the damaged yacht and completing the virus research. They affect your final assessment, although the campaign can reach Day 15 without both being finished.
Survivors do not always arrive in the same order. Follow the current inspection findings, named assignments, and Wanted List photographs instead of relying on a fixed sequence of people to accept or eliminate.
Day 1: Inspect Dr. Schultz and Check the Radio
Select Miami Campaign from the campaign menu. You can begin this story without completing Chicago.
After the opening at the festival grounds, collect the radio and approach the checkpoint staff. Your first required inspection is Dr. Schultz, a virologist who has come to assist with the outbreak.
Take the Biometric Scanner from the equipment table and inspect him. The opening introduces conditions such as Tremor, Bleeding Wound, Deep Scar, Varicose Veins, and Bite Mark.
Schultz’s shaking hands register as Tremor. Record the symptom, complete the inspection, and select Send to Ship. Tremor alone is not a reason to classify him as infected.
This clears the introduction and allows the ordinary survivor line to begin.
Find the Main Radio Receiver
Later in the shift, radio communications begin suffering from interference. Staff direct you to the main receiver inside your tent.
Leave the inspection line, enter the tent, and interact with the receiver. The broadcast explains that ordinary communications are being suspended and personnel should remain at their posts.
Return to the checkpoint afterward.
During these early inspections, check the survivor’s entire visible body before assigning a destination. Hair, hats, and clothing can conceal marks, while a harmless physical condition may look suspicious without actually indicating infection.
The tools available on Day 1 are limited, so recording the correct visible symptoms is especially important.
Day 2: Start Preparing the Yacht
The military announces that civilians remaining in active containment zones after 14 days will face final sanitation measures. With conventional evacuation becoming unlikely, the crew discusses repairing a yacht to leave Miami.
From this point onward, the checkpoint’s decisions affect the number of healthy people available for the ship.
The available destinations have different purposes:
- Ship: Admit a survivor who is safe to join the yacht.
- Quarantine: Hold someone whose condition requires observation.
- Liquidation: Eliminate a survivor when the inspection requires that outcome.
- Research Ward: Send a specifically requested experimental subject once Schultz begins assigning them.
A survivor sent to Quarantine can be inspected again later. This is useful when symptoms may change, rather than making a permanent decision while the person’s condition is still uncertain.
Begin the First Ship Assignments
The yacht tutorial introduces compartments and survivor assignments. Complete the initial instructions to start the repair work.
Sending someone to the ship does not automatically finish a compartment. The available rooms must be prepared and staffed, and repair progress accumulates over time.
Early assignments introduce the Cabins and the ship’s medical facilities. Some survivors are particularly useful in specific areas because of their occupations.
If the yacht is receiving people but making little progress, open the Miami Zero yacht repair instructions and check the unfinished compartments, worker assignments, and repair requirements.
Once the first ship assignments are underway, continue your checkpoint duties.
Day 3: Unlock the Shocker and Meet the Research Ward
Day 3 introduces the upgraded Shocker, which measures a survivor’s muscular response to an electrical impulse.
Collect the tool from the equipment table before beginning inspections. Its charge indicator has three zones:
- Gray: No electrical shock is delivered.
- Green: The intended inspection charge is applied.
- Red: The device overloads and injures the survivor.
Stop the moving indicator in the green zone, then observe the person’s reaction. The resulting movement is an inspection finding that must be recorded correctly.
Different reactions can look dramatic without necessarily indicating infection. Pay attention to the actual response rather than treating every sudden movement as dangerous.
Overcharging the device creates an injury instead of a clean diagnostic result.
Send the Required Survivor to Research
During this stage of the campaign, Schultz becomes interested in a survivor connected to an unusual drug.
The investigation involves abnormal physical reactions and changes detected in blood samples. A designated subject must be sent to the Research Ward rather than following the ordinary ship or quarantine route.
Complete the required inspection and select the Research Ward destination when instructed.
This begins the transition from ordinary checkpoint inspections to Schultz’s experimental assignments. The research system expands over the following shifts.
Day 4: Find the Survivors on Schultz’s Wanted List
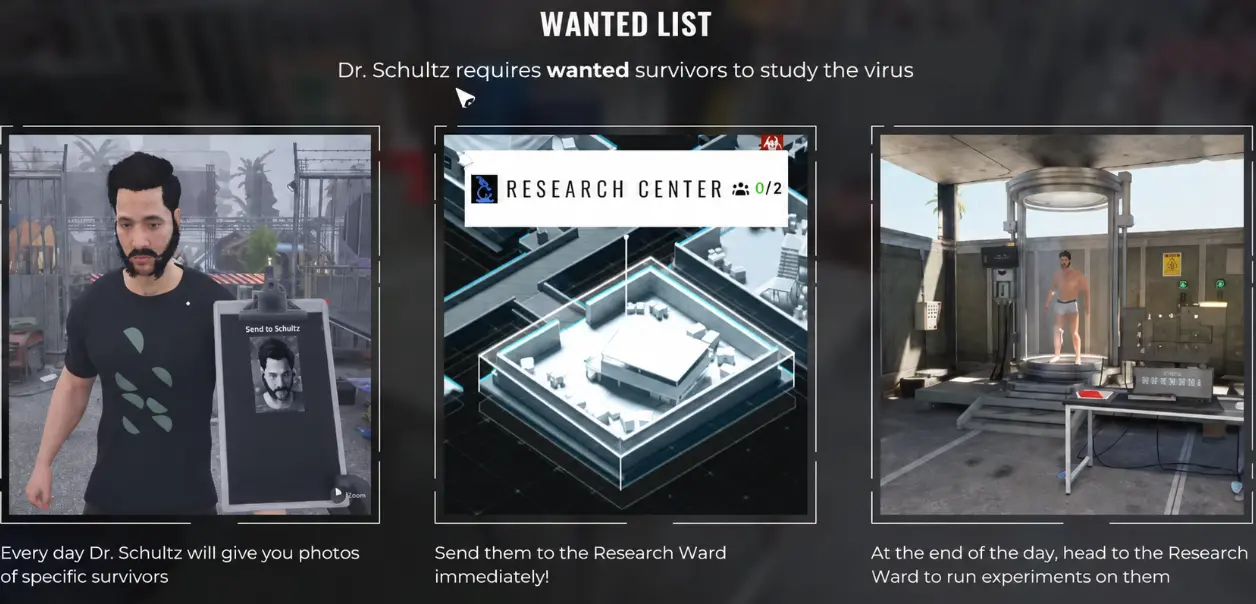
Schultz introduces the Wanted List, which contains photographs of people he specifically wants for his experiments.
The task is to identify these individuals while continuing to process the ordinary survivor line.
The Research Center counter can show 0/2, indicating that two requested subjects must be delivered.
Before calling the next survivor, examine the photographs. Compare each arriving person with the list and complete the required inspection.
If someone matches a requested photograph, send them to the Research Ward.
This instruction takes precedence over treating that person as an ordinary yacht worker. Sending a requested subject to the wrong destination can leave Schultz without the person needed for that day’s experiments.
The Wanted List changes as the campaign progresses, so check the current photographs again at the beginning of later shifts.
What to Do After the Inspection Shift
Once you have delivered the requested subjects, return to the Research Ward.
The experimental process involves preparing a drug, administering it to a subject, and identifying the resulting mutation. A completed experiment can contribute to the virus formula or provide an equipment upgrade.
The Miami Zero virus research instructions cover the drug combinations, mutation identification, and formula completion.
For daily progression, make sure you have actually processed the available research subjects before advancing to another shift. Delivering them to the laboratory and completing their experiments are separate actions.
Day 5: Use the Reflex Hammer and Recheck Quarantine
The Reflex Hammer becomes available on Day 5. Collect it from the equipment table and use it to examine a survivor’s muscular reflexes.
Strike the appropriate arms or legs and observe the reaction. The tool helps reveal reflex abnormalities that are not apparent through ordinary visual inspection.
By this stage, you may also have several people waiting in quarantine. Revisit those cases rather than leaving them indefinitely.
Open the survivor’s earlier symptom report and perform another inspection. Compare the current condition with what was recorded previously.
An abnormality may have disappeared, remained unchanged, or become more dangerous. Those outcomes should lead to different decisions.
For example, a survivor whose earlier condition required observation may become suitable for release if the concerning findings have resolved and no dangerous symptoms remain. Someone who develops a new infection warning should not be admitted to the yacht merely because their original condition improved.
This is particularly useful when the ship needs additional healthy workers.
Recovering From a Mistake
Miami allows the current day to be restarted, which can help if you lose a required subject or make a major mistake during an important assignment.
Restarting also means repeating the inspections and tasks already performed that day.
Consider that cost before using the option. Losing an ordinary inspection result is different from accidentally sending a named research subject to the wrong destination when the day’s remaining opportunities are limited.
Day 6: Find the Mechanic and Clear the Blocked Toilet
The yacht crew reports that the ship’s plumbing is blocked.
They need a mechanic to handle the problem, and one appears among the survivors arriving at the checkpoint.
Inspect the requested person and send them to the boat’s Head.
The crew warns you not to send additional people into the affected compartment until the plumbing problem is resolved.
After the mechanic reaches the ship, the task develops into finding something to clear the obstruction.
Where Is the Plunger?
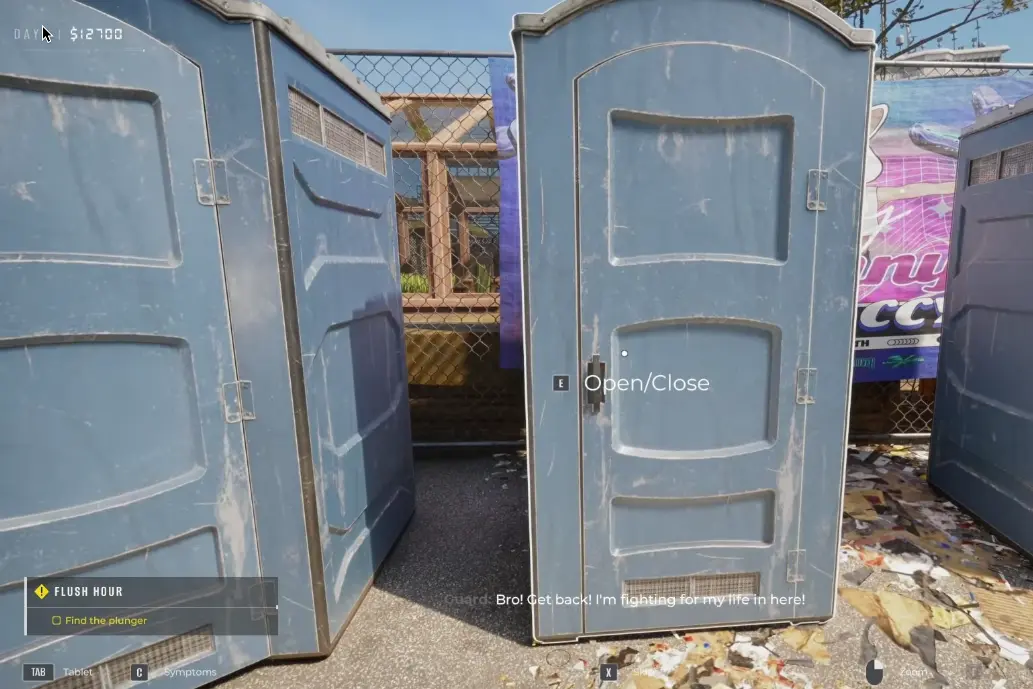
The task eventually asks you to find a Plunger.
Return to the portable toilet area at the checkpoint and open the stalls. Search the toilets rather than looking through the equipment crates or the survivor inspection station.
Another suggestion during this assignment involves metallic sodium, but the crew warns that it reacts violently with water. The plunger is the appropriate tool for the plumbing task.
Collect it and return to the required interaction to advance the repair.
Once the blockage has been dealt with, the Head can return to normal ship progression.
Day 7: Unlock the Service Dog and Investigate the Clinic
Day 7 introduces the Service Dog.
Approach the dog and give the command to sniff the survivor. Watch its reaction, then compare the result with the current symptom descriptions.
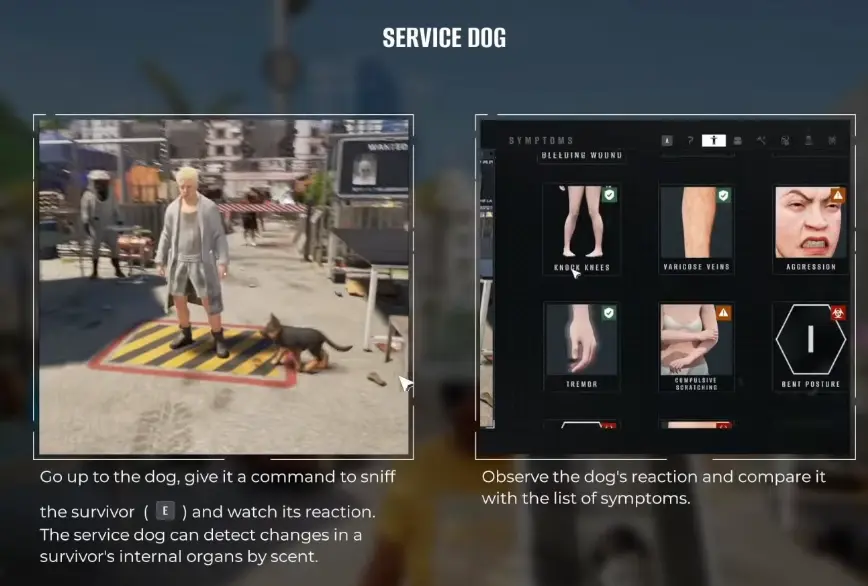
The dog can detect changes by scent that may not be obvious from a visual examination. This gives you another way to investigate uncertain cases.
Its response should be considered alongside the other inspection results rather than replacing the rest of the examination.
Follow the Adaptive Recovery Clinic Connection
Schultz begins noticing that several apparently unrelated survivors were connected to the same medical program.
Their involvement with the Adaptive Recovery Clinic raises questions about the treatment they received and its relationship to the outbreak.
The investigation eventually requires access to information that cannot be reached through ordinary communications.
When the active task directs you toward the military’s restricted network, use the indicated terminal to establish the connection.
After access is restored, Schultz continues investigating the clinic records.
This information becomes relevant again during the later confrontation involving Torres.
Day 8: Help Schultz Set Up the New Laboratory Equipment
Schultz receives additional equipment and asks you to assist inside the Research Ward.
Enter the laboratory and follow the task instructions to collect equipment near the entrance. Move it toward the containment area, then find the requested medical vials on the shelf and place them on the laboratory table.
Handle the vials through the designated interactions rather than leaving the task unfinished and returning immediately to the inspection line.
The sequence is interrupted by an incident involving the equipment. Continue through the resulting interaction and conversation until the active objective advances.
Afterward, return to the checkpoint and resume inspections.
The later Miami survivors begin displaying additional behaviors, including compulsive scratching. Check the current symptoms instead of relying only on the findings encountered during the first few days.
Day 9: Unlock X-Ray and Find Torres’s Drink Ingredients
The next major inspection tool is the X-Ray.
Collect it when the shift introduces the equipment. Unlike the earlier surface examinations, the X-Ray allows you to inspect internal organs.
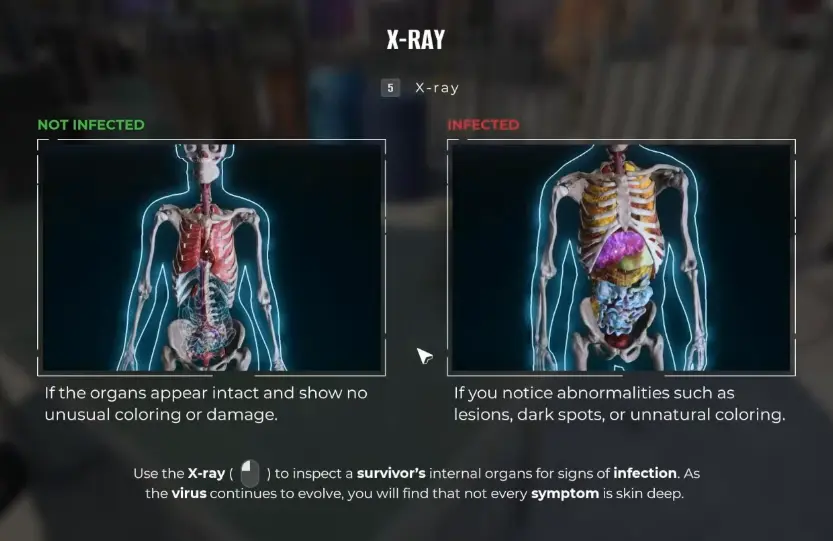
Move the scanner over the survivor’s torso and inspect the visible internal structures.
Organs that look intact are different from those showing suspicious lesions, discoloration, or damage. Record the appropriate symptom when an abnormality is present.
This becomes useful when a survivor has few external signs but may still carry a dangerous condition.
Find the Twixed Candy Bar
Torres asks you to collect ingredients for a drink associated with his grandfather.
He needs a Twixed Candy Bar and Fizz Soda. Torres already has the rubbing alcohol.
The clue for the candy bar points toward a member of the night watch who keeps sweets near an ATV.
Leave the inspection area and check around the ATV for the requested snack.
Find Fizz Soda at the Merch Shop
For the second ingredient, go to the Merch Shop.
Collect the Fizz Soda and return to Torres when the objective allows you to hand over the items.
These ingredients are found through checkpoint exploration. You do not need to repeatedly inspect random survivor bags to obtain them.
Once the items have been delivered, continue the resulting conversation and follow the next active objective.
After Torres’s Drink: Follow the Rat King Events
Torres’s drink leads into an increasingly strange series of events.
He discusses his suspicions about Schultz and suggests confronting the doctor. The situation escalates inside the Research Ward, where the protagonist becomes involved in unusual behavior and an argument with Schultz.
The sequence eventually leads to the Rat King, who speaks about Oracle Mushrooms and asks for help.
The encounter takes place away from the ordinary survivor inspection line. Follow the active task into the checkpoint’s surrounding areas and interact with the Rat King when the conversation becomes available.
The subsequent objective involves a guarded location, Dave, and a fire-related distraction.
If you are also pursuing the hidden interaction achievements, the Miami Zero achievements checklist covers Strange Conversations and Firestarter.
Cannot Return to Work After the Incident?
The next shift may begin with Georgie informing you that you cannot resume duty until Schultz clears you.
The task requires medical clearance from Schultz.
Go to the Research Ward and speak with him.
He discusses the previous incident and may ask you to inventory medical supplies and label crates before you are allowed to resume your ordinary duties.
Complete the current interaction and return to the checkpoint only after clearance has been granted.
Trying to call the next survivor before resolving this task will not advance the story.
Later Shifts: Use UV Light to Check Concealed Marks
The UV Light becomes available during the later Miami inspections.
This tool is useful because tattoos and burn marks can conceal other physical findings.
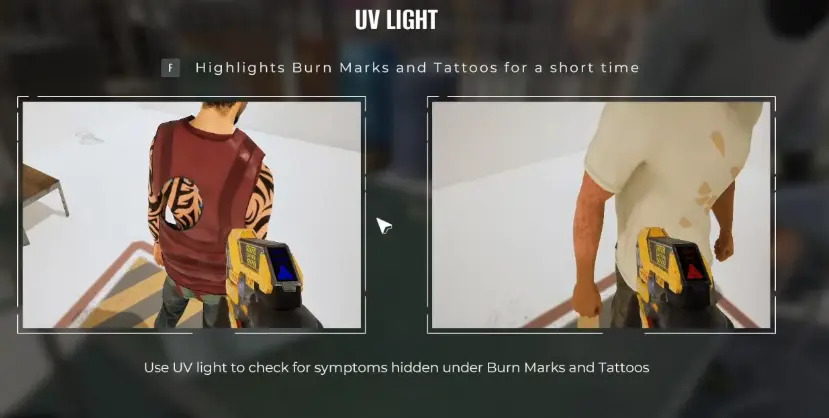
Aim the UV Light at a suspicious area and examine what becomes visible. Record the relevant finding before making the destination decision.
This matters particularly when considering a survivor for the yacht. A concealed dangerous mark can change the correct outcome of an otherwise ordinary inspection.
The UV Light does not replace the X-Ray, Service Dog, or reflex tools. It addresses concealed surface findings, while the other equipment examines different conditions.
Free Torres: Find a Satellite Phone
Later in the campaign, Torres is detained.
When you try to speak to him, a guard prevents the conversation. The discussion indicates that permission from command may help resolve the situation, but ordinary communications are unavailable.
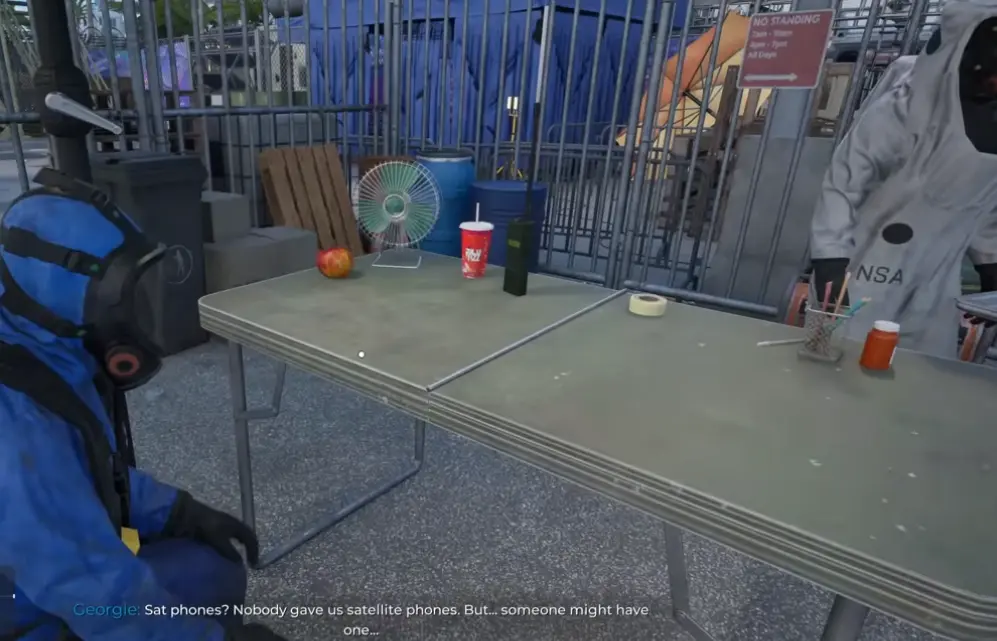
Georgie suggests looking for a satellite phone.
How to Find the Satellite Phone
Return to the checkpoint and continue processing the survivor line.
The phone is associated with survivor baggage inspections, not with the laboratory equipment or the earlier Merch Shop search.
Check the bags of incoming survivors until you locate the required item.
Do not assume the person carrying it must also have an obvious infection symptom. The baggage objective is separate from the medical inspection.
Once you obtain the phone, return to the guard-related task and complete the interaction that allows you to speak with Torres.
The conversation reveals more about his connection to the Adaptive Recovery Clinic and why he distrusts Schultz.
Torres’s information now points toward the doctor’s computer.
Access Schultz’s Computer With the NFC Key
The next investigation objective leads back to the Research Ward.
Schultz’s computer is locked and displays an NFC waiting message.
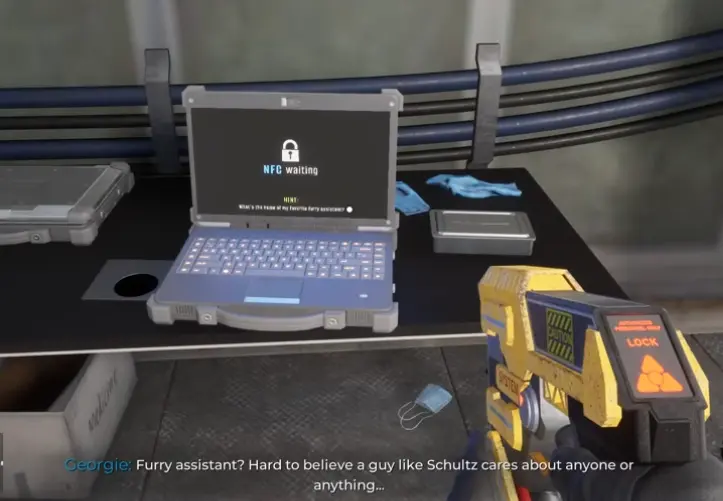
Approach the workstation and examine the computer’s lock message.
The task requires an NFC Key rather than a conventional password. Investigate the relevant interactable objects and follow the active access objective before returning to the terminal.
When the NFC authorization succeeds, the computer can be accessed and the investigation continues.
The information connects Schultz to the Adaptive Recovery Clinic and provides further details about the people who received treatment there.
The clinic’s former patients were also given tickets to the festival, explaining why several seemingly unrelated individuals appeared at the Miami checkpoint.
After reviewing the information, complete the subsequent conversation to advance the story.
Before Day 15: Check Your Unfinished Objectives
The last part of Miami gives you limited time to resolve outstanding work.
Before ending each remaining shift, inspect the active tasks rather than assuming that finishing the survivor line means all of the day’s important work is complete.
The most useful checks are:
- Wanted List: Have the requested survivors been delivered to the Research Ward?
- Research subjects: Are there experiments waiting to be completed before the next day?
- Yacht: Are workers actively repairing the remaining compartments?
- Story objective: Is a named character waiting for a conversation, item, or interaction elsewhere in the checkpoint?
The longer-running assignments become especially important as the deadline approaches.
The yacht must be fully repaired for the final report to recognize a restored ship. Check the yacht repair requirements if a compartment remains unfinished.
The laboratory must collect all seven virus formula fragments for research to count as complete. Missing experiments and unfinished fragments are covered in the virus research instructions.
A campaign can reach the final sequence with either objective unfinished, but that is different from completing both assignments.
What Should You Prioritize on the Last Shifts?
Spend the remaining opportunities on objectives that cannot be replaced by an ordinary inspection.
Research subjects are particularly important when the formula remains incomplete. A missed person on the Wanted List can leave you without the experimental opportunity you intended to use that day.
For the yacht, check the progress of rooms already under repair before spending money on another compartment. Starting expensive work late in the campaign may leave too little time for the assigned crew to finish it.
Optional laboratory upgrades can improve inspections, but they are not substitutes for missing virus fragments.
Similarly, admitting a risky survivor to obtain additional ship workers can cause losses that leave the yacht even further from completion.
Once the important assignments are complete, finish the remaining checkpoint duties and advance toward Day 15.
Day 15: Complete the Final Escape
Miami Zero concludes with an escalating confrontation involving Torres and the man known as Dr. Schultz.
The final sequence does not play out like an ordinary inspection shift. The protagonist undergoes an unusual transformation, and the action moves into a direct confrontation with armed personnel.
When character control returns, follow the available route through the checkpoint and complete the encounter.
The resulting events lead to the final interrogation, where the authorities review what happened during the Miami operation.
The report distinguishes between completed and unfinished objectives. A fully repaired yacht and completed virus research receive different recognition from a campaign where neither was finished.
However, completing those assignments should not be confused with a guaranteed true-ending outcome.
The Miami Zero endings explain the final confrontation, the different interrogation results, and what is known about the true ending.
After the Escape: What Is Worth Doing on Another Run?
A second Miami attempt is most useful when you have a specific missed objective.
If the yacht remained incomplete, start preparing compartments earlier and keep healthy survivors assigned throughout the campaign. If the virus formula was unfinished, pay closer attention to Schultz’s Wanted List and process available research subjects before moving on to another day.
Some special encounters also have their own completion conditions. Missing the Rat King, an unusual survivor, or a particular equipment interaction can leave achievements unfinished even after the story ends.
Miami Zero adds 15 achievements, several of which require actions outside ordinary inspection work.
For a completion run, use the Miami Zero achievements checklist to identify exactly which conditions remain unfinished. That gives the next attempt a clear purpose without repeating tasks that were already completed successfully.